C
Studio: Timeline Palette
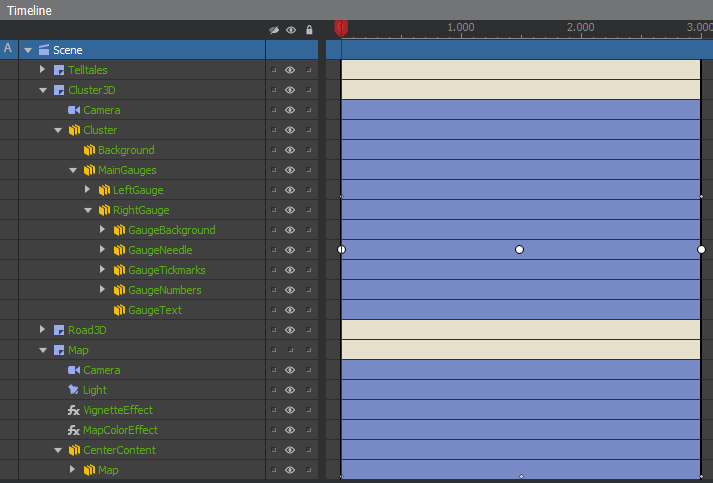
The timeline palette is second-only to the inspector palette in frequency of use when editing a presentation. The timeline palette provides direct access to all elements in your scene, including those not producing a visible result, and also gives you control over the animation and timing within a slide.
The palette is comprised of two connected sections: the scene graph (on the left side) and the animation portion (on the right).
Scene Graph
The left half of the timeline palette shows all elements in your presentation for the current slide (chosen in the slide palette). The root of your presentation is the scene, to which are attached one or more layers (and possibly additional presentation behaviors).
Name Color Indicates Slide
The name of an item in the scene graph is colored based on its presence on the master slide. Elements that are present on the master slide have a green name, while elements that are only present on the current slide have a light gray name.
The same holds true for animated properties. Properties that are animated the same on all slides show with green text, while properties that have a custom animation on this slide are shown with light gray text.
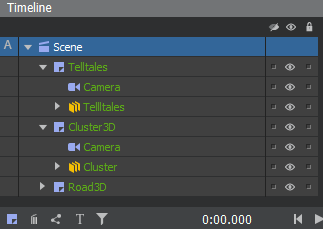
Element Hierarchy
Within each layer is a camera, usually a light, and the elements rendered for the layer. These elements are arranged hierarchically. Placing one element as a child of another causes:
- The child element to inherit the transform of the parent. When the parent moves or rotates, so do its children.
- The child element to inherit the opacity from the parent. As the parent becomes less opaque, so do its children.
- The child element to inherit the active state from the parent. If the parent is eyeballed off on this slide, so are all its children.
- Events to bubble from the child to the parent. An
onPressureDownevent on a child element may also be handled by the parent element.
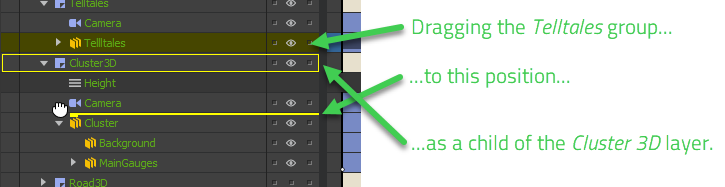
Rearranging Elements
It is possible to rearrange elements by dragging and dropping them within the scene graph. This way you can change positions of objects or alter parent/child relationships.
When dragging an element, a yellow line will indicate where it will be dropped, while a yellow frame indicates under which parent element it will be dropped. Additionally, a slightly yellow background indicates which element is being dragged.
A collapsed element will automatically expand if you drag and hold another element over it.
Action Indicators
The left-most column of the timeline palette is used to show which elements have actions on them.
- A row with
 indicates that the element has one or more actions on it.
 - A row with a down-triangle in this column indicates that one or more descendant elements have actions on them.
- A row with a right-triangle in this column indicates that the component on this row has one or more actions inside it.
Elsewhere in the interface, a green item indicates an action on the master slide, while a light gray item indicates an action specific to this slide.
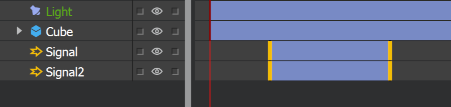
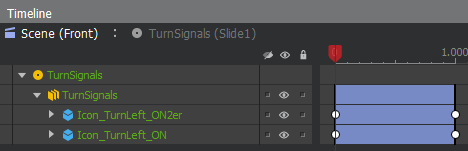
When an object has onActivate or onDeactivate timeline actions on it, those are indicated with markers at the beginning and at the end of the time bar. These actions are usually used with Signal objects.
Editing Components
Components are somewhat like mini scenes. A component has its own set of slides and independent time. Consequently the contents inside a component cannot sensibly be shown and edited at the same time as items outside a component. To see and edit the contents of a component, either double-click the component or right-click on it and choose Edit Component. The timeline and slide palettes will both switch to show the contents of the component.
When you enter a component, a breadcrumb is shown at the top of the Timeline palette.
To leave the component and return to the scene, click on the scene in the beginning of the breadcrumb.
Alternatively, double-click on an element outside the component in the rendered scene view; this will switch the timeline palette as necessary to select and show that item.
Hiding Irrelevant Elements
As your scene graph grows in elements you may find yourself annoyed by the presence of elements that you almost never edit. The first column after the name allows you to mark an element as shy, indicated by  Clicking the button at the top of this column will toggle the visibility of all element rows marked as shy.
Note: This is only an editing convenience within the timeline palette, and has no effect on the visibility of elements rendered in the scene at runtime.
Per-Slide Element Visibility
If you have an element that should only appear on one slide, you should create the element as a non-master element on the correct slide. If you have an element that should appear on every slide, you should create the element on the master slide. But what if you have an element that should appear on a few slides, but not all?
The second column after the name has eyeballs  to control the active state of an element and all its descendants. To cause an element to not appear on only certain slides, place your element on the master slide and then eyeball it off on slides where it should not be present.
Note: The visible property is disabled on the master slide, it can only be controlled on a per-slide basis.
The active state of an element controls more than just visibility. Elements that are not active do not receive update notifications each frame. which is particularly important for presentation behaviors.
Similar to the other columns, clicking the eyeball at the top of the column will hide the rows for elements that are eyeballed off on the current slide.
Note: Unlike the shy and lock columns, the presence or absence of the eyeball changes the runtime behavior of your presentation. You may wish to use the eyeball to temporarily hide an element during editing, but be sure to re-enable the element if it is supposed to be present on this slide.
Locking an Element
Once you have perfected a particular element you may wish to lock it. To lock the element, click the lock icon  element prevents its properties from being edited, and even prevents it from being selected.
Similar to the other columns, clicking the lock at the top of the column will hide the rows for elements that are locked. Unlike the other columns, which take effect per slide, an element that is locked is locked on every slide.
Note: This is only an editing convenience, and has no effect on interaction with elements at runtime.
Copying Object Path
The path to an element is used both in presentation behaviors as well as by an application's Visual Actions. While you could type out the name of each ancestor of the element, a more convenient option is available.
Right-click on the name of any element and choose Copy Object Path from the context menu. This will put a string on your clipboard like Scene.Overlays.Dialogs.Content.preloader, ready for pasting elsewhere.
Note: For visual actions you need to prefix this path with the id of the <presentation> asset in order to differentiate it from other possible presentations.
Layers
A layer represents a 3D scene that gets rendered into a 2D image and placed somewhere on the screen. Just as a Photoshop file may have multiple 2D layers drawn on top of one another, a Studio presentation may have multiple layers composited together.
Layers also provide a target where post-processing effects may be applied.
There must be at least one layer on each slide in the presentation. Studio will not let you delete the last layer unless you first add a new layer on the slide to replace it.
To create a new layer, do one of the following:
- Click the layer icon
 in the bottom part of the scene graph.
 - Right-click the scene element in the scene graph and select Add Layer from the context menu.
- Press
Ctrl + L.
Creating a new layer in your scene will add both a camera and a light to that new layer.
To remove a layer, first select it in the scene graph, then do one of the following:
- Click the delete icon
 in the bottom part of the scene graph.
 - Right-click it and select Delete Object from the context menu.
- Press
Del.
Data Input
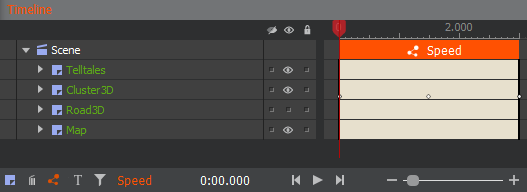
You can use a data input to control the timeline animation. You can set up a data input to control the timeline by clicking the ![]() icon.
icon.
Orange color indicates which data input is currently connected to the timeline. Click the ![]() and select None to remove the data input.
and select None to remove the data input.
Animation Portion
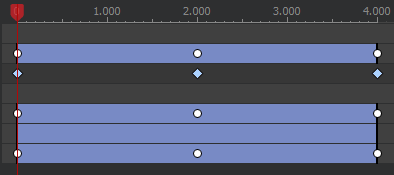
To the right of the scene graph in the timeline palette is the actual timeline. The time bars for each element control element lifespan. The keyframe markers control the timing of animation. The playhead (in red) allows the preview of animation effects. The time measure across the top coordinates the timing of it all.
Zooming In and Out
When working with fast animations you may wish to zoom in to see the contents better. It is possible to zoom the timeline both horizontally and vertically. To zoom the timeline horizontally, do one of the following:
- Press
Alt + mouse right clickand drag the mouse left/right to zoom in/out. - Press
+or-on the keyboard to zoom in/out. - Use the slider located in the bottom of the timeline palette
To zoom the timeline vertically, hold down the Alt key and use the mouse scroll wheel.
Note: Vertical zooming only applies to expanded property graphs.
Setting Playhead Time
Drag the playhead by the red knob over the time measure to adjust the time. (You can actually just click and drag on the time measure and the playhead will teleport to your mouse.) This is used to set the time for a new keyframe, and the effects of dragging the playhead back and forth will also preview the effects in the rendered scene view in real time.
To prevent keyframes from being misaligned, you may wish to ensure that the playhead is exactly at a particular time. Holding down the Shift key while dragging the playhead will cause it to snap to keyframe markers as well as certain notches on the time measure.
Use the Timeline Snapping Grid setting in the Application Preferences to control what level of notches it snaps to.
As you adjust the time for the playhead you will see the exact time displayed below the scene graph portion of the palette. Clicking on these numbers will open the Go To Time palette, where you may type in an exact time, down to milliseconds, to set the playhead to.
Working with Animations
For more information on how to work with animations, see the Animations documentation.
Adjusting Time Bars
The colored bars displayed for each element control the lifespan during which the element is active. Whenever the playhead (in Studio, or the virtual playhead active at runtime) is outside the time bar for an element, that element becomes inactive: it no longer renders, nor does it receive update events each frame.
Drag the ends of a time bar to adjust its duration. As with the dragging the playhead, holding down the shift key will snap the time to appropriate boundaries during dragging.
Alternatively, double-click on a time bar to open the Set Time Bar Start/End Time dialog, where you may enter specific values.
To set the start or end time for many time bars at once:
- Select an element.
- Set the playhead to the desired time.
- Press the
[key to set the start time to the playhead time, or the]key to set the end time to the playhead.
All descendant elements will also have their start or end time set to the same value. It is thus common when entering a new slide for the first time to select the scene or active component, set the playhead to a particular time, and then press ] to crop the entire slide to that duration.
Customizing Time Bars
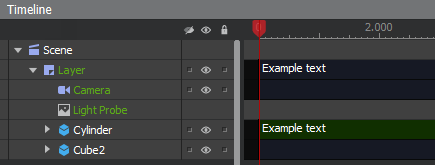
To help you keep track of your assets, Studio allows you to apply custom colors and text to time bars.
Custom Color
To apply a custom color, right-click on a time bar and choose Change Time Bar Color from the context menu.
Custom Text
To apply a custom text, first do one of the following:
- Right-click anywhere in the timeline palette and select Toggle Timebars Text Visibility from the context menu.
- Click the
 icon in the bottom of the scene graph.
Now, the timeline is in comment mode. Click a time bar to add or edit a text.
Playback Control

These commands control the playhead, making it easier to preview animations and slide transitions without leaving Studio.
- The Rewind command sets the playhead to time 0.
- The Play command starts advancing the playhead in realtime, previewing animations on elements. The Play Mode for the current slide is honored, possibly looping or ping-ponging playback, or causing Studio to switch to an new slide when the end time for the current slide is reached.
- The Stop command stops any playback. Stop replaces Play when animation is playing.
- The Fast-forward command sets the playhead to the timeline end.
- Holding down the space bar temporarily enables playback while held down. Releasing the spacebar returns the playhead to its previous time, allowing you to repeatedly hold down space to preview an animation.
- Pressing the Enter key will start playback. Press Enter again to stop playback.
Available under certain Qt licenses.
Find out more.