
1.3.4. Dashboard Installation
1.3.4.1. Requirements
The dashboard server is implemented in Java and most importantly needs good disk access performance and a decent network connection to its clients.
- Processor
Depending on the host OS, one of the processor classes:
Windows: x86-64
GNU/Linux: x86-64 or ARM64
macOS: ARM64
We recommend 2 or more cores, depending on the amount of simultaneous clients.
- Memory
We recommend at least 1 GB of free system memory.
- Hard disk
Depends very much on the size of your projects and the frequency of your analysis runs. 1 GB per project is a rule of thumb. Analysis data should be stored on a hard disk local to the dashboard server.
The dashboard server should run fine on the following operations systems:
- Windows
Windows 10, version 1809 or newer / Windows Server 2019 or newer in 64-bit.
For the dashboard windows service wrapper, .NET Framework 4.6.1 or higher is required
- GNU/Linux
with a 64-bit kernel 3.17 or newer and GLIBC in version 2.28 or newer.
- macOS
version 14 or newer in 64-bit.
Additional software requirements:
- Python
The Axivion Suite comes with its own Python interpreter, but using a different one is also supported. We support version 3.10, 3.11, 3.12, 3.13 or 3.14 in 64-bit available at https://www.python.org/
- Java Runtime Environment
We support the latest update release of versions 17, 21, and 25 of the 64-bit HotSpot Java Runtime Environment.
Other 64-bit Java 17 (or newer) runtimes should also work.
On Windows, the Java security provider “SunMSCAPI” (jdk.crypto.mscapi) is required. By default, this provider is included in the JRE and JDK. If a stripped down Java without SunMSCAPI has to be used, a fallback random number generator algorithm can be allowed by setting the environment variable
AXIVION_ALLOW_DEFAULT_SECURE_RANDOM=YES(case-sensitive).
1.3.4.2. Understanding the Dashboard
Let us first take a look at the composition of the parts relevant for understanding and setting up the dashboard.
The Axivion Dashboard Server itself is a Java Application running as a background process and mainly acting as an HTTP server in order to serve browser clients, but it also exposes an HTTP JSON API in order to serve other purposes.
If you want the dashboard to be able to send mails via its Erosion Notification System, described in Section Erosion Notification System, you’ll need to give it access to a mail server as well.
The displayed erosion data is stored in SQLite database
files. There exists one database file per project which is shared between the dashboard
and your analysis setup and must have the file suffix .db. The dashboard serves
for displaying the erosion data inside these databases, whereas it is your analysis
setup, possibly realized as a continuous integration, that fills and updates those
files. There exists another database file per project which is maintained by the
dashboard only and stores issue annotations made by the dashboard users. This database
file is only valid and usable in combination with its respective analysis database file
and thus is stored next to it on your file system. It has the same name except for the
different suffix .dbx.
For details on the Continuous Integration process please refer to the Continuous Integration Guide.
A diagram of the general idea can be found in Figure Context of the dashboard..
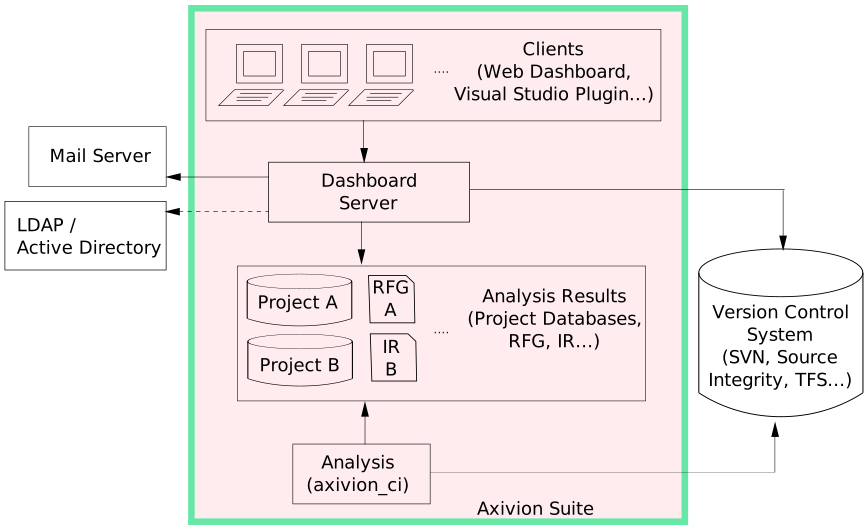
Context of the dashboard.
Dashboard users by default are authenticated with an integrated mechanism storing hashed passwords in the internal dashboard configuration, however the dashboard has an authentication system with the option of plugging in various authentication mechanisms, see Section Authentication with LDAP and Active Directory being two options provided by default.
Caution
Dashboard administrators have theoretical means to execute arbitrary processes on the machine hosting the dashboard with permissions of the machine account running the dashboard server.
1.3.4.3. Server Control Script
In order to control the Axivion Dashboard Server a service script dashserver is provided and
will be available inside the Axivion Suite command line.
Basic usage:
dashserver <subcommand> <options..>
List the available subcommands:
dashserver --help
List the available options of a specific subcommand:
dashserver <sub-command> --help
Some of the more important subcommands:
Option |
Meaning |
|---|---|
|
Create a configuration from a specified template. |
|
Starts the Axivion Dashboard Server. |
|
Stops the Axivion Dashboard Server. |
|
Installs the Axivion Dashboard Server as system service (not supported on MacOS). |
|
Uninstalls the Axivion Dashboard Server system service (not supported on MacOS). |
|
Displays info whether the Axivion Dashboard Server is currently running. |
|
Can be used to regain accidentally lost admin privileges. |
1.3.4.4. Initial Configuration
The correct functioning of the Axivion Dashboard Server requires that you have properly
prepared your installation of the Axivion Suite as described
here. Most importantly this means you need to have your
license key installed and if you are on linux that you need to have executed
setup.sh.
The first thing you need to do is to designate and create a directory outside of the Axivion Suite installation folder, where your configuration and log-files should be located and change into it in an Axivion command prompt.
Once that is done execute the following command in the same command prompt:
dashserver init [--confdir config] <TEMPLATE>
which will create a configuration for you from the specified template.
There are several templates available that you can choose from:
- SERVER_HTTPS:
This is the default and creates a configuration template suitable for the usecase of a multi-user Dashboard, potentially authenticating them via LDAP or Active Directory. It will default to using HTTPS with a self-signed certificate. See Securing Communication (TLS/SSL) for more information on this topic.
- SERVER:
An alias for SERVER_HTTPS.
- SERVER_HTTP:
This is the same as SERVER with the difference that it does not use HTTPS by default. Keep in mind that HTTP traffic is unencrypted, which means that e.g. user login passwords are sent over the wire in clear text.
- LOCALHOST:
Use this, if you want to create a “developer-dashboard” running on your local machine, that only you have access to. Does not contain any LDAP or Active Directory related examples.
- LOCAL:
An alias for LOCALHOST.
Note
Security and privacy issues occur if other users have access to the CONFDIR. Please read Permissions of the Dashboard Configuration Folder in such a situation.
Note
For security reasons we recommend not to expose the Dashboard (or a proxy it is running behind) directly to the public internet, instead we recommend limiting network level access to your company intranet.
If you are not planning on running multiple Dashboards in the same environment
you may want to set the permanent environment variable AXIVION_DASHBOARD_CONFIG as
indicated by the output of the init invocation in order to not have to specify
the configuration directory on future dashserver invocations.
Inside the configuration directory you will find the XML-file dashboard2.config
which usually is the only
dashboard configuration file you need to edit. Its schema follows the classic
Axivion Suite configuration schema consisting only of “Node” and “Binding” elements
but this configuration file does not support layering.
Each of these elements must be uniquely identifiable by a slash separated path, e.g.
/dashboard2/EmbeddedTomcat/HttpPort, where the path elements are the values
of the “key” attributes of the XML nodes. Every “Binding” node also represents a
configuration key, storing its value inside its “value”-Attribute.
The dashboard2.config file copied by the dashserver init command explains
the available configuration options and their defaults and also gives some examples.
For a first test run chances are you do not need to configure anything because the template you chose is sufficient for your usecase. The values that most often need adjustment are the network related configuration options as well as the HTTPS related configuration options. If you want to integrate with an external user directory like Active Directory you also need to get familiar with this configuration file.
During startup the Axivion Dashboard Server will create a file called dashboard2.db inside
its configuration folder. It mainly contains User and Project
configuration, or from a different point of view, the configuration data that is
editable from the web interface. Most importantly it contains the credentials for the
new user you need to log in with for doing the remaining configuration. This user
authenticates with the name “admin” and a randomly generated password. Start the Axivion Dashboard Server
using dashserver start --confdir "path/to/dashboard/config" and if this
succeeds you should be able to log in to the Axivion Dashboard Server with the url and
credentials printed on the console.
Caution
Do not forget to change the password of the admin user during initial dashboard
configuration.
Note
For a better out-of-the-box experience, the initial admin user has more
permissions than necessary
in a production setup. Consider e.g. creating dedicated technical users for
uploading new analysis results and remove the associated permission from the
initial admin user.
1.3.4.5. Detailed Configuration
The Dashboard Server
You should be able to handle most of your configuration needs by adjusting the default
values in the file dashboard2.config listed
in Figure HTTP Server configuration in dashboard2.config..
dashboard2.config.¶ <Node Key="EmbeddedTomcat">
<Binding Key="HttpPort" Value="9090" />
<Binding Key="HttpsPort" Value="9090" />
<Binding Key="BindAddress" Value="" />
<Binding Key="DashboardUrlBase" Value="/axivion" />
<Binding Key="JreHome" Value="$(JAVA_HOME)" />
<Binding Key="JavaMaxHeapSize" Value="1024" />
<Binding Key="RuntimeDirectory" Value="../tomcat" />
<Binding Key="KeyStorePath" Value="" />
<Binding Key="KeyStorePassword" Value="" />
<Binding Key="KeyAlias" Value="" />
</Node>
- HttpPort
The TCP port on which users can reach the dashboard with their browsers.
- HttpsPort
The TCP port on which users can reach the dashboard with their browsers. HTTPS is only enabled, if you configure the options KeyStorePath, KeyStorePassword and KeyAlias as well. In that case, HttpPort will be ignored.
- BindAddress
The default is listening on all available interfaces. If you want to listen only locally you might want to specify 127.0.0.1.
- DashboardUrlBase
Path-prefix for the dashboard URL. May be empty. If you proxy the dashboard, the paths in tomcat and on the proxy must match.
- JreHome
The path to your Java Runtime Environment. If you leave the value at its default and do not specify the
JAVA_HOMEenvironment variable, the system’s default Java installation will be used.- JavaMaxHeapSize
The Heap Size of the Tomcat Java-Process in Megabytes. Can be increased if you encounter Heap overflows. The default value should be fine.
- RuntimeDirectory
Directory where the tomcat process writes its temp files
- KeyStorePath
File system path denoting a server certificate and keystore. Supported keystore types are
PKCS #12(preferred) andJKS.- KeyStorePassword
The password required in order to access the keystore
- KeyAlias
Identifies the server key to use from the given keystore. If the
KeyAliasis set toautoand theKeyStorePathis not set, the Dashboard uses HTTPS with a self-signed certificate – generating one if none was generated before.
Find additional info related to HTTPS and the server identification related options in Section Securing Communication (TLS/SSL)
Caution
Check that the configured ports are not used by other services. Change the configuration accordingly if they are already being used.
Caution
Changes to these options will only take effect after restarting the dashboard.
Custom Java Variables
In case you want to define custom Java Variables for the JVM used to run the Dashboard
you can do so by putting a file named dashboard.properties with contents in
the schema of the below example into your configuration folder.
dashboard.properties¶com.example.property1=some example value
com.example.property2=another example value
Manual Tomcat Connector Tweaking
The Axivion Dashboard Server relies on an embedded Apache Tomcat that we ship as part of our product. Note, that we only use a small subset of the complete Apache Tomcat server and cannot integrate into a potentially preexisting Apache Tomcat setup.
Caution
This facility is provided in case you really need to tweak some aspect of the Tomcat Configuration that we do not expose and support directly. Changes you do here will overwrite connector settings we provide for our out-of-the-box experience and might even break dashboard functionality so use this with care.
dashboard2.config.¶ <Node Key="EmbeddedTomcat">
<Binding Key="HttpPort" Value="9443" />
...
<Node Key="Connector">
<Binding Key="server" Value="Customized Tomcat Connector" />
...
</Node>
</Node>
Available Binding names can be seen in the official Apache Tomcat connector documentation on their website.
Logging
The logfiles of Tomcat as well as the dashboard will all be written into the directory
specified by /dashboard2/Logging/Directory.
The Level i.e. the minimal criticality a log message must have before being
logged has the 5 possible values debug, info,
warning, error and fatal. Switching this to
debug can possibly provide additional information for diagnosing problems.
dashboard2.config.¶ <Node Key="Logging">
<Binding Key="Directory" Value="../logs" />
<Binding Key="Level" Value="info" />
</Node>
Dashboard log files all start with the prefix axivion_. Those files will be up
to 10 Megabytes in size and afterwards backed up with a sequential number counting up to
10. Probably the most relevant logfile is axivion_dashboard.log. Another quite
important logfile is the tomcat log, found in tomcat.log when starting via
dashserver or commons-daemon.log when starting the dashboard as a
Windows service Section Microsoft Windows®.
Changes to these options will only take effect after restarting the dashboard.
If you want to temporarily increase the loglevel for debugging purposes, consider
starting with the loglevel command line switch that overrides the value
from the configuration file.
Authentication
For authentication configuration, please refer to Dashboard Authentication Configuration.
Securing Communication with other Services
In this section we give you some hints on how you can secure the communication between the dashboard and other services it communicates with, i.e. the Mail Server, see Section General Settings and possibly an LDAP or Active Directory Server, see Section LDAP Configuration Options. If you want to secure communication between your browser and the dashboard, refer to Section Securing Communication (TLS/SSL).
When communicating via LDAP/ActiveDirectory or the mail server traditional, dedicated-port SSL/TLS can be used or the connection can be initiated via the unencrypted port and augmented to SSL/TLS via STARTTLS.
As the dashboard is implemented in Java it relies on its Secure Socket Layer implementation for creating secure connections. The accepted SSL protocols as well as the accepted cipher suites depend on your JVM. We generally recommend using the latest JVM if you want to make sure no connections are established using algorithms known to be vulnerable. Please consult your JVM documentation if you need to change the defaults.
When using authenticated and encrypted connections the Dashboard will require presented
certificates to be known. By default Java has one JVM-global file containing the trusted
certificate authorities (CAs) $(JAVA_HOME)/lib/security/cacerts or
$(JAVA_HOME)/lib/security/jssecacerts if it exists.
If you have your own CA certificate or you want to use self-signed certificates you
would need to add them to that file. For the dashboard the recommended way is to create
your own file (trust store) named truststore.jks, put it into your configuration
folder and configure the dashboard to use it as an additional source of trust,
see Section General Settings. Currently we only support
this java-specific X509 keystore format for the additional source of trust, so you will
need to familiarize yourself with the java command line tool
keytool
found at $(JAVA_HOME)/bin/keytool.
For LDAP or Active Directory as a Dashboard Administrator you can easily trust your LDAP
server’s certificate on the global settings page,
see Section General Settings. In the
Authentication section you can see your LDAP authenticators and when
pressing the Query known Users button you will be shown the unknown
certificate if any and be asked to trust it.
For the mail server currently you will have to import a possible certificate manually. In order to do this you will need your mail server’s certificate in PEM format and execute the following command inside the directory with your dashboard configuration.
keytool -importcert -keystore truststore.jks \
        -file mailserver-public_key.pem -alias mailserver
If the file truststore.jks doesn’t exist yet it will be created. Note, that the
certificate needs to have a “subject alternative name” that can be compared to the
hostname the dashboard is connecting to.
If you add a new certificate to your custom truststore or remove an old one, the change will not automatically be noticed by new connections. Therefore you have to tell the dashboard to reload the custom truststore on the general settings page where you also configure its path, see Section General Settings.
1.3.4.6. Securing Communication (TLS/SSL)
This section is about securing communication between your web browser and the dashboard server. If you want to learn how to secure communication between the dashboard and the different services it uses, refer to Section Securing Communication with other Services.
There are different ways to secure the HTTP communication with the Dashboard Server. The Tomcat’s built-in HTTPS support can be configured to secure the communication. This is necessary for secure communication if the clients talk directly to the Axivion Dashboard Server. Another way is to use a proxy server between the Axivion Dashboard Server and the clients which speaks HTTPS with the clients. However, it can make sense to use Tomcat’s built-in HTTPS support to protect the communication between the proxy and the Axivion Dashboard Server.
You can do that by configuring the corresponding bindings in
dashboard2.config:
dashboard2.config.¶ <Node Key="EmbeddedTomcat">
<Binding Key="HttpsPort" Value="9443" />
<Binding Key="KeyStorePath" Value="keystore.p12" />
<Binding Key="KeyStorePassword" Value="password" />
<Binding Key="KeyAlias" Value="dashboard" />
<!-- <Node Key="SubjectAltNames"> -->
<!-- <Binding Key="1" Value="axivion-dashboard" /> -->
<!-- <Binding Key="2" Value="axivion-dashboard.example.com" /> -->
<!-- </Node> -->
</Node>
If you configure these values, dashboard2/EmbeddedTomcat/HttpPort will be
ignored and Tomcat will only listen to HTTPS requests.
Note
If you switch back to HTTP you might have to delete cookies in browsers that have communicated with the dashboard over HTTPS previously.
Generating and Using a Self-Signed Certificate
The Axivion Dashboard Server can generate a self-signed certificate. This is achieved by setting the
option KeyAlias to auto and not setting the option
KeyStorePath (i.e. commenting it out). If the
KeyStorePassword is not set in such
a configuration, the password will be changeit (which you do
not have to change despite its name – this is just the default password
of the Java KeyStore cacerts).
By default, the Axivion Dashboard Server tries to get the name of the host from the system.
If the result
is not satisfying, the DNS names can be configured with the list in the option
SubjectAltNames. An arbitrary number of DNS names can be specified,
each with an individual key. The key is used to determine the order in the
certificate’s subject alternative name list. The first name (in key ordering)
is also used as common name.
On each startup, the Axivion Dashboard Server checks the certificate. If there are host names
discovered or configured which are not part of the current self-signed certificate,
a new certificate is generated. The old certificate store is renamed prior to this
to prevent data loss. The other generated files (auto.crt and
auto.csr) are not backed-up
because they can be regenerated with the information in the certificate store.
Another check is the validity period. If the certificate has expired or will expire within the next 4 weeks, a new one is generated.
Generated Files
The files generated in the self-signed certificate mode are stored in the directory
cert inside the Axivion Dashboard Server configuration directory.
- auto.p12
Contains the self-signed CA certificate, the server certificate for the Axivion Dashboard Server, and the private key of the server certificate. The Axivion Dashboard Server uses this file to load the necessary information to establish a TLS connection.
- auto.crt
Contains the self-signed CA certificate which has to be installed into the system’s certificate store (OS/browser, Java, Python) to trust the Axivion Dashboard Server.
- auto.csr
Certificate signing request (CSR, also called certification request) to request a certificate from an official (or company-internal) certificate authority. It contains (among other information) the public key and the list of subject alternative names of the server certificate. The CSR is signed by the private key of the server certificate but does not include it.
Using an official Certificate
Using an official certificate has the advantage of providing encrypted (and authenticated) communication with the Axivion Dashboard Server without the need of deploying the Axivion Dashboard Server certificate to every machine. This means that another authority already deployed the root certificate, e.g. your IT department.
Caution
The clients require the full certificate chain to validate the trust to the server certificate up to a trusted root certificate. So it is strongly recommended to include the full chain into the keystore instead of just the server certificate. This allows the Axivion Dashboard Server to provide the chain to the client in the TLS handshake. Only including the server certificate without full chain likely causes further configuration effort on every client: the full chain (and not only the root certificate) has to be provided for every single client.
Caution
Visual Studio Code uses the system certificate store to retrieve the root certificate (trust anchor). But it does not read intermediate certificates from the system certificate store. So, for a working Axivion Visual Studio Code Plugin, it is crucial that the Axivion Dashboard Server delivers the whole certificate chain.
To use an official certificate, several steps are necessary. First, a certificate has to be requested. Then, the Axivion Dashboard Server has to be configured to use the certificate.
Requesting a Certificate
There are two ways to request a certificate. One way is to create a certificate signing request and send it to your IT department. So the private key never leaves the machine the Axivion Dashboard Server is running on. The second way is to leave the task of private key generation to your IT department. This way is simpler.
Ask for a Certificate and Private Key
In this variant, your IT department not only generates the certificate (signs the public key) but also generates the private key.
So, a request should ask for the following information:
Server certificate
Private key corresponding to the server certificate
Certificate chain (all intermediate certificates, optionally with root certificate)
Passwords used to protect the private key and/or the certificate store
Request a Certificate via a Certificate Signing Request (CSR)
When requesting a certificate via a CSR, we recommend to let the Axivion Dashboard Server automatically generate a self-signed certificate. This also generates a new private key and a CSR.
Let the Axivion Dashboard Server automatically generate a self-signed certificate.
Send the generated auto.csr to your IT department so that it can sign it, i.e. generate a certificate from it. Be sure to ask not only for the server certificate but also for the whole certificate chain.
After successfully running the certificate wizard to install the new certificate, the automatically generated files are not needed anymore.
Using the Certificate Wizard to Create a Key Store and Install it
In the dashboard2.config, the options
KeyStorePathKeyStorePasswordKeyAlias
must be set, that is, the corresponding lines must not be commented out but their values may be gibberish.
An example invocation of the certificate wizard looks as following:
dashserver certificate --confdir path/to/dashboard/config --inputs server.crt private.key chain.pem
The option inputs takes an arbitrary amount of files that
contain the private keys and certificates. Additionally, system stores
are loaded. The order of the files is irrelevant. The type of the files
will be determined automatically. Files of different types can be mixed.
If a password is necessary to read a key, the wizard will prompt you to enter it.
Certificates can contain information on
where to look for the parent certificate.
By default, the certificate wizard does not use this information because
it requires loading data from a remote server. When started with the
flag --download, the certificate wizard tries to download and
use the certificates referenced by other certificates.
After reading the files, the wizard calculates possible certificate
chains and prompts for selecting the one to be used. The chosen chain will
then be stored in a file and dashboard2.config is updated to use the
selected chain. Furthermore, if a root certificate has been found, the root
certificate is stored in a file that can be used with REQUESTS_CA_BUNDLE
or installed into other trust stores.
The path of the generated files and the dashboard2.config will be
printed on the console.
The wizard can be aborted with Ctrl + c
(on German keyboards Strg + c). If this happens before
selecting a chain, no configuration changes or files will be written
to disk.
Caution
If you are using a self-signed certificate you will need to take special measures in
order for the communication between the Continuous Integration and the dashboard to
work. One way is to set the environment variable REQUESTS_CA_BUNDLE to a
path pointing to your certificate in PEM format when invoking axivion_ci.
Caution
Also the IDE Plugins might need additional configuration steps to install/use with a self-signed certificate. For the Eclipse Plugin, see Section HTTPS connections and for the Visual Studio Plugin, see Section Connection to Axivion Dashboard Server
Caution
The options HttpsPort/HttpPort,
DashboardUrlBase, SubjectAltNames, and
BindAddress are not checked for consistency. It is e.g.
possible to configure an DashboardUrlBase with a host
which is not covered by the names in the HTTPS certificate.
OpenSSL on Windows
OpenSSL is part of MinGW and Git for Windows. To use these implementations in a MinGW or Git Bash shell, you have to write wintty openssl to fix broken stdin/out behavior.
Other OpenSSL binaries for Windows: Binaries - OpenSSLWiki
Test the Axivion Dashboard Server Certificate Configuration
After configuring the certificate for the Axivion Dashboard Server, we recommend to test the setup. The first test is to access the Dashboard with a browser. The browser should be able to access it via HTTPS without certificate, TLS, or SSL warnings.
When the browser is able to talk to the Axivion Dashboard Server without problems, a
second step should be done to test that the Axivion Dashboard Server provides the
certificate chain. This can be done with the
OpenSSL command
openssl s_client -showcerts -connect axivion.example.com:9443 .
After the TLS handshake, the commands expects interactive user input
which will be sent to the server. So it appears as hanging. As we are
only interested in the TLS handshake, it can be aborted with
Ctrl + c (on German keyboards Strg + c).
The output should look similar to
CONNECTED(000001B0)
depth=1 C = US, O = Let's Encrypt, CN = R3
verify error:num=20:unable to get local issuer certificate
---
Certificate chain
 0 s:/CN=axivion.example.com
   i:/C=US/O=Let's Encrypt/CN=R3
-----BEGIN CERTIFICATE-----
[a few lines base64]
-----END CERTIFICATE-----
 1 s:/C=US/O=Let's Encrypt/CN=R3
   i:/C=US/O=Internet Security Research Group/CN=ISRG Root X1
-----BEGIN CERTIFICATE-----
[a few lines base64]
-----END CERTIFICATE-----
---
Server certificate
subject=/CN=axivion.example.com
issuer=/C=US/O=Let's Encrypt/CN=R3
---
[...]
It is important that not only the server certificate is shown but also all intermediate certificates. The root certificate may be served by the Axivion Dashboard Server but this is not required. Only providing the server certificate can cause problems with clients being unable to build the whole certificate chain.
When the browser is able to talk to the Axivion Dashboard Server via HTTPS without warnings but OpenSSL shows only the server certificate, it might be that no intermediate certificates are used - but that is an unusual setup. Most likely is that the browser is able to retrieve the intermediate certificates from other sources. In this case, we recommend to download the certificates manually with a browser and start the certificate wizard again with the downloaded certificates as additional input files.
Places to Install the Root Certificate of the Dashboard Certificate
- Windows
Double click the
auto.crtPress the button
Install Certificate...Choose the Store Location:
Local Machinewill install it for all users but requires Administrator permissions.Choose Certificate Store
Trusted Root Certificate AuthoritiesFinish the assistant
- Debian and Derivatives
The instructions can be found in
man 8 update-ca-certificates: https://manpages.debian.org/stable/ca-certificates/update-ca-certificates.8.en.html .- Python/CI
Python uses the Windows certificate store, however third-party packages can use their own certificate store. One of these third-party packages is Python
requestswhich the Axivion Suite uses. So it is necessary to point Pythonrequeststo a certificate store containing the root certificate of the Dashboard’s certificate via the environment variable:set "REQUESTS_CA_BUNDLE=<dashboard-configuration-directory>\cert\auto.crt"
- Browser
Microsoft Edge uses the system certificate store.
Firefox uses its own certificate store. Optionally, it additionally can use the system certificate store. https://wiki.mozilla.org/CA:AddRootToFirefox
Other browsers may use their own certificate store.
- Axivion Visual Studio Plugin
The Axivion Visual Studio Plugin uses the Windows certificate store.
- Axivion Visual Studio Code Plugin
Visual Studio Code (and therefore the Axivion Visual Studio Code Plugin) uses the system certificate store. https://code.visualstudio.com/docs/setup/network#_ssl-certificates
Caution
Visual Studio Code uses the system certificate store to retrieve the root certificate (trust anchor). But it does not read intermediate certificates from the system certificate store. So, for a working Axivion Visual Studio Code Plugin, it is crucial that the Axivion Dashboard Server delivers the whole certificate chain.
- Java/Axivion Eclipse Plugin
Java uses its own certificate store (.jks Java Keystore). The Axivion Eclipse Plugin uses the Java certificate store. The installation procedure is described in the Axivion Eclipse Plugin guide: HTTPS connections.
Note
When there are certificate or TLS connection problems and you need support from Axivion, please send the following information with your support request e-mail:
The error message you are seeing / the log from the plugin you are using.
The output of the Axivion diagnostic tool
axivion_support.The output of the OpenSSL command described in testing the Dashboard certificate configuration.
1.3.4.7. Running the Dashboard behind a Proxy
Often it may be the case, that your company has a large web server setup where things like SSL certificates and subdomains and sometimes user authentication are already configured and you just want the Axivion Dashboard Server to be reachable via this proxy. This is generally possible but there are some things to bear in mind.
URL Base Path
If your proxy e.g. serves https://dashboard.example.com/axivion and your dashboard
is running on http://some-host:9090/axivion then the URL Base Path is
/axivion and it needs to be the same on both the proxy URL as well as the proxied
URL.
See The Dashboard Server on how to configure the
URL Base Path.
Dashboard self references
Especially when running behind a proxy, the Axivion Dashboard Server cannot always know the URL
it should use to refer to itself. This most frequently becomes a problem when it sends
emails. In order to tell the Axivion Dashboard Server which URL to use to refer to itself we
thus always recommend to configure the option Dashboard URL, see
General Settings.
Proxy Authentication
The Dashboard supports proxy authentication where a proxy, that already has authenticated the user, e.g. via Basic-Auth, forwards that information via an HTTP header, see Proxy Authentication.
HTTP vs. HTTPS
It is generally better to also use HTTPS for the dashboard running behind the proxy, not only for security reasons, but also because of conflicts with some security features. Because of these, running an HTTPS dashboard behind an HTTP proxy is not supported at all from our side. Running an HTTP dashboard behind an HTTPS proxy works but we have had customers running into the Invalid CORS request problem with some browsers in that configuration. This can happen if the proxy does not inform the Axivion Dashboard Server about the protocol switch (usually done via the Forwarded HTTP Header) which will lead to the Dashboard rejecting the request. If you are unable to correctly configure this in your proxy, there exists the possibility to configure the Axivion Dashboard Server to accept its own proxy URL as an allowed “CORS origin” on the General Settings page, see General Settings.
1.3.4.8. Installing the Dashboard as a System Service
Permissions of the Dashboard Configuration Folder
We strongly recommend to run the Dashboard service under a OS user with limited
permissions. That means running it as Root, Administrator, or Local System is
highly discouraged. The Axivion Dashboard Server needs read and write access to its
configuration. So please check that the OS user running the Dashboard service
has these permissions for the config, the logs, and the
tomcat folder (recursively including their children).
The second aim of the permissions review is to ensure that only the necessary OS users and OS groups have access to the configuration folders (e.g. DashboardUser and the administrator). The configuration contains security and privacy sensitive data like user names, e-mail addresses, and password hashes. An attacker with write access to the configuration can (for example) add new user accounts or change the permissions of Dashboard users. This can also result in arbitrary code execution under the OS user account under which the Axivion Dashboard Server runs.
Microsoft Windows®
It is important to know that a Windows service is an isolated process running in its own environment. Thus all configuration you may have done inside your session will not be automatically available in the service environment. Such configurations can be authentication keys necessary for accessing your version control system or mounted network drives containing all or some of the dashboard files. Once the service is installed you can change the Windows user used to run the service from within the Windows service facilities. The service will then run in that user’s environment.
The installation can be done using the subcommands install and
uninstall of the script dashserver. On Windows Vista and newer
with UAC enabled you need to execute the dashserver command from within an
Administrator Command Prompt because installing a new system service requires elevated
privileges.
If you need some setup to be done in the service user’s context you can do so
by using the PreStartCommand and PostStopCommand options in
the file dashboard2.config.
<Configuration Key="dashboard2">
  ..
  <Binding Key="PreStartCommand" Value="net use L: \\fileserver\data" />
  <Binding Key="PostStopCommand" Value="net use L: /delete /yes" />
  ..
</Configuration>
You could also specify the path to a batch-file instead of a single command.
Note, that in case of a problem with service installation or service startup/shutdown
there will be separate log files in your logging directory configured at
/dashboard2/Logging/Directory. In some non-standard setups you might want
to place the service log files into another directory which can be achieved using the
--servicelogdir switch of the install and
uninstall subcommands. You may also want to use another Windows service id
which can be achieved using the switch
--id.
Note
If you don’t use the system default python for running rfgscript
you might
need to have set the variable BAUHAUS_PYTHON
while invoking dashserver install.
GNU/Linux
Preparation
The correct functioning of the Axivion Dashboard Server requires that you have properly
prepared your installation of the Axivion Suite as described
here. Most importantly this means you have installed
your license key and executed setup.sh.
Installation of the Dashboard service itself
The installation can be done using the subcommands install and
uninstall of the script dashserver.
Please note that you need to have superuser privileges to execute the
install and uninstall subcommands, so either you need to be
executing them already as root, or by using sudo.
If the Axivion Suite is installed for a user axivionuser and you invoke
the installation or uninstallation from that user context, you need to make sure that
root has access to the Axivion Suite and the license key. Assuming the license key is
placed in the $HOME/.bauhaus folder of the axivionuser, then this
could be achieved as follows:
sudo env "PATH=$PATH" "BAUHAUS_CONFIG=$HOME/.bauhaus" dashserver install --user axivionuser --confdir ~/axivion_dashboard/config
Logfile rotation using logrotate
As root, copy the file
BAUHAUS/templates/dashboard-service-linux/etc/logrotate.d/axivion-dashboard into
/etc/logrotate.d and adjust the path (and possibly the options) inside the file
accordingly in order to rotate the Axivion Dashboard Server logfiles.
Putting the Axivion Dashboard Server behind an Apache 2 web server
If you want to put the Axivion Dashboard Server behind an Apache 2 web server, then you
can use the Apache 2 configuration file in
BAUHAUS/templates/dashboard-service-linux/etc/apache2/sites-available/axivion-dashboard.conf
in order to configure Apache as a
proxy to the Axivion Dashboard Server (depending on your GNU/Linux distribution, the
place to copy the configuration file might not be /etc/apache2/sites-available,
but somewhere else, please consult the documentation of your distribution).
Putting the Axivion Dashboard Server behind an Nginx web server
If you want to put the Axivion Dashboard Server behind an Nginx web server, then you
can use the Nginx configuration file in
BAUHAUS/templates/dashboard-service-linux/etc/nginx/sites-available/axivion-dashboard.conf
in order to configure Nginx as a
proxy to the Axivion Dashboard Server (depending on your GNU/Linux distribution, the
place to copy the configuration file might not be /etc/nginx/sites-available,
but somewhere else, please consult the documentation of your distribution).
Putting the Axivion Dashboard Server behind a Caddy web server
If you want to put the Axivion Dashboard Server behind a Caddy web server, then you
can use the Caddy configuration file in
BAUHAUS/templates/dashboard-service-linux/etc/caddy/Caddyfile
in order to configure Caddy as a
proxy to the Axivion Dashboard Server (depending on your GNU/Linux distribution, the
place to copy the configuration file might not be /etc/caddy/Caddyfile,
but somewhere else, please consult the documentation of your distribution).
Running the Axivion Dashboard Server from within a Docker container
If you want to run the Axivion Dashboard Server from within a Docker container for easier dependency management and better isolation from the host system you can do so.
Note
We neither recommend nor discourage the usage of a container for running the Axivion Dashboard Server. Be aware that the requirements on the host-system may be higher than you are used to from other Docker images, i.e. the portability of the image may be not as good as you would like. Still if your main use case is to isolate the dependencies like Python and Java from those of other services running on the same machine containerization is a nice option.
We provide an example Dockerfile to get you started but you might need
to tailor it to your specific Docker setup and host.
# Please see Axivion Documentation on how to use Dashboard Docker image
# before using this file.

FROM debian:trixie

ARG DEBIAN_FRONTEND=noninteractive
RUN apt-get update && apt-get install -y \
    openjdk-25-jre-headless \
    && rm -rf /var/lib/apt/lists/*

# ATTENTION: You need to install all the command-line tools for the version control
# systems that your projects require. E.g. if you have projects using Subversion and
# Git, then you should install those packages here as well.

# bauhaus-suite.tar.gz corresponding with this Dockerfile is expected in the build context
ADD bauhaus-suite.tar.gz /opt/
RUN /opt/bauhaus-suite/setup.sh --non-interactive
ENV PATH /opt/bauhaus-suite/bin:$PATH

# The home directory is not created but expected to be mapped into the container.
RUN groupadd --gid 9000 axivionuser \
    && useradd --uid 9000 --gid axivionuser --shell /bin/bash --no-create-home axivionuser
USER axivionuser
VOLUME /home/axivionuser
WORKDIR /home/axivionuser

# This avoids the need for specifying --confdir for the dashserver-script when inside the container
ENV AXIVION_DASHBOARD_CONFIG /home/axivionuser/dashboard/config

# Depending on your configuration (HTTP vs. HTTPS or reconfigured ports),
# you have to adjust the exposed ports).
EXPOSE 9090 9443

# For successful start a valid license key is expected
# We recommend providing it as /home/axivionuser/.bauhaus/bauhaus.key
# via the mounted home directory.
CMD ["dashserver", "start", "--nodetach"]
This Dockerfile is based on the base-image of a supported Debian version and
installs the necessary dependencies. In order to build it, use
mkdir -p context
cp $DOWNLOADS/Axivion-X.Y.Z-x86_64-gnu_linux.tar.gz context/bauhaus-suite.tar.gz
docker build --tag axivion_dashboard:X.Y.Z --file $AXIVION_INST/templates/dashboard-docker/Dockerfile context
Note, how this explicitly builds the Docker-image for a specific Axivion version and also copies the installation files into the image. The axivion dependencies or our package recommendations might change anyway on updates, so it is a good idea to build the image anew each time when updating the Axivion Suite.
Note, how the image creates a user with uid and gid 9000 that will be used to execute the dashboard-process with non-root permissions.
The easiest way to use the image from the example Dockerfile is creating a
system user on the Docker host with the same uid and gid, i.e. 9000 and ensure that
user has correct access on the required host-resources, most importantly analysis
databases and Axivion Dashboard Server configuration.
Assuming you have created this user axivionuser with default group axivionuser with your distributions user-management facilities and also a new HOME-directory for this user (another new directory owned by the user will do just as fine) you can do the following (as root) to prepare the necessary files for the first dashboard run:
mkdir -p /home/axivionuser/.bauhaus
cp $DOWNLOADS/bauhaus.key /home/axivionuser/.bauhaus/bauhaus.key
chmod 600 /home/axivionuser/.bauhaus/bauhaus.key
chown -R axivionuser:axivionuser /home/axivionuser
This installs the license to a location where the Axivion Dashboard Server can find it and ensures correct permissions.
Now you can go ahead and run the container.
docker run -d --restart=unless-stopped --name=axivion_dashboard_service --init -v /home/axivionuser:/home/axivionuser -p 12345:9443 axivion_dashboard:X.Y.Z
This should start up the Axivion Dashboard Server in the container and create an initial configuration.
We specified quite some arguments there, so let’s see, what each of them does:
-dRun container in the background. To run in the foreground specify
-itinstead--restart=unless-stoppedAutomatically start container on system start and on crashes
--name=axivion_dashboard_serviceGives the container a meaningful name. Feel free to choose a different one, but the later example commands will make use of that name
--initWraps the Dashboard in a process reaper process. Should not be necessary but results in child processes being terminated nicely should the dashserver-script fail to do so.
-v /home/axivionuser:/home/axivionuserMakes the left (host path) available as the right (container path) in the container. Note, how we mounted the HOME-directory of
axivionuserwhich will contain the log and configuration files. Feel free to inspect it and adjust the configuration to your liking viadashboard2.configand afterwards restart the container. You probably want to map more paths (for your analysis databases) into the container. In order to map additional paths to the container you will need to delete it and create it again. Fortunately all our important data is outside the container, so we can simplydocker rm axivion_dashboard_serviceto remove it and issue above command again, adding the additional mounts in order to recreate our container.-p 12345:9443Maps the host TCP port 12345 to the container port 9443 (default HTTPS port for a fresh configuration). Adjust this value accordingly if you’re going to use an existing configuration.
If you followed the example, the login-page should be accessible from outside as
https://localhost:12345/axivion.axivion_dashboard:X.Y.ZName of the image we built before and want to use to create our container
We can now use various commands to further manage our container:
docker stop axivion_dashboard_serviceStop the container
docker start axivion_dashboard_serviceStarts the container (again)
docker logs axivion_dashboard_servicePrints the container processes output. This is important in order to know our initial administrative credentials. Do not forget to change them from within the Axivion Dashboard Server.
docker exec -it axivion_dashboard_service bashCreate a shell within the container This may become necessary if for example we need to do things like
dashserver restore-adminin order to reset our admin password.