
Qml Weather
Dies ist eine einfache Demonstration, die zeigt, wie man die verschiedenen Diagrammtypen mit QML verwendet.
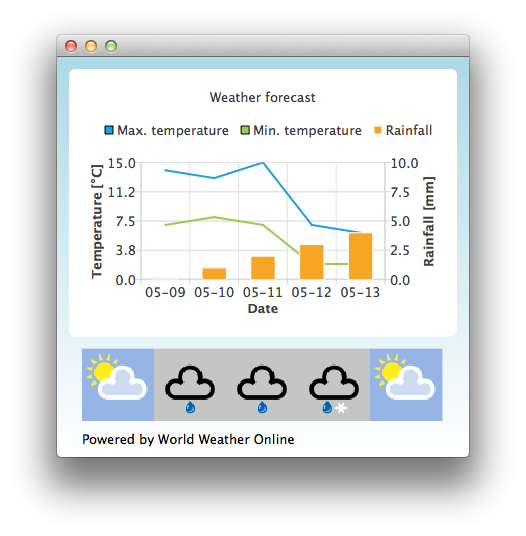
Standardmäßig verwendet die Anwendung statische Testdaten, um eine Wettervorhersage zu simulieren. Sie können auch eine Anwendungs-ID unter http://www.worldweatheronline.com/ abrufen, um Zugriff auf die von World Weather Online bereitgestellte Wetter-API zu erhalten. Anschließend können Sie Ihre Anwendungs-ID als Parameter an das ausführbare Qml-Weather-Programm übergeben, damit dieses Live-Daten verwendet.
Beispiel:
bin\qmlweather.exe 1234567890abcdef123456Ausführen des Beispiels
Sie können das Beispiel wie folgt ausführen:
- Qt Creator
Öffnen Sie den Modus „ Welcome “ und wählen Sie das Beispiel unter Examples aus. Weitere Informationen finden Sie unter Qt Creator: Tutorial: Erstellen und Ausführen.
- Qt Extension for Visual Studio Code
Führen Sie den Befehl „ Qt: Open Qt examples “ über „ Command Palette “ aus und wählen Sie das Beispiel aus der Liste aus. Weitere Informationen finden Sie unter Qt Extension for Visual Studio Code: Tutorial: Erstellen und Ausführen.
Verwendung von Diagrammen in „ Qt Quick “-Anwendungen
Die Beispielanwendung verwendet eine „ChartView“ und einige Zeitreihen, um Wetterdaten zu visualisieren:
ChartView {
    id: chartView
    title: "Weather forecast"
    BarCategoryAxis {
        id: barCategoriesAxis
        titleText: "Date"
    }

    ValueAxis{
        id: valueAxisY2
        min: 0
        max: 10
        titleText: "Rainfall [mm]"
    }

    ValueAxis {
        id: valueAxisX
        // Hide the value axis; it is only used to map the line series to bar categories axis
        visible: false
        min: 0
        max: 5
    }

    ValueAxis{
        id: valueAxisY
        min: 0
        max: 15
        titleText: "Temperature [°C]"
    }

    LineSeries {
        id: maxTempSeries
        axisX: valueAxisX
        axisY: valueAxisY
        name: "Max. temperature"
    }

    LineSeries {
        id: minTempSeries
        axisX: valueAxisX
        axisY: valueAxisY
        name: "Min. temperature"
    }

    BarSeries {
        id: myBarSeries
        axisX: barCategoriesAxis
        axisYRight: valueAxisY2
        BarSet {
            id: rainfallSet
            label: "Rainfall"
        }
    }
Um Wettervorhersagedaten abzurufen, senden wir eine HTTP-GET-Anfrage an World Weather Online. Wir fordern die Antwort im JSON-Datenformat an.
// Make HTTP GET request and parse the result
var xhr = new XMLHttpRequest;
xhr.open("GET",
         "http://free.worldweatheronline.com/feed/weather.ashx?q=Jyv%c3%a4skyl%c3%a4,Finland&format=json&num_of_days=5&key="
         + weatherAppKey);
xhr.onreadystatechange = function() {
    if (xhr.readyState == XMLHttpRequest.DONE) {
        var a = JSON.parse(xhr.responseText);
        parseWeatherData(a);
    }
}
xhr.send();
Die JSON-Antwort enthält ein Array mit Vorhersagedaten:
// Loop through the parsed JSON
for (var i in weatherData.data.weather) {
    var weatherObj = weatherData.data.weather[i];
Diese werden dann als Eingabedaten für unsere Zeitreihen und ein „ListModel“ verwendet, das wir als Container für die URLs der Wettersymbole nutzen:
// Store temperature values, rainfall and weather icon.
// The temperature values begin from 0.5 instead of 0.0 to make the start from the
// middle of the rainfall bars. This makes the temperature lines visually better
// synchronized with the rainfall bars.
maxTempSeries.append(Number(i) + 0.5, weatherObj.tempMaxC);
minTempSeries.append(Number(i) + 0.5, weatherObj.tempMinC);
rainfallSet.append(weatherObj.precipMM);
weatherImageModel.append({"imageSource":weatherObj.weatherIconUrl[0].value});© 2026 The Qt Company Ltd. Documentation contributions included herein are the copyrights of their respective owners. The documentation provided herein is licensed under the terms of the GNU Free Documentation License version 1.3 as published by the Free Software Foundation. Qt and respective logos are trademarks of The Qt Company Ltd. in Finland and/or other countries worldwide. All other trademarks are property of their respective owners.
