Qt Quick 3D - 퀵볼 예제
Quick3D를 사용하여 간단한 게임을 만드는 방법을 보여줍니다.

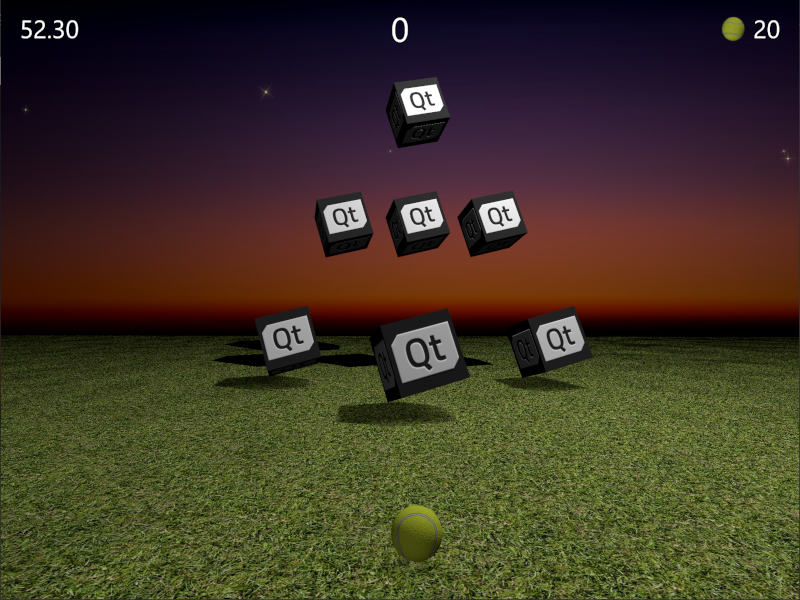
이 예제는 Qt Quick 와 Qt Quick 3D 을 결합하여 간단한 3D 게임을 만드는 방법을 보여줍니다. 게임의 목표는 공을 던져 목표 상자를 맞추는 것입니다. 얼마나 빨리, 얼마나 적은 수의 공으로 모든 목표물을 쓰러뜨리는지에 따라 점수가 주어집니다. 조준은 잘하되 빠르게!
이 예제는 완전히 플레이 가능한 게임이라는 점을 고려하여 소스 코드를 하나의 QML 파일에 담았습니다. 주요 프로퍼티부터 살펴보겠습니다. 이러한 프로퍼티는 설명이 필요 없으며, 쉽게 조정하여 게임에 어떤 영향을 미치는지 확인할 수 있습니다.
// Scaling helpper
readonly property real px: 0.2 + Math.min(width, height) / 800
// This is false until the first game has started
property bool playingStarted: false
// This is true whenever game is on
property bool gameOn: false
// Sizes of our 3D models
readonly property real ballSize: 40
readonly property real targetSize: 120
// Playing time in seconds
readonly property real gameTime: 60
property real currentTime: 0
// Amount of balls per game
readonly property int gameBalls: 20
property int currentBalls: 0
// Scores
property int score: 0
property int timeBonus: 0
property int ballsBonus: 0
View3D 에는 게임을 시작하고 필요한 모든 변수를 (재)초기화하며 레벨 타깃을 생성하는 함수가 포함되어 있습니다. 또한 게임이 종료될 때 최종 점수를 계산하는 함수도 포함되어 있습니다.
function createLevel1() {
    // Simple level of target items
    var level1 = [{ "x": 0, "y": 100, "z": -100, "points": 10 },
                  { "x": -300, "y": 100, "z": -400, "points": 10 },
                  { "x": 300, "y": 100, "z": -400, "points": 10 },
                  { "x": -200, "y": 400, "z": -600, "points": 20 },
                  { "x": 0, "y": 400, "z": -600, "points": 20 },
                  { "x": 200, "y": 400, "z": -600, "points": 20 },
                  { "x": 0, "y": 700, "z": -600, "points": 30 }];
    targetsNode.addTargets(level1);
}

function startGame() {
    ballModel.resetBall();
    targetsNode.resetTargets();
    createLevel1();
    score = timeBonus = ballsBonus = 0;
    currentBalls = gameBalls;
    gameOn = true;
    playingStarted = true;
}

function endGame() {
    if (targetsNode.currentTargets == 0) {
        // If we managed to get all targets down -> bonus points!
        timeBonus = mainWindow.currentTime;
        ballsBonus = currentBalls * 10;
    }
    gameOn = false;
    ballModel.resetBall();
}
뷰에는 씬을 밝히는 PointLight 노드도 포함되어 있습니다. 이 노드는 오브젝트 위에 위치하며 그림자를 드리우도록 설정되어 있습니다. 게임이 종료되면 밝기를 사용하여 게임 영역을 어둡게 만드는 방법에 주목하세요. ambientColor 속성은 빛의 대비를 부드럽게 하는 데 사용되며, 이 속성이 없으면 오브젝트의 아래쪽 부분이 매우 어두워집니다.
PointLight {
    x: 400
    y: 1200
    castsShadow: true
    shadowMapQuality: Light.ShadowMapQualityHigh
    shadowFactor: 50
    quadraticFade: 2
    ambientColor: "#202020"
    brightness: mainWindow.gameOn ? 200 : 40
    Behavior on brightness {
        NumberAnimation {
            duration: 1000
            easing.type: Easing.InOutQuad
        }
    }
}
공 던지기는 Qt Quick MouseArea 항목을 사용하는데, 이 항목은 게임이 켜져 있고 공이 아직 움직이지 않을 때만 활성화됩니다.
MouseArea {
    anchors.fill: parent
    enabled: mainWindow.gameOn && !ballModel.ballMoving
    onPressed: {
        ballModel.moveBall(mouseX, mouseY);
    }
    onPositionChanged: {
        ballModel.moveBall(mouseX, mouseY);
    }
    onReleased: {
        ballModel.throwBall();
    }
}
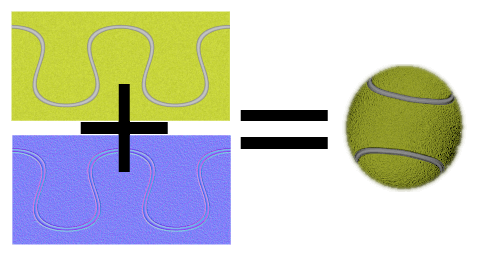
그런 다음 실제 3D 모델로 들어갑니다. 공 모델은 공의 동작 방식, 애니메이션, 타격 감지 로직이 포함되어 있기 때문에 가장 큰 모델입니다. 먼저 공의 속성을 살펴보겠습니다. 공은 ballSize 을 기준으로 스케일링된 내장 구 모델을 사용합니다. 테니스 공 모양을 만들기 위해 baseColorMap 및 normalMap 과 함께 PrincipledMaterial 을 사용합니다.

Model {
    id: ballModel
    property real directionX: 0
    property real directionY: 0
    // How many ms the ball flies
    readonly property real speed: 2000
    readonly property real ballScale: mainWindow.ballSize / 100
    property var moves: []
    readonly property int maxMoves: 5
    readonly property bool ballMoving: ballAnimation.running

    source: "#Sphere"
    scale: Qt.vector3d(ballScale, ballScale, ballScale)

    materials: PrincipledMaterial {
        baseColorMap: Texture {
            source: "images/ball.jpg"
        }
        normalMap: Texture {
            source: "images/ball_n.jpg"
        }
        normalStrength: 1.0
    }
마우스를 움직이거나 터치스크린을 스와이프하면 공을 놓기 전 마지막 maxMoves 위치가 moves 배열에 저장됩니다. 사용자가 공을 놓으면 throwBall() 이 호출되어 이 최신 위치에서 공의 방향을 계산하고 애니메이션을 시작합니다.
function resetBall() {
    moves = [];
    x = 0;
    y = mainWindow.ballSize/2;
    z = 400;
}

function moveBall(posX, posY) {
    if (!mainWindow.gameOn) return;
    var pos = view3D.mapTo3DScene(Qt.vector3d(posX, posY, ballModel.z + mainWindow.ballSize));
    pos.y = Math.max(mainWindow.ballSize / 2, pos.y);
    var point = {"x": pos.x, "y": pos.y };
    moves.push(point);
    if (moves.length > maxMoves) moves.shift();
    // Apply position into ball model
    ballModel.x = pos.x;
    ballModel.y = pos.y;
}

function throwBall() {
    if (!mainWindow.gameOn) return;
    mainWindow.currentBalls--;
    var moveX = 0;
    var moveY = 0;
    if (moves.length >= 2) {
        var first = moves.shift();
        var last = moves.pop();
        moveX = last.x - first.x;
        moveY = last.y - first.y;
        if (moveY < 0) moveY = 0;
    }
    directionX = moveX * 20;
    directionY = moveY * 4;
    ballAnimation.start();
}
공의 위치는 여러 축에 개별적으로 애니메이션이 적용됩니다. 이러한 애니메이션은 이전에 할당된 directionX 및 directionY 을 사용하여 공이 어디로 이동하는지 정의하고 speed 을 사용하여 공이 날아가는 시간을 정의합니다. 수직 위치에는 두 개의 순차적인 애니메이션이 있으므로 공의 바운스에 완화를 사용할 수 있습니다. 위치 애니메이션이 끝나면 공이 아직 남아 있는지 또는 게임이 종료되어야 하는지 확인합니다. 마지막으로 공의 회전도 애니메이션화하여 사용자가 커브볼을 던질 수 있도록 합니다.
ParallelAnimation {
    id: ballAnimation
    running: false
    // Move forward
    NumberAnimation {
        target: ballModel
        property: "z"
        duration: ballModel.speed
        to: -ballModel.directionY * 5
        easing.type: Easing.OutQuad
    }
    // Move up & down with a bounce
    SequentialAnimation {
        NumberAnimation {
            target: ballModel
            property: "y"
            duration: ballModel.speed * (1 / 3)
            to: ballModel.y + ballModel.directionY
            easing.type: Easing.OutQuad
        }
        NumberAnimation {
            target: ballModel
            property: "y"
            duration: ballModel.speed * (2 / 3)
            to: mainWindow.ballSize / 4
            easing.type: Easing.OutBounce
        }
    }
    // Move sideways
    NumberAnimation {
        target: ballModel
        property: "x"
        duration: ballModel.speed
        to: ballModel.x + ballModel.directionX
    }

    onFinished: {
        if (mainWindow.currentBalls <= 0)
            view3D.endGame();
        ballModel.resetBall();
    }
}

NumberAnimation on eulerRotation.z {
    running: ballModel.ballMoving
    loops: Animation.Infinite
    from: ballModel.directionX < 0 ? 0 : 720
    to: 360
    duration: 10000 / (2 + Math.abs(ballModel.directionX * 0.05))
}
게임 플레이에서 중요한 부분은 공이 목표물에 맞는 시점을 감지하는 것입니다. 공의 z 위치가 바뀔 때마다 targets 배열을 반복하고 fuzzyEquals() 을 사용하여 공이 목표물에 닿았는지 감지합니다. 적중을 감지할 때마다 타겟 hit() 함수를 호출하고 모든 타겟이 다운되었는지 확인합니다.
onZChanged: {
    // Loop through target items and detect collisions
    var hitMargin = mainWindow.ballSize / 2 + mainWindow.targetSize / 2;
    for (var i = 0; i < targetsNode.targets.length; ++i) {
        var target = targetsNode.targets[i];
        var targetPos = target.scenePosition;
        var hit = ballModel.scenePosition.fuzzyEquals(targetPos, hitMargin);
        if (hit) {
            target.hit();
            if (targetsNode.currentTargets <= 0)
                view3D.endGame();
        }
    }
}
그런 다음 타깃으로 전환할 수 있습니다. 이는 헬퍼 함수가 포함된 그룹화 노드로 동적으로 생성되어 모든 타깃을 그룹으로 애니메이션하는 등의 작업을 수행할 수 있습니다. currentTargets 속성이 필요한 이유는 QML 배열에서는 변경 사항이 바인딩을 트리거하지 않으므로 타깃의 양을 수동으로 업데이트할 것이기 때문입니다.
Node {
    id: targetsNode

    property var targets: []
    property int currentTargets: 0

    function addTargets(items) {
        items.forEach(function (item) {
            let instance = targetComponent.createObject(
                    targetsNode, { "x": item.x, "startPosY": item.y, "z": item.z, "points": item.points});
            targets.push(instance);
        });
        currentTargets = targets.length;
    }

    function removeTarget(item) {
        var index = targets.indexOf(item);
        targets.splice(index, 1);
        currentTargets = targets.length;
    }

    function resetTargets() {
        while (targets.length > 0)
            targets.pop().destroy();
        currentTargets = targets.length;
    }
}
타깃은 큐브 모델과 포인트를 표시하는 텍스트 요소가 있는 노드입니다. 공 모델과 마찬가지로 baseColorMap 및 normalMap 텍스처를 사용하여 Qt 로고가 있는 큐브를 만듭니다. 타격이 감지되면 큐브를 순차적으로 애니메이션으로 움직이고 이 타겟에서 얻은 점수를 표시합니다. 애니메이션이 완료되면 타겟 노드를 동적으로 제거합니다.
Component {
    id: targetComponent
    Node {
        id: targetNode

        property int points: 0
        property real hide: 0
        property real startPosY: 0
        property real posY: 0
        property real pointsOpacity: 0

        function hit() {
            targetsNode.removeTarget(this);
            mainWindow.score += points;
            hitAnimation.start();
            var burstPos = targetNode.mapPositionToScene(Qt.vector3d(0, 0, 0));
            hitParticleEmitter.burst(100, 200, burstPos);
        }

        y: startPosY + posY
        SequentialAnimation {
            running: mainWindow.gameOn && !hitAnimation.running
            loops: Animation.Infinite
            NumberAnimation {
                target: targetNode
                property: "posY"
                from: 0
                to: 150
                duration: 3000
                easing.type: Easing.InOutQuad
            }
            NumberAnimation {
                target: targetNode
                property: "posY"
                to: 0
                duration: 1500
                easing.type: Easing.InOutQuad
            }
        }

        SequentialAnimation {
            id: hitAnimation
            NumberAnimation {
                target: targetNode
                property: "hide"
                to: 1
                duration: 800
                easing.type: Easing.InOutQuad
            }
            NumberAnimation {
                target: targetNode
                property: "pointsOpacity"
                to: 1
                duration: 1000
                easing.type: Easing.InOutQuad
            }
            NumberAnimation {
                target: targetNode
                property: "pointsOpacity"
                to: 0
                duration: 200
                easing.type: Easing.InOutQuad
            }
            ScriptAction {
                script: targetNode.destroy();
            }
        }

        Model {
            id: targetModel

            readonly property real targetScale: (1 + targetNode.hide) * (mainWindow.targetSize / 100)

            source: "#Cube"
            scale: Qt.vector3d(targetScale, targetScale, targetScale)
            opacity: 0.99 - targetNode.hide * 2
            materials: PrincipledMaterial {
                baseColorMap: Texture {
                    source: "images/qt_logo.jpg"
                }
                normalMap: Texture {
                    source: "images/qt_logo_n.jpg"
                }
                normalStrength: 1.0
            }
            Vector3dAnimation on eulerRotation {
                loops: Animation.Infinite
                duration: 5000
                from: Qt.vector3d(0, 0, 0)
                to: Qt.vector3d(360, 360, 360)
            }
        }
        Text {
            anchors.centerIn: parent
            scale: 1 + targetNode.pointsOpacity
            opacity: targetNode.pointsOpacity
            text: targetNode.points
            font.pixelSize: 60 * mainWindow.px
            color: "#808000"
            style: Text.Outline
            styleColor: "#f0f000"
        }
    }
}
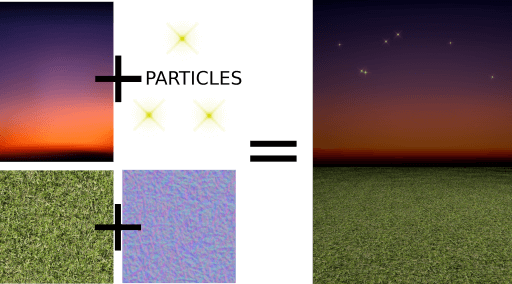
경기장 모델도 필요합니다. 지면 모델은 더 넓은 영역을 채우도록 잔디 텍스처가 스케일링된 직사각형입니다.
Model {
    source: "#Rectangle"
    scale: Qt.vector3d(50, 50, 1)
    eulerRotation.x: -90
    materials: PrincipledMaterial {
        baseColorMap: Texture {
            source: "images/grass.jpg"
            tilingModeHorizontal: Texture.Repeat
            tilingModeVertical: Texture.Repeat
            scaleU: 25.0
            scaleV: 25.0
        }
        normalMap: Texture {
            source: "images/grass_n.jpg"
        }
        normalStrength: 0.6
    }
}
하늘 모델은 더 뒤에 있으며 하늘에 그림자가 드리워지는 것을 원하지 않으므로 receivesShadows 을 false로 설정합니다. 하늘에는 별을 추가하기 위해 Qt Quick Particles 모듈을 사용하여 별을 추가합니다. 다른 2D Qt Quick 요소와 마찬가지로 파티클도 3D 노드 안에 직접 추가할 수 있습니다.
Model {
    id: sky
    property real scaleX: 100
    property real scaleY: 20
    source: "#Rectangle"
    scale: Qt.vector3d(sky.scaleX, sky.scaleY, 1)
    position: Qt.vector3d(0, 960, -2000)
    // We don't want shadows casted into sky
    receivesShadows: false
    materials: PrincipledMaterial {
        baseColorMap: Texture {
            source: "images/sky.jpg"
        }
    }
    // Star particles
    Node {
        z: 500
        y: 30
        // Stars are far away, scale up to half the resolution
        scale: Qt.vector3d(2 / sky.scaleX, 2 / sky.scaleY, 1)
        ParticleSystem {
            anchors.horizontalCenter: parent.horizontalCenter
            anchors.top: parent.top
            width: 3000
            height: 400
            ImageParticle {
                source: "qrc:///particleresources/star.png"
                rotationVariation: 360
                color: "#ffffa0"
                colorVariation: 0.1
            }
            Emitter {
                anchors.fill: parent
                emitRate: 4
                lifeSpan: 6000
                lifeSpanVariation: 4000
                size: 30
                sizeVariation: 20
            }
        }
    }
}
위의 지상과 하늘 모델을 결합하면 다음과 같은 3D 월드를 얻을 수 있습니다:

마지막으로 이번에는 QtQuick3D.Particles3D 모듈을 사용하여 대상에 반짝임을 추가합니다. ParticleSystem3D 에는 SpriteParticle3D 이 포함되어 있으며, 두 개의 동시 100 파티클 버스트에 충분한 200 또는 이들을 할당합니다. ParticleEmitter3D 는 스케일, 회전, 속도 및 수명 같은 파티클의 방출 속성을 정의합니다. 또한 Gravity3D 어펙터를 추가하여 파티클을 적절한 크기로 아래로 끌어내립니다.
ParticleSystem3D {
    id: psystem
    SpriteParticle3D {
        id: sprite
        sprite: Texture {
            source: "images/particle.png"
        }
        color: Qt.rgba(1.0, 1.0, 0.0, 1.0)
        colorVariation: Qt.vector4d(0.4, 0.6, 0.0, 0.0)
        unifiedColorVariation: true
        maxAmount: 200
    }
    ParticleEmitter3D {
        id: hitParticleEmitter
        particle: sprite
        particleScale: 4.0
        particleScaleVariation: 2.0
        particleRotationVariation: Qt.vector3d(0, 0, 180)
        particleRotationVelocityVariation: Qt.vector3d(0, 0, 250)
        velocity: VectorDirection3D {
            direction: Qt.vector3d(0, 300, 0)
            directionVariation: Qt.vector3d(200, 150, 100)
        }
        lifeSpan: 800
        lifeSpanVariation: 200
        depthBias: 100
    }
    Gravity3D {
        magnitude: 600
    }
}
이것으로 게임의 3D 부분은 끝났습니다. 시간, 점수, 시작 버튼 등을 표시하는 2D Qt Quick 요소는 게임에 중요하지만 이 퀵 3D 문서와 관련이 없습니다.
이제 공은 당신 편입니다(말장난 의도). 자유롭게 게임을 다양한 방식으로 확장하고 새롭고 기발한 레벨을 만들어 보세요!
© 2025 The Qt Company Ltd. Documentation contributions included herein are the copyrights of their respective owners. The documentation provided herein is licensed under the terms of the GNU Free Documentation License version 1.3 as published by the Free Software Foundation. Qt and respective logos are trademarks of The Qt Company Ltd. in Finland and/or other countries worldwide. All other trademarks are property of their respective owners.

