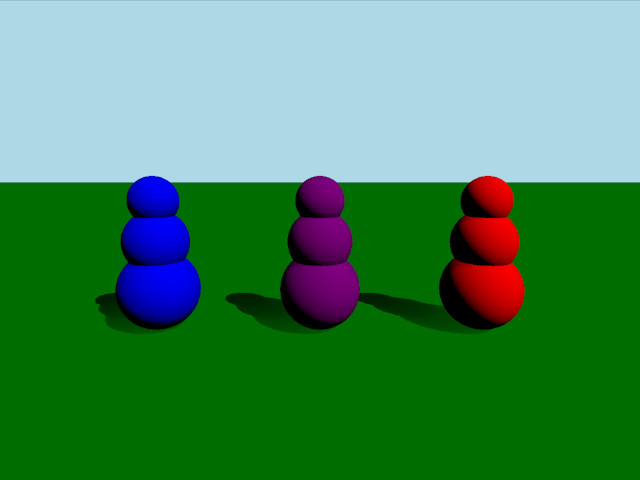
Qt Quick 3D 물리학 - 질량 예제
물체의 질량과 관성을 설정하는 다양한 방법을 보여줍니다.

이 예는 물체의 질량과 관성을 설정하는 세 가지 방법을 보여줍니다. 이 장면은 세 개의 구를 수직으로 쌓아 올린 세 개의 물체로 구성되어 있습니다. 이 물체는 모두 질량은 같지만 질량 중심과 관성 텐서가 다르기 때문에 충돌할 때 서로 다른 동작을 합니다.
설정
먼저 PhysicsWorld 을 추가합니다:
PhysicsWorld {
    running: true
    gravity: Qt.vector3d(0, -9.81, 0)
    typicalLength: 1
    typicalSpeed: 10
    scene: viewport.scene
}
환경, 카메라, 조명이 있는 일반적인 설정을 수행합니다:
environment: SceneEnvironment {
    clearColor: "lightblue"
    backgroundMode: SceneEnvironment.Color
}

PerspectiveCamera {
    id: camera
    position: Qt.vector3d(0, 2, 5)
    eulerRotation: Qt.vector3d(-10, 0, 0)
    clipFar: 100
    clipNear: 0.01
}

DirectionalLight {
    eulerRotation.x: -45
    eulerRotation.y: 45
    castsShadow: true
    brightness: 1
    shadowFactor: 50
    shadowBias: 0.1
    pcfFactor: 0.01
}
물리적 오브젝트
일반적인 정적 평면이 있습니다:
StaticRigidBody {
    position: Qt.vector3d(0, 0, 0)
    eulerRotation: Qt.vector3d(-90, 0, 0)
    collisionShapes: PlaneShape {}
    Model {
        source: "#Rectangle"
        materials: PrincipledMaterial {
            baseColor: "green"
        }
        castsShadows: false
        receivesShadows: true
    }
}
소위 롤리폴리 장난감처럼 동작하는 몸체에 대한 커스텀 QML 클래스를 정의하고 이를 RolyPoly라고 부릅니다. RolyPoly는 세 개의 구형 충돌 모양을 가진 DynamicRigidBody 입니다:
DynamicRigidBody {
    property string color: "blue"

    collisionShapes: [
        SphereShape {
            id: sphere0
            diameter:  1
        },
        SphereShape {
            id: sphere1
            diameter:  0.8
            position: Qt.vector3d(0, 0.6, 0)
        },
        SphereShape {
            id: sphere2
            diameter:  0.6
            position: Qt.vector3d(0, 1.1, 0)
        }
    ]

    Model {
        source: "#Sphere"
        position: sphere0.position
        scale: Qt.vector3d(1,1,1).times(sphere0.diameter*0.01)
        materials: PrincipledMaterial {
            baseColor: color
        }
    }

    Model {
        source: "#Sphere"
        position: sphere1.position
        scale: Qt.vector3d(1,1,1).times(sphere1.diameter*0.01)
        materials: PrincipledMaterial {
            baseColor: color
        }
    }

    Model {
        source: "#Sphere"
        position: sphere2.position
        scale: Qt.vector3d(1,1,1).times(sphere2.diameter*0.01)
        materials: PrincipledMaterial {
            baseColor: color
        }
    }
}
그런 다음 씬에 롤리폴리 세 개를 추가합니다:
RolyPoly {
    position: Qt.vector3d(-2, 0.5, 0)
    color: "blue"

    mass: 0.9
    centerOfMassPosition: Qt.vector3d(0, -0.5, 0)
    inertiaTensor: Qt.vector3d(0.217011, 0.0735887, 0.217011)
    massMode: DynamicRigidBody.MassAndInertiaTensor
}

RolyPoly {
    position: Qt.vector3d(0, 0.5, 0)
    color: "purple"

    mass: 0.9
    centerOfMassPosition: Qt.vector3d(0, -0.5, 0)
    inertiaTensor: Qt.vector3d(0.05, 100, 100)
    massMode: DynamicRigidBody.MassAndInertiaTensor
}

RolyPoly {
    position: Qt.vector3d(2, 0.5, 0)
    color: "red"

    mass: 0.9
    massMode: DynamicRigidBody.Mass
}
보라색과 파란색 롤리폴리에는 사용자 정의 질량 중심과 관성 텐서가 있습니다. 바디는 기본적으로 균일한 밀도를 사용하고 질량과 관성을 자동으로 계산하므로 제공된 질량 및 관성 텐서를 대신 사용하도록 보라색과 파란색 바디에서 massMode를 DynamicRigidBody.MassAndInertiaTensor로 설정합니다. 질량 중심이 낮으면 몸체가 밀려도 항상 일어서도록 만들 수 있습니다. 보라색 몸체의 관성 텐서는 한 방향으로 쉽게 흔들리지만 다른 방향으로는 거의 흔들리지 않도록 만듭니다. 빨간색 몸체는 자동으로 계산된 질량 중심을 가지므로 쓰러진 후에도 계속 눕게 됩니다.
공 쏘기
다양한 몸체의 동작을 테스트하기 위해 공을 쏘는 노드를 추가합니다:
Node {
    id: shapeSpawner
    property var spheres: []
    property var sphereComponent: Qt.createComponent("Sphere.qml")

    function createBall(position, forward) {
        let diameter = 0.2
        let speed = 20
        let sphere = sphereComponent.createObject(shapeSpawner, {
                                                      "position": position,
                                                      "sphereDiameter": diameter
                                                  })
        sphere.setLinearVelocity(forward.times(speed))

        var pair = {
            "sphere": sphere,
            "date": Date.now()
        }

        spheres.push(pair)

        if (sphere === null) {
            console.log("Error creating object")
        }
    }

    function clean() {
        spheres = spheres.filter(sphere => {
            let diff = Date.now() - sphere['date'];
            if (diff > 5000) {
                sphere['sphere'].destroy();
                return false;
            }
            return true;
        });
    }

    Timer {
        interval: 200
        running: true
        repeat: true
        onTriggered: shapeSpawner.clean()
    }
}
그런 다음 WasdController 을 추가하여 카메라를 움직이고 시체를 향해 공을 조준하고 쏠 수 있도록 합니다:
WasdController {
    speed: 0.01
    shiftSpeed: 0.1
    controlledObject: camera
    Keys.onPressed: (event) => {
        handleKeyPress(event);
        if (event.key === Qt.Key_Space) {
            shapeSpawner.createBall(camera.position, camera.forward);
        }
    }
    Keys.onReleased: (event) => { handleKeyRelease(event) }
}
Files:
© 2025 The Qt Company Ltd. Documentation contributions included herein are the copyrights of their respective owners. The documentation provided herein is licensed under the terms of the GNU Free Documentation License version 1.3 as published by the Free Software Foundation. Qt and respective logos are trademarks of The Qt Company Ltd. in Finland and/or other countries worldwide. All other trademarks are property of their respective owners.

