
3.3. Source Code Analysis Setup Guide for C#/.NET
This guide provides step-by-step instructions for setting up Axivion static code analysis for C# and .NET projects. It assumes that you already have a working Axivion Suite installation and have configured an instance of the Axivion Dashboard Server.
3.3.1. Overview
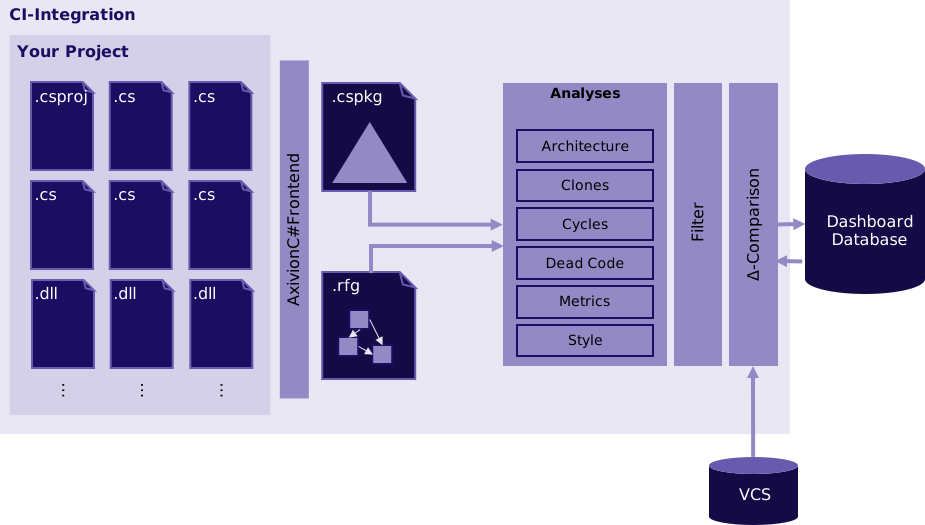
Diagram illustrating the C# analysis CI workflow with Axivion
Unlike conventional static code analysis tools/linters, the Axivion Suite not only performs analyses at the source code level, it also extracts a model of the code and its dependencies. This abstraction is called “Resource Flow Graph” (RFG). A detailed description of the contents of an RFG for the C# programming language is available in Language Representation for C#/.NET.
The build integration of the Axivion Suite for C# works by reading the MSBuild solution
and project files of the system to be analyzed. In a first step it collects all inputs that would be
passed to the C# compiler, this includes the source files, referenced assemblies, and
compiler options. These inputs are stored in a C# package file (.cspkg) and then
further processed to perform the various analyses and to create the RFG.
Note
C# analysis is not based on IR files and therefore
cafeCCis not used.
3.3.2. Prerequisites
3.3.2.1. System Requirements
Before setting up Axivion analysis for C#, ensure your system meets the following requirements, in addition to installing the Axivion Suite and setting up the Axivion Dashboard Server:
.NET Runtime 8.0.4 or higher (8.0.13 or higher for GNU/Linux ARM64) is required to run AxivionC#Frontend and C# analyses. It can be downloaded from the official Microsoft .NET website.
MSBuild
Since the C# analysis relies on MSBuild to interpret project files, you need to have MSBuild installed. Supported versions:
MSBuild 15.3+ (Visual Studio 2017)
MSBuild 16.x (Visual Studio 2019)
MSBuild 17.x (Visual Studio 2022)
MSBuild 18.x (Visual Studio 2026)
Supported C# Versions
The Axivion Suite supports C# versions 1.0 through 14.0:
C# 1.0 through 8.0 (Visual Studio .NET through 2019)
C# 9.0 (Visual Studio 2019 [16.8] / .NET 5.0)
C# 10.0 (Visual Studio 2022 [17.0] / .NET 6.0)
C# 11.0 (Visual Studio 2022 [17.4] / .NET 7.0)
C# 12.0 (Visual Studio 2022 [17.8] / .NET 8.0)
C# 13.0 (Visual Studio 2022 [17.12] / .NET 9.0)
C# 14.0 (Visual Studio 2026 [18.0] / .NET 10.0)
Warning
Using newer C# versions not listed above may result in incomplete analysis results or errors.
3.3.2.2. Project Requirements
Your C# project must meet these criteria:
Command-Line Build
The project must be buildable from the command line using one of:
msbuilddotnet msbuilddotnet build
This is essential because AxivionC#Frontend interprets MSBuild project files similarly to MSBuild itself.
Supported Input Formats
AxivionC#Frontend can process the following inputs:
Single C# source files (
.cs)Directories containing C# source files
Visual Studio project files (
.csproj)Visual Studio solution files (
.sln,.slnx)Visual Studio solution filter files (
.slnf)
Analyzing single files or directories requires additional configuration. Therefore, it is recommended to analyze at least at the project level (
.csproj) to ensure that all dependencies and compiler options are correctly captured. Analyzing at the solution level (.sln) is also supported and will analyze all projects within the solution. If you wish to only analyze a subset of projects in a solution, you can use a solution filter file (.slnf) to specify which projects to include. For more information on solution filters see the Microsoft documentation.Alternative Build Systems
If you use a build system other than MSBuild (e.g., Cake, Bazel), you will have to generate MSBuild solution/project files for use with AxivionC#Frontend.
3.3.3. Initial Setup
Note
The Axivion setup wizard does not currently support C# projects. You must configure C# analysis manually as described in this guide.
Step 1: Verify Your Build
Before configuring Axivion, ensure your project builds successfully from the command line:
:: For .NET Framework projects
msbuild YourSolution.sln /p:Configuration=Debug /p:Platform="Any CPU"

:: For .NET Core/.NET 5+ projects
dotnet build YourSolution.sln --configuration Debug
If the build fails, resolve all build issues before proceeding with the project setup.
Step 2: Create Configuration Directory And Copy Example Configuration
Create a dedicated directory for Axivion configuration files in your project repository
and copy the example C# configuration files from the Axivion Suite installation subdirectory
example/projectconfig/csharp to this directory.
Windows:
mkdir axivion
copy "C:\path\to\bauhaussuite\example\projectconfig\csharp\*" axivion\
Linux/macOS:
mkdir -p axivion
cp /path/to/bauhaussuite/example/projectconfig/csharp/* axivion/
Note
It is best practice to store all Axivion configuration files in a dedicated
axivion folder within your version control system. This keeps the configuration
organized and makes it easy to track changes.
These files serve as a starting point for your configuration and include settings for the C# frontend and example analysis rules.
Step 3: Adapt The Analysis Script
Open one of the example analysis scripts (start_analysis.bat for Windows
or start_analysis.sh for Linux/macOS or start_analysis.ps1 for PowerShell) and
adapt it to set the required environment variables:
Name |
Description |
|---|---|
|
Should point to the directory containing your Axivion configuration files (the one you created in Step 2). |
|
Should point to the URL of your Axivion Dashboard instance. |
|
Should be set to the name of your project, so that you can easily identify it in the dashboard. This can also be set in the configuration file using the |
Make the script executable on Linux/macOS:
chmod +x axivion/start_analysis.sh
For more information on the available built-in variables and their usage, see the Builtin Variables section of the configuration guide.
Step 4: Adapt Example Configuration for Your Project
Before configuring the C#-specific build action, set the following global properties
using axivion_config:
Launch the configuration tool:
axivion_config axivion\axivion_config.json
Set the following properties:
Project Directory (
/Project/directory):Set this to your repository root directory.
Example:
C:\projects\MyProjector/home/user/projects/MyProjectProject Name (
/Project/name):Set a unique name for your project.
Example:
MyProjectAlternatively, you can set the project name using the
AXIVION_PROJECT_NAMEenvironment variable.
Configure Version Control System (VCS) integration:
If your project is under version control, set the VCS type and repository URL to enable integration with the Axivion Dashboard.
Go to
/Project/VCSIntegrationand enable the appropriate VCS (e.g., Git, Subversion). For many supported VCS, the necessary configuration will be automatically detected based on the project directory.In case of source code that is generated during the build and still relevant for analysis, you can enable Shadow in order to do automatic code versioning of generated code.
For a description of the available VCS options, see VCSIntegration.
Decide whether to configure the analysis as a managed (recommended) or unmanaged dashboard project:
In a managed project the build artifacts are automatically uploaded to the dashboard and managed by the dashboard. An unmanaged project requires file-system access to the dashboard database. For more information see the Dashboard Project Configuration.
To configure a managed project, set the
/Results/Dashboard/database_modeproperty tomanaged_upload. You should supply the necessary dashboard credentials by setting the environment variablesAXIVION_USERNAMEandAXIVION_PASSWORD. If the variables are not properly set, theaxivion_citool will prompt you to provide the credentials when the script is run.To configure an unmanaged project, set the
/Results/Dashboard/database_modeproperty toshared_databaseand set theAXIVION_DATABASES_DIRenvironment variable to the path of the dashboard’s databases directory.
Note
You can also set the dashboard credentials and database directory directly in the configuration file using the properties in
/Results/Dashboard/ci_mode/authenticationand/Results/Dashboard/ci_mode/directory.Review the example defaults in
/Analysis/GlobalOptions/global_excludesand add any paths that should be excluded from all analyses. For example, you may want to exclude generated code or third-party libraries. For more information on exclude options, see Exclude files from the Analysis.
Configure the C# build step to use the correct input files and build settings for your project: Navigate to BuildSystemIntegration and adapt the
AxivionC#Frontendbuild action to build your project:Input (
input, required). For the list of supported input formats, see Project Requirements.Output (
output, optional). Set this to the desired output path for the generated package file (.cspkg). If not set, the package will be generated in a temporary directory and deleted after the analysis. Setting this is useful if you want to reuse it for multiple analyses.
If you are analyzing a Visual Studio solution or project file, configure these options:
Build Configuration (
build_configuration):Specify the build configuration to use.
Default:
DebugCommon values:
Debug,ReleaseBuild Platform (
build_platform):Specify the platform target.
Default:
Any CPUCommon values:
Any CPU,x86,x64Target Framework (
build_target_framework):For SDK-style projects targeting multiple frameworks, specify which framework to analyze.
Example:
net8.0,net6.0,netstandard2.0Note
An Axivion analysis can only target one framework at a time. If your project uses multi-targeting, you must choose one framework for analysis.
Step 5: Run Initial Analysis
Execute your analysis script to perform the first analysis:
:: Windows
axivion\start_analysis.bat > build.log 2>&1
# Linux/macOS
./axivion/start_analysis.sh > build.log 2>&1
Monitor the output and check build.log for any errors or warnings.
3.3.4. Where To Go From Here
Once you have a working analysis build configuration, you can start customizing your analysis by enabling analysis rules:
For architecture verification follow the instructions in the architecture guide.
For clone detection follow the instructions in the clones guide.
For cycle detection follow the instructions in the cycles guide.
For dead code detection follow the instructions in the dead code guide.
For metrics configuration, see Metrics for available C# metrics.
For style checks and other code quality rules, refer to the C# rule group in the analysis reference.
For cross-language analysis (e.g., C# combined with other languages), see Cross-Language Analysis Setup Guide.
If you are already using Roslyn-based analyzers in your project, you can also import their diagnostics into the Axivion Dashboard by enabling C#-ImportCompilerAndAnalyzerDiagnostics. This allows you to have a unified view of all code issues in your project, including those detected by third-party analyzers.
If you are using a framework that uses XAML files (e.g., WPF, Xamarin), you can also
configure the analysis to process these files and include them in the RFG. For more information,
see the Architecture-XAMLAnalysis and Architecture-ComputeDependencyProperties rules.
Other useful RFG transformation rules for C# include:
Architecture-ActivateMembers: Add members to the entries view if they and their parent types satisfy specific rules.
Architecture-CSharpCOMAnalysis: Analyze COM usages in C# code and add dependencies in the RFG.
Architecture-CSharpRFGTransformations: Additional transformation steps for C#-based RFGs.
3.3.5. References
For more detailed information, refer to these resources:
C# Tool Reference: Source Code Analysis for C#/.NET
Running Analyses with
axivion_ci: axivion_ciAnalysis Configuration Reference: Analysis Configuration Reference