
QtGrpc チャット
チャットルームであらゆる種類のメッセージを共有するためのチャットアプリケーションです。
この「Chat」サンプルは、Qt GRPC クライアントAPIの高度な使用方法を示しています。サーバーはユーザーの登録と認証を行い、ユーザーがChatRoomに参加できるようにします。参加後は、ユーザーはChatRoom内で、テキストメッセージ、画像、ユーザーのアクティビティ、あるいはディスク上のその他のファイルなど、さまざまな種類のメッセージを他のすべての参加者と共有できます。
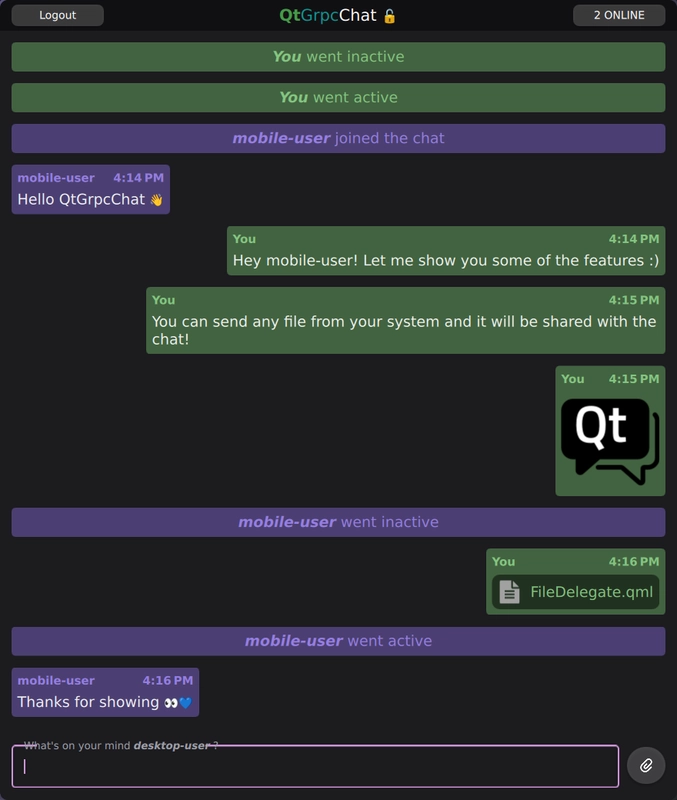
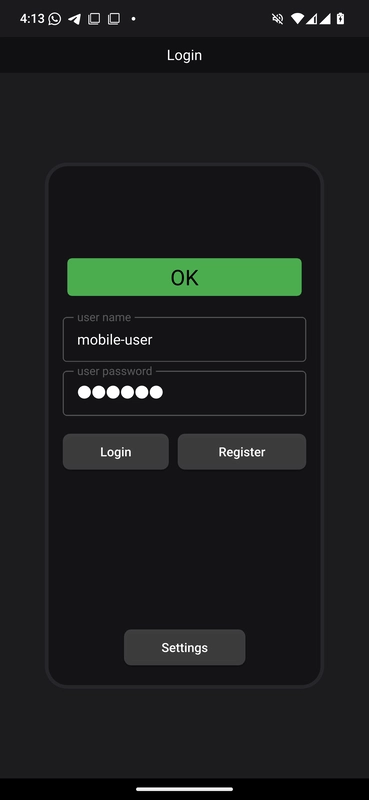
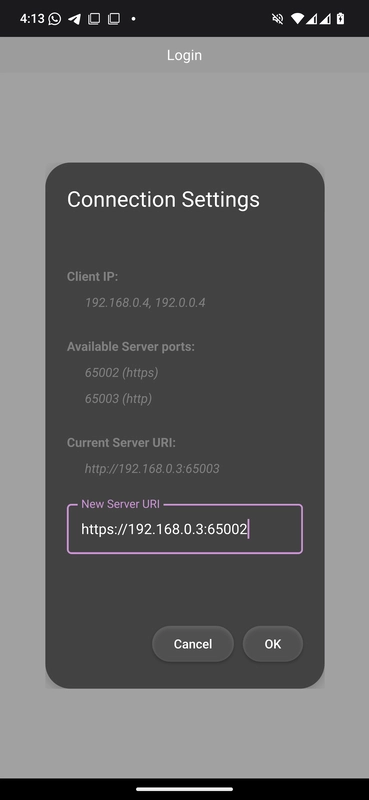
サンプルを実行する
qtgrpc_chat_serverが実行されており、正常にリスニングしていることを確認してください。- サーバーと同じマシン上で作業している場合は、
qtgrpc_chat_clientを実行する際、localhostのデフォルトアドレスで問題ありません。サーバーをホストしているマシン以外のデバイスを使用している場合は、[設定] ダイアログでサーバーを実行しているホストの正しいIPアドレスを指定してください。 - スムーズな絵文字体験 🚀 でビルドを行うには、クライアント側で「
GRPC_CHAT_USE_EMOJI_FONT」という CMake オプションが有効になっていることを確認してください。
例を実行するには Qt Creatorの例を実行するには、Welcome モードを開き、Examples からその例を選択してください。詳細については、Qt Creator の「チュートリアル:ビルドと実行」を参照してください。
関連するモジュールとクラス。
この例では、以下の Qt モジュールおよびクラスを紹介します。
- 長期存続型QGrpcBidiStream による通信。
- ワーカーからの
QtGrpcクライアントの使用thread 。 - protobuf スキーマでのQtProtobufQtCoreTypes モジュールの使用。
- SSL によるセキュアな通信。
- QMLでのQtProtobuf メッセージの可視化ListView 。
Protobufスキーマ
Protobufスキーマは、チャットアプリケーションで使用されるメッセージおよびサービスの構造を定義します。このスキーマは2つのファイルに分かれています:
syntax = "proto3";

package chat;

import "chatmessages.proto";

service QtGrpcChat {
    // Register a user with \a Credentials.
    rpc Register(Credentials) returns (None);
    // Join as a registered user and exchange \a ChatMessage(s)
    rpc ChatRoom(stream ChatMessage) returns (stream ChatMessage) {}
}
qtgrpcchat.proto ファイルは、2つのRPCメソッドを提供するQtGrpcChatサービスを指定しています:
Register: 指定されたCredentialsを使用してユーザーを登録します。サーバーは、プレーンテキスト形式でデータベースにユーザー情報を保存し、その有効性を検証します。ChatRoom: 接続中のすべてのクライアント間でChatMessageを交換するための双方向ストリームを確立します。サーバーは、受信したすべてのメッセージを他の接続中のクライアントにブロードキャストします。
syntax = "proto3";

package chat;

import "QtCore/QtCore.proto";

message ChatMessage {
    string username = 1;
    int64 timestamp = 2;
    oneof content {
        TextMessage text = 3;
        FileMessage file = 4;
        UserStatus user_status = 5;
    }
}
chatmessages.proto ファイルは、ChatMessage を定義しています。これはタグ付きユニオン(和型とも呼ばれる)であり、ChatRoom ストリーミングRPCを通じて送信可能なすべての個別のメッセージを表します。すべてのChatMessage には、送信者を識別するためのusername およびtimestamp が含まれていなければなりません。
QtCore/QtCore.proto をインポートすることで、QtProtobufQtCoreTypes モジュールの型が利用可能になり、QtCore 固有の型とそれに対応するProtobuf型との間でシームレスな変換が可能になります。
message FileMessage {
    enum Type {
        UNKNOWN = 0;
        IMAGE = 1;
        AUDIO = 2;
        VIDEO = 3;
        TEXT = 4;
    }
    Type type = 1;
    string name = 2;
    bytes content = 3;
    uint64 size = 4;

    message Continuation {
        uint64 index = 1;
        uint64 count = 2;
        QtCore.QUuid uuid = 3;
    }
    optional Continuation continuation = 5;
}
FileMessage は、ChatMessage 集合型でサポートされているメッセージ型の一つです。これにより、任意のローカルファイルをメッセージにラップすることができます。オプションのContinuation フィールドは、大容量ファイルの転送をチャンク単位で処理することで、確実な配信を保証します。
注: ProtobufスキーマおよびアプリケーションコードでのProtobufQtCoreTypes モジュールの使用に関する詳細については 、 Qt Core usageを参照してください。
サーバー
注: ここで説明するサーバーアプリケーションは 、 gRPC™ ライブラリを使用しています。
このサーバーアプリケーションは、非同期のgRPC コールバックAPIを使用しています。これにより、完了キューを手動で管理するという複雑さを伴わずに、非同期APIのパフォーマンス上の利点を活用することができます。
class QtGrpcChatService final : public chat::QtGrpcChat::CallbackService生成されたQtGrpcChat サービスのCallbackService をサブクラス化するQtGrpcChatService クラスを宣言します。
    grpc::ServerBidiReactor<chat::ChatMessage, chat::ChatMessage> *
    ChatRoom(grpc::CallbackServerContext *context) override
    {
        return new ChatRoomReactor(this, context);
    }

    grpc::ServerUnaryReactor *Register(grpc::CallbackServerContext *context,
                                       const chat::Credentials *request,
                                       chat::None * /*response*/) override
また、サービスによって提供される 2 つの `gRPC ` メソッドの機能を実装するために、仮想関数をオーバーライドします。
Registerメソッドは、ユーザー情報を検証し、プレーンテキストのデータベースに保存します。ChatRoomメソッドは、メタデータで提供された認証情報をデータベースと照合します。照合に成功した場合、通信用の双方向ストリームを確立します。
    // Broadcast \a message to all connected clients. Optionally \a skip a client
    void broadcast(const std::shared_ptr<chat::ChatMessage> &message, const ChatRoomReactor *skip)
    {
        for (auto *client : activeClients()) {
            assert(client);
            if (skip && client == skip)
                continue;
            client->startSharedWrite(message);
        }
}サービスの実装では、ChatRoom メソッドを通じて接続または切断を行うすべてのアクティブなクライアントを追跡します。これにより、接続中のすべてのクライアントとメッセージを共有する「broadcast 」機能が実現されます。ストレージ容量とオーバーヘッドを削減するため、ChatMessage はshared_ptr でラップされています。
    // Share \a response. It will be kept alive until the last write operation finishes.
    void startSharedWrite(std::shared_ptr<chat::ChatMessage> response)
    {
        std::scoped_lock lock(m_writeMtx);
        if (m_response) {
            m_responseQueue.emplace(std::move(response));
        } else {
            m_response = std::move(response);
            StartWrite(m_response.get());
        }
    }
startSharedWrite メソッドは、ChatRoomReactor のメンバ関数です。リアクターが現在書き込み中である場合、メッセージはキューにバッファリングされます。そうでない場合は、書き込み操作が開始されます。すべてのクライアント間で共有されるメッセージは1つだけです。response メッセージのコピーが1つ増えるごとに、use_count が増加します。すべてのクライアントがメッセージの書き込みを完了し、そのuse_count が0になると、リソースは解放されます。
    // Distribute the incoming message to all other clients.
    m_service->broadcast(m_request, this);
    m_request = std::make_shared<chat::ChatMessage>(); // detach
StartRead(m_request.get());このスニペットは、ChatRoomReactor::OnReadDone 仮想メソッドの一部です。このメソッドが呼び出されるたびに、クライアントから新しいメッセージを受信したことを意味します。メッセージは送信者をスキップして、他のすべてのクライアントにブロードキャストされます。
    std::scoped_lock lock(m_writeMtx);

    if (!m_responseQueue.empty()) {
        m_response = std::move(m_responseQueue.front());
        m_responseQueue.pop();
        StartWrite(m_response.get());
        return;
    }

m_response.reset();このスニペットは、ChatRoomReactor::OnWriteDone 仮想メソッドの一部です。このメソッドが呼び出されるたびに、クライアントへのメッセージの書き込みが行われます。キューにバッファされたメッセージがある場合は、次のメッセージが書き込まれます。そうでない場合は、m_response がリセットされ、書き込み操作が進行中ではないことが示されます。broadcast メソッドとの競合を防ぐために、ロックが使用されています。
クライアント
クライアントアプリケーションは、提供されたProtobufスキーマを使用してサーバーと通信します。このアプリケーションは、ユーザーの登録や、ChatRoom のgRPC メソッドによる長期にわたる双方向ストリームの処理を行うための、フロントエンドおよびバックエンドの両方の機能を提供します。これにより、ChatMessageの可視化と通信が可能になります。
セットアップ
add_library(qtgrpc_chat_client_proto STATIC)
qt_add_protobuf(qtgrpc_chat_client_proto
    QML
    QML_URI QtGrpcChat.Proto
    PROTO_FILES
        ../proto/chatmessages.proto
    PROTO_INCLUDES
        $<TARGET_PROPERTY:Qt6::ProtobufQtCoreTypes,QT_PROTO_INCLUDES>
)

qt_add_grpc(qtgrpc_chat_client_proto CLIENT
    PROTO_FILES
        ../proto/qtgrpcchat.proto
    PROTO_INCLUDES
        $<TARGET_PROPERTY:Qt6::ProtobufQtCoreTypes,QT_PROTO_INCLUDES>
)まず、Protobufスキーマからソースファイルを生成します。qtgrpcchat.proto ファイルにはmessage の定義が含まれていないため、qtgrpcgenによる生成のみが必要です。また、ProtobufQtCoreTypes モジュールのPROTO_INCLUDES を指定し、"QtCore/QtCore.proto" のインポートが有効であることを確認してください。
target_link_libraries(qtgrpc_chat_client_proto
    PUBLIC
        Qt6::Protobuf
        Qt6::ProtobufQtCoreTypes
        Qt6::Grpc
)独立したqtgrpc_chat_client_proto ターゲットが、ProtobufQtCoreTypes モジュールを含む依存関係に対してパブリックリンクされていることを確認してください。その後、applicationターゲットはこのライブラリに対してリンクされます。
バックエンドロジック
アプリケーションのバックエンドは、以下の4つの重要な要素を中核として構築されています。
ChatEngine: アプリケーションロジックを管理する、QML向けシングルトン。ClientWorker: 「gRPC 」クライアント機能を非同期で提供するワーカーオブジェクト。ChatMessageModel:ChatMessageを処理・保存するためのカスタムQAbstractListModel。UserStatusModel: ユーザーのアクティビティを管理するためのカスタムQAbstractListModel。
    explicit ChatEngine(QObject *parent = nullptr);
    ~ChatEngine() override;

    // Register operations
    Q_INVOKABLE void registerUser(const chat::Credentials &credentials);
    // ChatRoom operations
    Q_INVOKABLE void login(const chat::Credentials &credentials);
    Q_INVOKABLE void logout();
    Q_INVOKABLE void sendText(const QString &message);
    Q_INVOKABLE void sendFile(const QUrl &url);
    Q_INVOKABLE void sendFiles(const QList<QUrl> &urls);
Q_INVOKABLE bool sendFilesFromClipboard();上記のスニペットは、QMLから呼び出されてサーバーとやり取りを行うQ_INVOKABLE の機能の一部を示しています。
    explicit ClientWorker(std::shared_ptr<LogModel> logger, QObject *parent = nullptr);
    ~ClientWorker() override;

public Q_SLOTS:
    void registerUser(const chat::Credentials &credentials);
    void login(const chat::Credentials &credentials);
    void logout();
    void sendFile(const QUrl &url);
    void sendFiles(const QList<QUrl> &urls);
    void sendMessage(const chat::ChatMessage &message);
ClientWorker が提供するスロットは、ChatEngine が公開しているAPIとある程度類似しています。ClientWorker は、大容量ファイルの送受信などの負荷の高い処理をバックグラウンドで処理するために、専用のスレッドで動作します。
m_clientWorker->moveToThread(&m_clientThread);
m_clientThread.start();
connect(&m_clientThread, &QThread::finished, m_clientWorker, &QObject::deleteLater);
connect(m_clientWorker, &ClientWorker::registerFinished, this, &ChatEngine::registerFinished);
connect(m_clientWorker, &ClientWorker::chatError, this, &ChatEngine::chatError);
...
ChatEngine のコンストラクタでは、ClientWorker を専用のワーカースレッドに割り当て、そのシグナルを処理・転送し続け、QML側で利用できるようにします。
void ChatEngine::registerUser(const chat::Credentials &credentials)
{
    QMetaObject::invokeMethod(m_clientWorker, &ClientWorker::registerUser, credentials);
}
...
void ClientWorker::registerUser(const chat::Credentials &credentials)
{
    if (credentials.name().isEmpty() || credentials.password().isEmpty()) {
        emit chatError(tr("Invalid credentials for registration"));
        return;
    }

    if ((!m_client || m_hostUriDirty) && !initializeClient()) {
        emit chatError(tr("Failed registration: unabled to initialize client"));
        return;
    }

    auto reply = m_client->Register(credentials, QGrpcCallOptions{}.setDeadlineTimeout(2s));
    const auto *replyPtr = reply.get();
    connect(
        replyPtr, &QGrpcCallReply::finished, this,
        [this, reply = std::move(reply)](const QGrpcStatus &status) {
            emit registerFinished(status);
        },
        Qt::SingleShotConnection);
}これは、ChatEngine がClientWorker と連携してユーザーを登録する仕組みを示しています。ClientWorker は独自のスレッドで実行されるため、そのメンバ関数を安全に呼び出すには、invokeMethod を使用することが重要です。
ClientWorker では、クライアントが初期化されていないか、ホスト URI が変更されたかを確認します。いずれかの条件が満たされた場合は、initializeClient を呼び出し、新しいQGrpcHttp2Channel を作成します。これは負荷の高い操作であるため、その発生回数を最小限に抑えてください。
Register RPC を処理する際は、setDeadlineTimeout オプションを使用して、サーバーの非アクティブ状態を防ぐようにしてください。一般に、単項 RPC には期限を設定することが推奨されます。
void ClientWorker::login(const chat::Credentials &credentials)
{
    if (credentials.name().isEmpty() || credentials.password().isEmpty()) {
        emit chatError(tr("Invalid credentials for login"));
        return;
    }
    ...
    QGrpcCallOptions opts;
    opts.setMetadata({
        { "user-name",     credentials.name().toUtf8()     },
        { "user-password", credentials.password().toUtf8() },
    });
    connectStream(opts);
}
ChatRoom にログインする際は、setMetadata オプションを使用して、サーバーが認証のために要求するユーザー認証情報を指定できます。実際の呼び出しと接続の確立は、connectStream メソッドで処理されます。
void ClientWorker::connectStream(const QGrpcCallOptions &opts)
{
    ...
    m_chatStream = m_client->ChatRoom(*initialMessage, opts);
    ...
    connect(m_chatStream.get(), &QGrpcBidiStream::finished, this,
            [this, opts](const QGrpcStatus &status) {
                if (m_chatState == ChatState::Connected) {
                    // If we're connected retry again in 250 ms, no matter the error.
                    QTimer::singleShot(250, [this, opts]() { connectStream(opts); });
                } else {
                    setState(ChatState::Disconnected);
                    m_chatResponse = {};
                    m_userCredentials = {};
                    m_chatStream.reset();
                    emit chatStreamFinished(status);
                }
            });
...接続中の状態でストリームが突然終了した場合に備え、基本的な再接続ロジックを実装します。これは、最初の呼び出しで使用したQGrpcCallOptions を指定して、connectStream を再度呼び出すだけで行えます。これにより、必要なすべての接続も確実に更新されます。
注:Android のDoze/App-Standbyモードは、例えばFileDialogの使用や別のアプリへの切り替えなどによってトリガーされる可能性があります。このモードではネットワークアクセスが遮断され、すべてのアクティブなQTcpSocket 接続が閉じられ、ストリームがfinished 状態になります。この問題は、再接続ロジックによって対処できます。
    connect(m_chatStream.get(), &QGrpcBidiStream::messageReceived, this, [this]{
        ...
        switch(m_chatResponse.contentField()) {
        casechat::ChatMessage::ContentFields::UninitializedField:
            qDebug("Received uninitialized message");
           return;
        casechat::ChatMessage::ContentFields::Text:
            if(m_chatResponse.text().content().isEmpty())
                return;
            break;
        casechat::ChatMessage::ContentFields::File:
           // ファイルメッセージをダウンロードし、ダウンロードされたURLを
            // コンテンツ に格納 することで、モデルがそこから参照できるようにする。
            m_chatResponse.file()
                .setContent(saveFileRequest(m_chatResponse.file()).toString().toUtf8());
           break;
        ...
        emitchatStreamMessageReceived(m_chatResponse);
    });
    setState(Backend::ChatState::Connecting);
}メッセージを受信すると、ClientWorker はFileMessage のコンテンツを保存するなどの前処理を行い、ChatEngine がモデルにのみ集中できるようにします。ContentFields 列挙型を使用して、ChatMessage和集合型のoneof content フィールドを安全に確認します。
void ChatEngine::sendText(const QString &message)
{
    if (message.trimmed().isEmpty())
        return;

    if (auto request = m_clientWorker->createMessage()) {
        chat::TextMessage tmsg;
        tmsg.setContent(message.toUtf8());
        request->setText(std::move(tmsg));
        QMetaObject::invokeMethod(m_clientWorker, &ClientWorker::sendMessage, *request);
        m_chatMessageModel->appendMessage(*request);
    }
}
...
void ClientWorker::sendMessage(const chat::ChatMessage &message)
{
    if (!m_chatStream || m_chatState != ChatState::Connected) {
        emit chatError(tr("Unable to send message"));
        return;
    }
    m_chatStream->writeMessage(message);
}メッセージの送信時、ChatEngine は適切な形式のリクエストを生成します。例えば、sendText メソッドはQString を受け取り、createMessage 関数を使用して、username およびtimestamp フィールドが設定された有効なメッセージを生成します。その後、クライアントが呼び出されてメッセージが送信され、そのコピーが独自のChatMessageModel にキューに入れられます。
QML フロントエンド
import QtGrpc
import QtGrpcChat
import QtGrpcChat.Proto
QMLコードでは、以下のインポートが使用されています:
QtGrpc: `QtGrpc ` のQML機能(StatusCode など)を提供します。QtGrpcChat: 当社のアプリケーションモジュール。ChatEngineのシングルトンなどのコンポーネントが含まれています。QtGrpcChat.Proto: 生成されたProtobuf型へのQMLからのアクセスを提供します。
    Connections {
        target: ChatEngine
        function onChatStreamFinished(status) {
            root.handleStatus(status)
            loginView.clear()
        }
        function onChatStateChanged() {
            if (ChatEngine.chatState === Backend.ChatState.Connected && mainView.depth === 1)
                mainView.push("ChatView.qml")
            else if (ChatEngine.chatState === Backend.ChatState.Disconnected && mainView.depth > 1)
                mainView.pop()
        }
        function onRegisterFinished(status) {
            root.handleStatus(status)
        }
        function onChatError(message) {
            statusDisplay.text = message
            statusDisplay.color = "yellow"
            statusDisplay.restart()
        }
    }
Main.qml ChatEngine から発信されるコアシグナルを処理します。これらのシグナルのほとんどはグローバルに処理され、アプリケーションのどの状態でも可視化されます。
Rectangle {
    id: root

    property credentials creds
    ...
    ColumnLayout {
        id: credentialsItem
        ...
        RowLayout {
            id: buttonLayout
            ...
            Button {
                id: loginButton
                ...
                enabled: nameField.text && passwordField.text
                text: qsTr("Login")
                onPressed: {
                    root.creds.name = nameField.text
                    root.creds.password = passwordField.text
                    ChatEngine.login(root.creds)
                }
}protobufスキーマから生成されたメッセージタイプは、QML_VALUE_TYPE(メッセージ定義のキャメルケース表記)であるため、QMLからアクセス可能です。LoginView.qml は、credentials のvalue typeプロパティを使用して、ChatEngine 上のlogin を起動します。
        ListView {
            id: chatMessageView
            ...
            component DelegateBase: Item {
                id: base

                required property chatMessage display
                default property alias data: chatLayout.data
                ...
            }
            ...
            // We use the DelegateChooser and the 'whatThis' role to determine
            // the correct delegate for any ChatMessage
            delegate: DelegateChooser {
                role: "whatsThis"
                ...
                DelegateChoice {
                    roleValue: "text"
                    delegate: DelegateBase {
                        id: dbt
                        TextDelegate {
                            Layout.fillWidth: true
                            Layout.maximumWidth: root.maxMessageBoxWidth
                            Layout.preferredHeight: implicitHeight
                            Layout.bottomMargin: root.margin
                            Layout.leftMargin: root.margin
                            Layout.rightMargin: root.margin

                            message: dbt.display.text
                            selectionColor: dbt.lightColor
                            selectedTextColor: dbt.darkColor
                        }
                    }
                }
ChatView.qml では、ListView がChatRoom にメッセージを表示します。これは、ChatMessage の和型を条件付きで処理する必要があるため、若干複雑になります。
DelegateChooserを使用すると、メッセージの型に基づいて適切なデリゲートを選択できます。モデル内のデフォルトのwhatThis ロールを使用します。これにより、各ChatMessage インスタンスにメッセージ型が提供されます。その後、DelegateBase コンポーネントがモデルのdisplay ロールにアクセスし、チャットメッセージデータをレンダリング用に利用可能にします。
TextEdit {
    id: root

    required property textMessage message

    text: message.content
    color: "#f3f3f3"
    font.pointSize: 14
    wrapMode: TextEdit.Wrap
    readOnly: true
    selectByMouse: true
}以下は、TextMessage 型を可視化するコンポーネントの一例です。このコンポーネントは、protobufモジュールのtextMessage 値型を使用して、テキストを可視化しています。
                TextArea.flickable: TextArea {
                    id: inputField

                    function sendTextMessage() : void {
                        if (text === "")
                            return
                        ChatEngine.sendText(text)
                        text = ""
                    }
                    ...
                    Keys.onPressed: (event) => {
                        if (event.key === Qt.Key_Return && event.modifiers & Qt.ControlModifier) {
                            sendTextMessage()
                            event.accepted = true
                        } else if (event.key === Qt.Key_V && event.modifiers & Qt.ControlModifier) {
                            if (ChatEngine.sendFilesFromClipboard())
                                event.accepted = true
                        }
                    }
チャットクライアントは、メッセージの送信において次のようなさまざまなアクセスポイントを提供しています。
- アプリケーションにドラッグ&ドロップされたファイルの受け取り。
- <Ctrl + V>:QClipboardに保存されている内容を送信します。
- <Ctrl + Enter>:
inputField - 送信ボタンをクリックして
inputField - FileDialog を使用してファイルを選択する
SSL
サーバーとクライアント間の通信を保護するために、SSL/TLS暗号化が使用されます。これには、少なくとも以下の要件が必要です:
- 秘密鍵:サーバーの秘密鍵が含まれており、安全な接続を確立するために使用されます。機密として厳重に管理し、決して他者と共有してはなりません。
- 証明書:サーバーの公開証明書が含まれており、サーバーの身元を確認するためにクライアントと共有されます。通常は認証局(CA)によって署名されていますが、テスト目的で自己署名することも可能です。
- オプションのルートCA証明書:カスタム認証局(CA)を使用してサーバー証明書に署名する場合、サーバーの証明書チェーンを検証するために、クライアント側でルートCA証明書が必要となります。 これにより、カスタムCAのルート証明書は、公開CAのものとは異なり、クライアントの信頼ストアにプリインストールされていない場合でも、クライアントがサーバーの証明書を信頼できるようになります。
OpenSSLを使用してこれらのファイルを作成し、SSL/TLS を使用するようにgRPC の通信を設定してください。
        grpc::SslServerCredentialsOptions sslOpts;
        sslOpts.pem_key_cert_pairs.emplace_back(grpc::SslServerCredentialsOptions::PemKeyCertPair{
            LocalhostKey,
            LocalhostCert,
        });
        builder.AddListeningPort(QtGrpcChatService::httpsAddress(), grpc::SslServerCredentials(sslOpts));
        builder.AddListeningPort(QtGrpcChatService::httpAddress(), grpc::InsecureServerCredentials());
秘密鍵と 証明書を gRPC サーバーに提供します。これにより、SslServerCredentials を構築して、サーバー側でTLSを有効にできます。セキュアな通信に加え、暗号化されていないアクセスも許可します。
サーバーは以下のアドレスでリスニングしています:
- HTTPS :
0.0.0.0:65002 - HTTP :
0.0.0.0:65003
サーバーは0.0.0.0 にバインドしてすべてのネットワークインターフェースでリスニングを行うため、同じネットワーク上のどのデバイスからでもアクセスが可能になります。
if(m_hostUri.scheme()== "https") {
    if(!QSslSocket::supportsSsl()) {
        emitchatError(tr("このデバイスはSSLに対応していません。'http'スキーマを使用してください。"));
        return false;
    }
    QFile crtFile(":/res/root.crt");
    if(!crtFile.open(QFile::ReadOnly)) {
        qFatal("Unable to load root certificate");
       return false;
    }

    QSslConfiguration sslConfig;
    QSslCertificate crt(crtFile.readAll());
    sslConfig.addCaCertificate(crt);
    sslConfig.setProtocol(QSsl::TlsV1_2OrLater);
    sslConfig.setAllowedNextProtocols({"h2"});// HTTP/2を許可

    // ホスト名の検証を無効化し、任意のローカルIPからの接続を許可します。
   // 開発環境では許容されますが、セキュリティ上の理由から本番環境では避けてください。
    sslConfig.setPeerVerifyMode(QSslSocket::VerifyNone);
    opts.setSslConfiguration(sslConfig);
}CAを自己署名したため、クライアントはルートCA証明書を読み込みます。この証明書は、QSslCertificate の作成に使用されます。HTTP/2を使用しているため、"h2" プロトコルにsetAllowedNextProtocols を指定することが重要です。
インターセプター
チャットクライアントは、QGrpcInterceptorChain を使用してすべての RPC アクティビティを監視します。初期化時に、LoggingInterceptor がチャネルにアタッチされ、チェーンを通過するすべての操作をアプリケーションがリアルタイムで把握できるようになります。
QGrpcInterceptorChain interceptorChain;
interceptorChain.add(std::make_unique<LoggingInterceptor>(m_logModel));
auto channel = std::make_shared<QGrpcHttp2Channel>(m_hostUri, opts,
                                                   std::move(interceptorChain));
QGrpcInterceptorChain を作成し、その `unique_ptr ` オーバーロードを使用してインターセプタを追加します。これにより、所有権がチェーンに移管されます。その後、そのチェーンを `QGrpcHttp2Channel ` コンストラクタに渡します。チャネルが所有権を取得した後も、インターセプタはチャネルの存続期間全体を通じて有効なままとなります。
class LoggingInterceptor final : public QGrpcStartInterceptor,
                                 public QGrpcInitialMetadataInterceptor,
                                 public QGrpcMessageReceivedInterceptor,
                                 public QGrpcWriteMessageInterceptor,
                                 public QGrpcWritesDoneInterceptor,
                                 public QGrpcTrailingMetadataInterceptor,
                                 public QGrpcCancelInterceptor,
                                 public QGrpcFinishedInterceptor
{
public:
    explicit LoggingInterceptor(std::shared_ptr<LogModel> logModel);
    ~LoggingInterceptor() override;

    Continuation onStart(QGrpcInterceptionContext &context, QProtobufMessage &message,
                         QGrpcCallOptions &callOptions) override;

    void onInitialMetadata(QGrpcInterceptionContext &context,
                           QMultiHash<QByteArray, QByteArray> &metadata) override;

    void onMessageReceived(QGrpcInterceptionContext &context, QByteArray &messageData) override;

    void onWriteMessage(QGrpcInterceptionContext &context, QProtobufMessage &message) override;

    void onWritesDone(QGrpcInterceptionContext &context) override;

    void onTrailingMetadata(QGrpcInterceptionContext &context,
                            QMultiHash<QByteArray, QByteArray> &metadata) override;

    void onCancel(QGrpcInterceptionContext &context) override;

    void onFinished(QGrpcInterceptionContext &context, QGrpcStatus &status) override;

private:
    std::shared_ptr<LogModel> m_log;
    using Clock = std::chrono::steady_clock;
    using Ms = std::chrono::duration<double, std::milli>;
    QHash<quint64, Clock::time_point> m_activeRPCs;
};
LoggingInterceptor は、利用可能なすべてのインターセプターインターフェースを実装しており、RPCのライフサイクル全体を網羅しています。ログエントリを追加するためのLogModel へのshared_ptr と、IDごとにアクティブな操作を追跡するためのQHash を保持しています。
ロギングインターセプタの実装
以下のコードスニペットは、onStart およびonFinished のインターセプトポイントがどのように機能するかを示しています。残りのインターセプトポイントは、それぞれのイベントに対して基本的なロギングを行います。
LoggingInterceptor::Continuation LoggingInterceptor::onStart(QGrpcInterceptionContext &context,
                                                             QProtobufMessage &, QGrpcCallOptions &)
{
    const auto id = context.operationId();
    m_activeRPCs.insert(id, Clock::now());
    m_log->add(LogModel::Level::Debug, id, context.descriptor(), u"Starting"_s);
    return Continuation::Proceed;
}
onStart では、インターセプターはoperationId()をキーとして、QHash に現在のタイムスタンプを格納します。Continuation::Proceed を返すことで、呼び出しをチェーンの下流へ渡します。
void LoggingInterceptor::onFinished(QGrpcInterceptionContext &context, QGrpcStatus &status)
{
    const auto it = m_activeRPCs.find(context.operationId());
    Q_ASSERT(it != m_activeRPCs.cend());
    const auto duration = Ms(Clock::now() - it.value()).count();
    m_activeRPCs.erase(it);

    const auto codeStr = QDebug::toString(status.code()).section("::", -1);
    auto msg = u"Finished in %1 ms. StatusCode: %2"_s.arg(duration).arg(codeStr);
    if (!status.message().isEmpty())
        msg += u", Message: "_s + status.message();

    const auto level = [&] {
        switch (status.code()) {
        case QtGrpc::StatusCode::Ok:
            return LogModel::Level::Info;
        case QtGrpc::StatusCode::NotFound:
        case QtGrpc::StatusCode::Unauthenticated:
            return LogModel::Level::Warning;
        default:
            return LogModel::Level::Error;
        }
    }();

    m_log->add(level, context.operationId(), context.descriptor(), msg);
}
onFinished では、保存されたタイムスタンプが操作IDによって検索され、RPCの所要時間が算出されます。ログレベルはステータスコードから導出され、最終的なエントリがLogModel に追加されます。
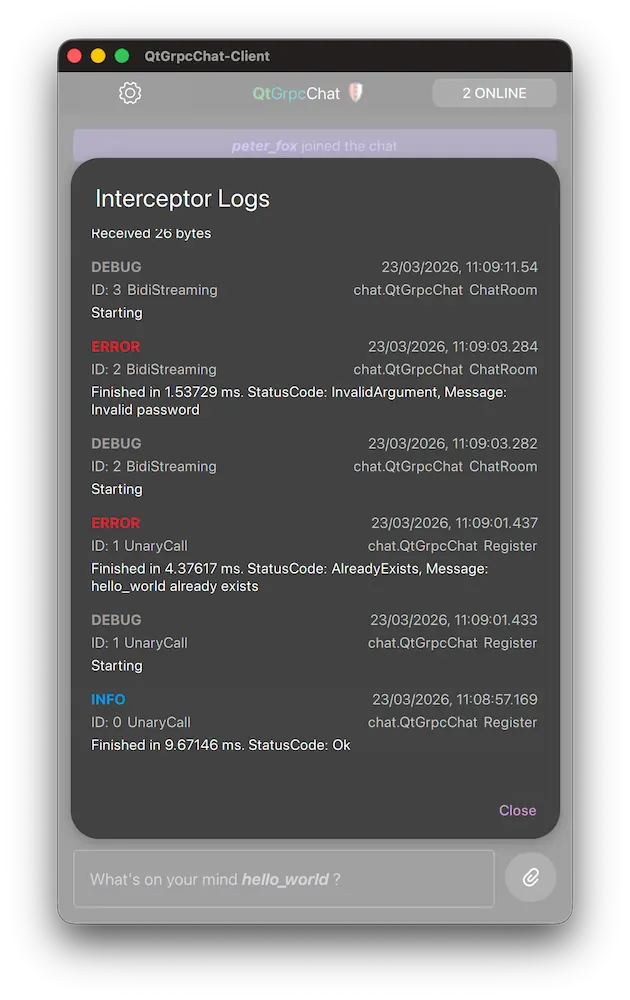
蓄積されたログエントリは、ChatEngine::logModel プロパティを通じてQMLに公開されます。専用のLogDialog が、それらをListView にレンダリングします:
Dialog {
    id: root
    title: "Interceptor Logs"
    ...
    ListView {
        ScrollIndicator.horizontal: ScrollIndicator { }
        ScrollIndicator.vertical: ScrollIndicator { }

        anchors.fill: parent
        model: ChatEngine.logModel
        clip: true

        delegate: ItemDelegate {
            id: delegate

            required property int level
            required property string timestamp
            required property int operationId
            required property string service
            required property string method
            required property int rpcType
            required property string message

            width: ListView.view.width

            contentItem: ColumnLayout {
                RowLayout {
                    Label {
                        font.bold: true
                        text: root.levelToString(delegate.level)
                        color: root.levelToColor(delegate.level)
                    }
                    Item { Layout.fillWidth: true }
                    Label {
                        text: delegate.timestamp
                        opacity: 0.7
                    }
                }
                // further entries for visualizing the RPC context and message.
                ...
            }
        }
    }
}各デリゲートには、ログレベル、タイムスタンプ、およびRPCの詳細が表示されます。LogModel は新しいエントリを先頭に追加するため、最新のアクティビティが最上部に表示されます。
ソースファイル
「すべての Qt サンプル」も参照してください 。
© 2026 The Qt Company Ltd. Documentation contributions included herein are the copyrights of their respective owners. The documentation provided herein is licensed under the terms of the GNU Free Documentation License version 1.3 as published by the Free Software Foundation. Qt and respective logos are trademarks of The Qt Company Ltd. in Finland and/or other countries worldwide. All other trademarks are property of their respective owners.
