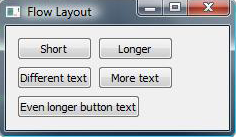
フローレイアウトの例
異なるウィンドウ・サイズにウィジェットを配置する方法を示します。
Flow Layoutは、異なるウィンドウサイズに対応するレイアウトを実装します。ウィジェットの配置は、アプリケーションウィンドウの幅によって変わります。

Flowlayout クラスは主にQLayout とQWidgetItem を使用し、Window はQWidget とQLabel を使用します。
詳細については、レイアウト管理のページを参照してください。
例の実行
からサンプルを実行するには Qt Creatorからサンプルを実行するには、Welcome モードを開き、Examples からサンプルを選択します。詳しくは、Qt Creator: チュートリアルをご覧ください:ビルドと実行。
FlowLayoutクラスの定義
FlowLayout クラスはQLayout を継承しています。これは、子ウィジェットを水平および垂直に配置するカスタムレイアウトクラスです。
class FlowLayout : public QLayout
{
public:
    explicit FlowLayout(QWidget *parent, int margin = -1, int hSpacing = -1, int vSpacing = -1);
    explicit FlowLayout(int margin = -1, int hSpacing = -1, int vSpacing = -1);
    ~FlowLayout();

    void addItem(QLayoutItem *item) override;
    int horizontalSpacing() const;
    int verticalSpacing() const;
    Qt::Orientations expandingDirections() const override;
    bool hasHeightForWidth() const override;
    int heightForWidth(int) const override;
    int count() const override;
    QLayoutItem *itemAt(int index) const override;
    QSize minimumSize() const override;
    void setGeometry(const QRect &rect) override;
    QSize sizeHint() const override;
    QLayoutItem *takeAt(int index) override;

private:
    int doLayout(const QRect &rect, bool testOnly) const;
    int smartSpacing(QStyle::PixelMetric pm) const;

    QList<QLayoutItem *> itemList;
    int m_hSpace;
    int m_vSpace;
};
QLayout から継承した関数を再実装します。これらの関数は、レイアウトにアイテムを追加し、その向きとジオメトリを処理します。
また、doLayout() とsmartSpacing() の 2 つのプライベートメソッドを宣言します。doLayout() はレイアウトアイテムを配置し、smartSpacing() 関数はアイテム間の間隔を計算します。
FlowLayoutクラスの実装
まず、コンストラクタから始めます:
FlowLayout::FlowLayout(QWidget *parent, int margin, int hSpacing, int vSpacing)
    : QLayout(parent), m_hSpace(hSpacing), m_vSpace(vSpacing)
{
    setContentsMargins(margin, margin, margin, margin);
}

FlowLayout::FlowLayout(int margin, int hSpacing, int vSpacing)
    : m_hSpace(hSpacing), m_vSpace(vSpacing)
{
    setContentsMargins(margin, margin, margin, margin);
}
コンストラクタでは、setContentsMargins() を呼び出して、左、上、右、下のマージンを設定します。デフォルトでは、QLayout 、現在のスタイルが提供する値が使用されます(QStyle::PixelMetric を参照)。
FlowLayout::~FlowLayout()
{
    QLayoutItem *item;
    while ((item = takeAt(0)))
        delete item;
}
この例では、純粋な仮想関数であるaddItem() を再実装しています。addItem() 、レイアウト・アイテムの所有権はレイアウトに移譲されるため、アイテムの削除はレイアウトの責任となります。
void FlowLayout::addItem(QLayoutItem *item)
{
    itemList.append(item);
}
addItem() はレイアウトにアイテムを追加するために実装されています。
int FlowLayout::horizontalSpacing() const
{
    if (m_hSpace >= 0) {
        return m_hSpace;
    } else {
        return smartSpacing(QStyle::PM_LayoutHorizontalSpacing);
    }
}

int FlowLayout::verticalSpacing() const
{
    if (m_vSpace >= 0) {
        return m_vSpace;
    } else {
        return smartSpacing(QStyle::PM_LayoutVerticalSpacing);
    }
}
horizontalSpacing() とverticalSpacing() を実装して、レイアウト内のウィジェット間の間隔を取得します。値が0以下であれば、この値が使用されます。そうでない場合は、smartSpacing() を呼び出して間隔を計算します。
int FlowLayout::count() const
{
    return itemList.size();
}

QLayoutItem *FlowLayout::itemAt(int index) const
{
    return itemList.value(index);
}

QLayoutItem *FlowLayout::takeAt(int index)
{
    if (index >= 0 && index < itemList.size())
        return itemList.takeAt(index);
    return nullptr;
}
次に、count() を実装して、レイアウト内のアイテムの数を返します。項目のリストを移動するには、itemAt() と takeAt() を使用して、リストから項目を削除して返します。アイテムが削除されると、残りのアイテムの番号が変更されます。この3つの関数はすべて、QLayout の純粋な仮想関数である。
Qt::Orientations FlowLayout::expandingDirections() const
{
    return { };
}
expandingDirections() は、レイアウトがそのsizeHint() よりも多くのスペースを使用できるQt::Orientations を返します。
bool FlowLayout::hasHeightForWidth() const
{
    return true;
}

int FlowLayout::heightForWidth(int width) const
{
    int height = doLayout(QRect(0, 0, width, 0), true);
    return height;
}
高さが幅に依存するウィジェットを調整するために、heightForWidth() を実装します。関数hasHeightForWidth() はこの依存性をテストするために使用され、heightForWidth() は幅をdoLayout() に渡し、 はその幅をレイアウト rect の引数として使用します。このrectにはレイアウトマージン()は含まれません。
void FlowLayout::setGeometry(const QRect &rect)
{
    QLayout::setGeometry(rect);
    doLayout(rect, false);
}

QSize FlowLayout::sizeHint() const
{
    return minimumSize();
}

QSize FlowLayout::minimumSize() const
{
    QSize size;
    for (const QLayoutItem *item : std::as_const(itemList))
        size = size.expandedTo(item->minimumSize());

    const QMargins margins = contentsMargins();
    size += QSize(margins.left() + margins.right(), margins.top() + margins.bottom());
    return size;
}
setGeometry() は通常、実際のレイアウト、すなわちレイアウト項目のジオメトリを計算するために使用されます。この例では、doLayout() を呼び出し、レイアウト rect を渡します。
sizeHint() はレイアウトの好ましいサイズを返し、minimumSize() はレイアウトの最小サイズを返します。
int FlowLayout::doLayout(const QRect &rect, bool testOnly) const
{
    int left, top, right, bottom;
    getContentsMargins(&left, &top, &right, &bottom);
    QRect effectiveRect = rect.adjusted(+left, +top, -right, -bottom);
    int x = effectiveRect.x();
    int y = effectiveRect.y();
    int lineHeight = 0;
doLayout() horizontalSpacing() または がデフォルト値を返さない場合、レイアウトを処理します。 を使用して、レイアウト項目が使用可能な領域を計算します。verticalSpacing() getContentsMargins()
    for (QLayoutItem *item : std::as_const(itemList)) {
        const QWidget *wid = item->widget();
        int spaceX = horizontalSpacing();
        if (spaceX == -1)
            spaceX = wid->style()->layoutSpacing(
                QSizePolicy::PushButton, QSizePolicy::PushButton, Qt::Horizontal);
        int spaceY = verticalSpacing();
        if (spaceY == -1)
            spaceY = wid->style()->layoutSpacing(
                QSizePolicy::PushButton, QSizePolicy::PushButton, Qt::Vertical);
そして、現在のスタイルに基づいて、レイアウト内の各ウィジェットに適切なスペーシングを設定します。
        int nextX = x + item->sizeHint().width() + spaceX;
        if (nextX - spaceX > effectiveRect.right() && lineHeight > 0) {
            x = effectiveRect.x();
            y = y + lineHeight + spaceY;
            nextX = x + item->sizeHint().width() + spaceX;
            lineHeight = 0;
        }

        if (!testOnly)
            item->setGeometry(QRect(QPoint(x, y), item->sizeHint()));

        x = nextX;
        lineHeight = qMax(lineHeight, item->sizeHint().height());
    }
    return y + lineHeight - rect.y() + bottom;
}
そして、レイアウト内の各アイテムの位置は、アイテムの幅と行の高さを最初のx座標とy座標に加算して計算されます。これにより、次のアイテムが現在の行に収まるか、次の行に移動しなければならないかがわかります。また、ウィジェットの高さから現在の行の高さを求めます。
int FlowLayout::smartSpacing(QStyle::PixelMetric pm) const
{
    QObject *parent = this->parent();
    if (!parent) {
        return -1;
    } else if (parent->isWidgetType()) {
        QWidget *pw = static_cast<QWidget *>(parent);
        return pw->style()->pixelMetric(pm, nullptr, pw);
    } else {
        return static_cast<QLayout *>(parent)->spacing();
    }
}
smartSpacing() は、トップレベルレイアウトまたはサブレイアウトのデフォルトの間隔を取得するように設計されています。親がQWidget の場合、トップレベル レイアウトのデフォルトの間隔は、スタイルをクエリすることで決定されます。サブレイアウトのデフォルトの間隔は、親がQLayout の場合、親レイアウトの間隔をクエリして決定されます。
© 2025 The Qt Company Ltd. Documentation contributions included herein are the copyrights of their respective owners. The documentation provided herein is licensed under the terms of the GNU Free Documentation License version 1.3 as published by the Free Software Foundation. Qt and respective logos are trademarks of The Qt Company Ltd. in Finland and/or other countries worldwide. All other trademarks are property of their respective owners.

