例 1:静的ソースを使用した直接接続
- ソース・オブジェクトの作成
このソース・オブジェクトを作成するには、まず定義ファイル
simpleswitch.repを作成します。このファイルには、オブジェクトのプロパティとメソッドが記述され、Qt Remote Objects Compilerrepc に入力されます。このファイルには、レプリカに公開するために必要なインターフェイスのみが定義されています。simpleswitch.repclass SimpleSwitch { PROP(bool currState=false); SLOT(server_slot(bool clientState)); };
simpleswitch.repにあります、currStateはスイッチの現在の状態を保持する。server_slot()により、ソースと対話することができる。echoSwitchState(bool newstate)信号に接続される。
repc がこのファイルを処理するには、
cmakeファイルに以下の行を追加します:qt6_add_repc_sources(directconnectserver simpleswitch.rep )qmake:REPC_SOURCE = simpleswitch.rep
これらの説明は Qt Remote Objects モジュールにのみ関係しますので、プロジェクトに追加する必要があります。CMakeを使用している場合は、追加してください:
find_package(Qt6 REQUIRED COMPONENTS RemoteObjects)
target_link_libraries(directconnectserver PRIVATE Qt6::RemoteObjects)
qmakeを使っている場合は、以下を追加してください:QT += remoteobjects
repc は指定したビルドディレクトリに
rep_SimpleSwitch_source.hヘッダーを作成します。詳細については、ソースを参照してください。repc は QtRO で使用する 3 つのヘルパークラスを作成します。この例では、基本的なものを使います:
SimpleSwitchSimpleSource。これは抽象クラスで、rep_SimpleSwitch_source.hで定義されています。このクラスから派生して、SimpleSwitchの実装クラスを定義します:simpleswitch.h#ifndef SIMPLESWITCH_H #define SIMPLESWITCH_H #include "rep_simpleswitch_source.h" class SimpleSwitch : public SimpleSwitchSimpleSource { Q_OBJECT public: SimpleSwitch(QObject *parent = nullptr); ~SimpleSwitch(); void server_slot(bool clientState) override; public Q_SLOTS: void timeout_slot(); private: QTimer *stateChangeTimer; }; #endif
simpleswitch.hで定義されています、stateChangeTimerはQTimer で、SimpleSwitch の状態を切り替えるのに使われます。timeout_slot()はstateChangeTimerの timeout() シグナルに接続されています。server_slot()- このシグナルは、レプリカがスロットのバージョンを呼び出すたびに、ソース上で自動的に呼び出されます。currStateChanged(bool)rep_SimpleSwitch_source.hこのシグナルは、currStateがトグルするたびに出力されます。この例では、ソース側でこのシグナルを無視し、後でレプリカ側で処理します。
SwitchStateクラスの定義を以下に示します:simpleswitch.cpp#include "simpleswitch.h"// コンストラクタSimpleSwitch::SimpleSwitch(QObject*parent) :SimpleSwitchSimpleSource(parent) { stateChangeTimer= newQTimer(this);// タイマーを初期化する QObject::connect(stateChangeTimer, &)QTimer::timeout, this, &SimpleSwitch::timeout_slot);// stateChangeTimerからのtimeout()シグナルをsimpleSwitchのtimeout_slot()に接続 stateChangeTimer->start(2000);// タイマーを開始し、タイムアウトを2秒に設定する qDebug() << "Source Node Started"; }//デストラクタSimpleSwitch::~SimpleSwitch() { stateChangeTimer->stop(); }voidSimpleSwitch::server_slot(boolclientState){ qDebug() << "Replica state is " << clientState; // print switch state echoed back by client }voidSimpleSwitch::timeout_slot() {// タイマーのタイムアウト時に呼び出されるスロット if(currState())// 現在の状態が true かどうかをチェックする。currState() は repc で生成された rep_simpleswitch_source.h で定義されているsetCurrState(false);// 状態を false に設定する elsesetCurrState(true);// 状態を true に設定する qDebug() << "Source State is "<<currState(); }
- レジストリの作成
この例ではノード間の直接接続を使用している
ため、このステップは省略できます。
- ホストノードの
作成ホストノードは以下のように作成されます:
QRemoteObjectHost srcNode(QUrl(QStringLiteral("local:replica")));
- ホストソースオブジェクトとリモーティング
以下のステートメントでソースオブジェクトをインスタンス化し、ホストに渡して「リモーティング」(オブジェクトを QtRO ネットワークから見えるようにするプロセス)を有効にします:
SimpleSwitch srcSwitch; // create simple switch
srcNode.enableRemoting(&srcSwitch); // enable remoting
上記のステップを実装した
main.cppファイルの内容は以下のとおりです:main.cpp#include <QCoreApplication> #include "simpleswitch.h" int main(int argc, char *argv[]) { QCoreApplication a(argc, argv); SimpleSwitch srcSwitch; // create simple switch // Create host node without Registry: QRemoteObjectHost srcNode(QUrl(QStringLiteral("local:replica"))); srcNode.enableRemoting(&srcSwitch); // enable remoting/sharing return a.exec(); }
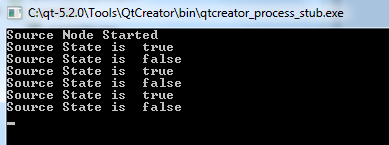
このソース側プロジェクトをコンパイルして実行します。出力は、レプリカが作成されていない状態で、2秒ごとに
trueとfalseの間でスイッチの状態が切り替わり、以下のようになるはずです。
この例では、ソースからスイッチの状態を取得し、それをエコーバックしています。
レプリカコード
- repcを使用してプロジェクトにレプリカを追加する
ソース側で行ったのと同じAPI定義ファイル
、SimpleSwitch.reprepcを使用してReplicaヘッダーファイルを作成します。
cmakeを使用している場合は、クライアント側のcmakeファイルに以下の行を追加し、.repファイルの入力を指定します:qt6_add_repc_replicas(directconnectclient simpleswitch.rep )qmakeを使用している場合は、クライアント側の.proファイルに以下の行を追加します:REPC_REPLICA = simpleswitch.rep
repcツールは、ビルド・ディレクトリに
rep_SimpleSwitch_replica.hファイルを生成します。詳細は、「Replica」を参照してください。 - ソースのホスト・ノードと接続するノードを作成する
次のコードは、ネットワーク上の 2 番目のノードをインスタンス化し、ソースのホスト・ノードと接続します:
QRemoteObjectNode repNode; // create remote object node
repNode.connectToNode(QUrl(QStringLiteral("local:replica"))); // connect with remote host node
- ノードのacquire() を呼び出して、レプリカへのポインタを作成します。
まず、レプリカをインスタンス化します:
QSharedPointer<SimpleSwitchReplica> ptr;
ptr.reset(repNode.acquire<SimpleSwitchReplica>()); // acquire replica of source from host node
注: acquire() はレプリカへのポインタを返しますが、その寿命は管理しません。この例では、ポインタが常に適切に削除されるように、返されたポインタをQSharedPointer またはQScopedPointer でラップすることを推奨しています。
main.cppは上記の手順を実装し、オブジェクトをインスタンス化します:main.cpp#include <QCoreApplication> #include "client.h" int main(int argc, char *argv[]) { QCoreApplication a(argc, argv); QSharedPointer<SimpleSwitchReplica> ptr; // shared pointer to hold source replica QRemoteObjectNode repNode; // create remote object node repNode.connectToNode(QUrl(QStringLiteral("local:replica"))); // connect with remote host node ptr.reset(repNode.acquire<SimpleSwitchReplica>()); // acquire replica of source from host node Client rswitch(ptr); // create client switch object and pass reference of replica to it return a.exec(); }
Clientクラスの完全な宣言と定義は以下の通りである:client.h#ifndef _CLIENT_H #define _CLIENT_H #include <QObject> #include <QSharedPointer> #include "rep_simpleswitch_replica.h" class Client : public QObject { Q_OBJECT public: Client(QSharedPointer<SimpleSwitchReplica> ptr); ~Client() override = default; void initConnections();// Function to connect signals and slots of source and client Q_SIGNALS: void echoSwitchState(bool switchState);// this signal is connected with server_slot(..) on the source object and echoes back switch state received from source public Q_SLOTS: void recSwitchState_slot(bool); // slot to receive source state private: bool clientSwitchState; // holds received server switch state QSharedPointer<SimpleSwitchReplica> reptr;// holds reference to replica }; #endif
client.cpp#include "client.h"// コンストラクタClient::Client(QSharedPointer<SimpleSwitchReplica>ptr) : QObject(nullptr),reptr(ptr) {// 初期化スロットで初期化された レプリカの シグナルを接続します。initConnections();// レプリカは repc によって生成されたので、 // SimpleSwitchReplica のシグナル/ スロットに 直接 接続できます 。 QObject::connect(reptr.data(), &SimpleSwitchReplica::currStateChanged, this, &Client::recSwitchState_slot);// クライアントの echoSwitchState(...) シグナルとレプリカの server_slot(...) を接続して、受信した状態をエコーバックする。 QObject::connect(this, &Client::echoSwitchState,reptr.data(), &SimpleSwitchReplica::server_slot); }voidClient::recSwitchState_slot(boolvalue){ qDebug() << "Received source state "<< value << reptr.data()->currState(); clientSwitchState=reptr.data()->currState(); Q_EMIT echoSwitchState(clientSwitchState);// 受信した状態をサーバーにエコーバックするシグナルを出力する}
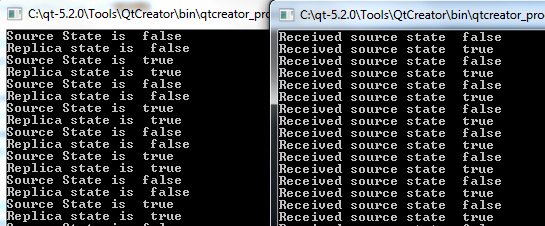
この例をソース側の例と一緒にコンパイルして実行すると、以下の出力が生成されます:

© 2025 The Qt Company Ltd. Documentation contributions included herein are the copyrights of their respective owners. The documentation provided herein is licensed under the terms of the GNU Free Documentation License version 1.3 as published by the Free Software Foundation. Qt and respective logos are trademarks of The Qt Company Ltd. in Finland and/or other countries worldwide. All other trademarks are property of their respective owners.

