Qt Quick Android Studioプロジェクトの場合
Qt Quick Android API のサンプルは Android Studio プロジェクト
Qt Quick for Android API のサンプルは、Android Studio プロジェクトとして提供されています。プロジェクトフォルダは Qt のインストール場所にあります。
例えば、デフォルトの Windows インストールパスでは、ここにあります:
C:\Qt\Examples\Qt-<patch-release-number>\platforms\android\<example-name>
これらのプロジェクトは、Qtのバージョンと互換性のあるQt Gradle Pluginのバージョンを使用するように設定されています。
概要
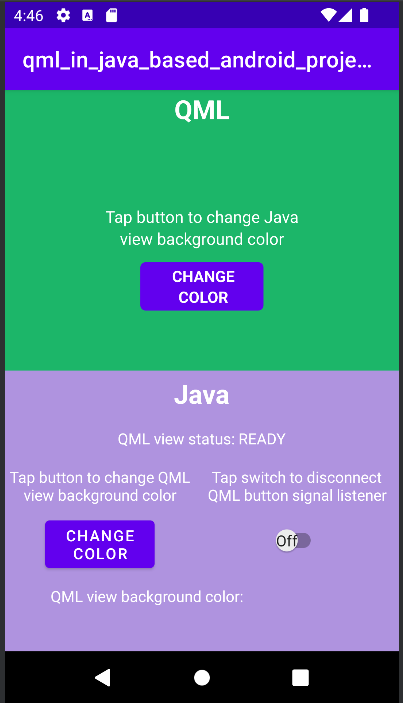
この例では、Qt Tools for Android Studioプラグインを使用して Android Studio にインポートできる QML プロジェクトを紹介します。QtQuickViewAPIを利用することで、QMLプロジェクトをViewとして利用するJavaやKotlinのプロジェクトもあります。
QMLの仕組みについては Qt Qml.このドキュメントでは、JavaやKotlinを使ったAndroidアプリケーションにQMLコンポーネントを組み込む方法を中心に説明します。
Qt Quick for Android APIでは、main() の変更が必要です。
典型的なQt Quick アプリケーションの main.cpp はこのようになっています:
#include <QGuiApplication>
#include <QQmlApplicationEngine>

int main(int argc, char *argv[])
{
    QGuiApplication app(argc, argv);

    QQmlApplicationEngine engine;
    QObject::connect(
        &engine,
        &QQmlApplicationEngine::objectCreationFailed,
        &app,
        []() { QCoreApplication::exit(-1); },
        Qt::QueuedConnection);
    engine.loadFromModule("MyQtQuickProject", "Main");

    return app.exec();
}
main() では、QML エンジンを作成したり、Qt Quick の View API で処理される QML を読み込んだりする必要はありません。必要なものはmain() にあります:
#include <QGuiApplication>

int main(int argc, char *argv[])
{
    QGuiApplication app(argc, argv);

    return app.exec();
}
レイアウトの設定
JavaプロジェクトでもKotlinプロジェクトでも、app/src/main/res/layout/activity_main.xml でQtQuickViewsのレイアウトを設定する必要があります。
LinearLayout 、各QtQuickViewに2つのFrameLayoutを設定します。
 <FrameLayout
    android:id="@+id/firstQmlFrame"
    android:layout_width="match_parent"
    android:layout_height="0dp"
    android:layout_weight="1">
</FrameLayout>

<FrameLayout
    android:id="@+id/secondQmlFrame"
    android:layout_width="match_parent"
    android:layout_height="0dp"
    android:layout_weight="1">
</FrameLayout>
id 、KotlinやJavaでコーディングされたMainActivityで参照されるものです。
自動生成されたQML型のJavaクラスのインポート
QMLタイプのJavaクラスは、Qt Quick プロジェクトのビルド時に生成されます。これらをMainActivityで使用する前にインポートする必要があります。
import org.qtproject.example.qtquickview.QmlModule.Main;
import org.qtproject.example.qtquickview.QmlModule.Second;
import org.qtproject.example.qtquickview.QmlModule.Main
import org.qtproject.example.qtquickview.QmlModule.Second
注意: QML コンポーネントの Java コード生成の詳細については、QT_ANDROID_GENERATE_JAVA_QTQUICKVIEW_CONTENTSCMake 変数を参照してください。
MainActivityのonCreate()メソッド
まず、JavaとKotlinプロジェクトのMainActivity'のonCreate()メソッドを見てみましょう。
@Override
protected void onCreate(Bundle savedInstanceState) {
    super.onCreate(savedInstanceState);
    setContentView(R.layout.activity_main);

    m_qmlViewBackgroundText = findViewById(R.id.qmlViewBackgroundText);
    m_qmlStatus = findViewById(R.id.qmlStatusText);
    m_androidControlsLayout = findViewById(R.id.javaRelative);
    m_colorBox = findViewById(R.id.qmlColorBox);
    m_switch = findViewById(R.id.disconnectQmlListenerSwitch);
    m_switch.setOnClickListener(view -> switchListener());
    QtQuickView m_firstQuickView = new QtQuickView(this);
    QtQuickView m_secondQuickView = new QtQuickView(this);

    // Set status change listener for m_qmlView
    // listener implemented below in OnStatusChanged
    m_firstQmlContent.setStatusChangeListener(this);
    m_secondQmlContent.setStatusChangeListener(this);
    final ViewGroup.LayoutParams params = new FrameLayout.LayoutParams(
            ViewGroup.LayoutParams.MATCH_PARENT, ViewGroup.LayoutParams.MATCH_PARENT);
    FrameLayout m_firstQmlFrameLayout = findViewById(R.id.firstQmlFrame);
    m_firstQmlFrameLayout.addView(m_firstQuickView, params);
    FrameLayout m_secondQmlFrameLayout = findViewById(R.id.secondQmlFrame);
    m_secondQmlFrameLayout.addView(m_secondQuickView, params);
    m_firstQuickView.loadContent(m_firstQmlContent);
    m_secondQuickView.loadContent(m_secondQmlContent);

    Button m_changeColorButton = findViewById(R.id.changeQmlColorButton);
    m_changeColorButton.setOnClickListener(view -> onClickListener());
    Button m_rotateQmlGridButton = findViewById(R.id.rotateQmlGridButton);
    m_rotateQmlGridButton.setOnClickListener(view -> rotateQmlGrid());
}
override fun onCreate(savedInstanceState: Bundle?) {
super.onCreate(savedInstanceState)
m_binding = ActivityMainBinding.inflate(layoutInflater)
val view = m_binding.root
setContentView(view)
m_binding.disconnectQmlListenerSwitch.setOnCheckedChangeListener { button, checked ->
switchListener(
button,
checked
)
}
val firstQtQuickView = QtQuickView(this)
val secondQtQuickView = QtQuickView(this)
// Set status change listener for m_qmlView
// listener implemented below in OnStatusChanged
m_firstQmlContent.setStatusChangeListener(this)
m_secondQmlContent.setStatusChangeListener(this)
val params: ViewGroup.LayoutParams = FrameLayout.LayoutParams(
ViewGroup.LayoutParams.MATCH_PARENT, ViewGroup.LayoutParams.MATCH_PARENT
)
m_binding.firstQmlFrame.addView(firstQtQuickView, params)
m_binding.secondQmlFrame.addView(secondQtQuickView, params)
firstQtQuickView.loadContent(m_firstQmlContent)
secondQtQuickView.loadContent(m_secondQmlContent)
m_binding.changeQmlColorButton.setOnClickListener { onClickListener() }
m_binding.rotateQmlGridButton.setOnClickListener { rotateQmlGrid() }
}注: Kotlinプロジェクトでは、アプリケーションのUIコンポーネントにアクセスするためにViewバインディングを使用しています:
m_binding = ActivityMainBinding.inflate(layoutInflater) val view = m_binding.root setContentView(view)
onCreate() メソッド内で、以前に宣言された変数は新しいQtQuickViewインスタンスで初期化されます。これらのインスタンスは、Java/KotlinアクティビティのContext を引数として取ります。
QtQuickView m_firstQuickView = new QtQuickView(this);
QtQuickView m_secondQuickView = new QtQuickView(this);
val firstQtQuickView = QtQuickView(this)
val secondQtQuickView = QtQuickView(this)
QtQuickViewインスタンスは、適切なレイアウトパラメータでAndroidレイアウトに追加されます。
final ViewGroup.LayoutParams params = new FrameLayout.LayoutParams(
        ViewGroup.LayoutParams.MATCH_PARENT, ViewGroup.LayoutParams.MATCH_PARENT);
FrameLayout m_firstQmlFrameLayout = findViewById(R.id.firstQmlFrame);
m_firstQmlFrameLayout.addView(m_firstQuickView, params);
FrameLayout m_secondQmlFrameLayout = findViewById(R.id.secondQmlFrame);
m_secondQmlFrameLayout.addView(m_secondQuickView, params);
val params: ViewGroup.LayoutParams = FrameLayout.LayoutParams(
ViewGroup.LayoutParams.MATCH_PARENT, ViewGroup.LayoutParams.MATCH_PARENT
)
m_binding.firstQmlFrame.addView(firstQtQuickView, params)
m_binding.secondQmlFrame.addView(secondQtQuickView, params)Main とSecond Java クラスはQtQuickViewContentクラスを継承しています。これらのクラスは、インポートしたQMLプロジェクトから生成されます。
private final Main m_firstQmlContent = new Main();
private final Second m_secondQmlContent = new Second();
private val m_firstQmlContent: Main = Main()
private val m_secondQmlContent: Second = Second()
Qt Quick のコンテンツは、QtQuickViewContentを引数に取るQtQuickView.loadContent() メソッドを通してロードされます。
m_firstQuickView.loadContent(m_firstQmlContent);
m_secondQuickView.loadContent(m_secondQmlContent);
firstQtQuickView.loadContent(m_firstQmlContent)
secondQtQuickView.loadContent(m_secondQmlContent)
QML コンポーネントとのインタラクション
埋め込まれた QML コンポーネントと対話するために、QtQmlStatusChangeListenerインターフェースを実装し、onStatusChanged メソッドをオーバーライドして、現在QtQuickView に読み込まれているQtQuickViewContentの読み込みステータスを取得します。
public class MainActivity extends AppCompatActivity implements
QtQmlStatusChangeListener {
    ...
}
class MainActivity : AppCompatActivity(), QtQmlStatusChangeListener {
    ...
}
onStatusChanged :
@Override
public void onStatusChanged(QtQmlStatus qtQmlStatus, QtQuickViewContent content) {
    Log.i(TAG, "Status of QtQuickView: " + qtQmlStatus);

    // Show current QML View status in a textview
    m_qmlStatus.setText(getString(R.string.qml_view_status, m_statusNames.get(qtQmlStatus)));
    updateColorDisplay();

    if (content == m_firstQmlContent) {
        // Connect signal listener to "onClicked" signal from main.qml
        // addSignalListener returns int which can be used later to identify the listener
        if (qtQmlStatus == QtQmlStatus.READY && m_switch.isChecked()) {
            m_qmlButtonSignalListenerId = m_firstQmlContent.connectOnClickedListener(
                    (String name, Void v) -> {
                        Log.i(TAG, "QML button clicked");
                        m_androidControlsLayout.setBackgroundColor(Color.parseColor(
                                m_colors.getColor()
                        ));
                    });
        }
    }
}
override fun onStatusChanged(status: QtQmlStatus?, content: QtQuickViewContent?) {
Log.v(TAG, "Status of QtQuickView: $status")
// Show current QML View status in a textview
m_binding.qmlStatusText.text = getString(R.string.qml_view_status, m_statusNames[status])
updateColorDisplay()
if (content == m_firstQmlContent) {
// Connect signal listener to "onClicked" signal from main.qml
// addSignalListener returns int which can be used later to identify the listener
if (status == QtQmlStatus.READY && m_binding.disconnectQmlListenerSwitch.isChecked) {
m_qmlButtonSignalListenerId =
m_firstQmlContent.connectOnClickedListener { _: String, _: Void? ->
Log.i(TAG, "QML button clicked")
m_binding.kotlinRelative.setBackgroundColor(
Color.parseColor(
m_colors.getColor()
)
)
}
}
}
}MainActivity はm_mainQmlContent とm_secondQmlContent のstatusChangeListener としてQtQuickViewContent.setStatusChangeListener メソッドで設定される。
m_firstQmlContent.setStatusChangeListener(this);
m_secondQmlContent.setStatusChangeListener(this);
m_firstQmlContent.setStatusChangeListener(this)
m_secondQmlContent.setStatusChangeListener(this)
オーバーライドされたコールバック関数onStatusChanged() は、QtQmlStatusEnum 型の現在のステータスを含むStatusChanged() シグナルを受信し、現在のQtQuickViewContent をQtQuickView にロードします。このQtQmlStatus がQtQmlStatus.READY であることが確認されれば、QML ビューとのインタラクションを開始できます。
QMLコンポーネントのプロパティ値の取得と設定
QMLコンポーネントのプロパティ値の取得と設定は、Main.java クラスに記述されているメソッドを通して行います。ここでは、m_mainQmlContent.setColorStringProperty() とm_mainQmlContent.getColorStringProperty() のメソッドを使用します。これらのメソッドは、QMLコンポーネントのプロパティに応じて生成されます。
public void onClickListener() {
    // Set the QML view root object property "colorStringFormat" value to
    // color from Colors.getColor()
    m_firstQmlContent.setColorStringFormat(m_colors.getColor());
    updateColorDisplay();
}
private void updateColorDisplay() {
    String qmlBackgroundColor = m_firstQmlContent.getColorStringFormat();
    // Display the QML View background color code
    m_qmlViewBackgroundText.setText(qmlBackgroundColor);

    // Display the QML View background color in a view
    // if qmlBackGroundColor is not null
    if (qmlBackgroundColor != null) {
        m_colorBox.setBackgroundColor(Color.parseColor(qmlBackgroundColor));
    }
}
private fun onClickListener() {
// Set the QML view root object property "colorStringFormat" value to
// color from Colors.getColor()
m_firstQmlContent.colorStringFormat = m_colors.getColor()
updateColorDisplay()
}
private fun updateColorDisplay() {
val qmlBackgroundColor = m_firstQmlContent.colorStringFormat
// Display the QML View background color code
m_binding.qmlViewBackgroundText.text = qmlBackgroundColor
// Display the QML View background color in a view
// if qmlBackgroundColor is not null
if (qmlBackgroundColor != null) {
m_binding.qmlColorBox.setBackgroundColor(Color.parseColor(qmlBackgroundColor))
}
}m_mainQmlContent.setColorStringProperty() メソッドで、m_mainQmlContent のcolorStringFormat プロパティ値に、Colors.java (またはColors.kt )クラスから取得したランダムな色の値を設定します。
m_mainQmlContent.getColorStringProperty() メソッドは、m_mainQmlContent のルート・オブジェクトの現在の背景色を取得し、Java/Kotlin Android アプリケーション側でユーザーに表示するために使用します。
m_secondQmlContent QML コンポーネントにはGrid があり、生成されたm_secondQmlContent.setGridRotation() メソッドを使って Java 側から回転させることができます。
private void rotateQmlGrid() {
    Integer previousGridRotation = m_secondQmlContent.getGridRotation();
    if (previousGridRotation != null) {
        m_secondQmlContent.setGridRotation(previousGridRotation + 45);
    }
}
private fun rotateQmlGrid() {
val previousGridRotation = m_secondQmlContent.gridRotation
if (previousGridRotation != null) {
m_secondQmlContent.gridRotation = previousGridRotation + 45
}
}シグナルリスナー
QtQuickViewContent クラスはconnectSignalListener() とdisconnectSignalListener() メソッドを提供し、 QML コンポーネントのルートオブジェクトで宣言されたシグナル間の シグナルリスナーの接続と切断に使用します。QtQuickViewContent.connectSignalListener() は一意のシグナルリスナーIDを返します。このIDを保存しておき、後でリスナーの識別や切断に使用します。
ここでは、QMLコンポーネントのシグナルonClicked() にシグナルリスナーを接続します:
if (qtQmlStatus == QtQmlStatus.READY && m_switch.isChecked()) {
    m_qmlButtonSignalListenerId = m_firstQmlContent.connectOnClickedListener(
            (String name, Void v) -> {
                Log.i(TAG, "QML button clicked");
                m_androidControlsLayout.setBackgroundColor(Color.parseColor(
                        m_colors.getColor()
                ));
            });
}
if (status == QtQmlStatus.READY && m_binding.disconnectQmlListenerSwitch.isChecked) {
m_qmlButtonSignalListenerId =
m_firstQmlContent.connectOnClickedListener { _: String, _: Void? ->
Log.i(TAG, "QML button clicked")
m_binding.kotlinRelative.setBackgroundColor(
Color.parseColor(
m_colors.getColor()
)
)
}
}QMLコンポーネントのボタンがクリックされるたびにonClicked() シグナルが発せられます。そして、このリスナーがこのシグナルを受信すると、アプリケーションのAndroid側を保持するレイアウトの背景色が、Colors.java クラスから取得したランダムな色に設定されます。
次に、QtQuickViewContent.disconnectSignalListener() メソッドを使って、シグナルリスナーに固有のシグナルリスナーIDを与え、シグナルリスナーを切断します。
m_firstQmlContent.disconnectSignalListener(m_qmlButtonSignalListenerId);
m_firstQmlContent.disconnectSignalListener(m_qmlButtonSignalListenerId)
まだの方は、Qt アカデミーをご覧ください: Qt Quick 3D この例で参照されているツールやAPIを紹介しています。
© 2026 The Qt Company Ltd. Documentation contributions included herein are the copyrights of their respective owners. The documentation provided herein is licensed under the terms of the GNU Free Documentation License version 1.3 as published by the Free Software Foundation. Qt and respective logos are trademarks of The Qt Company Ltd. in Finland and/or other countries worldwide. All other trademarks are property of their respective owners.
