シーングラフ - RHI テクスチャアイテム
QRhi でレンダリングされたテクスチャを表示するカスタムQQuickItem の実装方法を示します。
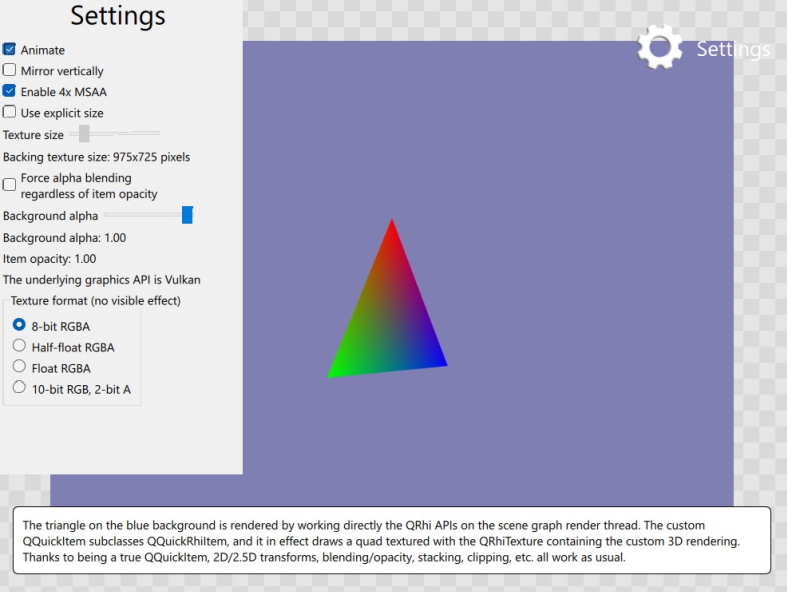
この例では、QRhi API を使用してテクスチャにクロスプラットフォームでポータブルな 3D レンダリングを実行し、その画像を表示するアイテムの実装方法を示します。
注意: この例では、Qt GUI モジュールの限定的な互換性保証の API に依存しながら、ポータブルでクロスプラットフォームな 3D レンダリングを実行する、高度で低レベルの機能を示します。QRhi API を使用できるように、アプリケーションはQt::GuiPrivate にリンクし、<rhi/qrhi.h> をインクルードしています。
他のアプローチとの比較
RHI Under QML の例では、QRhi API を使用して、ポータブルでクロスプラットフォームな 3D レンダリングを実装する方法を示しています。この方法では、カスタムレンダリングは、Qt Quick シーングラフ自体のレンダリングの前に発行され、効果的に「アンダーレイ」を提供します。このアプローチは、追加のレンダーターゲットとレンダーパスが必要になったときに、カスタムレンダリングがシーングラフ独自の描画呼び出しの前にメインのレンダーパスに注入されるため、効率的です。
対照的に、この例では、別個のレンダーターゲット、QRhiTexture 、そのdimensions はシーン内のQQuickItem のサイズと一致し、そのテクスチャをクリアし、そのテクスチャに描画するために使用される全体のレンダーパスが含まれます。このテクスチャはメインレンダーパスでサンプリングされ、クワッドにテクスチャを貼るために使用され、効果的に2D画像を表示します。
アンダーレイ・オーバーレイアプローチと比較すると、ここでは真のQQuickItem があるため、Qt Quick シーン内のどこにでも、3D レンダリングのフラット化された 2D イメージを表示、ブレンド、変換することができます。これは、最初にテクスチャにレンダリングする必要があるため、リソースとパフォーマンスの面でより高価になります。
概要
この例は、QQuickRhiItem とQQuickRhiItemRenderer を使って実装されています。QQuickRhiItem は便利なクラスで、サブクラス化することで、QSGSimpleTextureNode を使ってQRhiTexture の内容を表示する、完全な機能を備えたカスタムQQuickItem を簡単かつ迅速に作成できます。テクスチャの内容は、QQuickRhiItemRenderer のサブクラスで実装されたアプリケーション提供のロジックによって生成されます。
ExampleRhiItem はQQuickRhiItem のサブクラスで、angle やbackgroundAlpha など、いくつかのプロパティを提供します。これらはQMLから読み書きされ、アニメーション化されます。Qt Quick のスレッド化されたレンダリングモデルをサポートするために、QQQuickRhiItemRendererはQQuickRhiItem (メイン/GUIスレッドに属する)とQQuickRhiItemRenderer (レンダースレッドがある場合、レンダースレッドに属する)の間でデータのコピーを安全に実行するために再実装可能な仮想synchronize ()関数を持っています。
QQuickRhiItemRenderer *ExampleRhiItem::createRenderer()
{
    return new ExampleRhiItemRenderer;
}

void ExampleRhiItem::setAngle(float a)
{
    if (m_angle == a)
        return;

    m_angle = a;
    emit angleChanged();
    update();
}

void ExampleRhiItem::setBackgroundAlpha(float a)
{
    if (m_alpha == a)
        return;

    m_alpha = a;
    emit backgroundAlphaChanged();
    update();
}

void ExampleRhiItemRenderer::synchronize(QQuickRhiItem *rhiItem)
{
    ExampleRhiItem *item = static_cast<ExampleRhiItem *>(rhiItem);
    if (item->angle() != m_angle)
        m_angle = item->angle();
    if (item->backgroundAlpha() != m_alpha)
        m_alpha = item->backgroundAlpha();
}
initialize() は、render() を最初に呼び出す前に少なくとも 1 回呼び出されますが、実際には複数回呼び出される可能性があります。QQuickItem のジオメトリが変更された場合(レイアウトの変更、ウィンドウのサイズ変更などによる)、 のような設定が変更された場合などです。ジオメトリが変更された場合(レイアウトの変更、ウィンドウのサイズ変更など)、QQuickRhiItem サンプル数やテクスチャ・フォーマットなどの設定が変更された場合、またはアイテムが新しいQQuickWindow に属するように再ペアレントされた場合、これらはすべてinitialize()を再度呼び出すトリガとなります。これは、QQuickRhiItem で管理されるリソースの1つ以上が変更されることを意味するためで、サブクラスにも影響を与えることになります。ここでは、これらの特殊な状況(QRhi 、サンプル・カウントの変更、テクスチャ・フォーマットの変更)を処理するためのサンプル・コードを用意しました。(カラーバッファとして使用されるテクスチャを保持しないため、サイズが異なるためにテクスチャが再作成される場合、特別な処理は必要ありません)
void ExampleRhiItemRenderer::initialize(QRhiCommandBuffer *cb)
{
    if (m_rhi != rhi()) {
        m_rhi = rhi();
        m_pipeline.reset();
    }

    if (m_sampleCount != renderTarget()->sampleCount()) {
        m_sampleCount = renderTarget()->sampleCount();
        m_pipeline.reset();
    }

    QRhiTexture *finalTex = m_sampleCount > 1 ? resolveTexture() : colorTexture();
    if (m_textureFormat != finalTex->format()) {
        m_textureFormat = finalTex->format();
        m_pipeline.reset();
    }
initialize()の残りは、QRhi-ベースのコードです。
3Dシーンは透視投影を使用します。透視投影は出力サイズに基づいて計算され、便宜上QRhiRenderTarget (colorTexture ()およびmsaaColorBuffer ()にアクセスすると、どのオブジェクトが有効であるかに基づいて分岐ロジックが必要になります)。
3DグラフィックスAPI間の座標系の違いに対応するために、QRhi::clipSpaceCorrMatrix ()を使用していることに注意してください。
    if (!m_pipeline) {
        m_vbuf.reset(m_rhi->newBuffer(QRhiBuffer::Immutable, QRhiBuffer::VertexBuffer, sizeof(vertexData)));
        m_vbuf->create();

        m_ubuf.reset(m_rhi->newBuffer(QRhiBuffer::Dynamic, QRhiBuffer::UniformBuffer, 64));
        m_ubuf->create();

        m_srb.reset(m_rhi->newShaderResourceBindings());
        m_srb->setBindings({
            QRhiShaderResourceBinding::uniformBuffer(0, QRhiShaderResourceBinding::VertexStage, m_ubuf.get()),
        });
        m_srb->create();

        m_pipeline.reset(m_rhi->newGraphicsPipeline());
        m_pipeline->setShaderStages({
           { QRhiShaderStage::Vertex, getShader(QLatin1String(":/scenegraph/rhitextureitem/shaders/color.vert.qsb")) },
           { QRhiShaderStage::Fragment, getShader(QLatin1String(":/scenegraph/rhitextureitem/shaders/color.frag.qsb")) }
        });
        QRhiVertexInputLayout inputLayout;
        inputLayout.setBindings({
            { 5 * sizeof(float) }
        });
        inputLayout.setAttributes({
            { 0, 0, QRhiVertexInputAttribute::Float2, 0 },
            { 0, 1, QRhiVertexInputAttribute::Float3, 2 * sizeof(float) }
        });
        m_pipeline->setSampleCount(m_sampleCount);
        m_pipeline->setVertexInputLayout(inputLayout);
        m_pipeline->setShaderResourceBindings(m_srb.get());
        m_pipeline->setRenderPassDescriptor(renderTarget()->renderPassDescriptor());
        m_pipeline->create();

        QRhiResourceUpdateBatch *resourceUpdates = m_rhi->nextResourceUpdateBatch();
        resourceUpdates->uploadStaticBuffer(m_vbuf.get(), vertexData);
        cb->resourceUpdate(resourceUpdates);
    }

    const QSize outputSize = renderTarget()->pixelSize();
    m_viewProjection = m_rhi->clipSpaceCorrMatrix();
    m_viewProjection.perspective(45.0f, outputSize.width() / (float) outputSize.height(), 0.01f, 1000.0f);
    m_viewProjection.translate(0, 0, -4);
render() の実装は、1つの三角形の描画を記録します。回転角度が変化することが予想されるため、4x4行列を持つ均一バッファは毎回更新されます。透明な色には、アイテムが提供する背景アルファが焼き付けられている。赤、緑、青の各成分にアルファ値を事前乗算する必要があることを覚えておいてください。
void ExampleRhiItemRenderer::render(QRhiCommandBuffer *cb)
{
    QRhiResourceUpdateBatch *resourceUpdates = m_rhi->nextResourceUpdateBatch();
    QMatrix4x4 modelViewProjection = m_viewProjection;
    modelViewProjection.rotate(m_angle, 0, 1, 0);
    resourceUpdates->updateDynamicBuffer(m_ubuf.get(), 0, 64, modelViewProjection.constData());

    // Qt Quick expects premultiplied alpha
    const QColor clearColor = QColor::fromRgbF(0.5f * m_alpha, 0.5f * m_alpha, 0.7f * m_alpha, m_alpha);
    cb->beginPass(renderTarget(), clearColor, { 1.0f, 0 }, resourceUpdates);

    cb->setGraphicsPipeline(m_pipeline.get());
    const QSize outputSize = renderTarget()->pixelSize();
    cb->setViewport(QRhiViewport(0, 0, outputSize.width(), outputSize.height()));
    cb->setShaderResources();
    const QRhiCommandBuffer::VertexInput vbufBinding(m_vbuf.get(), 0);
    cb->setVertexInput(0, 1, &vbufBinding);
    cb->draw(3);

    cb->endPass();
}
QQuickRhiItem 、Scene Graph - RHI Under QML 、Scene Graph - Custom QSGRenderNodeも参照して ください。
© 2026 The Qt Company Ltd. Documentation contributions included herein are the copyrights of their respective owners. The documentation provided herein is licensed under the terms of the GNU Free Documentation License version 1.3 as published by the Free Software Foundation. Qt and respective logos are trademarks of The Qt Company Ltd. in Finland and/or other countries worldwide. All other trademarks are property of their respective owners.
