
Qt Quick 3D - スクリーンスペース反射の例
Qt Quick の3D環境における反射の効果を実演します。
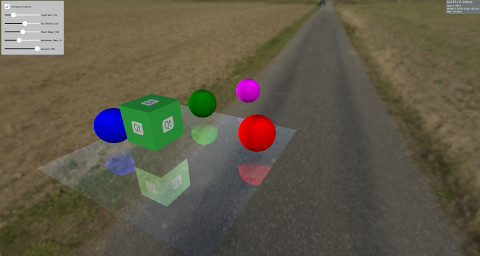
この例では、モデル上でスクリーンスペース反射(SSR)を使用して反射を作成する方法を示します。SSRは、シーンに反射を追加することで表現を向上させることができるポストプロセス効果です。SSRの仕組みは、オブジェクトのレンダリング完了後にスクリーンスペースで反射を計算するというものです。 各フラグメントについて、カメラからそのフラグメントに向けて光線が放出され、フラグメントの法線方向に沿って反射されます。その後、反射した光線を追跡し、オブジェクトに当たらるかどうかを判定します。オブジェクトに当たった場合、そのフラグメントはそのオブジェクトを反射します。SSRが機能しない状況もあります。 例えば、反射した光線がカメラの背後に位置するオブジェクトに当たった場合などです。反射はオブジェクトのレンダリング完了後にスクリーンスペースで計算されるため、カメラの背後に位置するオブジェクトの色に関する情報は利用できません。SSRにはいくつかの欠点がありますが、シーンにより高いリアリティをもたらします。
この例では、Model 上で使用可能なCustom Materials を用いてSSRを実装しており、これによりオブジェクトが周囲を反射するようになります。
Model {
    source: "#Rectangle"
    scale: Qt.vector3d(5, 5, 5)
    eulerRotation.x: -90
    eulerRotation.z: 180
    position: Qt.vector3d(0.0, -50.0, 0.0)
    materials: ScreenSpaceReflections {
        depthBias: depthBiasSlider.value
        rayMaxDistance: distanceSlider.value
        marchSteps: marchSlider.value
        refinementSteps: refinementStepsSlider.value
        specular: specularSlider.value
        materialColor: materialColorCheckBox.checked ? "transparent" : "dimgray"
    }
}
シーンのその他の部分には、静止しているオブジェクトや、水面上で回転して反射を映し出すオブジェクトが配置されています。
Node {

    Model {
        source: "#Cube"
        eulerRotation.y: 0
        scale: Qt.vector3d(1, 1, 1)
        position: Qt.vector3d(50.0, 40.0, 50.0)
        materials:  PrincipledMaterial {
            baseColorMap: Texture {
                source: "qt_logo_rect.png"
            }
        }
    }

    Node{

        Model {
            source: "#Sphere"
            position: Qt.vector3d(-400.0, screenSpaceReflectionsView.modelHeight, 0.0)
            materials: PrincipledMaterial {
                baseColor: "magenta"
            }
        }
    }

    Node{
        eulerRotation.y: screenSpaceReflectionsView.modelRotation
        position.y: screenSpaceReflectionsView.modelHeight

        Model {
            source: "#Sphere"
            pivot: Qt.vector3d(0, 0.0, 0.0)
            position: Qt.vector3d(200.0, 0.0, 0.0)
            materials: PrincipledMaterial {
                baseColor: "green"
            }
        }
    }

    Node{
        eulerRotation.y: screenSpaceReflectionsView.modelRotation
        position.y: screenSpaceReflectionsView.modelHeight

        Model {
            source: "#Sphere"
            eulerRotation.y: 45
            position: Qt.vector3d(0.0, 0.0, -200.0)
            materials: PrincipledMaterial {
                baseColor: "blue"
            }
        }
    }

    Node{
        eulerRotation.y: screenSpaceReflectionsView.modelRotation
        position.y: screenSpaceReflectionsView.modelHeight

        Model {
            source: "#Sphere"
            position: Qt.vector3d(0.0, 0.0, 200.0)
            materials: PrincipledMaterial {
                baseColor: "red"
            }
        }
    }
シェーダーのコード
シェーダーのコードに入る前に、反射を制御するために使用できるいくつかのパラメータを確認しておきましょう。
depthBias | このパラメータは、レイの深度とオブジェクトの深度の差が、特定の閾値内にあるかどうかを確認するために使用されます。 |
rayMaxDistance | ビュー空間におけるレイの終点がどの程度離れているかを制御します。 |
marchSteps | 計算に使用するステップ数を制御します。ステップ数を増やすと、各反復でレイが移動するフラグメントの数が減り、品質が向上します。 |
refinementSteps | 反射した光線がオブジェクトのどこに当たったかを特定した後、その正確な位置を特定するために精細化処理が行われます。このパラメータは、使用するステップ数を制御します。marchSteps が小さい場合、より良い結果が得られます。 |
specular | 0 から 1 までの値で、モデルの反射率を制御します。 |
materialColor | モデルに色を付与します。この色は、反射色と混合されます。 |
シェーダーは、まずカメラからフラグメントへの方向を取得し、それをフラグメントの法線を中心に反射させます。 レイの始点と終点はビュー空間で計算され、その後、これらの点はスクリーン空間に変換されます。反射レイをスクリーン空間で追跡する利点は、画質が向上することです。さらに、レイはビュー空間では長い距離を移動しても、スクリーン空間ではごく少数のフラグメントしかカバーしない場合があります。
開始フラグメントから終了フラグメントを指すベクトルが計算され、marchSteps で除算されます。
その後、rayMarch 関数が呼び出されます。この関数は、スクリーン空間で各ステップごとにレイを進め、その後ビュー空間に戻して変換します。また、シーンのDEPTH_TEXTURE を使用して、このフラグメントの位置にあるオブジェクトを取得します。レイの深度とオブジェクトの深度の差が計算され、depthBias と比較されます。ヒットが見つかった場合、refinementStep 関数が呼び出されます。
void rayMarch(vec2 rayStepVector, vec2 size)
{
    for(int i = 0; i < marchSteps; i++)
    {
        rayData.rayFragCurr += rayStepVector;
        rayData.rayCoveredPart = length(rayData.rayFragCurr - rayData.rayFragStart) / length(rayData.rayFragEnd - rayData.rayFragStart);
        rayData.rayCoveredPart = clamp(rayData.rayCoveredPart, 0.0, 1.0);
        float rayDepth = rayViewDepthFromScreen(size);
        rayData.objHitViewPos = viewPosFromScreen(rayData.rayFragCurr, size);
        float deltaDepth = rayDepth - rayData.objHitViewPos.z;

        if(deltaDepth > 0 && deltaDepth < depthBias)
        {
            rayData.hit = 1;
            refinementStep(rayStepVector, size);
            return;
        }
    }
}精細化ステップはrayMarch と同じですが、ヒットが発生した正確な位置を特定しようとするため、反復ごとにレイをステップ距離の半分だけ前進させます。
void refinementStep(vec2 rayStepVector, vec2 size)
{
    for(int i = 0; i < refinementSteps; i++)
    {
        rayData.rayCoveredPart = length(rayData.rayFragCurr - rayData.rayFragStart) / length(rayData.rayFragEnd - rayData.rayFragStart);
        rayData.rayCoveredPart = clamp(rayData.rayCoveredPart, 0.0, 1.0);
        float rayDepth = rayViewDepthFromScreen(size);
        rayData.objHitViewPos = viewPosFromScreen(rayData.rayFragCurr, size);
        float deltaDepth = rayDepth - rayData.objHitViewPos.z;

        rayStepVector *= 0.5;
        if(deltaDepth > 0 && deltaDepth < depthBias)
            rayData.rayFragCurr -= rayStepVector;
        else
            rayData.rayFragCurr += rayStepVector;
    }
}
反射の可視性はヒット値に設定され、その後、いくつかの可視性チェックが行われます。 前述のように、反射したレイがカメラの背後の何かに当たると SSR は失敗するため、反射したレイがカメラに向かって進んでいる度合いに応じて、可視度がフェードアウトされます。また、ヒットしたオブジェクトがレイの起点からどれだけ離れているかによっても、可視度はフェードアウトされます。
float visibility = rayData.hit;
/* Check if the ray hit an object behind the camera. This means information about the object can not be obtained from SCREEN_TEXTURE.
   Start fading the visibility according to how much the reflected ray is moving toward the opposite direction of the camera */
visibility *= (1 - max(dot(-normalize(fragViewPos), reflected), 0));

/* Fade out visibility according how far is the hit object from the fragment */
visibility *= (1 - clamp(length(rayData.objHitViewPos - rayData.rayViewStart) / rayMaxDistance, 0, 1));
visibility = clamp(visibility, 0, 1);最後に、反射色はSCREEN_TEXTURE から計算され、マテリアルカラーと混合されます。
vec2 uv = rayData.rayFragCurr / size;
uv = correctTextureCoordinates(uv);
vec3 reflectionColor = texture(SCREEN_TEXTURE, uv).rgb;
reflectionColor *= specular;

vec3 mixedColor = mix(materialColor.rgb, reflectionColor, visibility);
BASE_COLOR = vec4(mixedColor, materialColor.a);
ヘルパー関数
シェーダーのコードでは、いくつかのヘルパー関数が使用されています。correctTextureCoordinates 関数は、使用されているグラフィックスAPIに応じてテクスチャの座標を補正します。これは、D3D11やMetalを使用する場合に必須の処理です。詳細については、CustomMaterial のドキュメントを参照してください。
vec2 correctTextureCoordinates(vec2 uv)
{
    if(FRAMEBUFFER_Y_UP < 0 && NDC_Y_UP == 1)
        uv.y = 1 - uv.y;

    return uv;
}
rayFragOutOfBound 関数は、マーチング処理後に光線が画面外にあるかどうかを判定します。画面外の場合、画面外の物体に関する情報が得られないため、反射色は使用されません。
bool rayFragOutOfBound(vec2 rayFrag, vec2 size)
{
    if(rayFrag.x > size.x || rayFrag.y > size.y)
        return true;

    if(rayFrag.x < 0 || rayFrag.y < 0)
        return true;

    return false;
}
viewPosFromScreen 関数は、DEPTH_TEXTURE を使用して、ビュー空間におけるオブジェクトの位置を取得します。
vec3 viewPosFromScreen(vec2 fragPos, vec2 size)
{
    vec2 uv = fragPos / size;
    vec2 texuv = correctTextureCoordinates(uv);

    float depth = textureLod(DEPTH_TEXTURE, texuv, 0).r;
    if(NEAR_CLIP_VALUE  < 0.0)
        depth = 2 * depth - 1.0;

    vec3 ndc = vec3(2 * uv - 1, depth);
    vec4 viewPos = INVERSE_PROJECTION_MATRIX * vec4(ndc, 1.0);
    viewPos /= viewPos.w;
    return viewPos.xyz;
}
rayViewDepthFromScreen 関数は、 を使用して、ビュー空間におけるオブジェクトの位置を取得します。 関数は、ビュー空間における光線の現在の位置を取得します。この際、深度値は、光線の始点深度と終点深度の間の値を線形補間して算出されます。
float rayViewDepthFromScreen(vec2 size)
{
    vec2 uv = rayData.rayFragCurr / size;
    float depth = mix(rayData.rayFragStartDepth, rayData.rayFragEndDepth, rayData.rayCoveredPart);
    vec3 ndc = vec3(2 * uv - 1, depth);
    vec4 viewPos = INVERSE_PROJECTION_MATRIX * vec4(ndc, 1.0);
    viewPos /= viewPos.w;
    return viewPos.z;
}© 2026 The Qt Company Ltd. Documentation contributions included herein are the copyrights of their respective owners. The documentation provided herein is licensed under the terms of the GNU Free Documentation License version 1.3 as published by the Free Software Foundation. Qt and respective logos are trademarks of The Qt Company Ltd. in Finland and/or other countries worldwide. All other trademarks are property of their respective owners.
