センサーショーケース
センサー・ショーケースは、センサーの使い方をビジュアルな例で紹介します。
概要
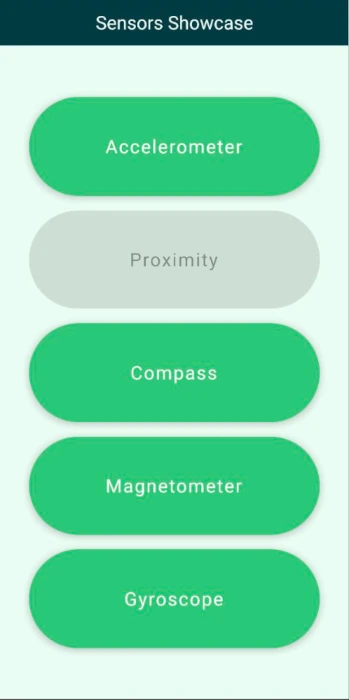
起動時、アプリケーションは各センサーのサブビューのボタンを持つメニューを表示します。センサーのビューは、指定されたセンサーをインスタンス化し、センサーの値を数値として表示し、シンプルなグラフィカル表示で可視化します。
メインメニュー
メインビューには、アプリケーション名のタイトルと、ColumnLayout によって均等にレイアウトされた各サブビューのボタンが表示されます。StackView は、サブビューとメインメニュー間のナビゲーションを管理します。アプリケーションは起動時にセンサーの利用可能性をチェックし、利用可能でないセンサーのボタンは無効にします。
注: 例を簡単にするため、センサーの利用可能性は起動時に一度だけチェックされます。
加速度計ビュー
加速度計ビューは、現在のデバイスの加速度値を表示し、デバイスの加速度とは反対の値で画像を移動させることで、デバイスの動きに比例した慣性効果を画像に与えます。
画像の移動は、加速度センサーonReadingChanged 方式で行われます。
Accelerometer {
    id: accelerometer

    property real x: 0
    property real y: 0
    property real z: 0

    active: true
    dataRate: 25

    onReadingChanged: {
        x = (reading as AccelerometerReading).x
        y = (reading as AccelerometerReading).y
        z = (reading as AccelerometerReading).z
        imageTranslation.x = -x * 10
        imageTranslation.y = y * 10
    }
}
新しい加速度センサーの値があるたびに、画像の移動座標はそれに応じて更新されます。
近接ビュー
近接ビューは、デバイスの近接センサーがカバーされるたびに拡大される画像を表示します。
コンパスビュー
コンパスビューは、コンパスセンサーの読み取り値に応じて回転するコンパス画像を表示し、コンパスを北に向けます。
磁力計ビュー
磁力計ビューは、xとyの磁力計の値で指定されたベクトルの回転角度によって決定される量を中心に回転された磁石画像を表示します。これは、一般的にコンパスが与えるのと同じ回転になり、磁力計の測定値がどのように使用できるかの1つの使用例を示しています。磁力計は3軸すべての測定値を提供するため、これらの測定値をどのように使用するかについて、より自由度があります。
Magnetometer {
    id: magnetometer
    active: true
    dataRate: 25
    onReadingChanged: {
        root.magnetometerX = (reading as MagnetometerReading).x
        root.magnetometerY = (reading as MagnetometerReading).y
        root.magnetometerZ = (reading as MagnetometerReading).z
        root.magnetRotation =
            ((Math.atan2(root.magnetometerX, root.magnetometerY) / Math.PI) * 180)
    }
}
ジャイロスコープビュー
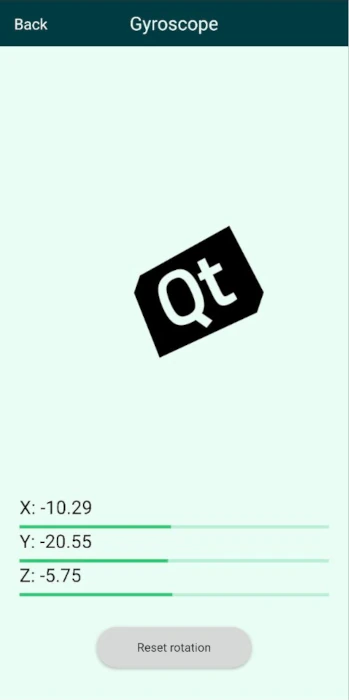
ジャイロスコープビューもまた、ジャイロスコープの読み取り値から計算された量で3軸周りに回転させた画像を表示します。ジャイロセンサーは、3つの空間軸を中心とした相対的な回転変化を提供し、読み取り値の更新間の時間は変化する可能性があるため、読み取り値の時間が保存され、回転変化は読み取り値の更新間の経過時間に基づいて正規化されます。
Gyroscope {
    id: gyroscope

    property var lastTimeStamp: 0
    property real x: 0
    property real y: 0
    property real z: 0

    active: true
    dataRate: 25

    onReadingChanged: {
        x = (reading as GyroscopeReading).x
        y = (reading as GyroscopeReading).y
        z = (reading as GyroscopeReading).z
        let firstCall = false
        if (lastTimeStamp == 0) {
            firstCall = true
        }
        let timeSinceLast = reading.timestamp - lastTimeStamp
        lastTimeStamp = reading.timestamp

        //Skipping the initial time jump from 0
        if (firstCall === true)
            return
        let normalizedX = x * (timeSinceLast / 1000000)
        imageXRotation.angle += normalizedX
        let normalizedY = y * (timeSinceLast / 1000000)
        imageYRotation.angle -= normalizedY
        let normalizedZ = z * (timeSinceLast / 1000000)
        imageZRotation.angle += normalizedZ
    }
}
リセットボタンを押すと、画像の回転は0にリセットされます。
© 2026 The Qt Company Ltd. Documentation contributions included herein are the copyrights of their respective owners. The documentation provided herein is licensed under the terms of the GNU Free Documentation License version 1.3 as published by the Free Software Foundation. Qt and respective logos are trademarks of The Qt Company Ltd. in Finland and/or other countries worldwide. All other trademarks are property of their respective owners.
