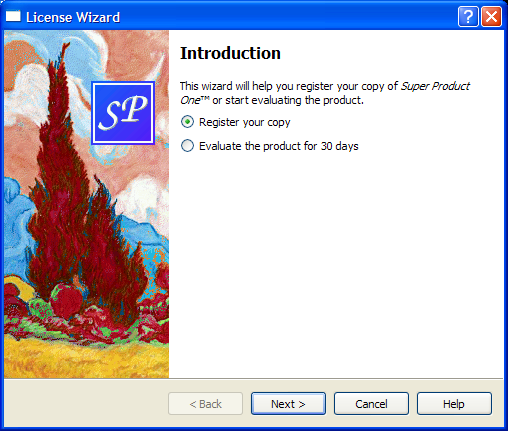
ライセンスウィザードの例
ライセンス・ウィザードの例は、Qtで複雑なウィザードを実装する方法を示しています。

ほとんどのウィザードは、1ページ目の後に2ページ目が続き、最終ページまで続く直線的な構造になっています。Trivial Wizardの例では、そのようなウィザードの作成方法を示します。
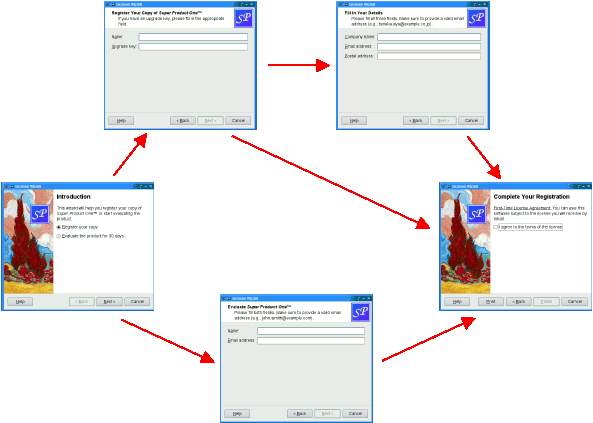
ウィザードの中には、ユーザーによって提供された情報に基づいて、異なるトラバーサル・パスを許可する複雑なものもあります。ライセンス・ウィザードの例は、これを示しています。これは複数のウィザード・ページを提供し、選択されたオプションに応じて、ユーザは異なるページに到達することができます。

この例は、以下のクラスで構成されています:
LicenseWizardQWizard を継承し、ユーザーをライセンス契約の選択プロセスへと導く、5 ページのノンリニアウィザードを実装しています。IntroPageEvaluatePage、 、 、 は、ウィザード・ページを実装する サブクラスです。RegisterPageDetailsPageConclusionPageQWizardPage
LicenseWizard クラス
LicenseWizard クラスはQWizard から派生したもので、架空のソフトウェア製品のコピーの登録プロセスを通じてユーザーをガイドする 5 ページのウィザードを提供します。クラスの定義は次のとおりです:
class LicenseWizard : public QWizard
{
    Q_OBJECT

public:
    enum { Page_Intro, Page_Evaluate, Page_Register, Page_Details,
           Page_Conclusion };

    LicenseWizard(QWidget *parent = nullptr);

private slots:
    void showHelp();
};
このクラスのパブリックAPIはコンストラクタと列挙型に限られています。列挙型は、さまざまなページに関連するIDを定義します:
| クラス名 | 列挙値 | ページID |
|---|---|---|
IntroPage | Page_Intro | 0 |
EvaluatePage | Page_Evaluate | 1 |
RegisterPage | Page_Register | 2 |
DetailsPage | Page_Details | 3 |
ConclusionPage | Page_Conclusion | 4 |
この例では、IDは任意である。IDによってページを参照することができる。
LicenseWizard::LicenseWizard(QWidget *parent)
    : QWizard(parent)
{
    setPage(Page_Intro, new IntroPage);
    setPage(Page_Evaluate, new EvaluatePage);
    setPage(Page_Register, new RegisterPage);
    setPage(Page_Details, new DetailsPage);
    setPage(Page_Conclusion, new ConclusionPage);

    setStartId(Page_Intro);
コンストラクタでは、5つのページを作成し、QWizard::setPage ()を使用してウィザードに挿入し、Page_Intro を最初のページに設定します。
#ifndef Q_OS_MAC
    setWizardStyle(ModernStyle);
#endif
macOS以外のプラットフォームでは、スタイルをModernStyle 、
    setOption(HaveHelpButton, true);
    setPixmap(QWizard::LogoPixmap, QPixmap(":/images/logo.png"));

    connect(this, &QWizard::helpRequested, this, &LicenseWizard::showHelp);

    setWindowTitle(tr("License Wizard"));
}
showHelp() スロットに接続されているHelp ボタンを表示するようにQWizard を設定します。また、ヘッダーを持つすべてのページ(すなわち、EvaluatePage 、RegisterPage 、DetailsPage )にLogoPixmap を設定します。
void LicenseWizard::showHelp()
{
    static QString lastHelpMessage;

    QString message;

    switch (currentId()) {
    case Page_Intro:
        message = tr("The decision you make here will affect which page you "
                     "get to see next.");
        break;
    ...
    default:
        message = tr("This help is likely not to be of any help.");
    }

    if (lastHelpMessage == message)
        message = tr("Sorry, I already gave what help I could. "
                     "Maybe you should try asking a human?");

    QMessageBox::information(this, tr("License Wizard Help"), message);

    lastHelpMessage = message;
}
showHelp() では、現在のページに適したヘルプテキストを表示します。もしユーザーが同じページでHelp を2回クリックした場合、「申し訳ありません、できる限りのヘルプはすでにしました。人間に尋ねてみてはいかがでしょうか?" と表示します。
IntroPageクラス
LicenseWizardページはlicensewizard.h で定義され、licensewizard.cpp で実装されています。
以下はIntroPage の定義と実装です:
class IntroPage : public QWizardPage { Q_OBJECT public: IntroPage(QWidget *parent = nullptr); int nextId() const override; private: QLabel *topLabel; QRadioButton *registerRadioButton; QRadioButton *evaluateRadioButton; }; IntroPage::IntroPage(QWidget *parent) : QWizardPage(parent) { setTitle(tr("Introduction")); setPixmap(QWizard::WatermarkPixmap, QPixmap(":/images/watermark.png")); topLabel = new QLabel(tr("This wizard will help you register your copy of " "<i>Super Product One</i>™ or start " "evaluating the product.")); topLabel->setWordWrap(true); registerRadioButton = new QRadioButton(tr("&Register your copy")); evaluateRadioButton = new QRadioButton(tr("&Evaluate the product for 30 " "days")); registerRadioButton->setChecked(true); QVBoxLayout *layout = new QVBoxLayout; layout->addWidget(topLabel); layout->addWidget(registerRadioButton); layout->addWidget(evaluateRadioButton); setLayout(layout); }
ページはQWizardPage を継承します。title とwatermark pixmap を設定します。subTitle を設定しないことで、このページにヘッダーが表示されないようにしています。(Windowsでは、ウィザードは最初と最後のページに透かしのピクセルマップを表示し、他のページにはヘッダーを表示するのが通例です)。
int IntroPage::nextId() const
{
    if (evaluateRadioButton->isChecked()) {
        return LicenseWizard::Page_Evaluate;
    } else {
        return LicenseWizard::Page_Register;
    }
}
nextId() 関数は、Evaluate the product for 30 days オプションがチェックされていればEvaluatePage の ID を返し、そうでなければRegisterPage の ID を返します。
EvaluatePageクラス
EvaluatePage は少し複雑です:
class EvaluatePage : public QWizardPage { Q_OBJECT public: EvaluatePage(QWidget *parent = nullptr); int nextId() const override; private: QLabel *nameLabel; QLabel *emailLabel; QLineEdit *nameLineEdit; QLineEdit *emailLineEdit; }; EvaluatePage::EvaluatePage(QWidget *parent) : QWizardPage(parent) { setTitle(tr("Evaluate <i>Super Product One</i>™")); setSubTitle(tr("Please fill both fields. Make sure to provide a valid " "email address (e.g., john.smith@example.com).")); nameLabel = new QLabel(tr("N&ame:")); nameLineEdit = new QLineEdit; ... registerField("evaluate.name*", nameLineEdit); registerField("evaluate.email*", emailLineEdit); ... }
まず、ページのtitle とsubTitle を設定します。
次に、子ウィジェットを作成し、それらに関連付けられたwizard fields を作成し、それらをレイアウトに配置します。フィールドは、名前の横にアスタリスク(*)を付けて作成します。mandatory fieldsつまり、ユーザがNext ボタン ( macOS ではContinue ) を押す前に入力しなければならないフィールドです。フィールドの値は、他のどのページからもQWizardPage::field()を使ってアクセスすることができる。
ページをリセットすることは、2つのテキスト・フィールドをクリアすることに等しい。
int EvaluatePage::nextId() const
{
    return LicenseWizard::Page_Conclusion;
}
次のページは常にConclusionPage 。
ConclusionPageクラス
RegisterPage とDetailsPage はEvaluatePage とよく似ています。ConclusionPage に直接アクセスしてみましょう:
class ConclusionPage : public QWizardPage
{
    Q_OBJECT

public:
    ConclusionPage(QWidget *parent = nullptr);

    void initializePage() override;
    int nextId() const override;
    void setVisible(bool visible) override;

private slots:
    void printButtonClicked();

private:
    QLabel *bottomLabel;
    QCheckBox *agreeCheckBox;
};
今回は、nextId() に加えて、QWizardPage::initializePage() とQWidget::setVisible() を再実装します。また、printButtonClicked() というプライベート・スロットを宣言します。
int IntroPage::nextId() const
{
    if (evaluateRadioButton->isChecked()) {
        return LicenseWizard::Page_Evaluate;
    } else {
        return LicenseWizard::Page_Register;
    }
}
QWizardPage::nextId() のデフォルトの実装は、次のIDを持つページを返し、現在のページが最も高いIDを持つ場合は-1を返す。この動作は、Page_Conclusion が 5 に等しく、それより高い ID を持つページが存在しないため、ここでも機能するが、そのような微妙な動作に依存するのを避けるため、nextId() を再実装して -1 を返すようにする。
void ConclusionPage::initializePage()
{
    QString licenseText;

    if (wizard()->hasVisitedPage(LicenseWizard::Page_Evaluate)) {
        licenseText = tr("<u>Evaluation License Agreement:</u> "
                         "You can use this software for 30 days and make one "
                         "backup, but you are not allowed to distribute it.");
    } else if (wizard()->hasVisitedPage(LicenseWizard::Page_Details)) {
        const QString emailAddress = field("details.email").toString();
        licenseText = tr("<u>First-Time License Agreement:</u> "
                         "You can use this software subject to the license "
                         "you will receive by email sent to %1.").arg(emailAddress);
    } else {
        licenseText = tr("<u>Upgrade License Agreement:</u> "
                         "This software is licensed under the terms of your "
                         "current license.");
    }
    bottomLabel->setText(licenseText);
}
QWizard::hasVisitedPage()を使用して、ユーザーが選択したライセンス契約のタイプを判断する。ユーザーがEvaluatePage を入力した場合、ライセンス・テキストは評価ライセンス契約を参照する。ユーザーがDetailsPage に記入した場合、ライセンステキストは初回ライセンス契約です。ユーザーがアップグレードキーを提供し、DetailsPage をスキップした場合、ライセンステキストは更新ライセンス契約です。
void ConclusionPage::setVisible(bool visible)
{
    QWizardPage::setVisible(visible);

    if (visible) {
        wizard()->setButtonText(QWizard::CustomButton1, tr("&Print"));
        wizard()->setOption(QWizard::HaveCustomButton1, true);
        connect(wizard(), &QWizard::customButtonClicked,
                this, &ConclusionPage::printButtonClicked);
    } else {
        wizard()->setOption(QWizard::HaveCustomButton1, false);
        disconnect(wizard(), &QWizard::customButtonClicked,
                   this, &ConclusionPage::printButtonClicked);
    }
}
ConclusionPage 、ウィザードにPrint 。これを実現する1つの方法は、QWidget::setVisible ()を再実装することです:
- ページが表示されたら、CustomButton1 ボタンのテキストを Printページが表示されている場合、
printButtonClicked()ボタンのテキストを設定し、HaveCustomButton1 オプションを有効にし、QWizard'のcustomButtonClicked() シグナルを スロットに接続します。 - ページが非表示の場合は、HaveCustomButton1 オプションを無効にし、
printButtonClicked()スロットを切断します。
QWizard およびTrivial Wizard Exampleも参照してください 。
© 2025 The Qt Company Ltd. Documentation contributions included herein are the copyrights of their respective owners. The documentation provided herein is licensed under the terms of the GNU Free Documentation License version 1.3 as published by the Free Software Foundation. Qt and respective logos are trademarks of The Qt Company Ltd. in Finland and/or other countries worldwide. All other trademarks are property of their respective owners.

