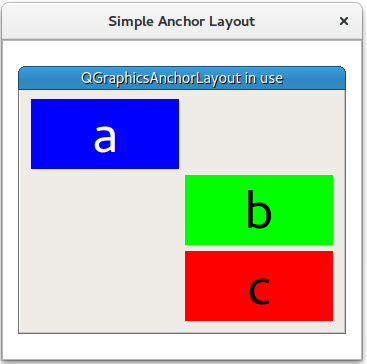
簡単なアンカーレイアウトの例
グラフィックスビューシーンでのアンカーレイアウトの例です。
単純なアンカー・レイアウトの例では、QGraphicsAnchorLayout クラスの基本的な使い方を示します。

この例では、QGraphicsScene (scene)、3つのウィジェット (a,b,c)、QGraphicsAnchorlayout (layout)を作成することから始めます。
    QGraphicsScene scene;

    Widget *a = new Widget(Qt::blue, Qt::white, "a");
    a->setPreferredSize(100, 100);
    Widget *b = new Widget(Qt::green, Qt::black, "b");
    b->setPreferredSize(100, 100);
    Widget *c = new Widget(Qt::red, Qt::black, "c");
    c->setPreferredSize(100, 100);

    QGraphicsAnchorLayout *layout = new QGraphicsAnchorLayout;
まず、アイテムa の左上隅をlayout の左上隅にアンカーします。 これは、2つのステップで行うことができます:
    layout->addAnchor(a, Qt::AnchorTop, layout, Qt::AnchorTop);
    layout->addAnchor(a, Qt::AnchorLeft, layout, Qt::AnchorLeft);
あるいは1ステップで行います:
次に、a の右アンカーをb の左アンカーにアンカーし、アイテムb の上部をa の下部にアンカーする。
    layout->addAnchor(b, Qt::AnchorLeft, a, Qt::AnchorRight);
    layout->addAnchor(b, Qt::AnchorTop, a, Qt::AnchorBottom);
第3のウィジェットc をウィジェットb の下に置く:
アイテムb とc は互いに水平に固定されている:
layout->addAnchors(b, c, Qt::Horizontal);
アイテムcは、ウィジェット の右下に固定される。layout
最後に、QGraphicsWidget w がQGraphicsView view に表示される。
    auto w = new QGraphicsWidget(nullptr, Qt::Window | Qt::CustomizeWindowHint | Qt::WindowTitleHint);
    w->setPos(20, 20);
    w->setMinimumSize(100, 100);
    w->setPreferredSize(320, 240);
    w->setLayout(layout);
    w->setWindowTitle(QApplication::translate("simpleanchorlayout", "QGraphicsAnchorLayout in use"));
    scene.addItem(w);

    QGraphicsView view;
    view.setScene(&scene);
    view.setWindowTitle(QApplication::translate("simpleanchorlayout", "Simple Anchor Layout"));

    view.resize(360, 320);
    view.show();

    return app.exec();
© 2025 The Qt Company Ltd. Documentation contributions included herein are the copyrights of their respective owners. The documentation provided herein is licensed under the terms of the GNU Free Documentation License version 1.3 as published by the Free Software Foundation. Qt and respective logos are trademarks of The Qt Company Ltd. in Finland and/or other countries worldwide. All other trademarks are property of their respective owners.

