オーダーフォームの例
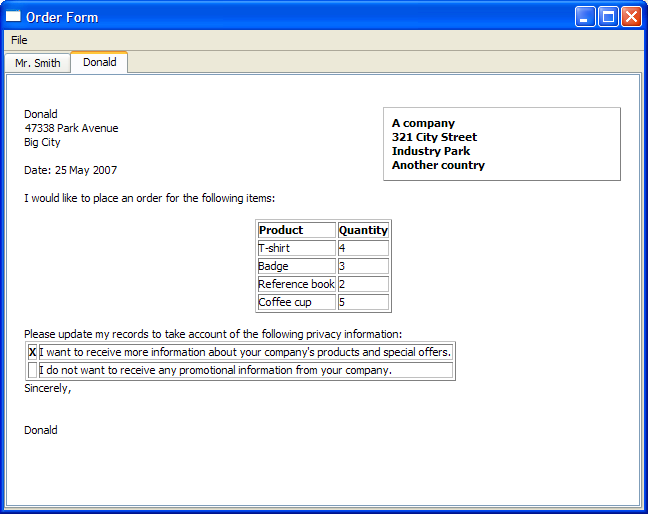
注文フォームの例では、ダイアログ内のユーザーによるデータ入力と単純なテンプレートを組み合わせてリッチテキスト文書を生成する方法を示します。

詳細ダイアログの定義
DetailsDialog クラスはQDialog のサブクラスです。verify() スロットを実装し、DetailsDialog の内容を後で確認できるようにしています。これについてはDetailsDialog 実装で詳しく説明します。
class DetailsDialog : public QDialog
{
    Q_OBJECT

public:
    DetailsDialog(const QString &title, QWidget *parent);

public slots:
    void verify();

public:
    QList<QPair<QString, int> > orderItems();
    QString senderName() const;
    QString senderAddress() const;
    bool sendOffers();

private:
    void setupItemsTable();

    QLabel *nameLabel;
    QLabel *addressLabel;
    QCheckBox *offersCheckBox;
    QLineEdit *nameEdit;
    QStringList items;
    QTableWidget *itemsTable;
    QTextEdit *addressEdit;
    QDialogButtonBox *buttonBox;
};
DetailsDialog のコンストラクタはパラメータtitle とparent を受け取ります。このクラスは4つのゲッター関数を定義しています:orderItems() senderName() 、senderAddress() 、sendOffers() の4つのゲッター関数を定義し、外部からデータにアクセスできるようにします。
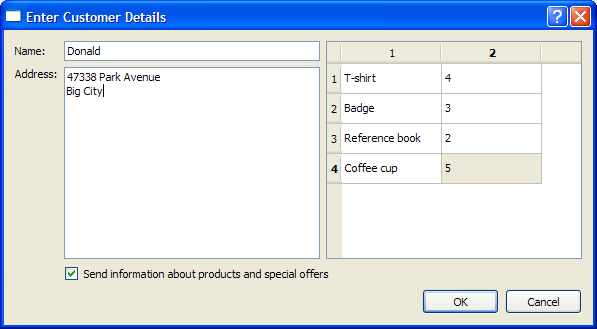
このクラス定義には、必須フィールド用の入力ウィジェットnameEdit とaddressEdit が含まれています。また、QCheckBox とQDialogButtonBox も定義されている。前者は、製品やオファーの情報を受け取るオプションをユーザーに提供し、後者は、使用されるボタンがユーザーのネイティブ・プラットフォームに従って配置されるようにする。さらに、QTableWidget 、itemsTable は、注文の詳細を保持するために使用される。
以下のスクリーンショットは、私たちが作成しようとしているDetailsDialog を示しています。

DetailsDialogの実装
DetailsDialog のコンストラクタは、先に定義したフィールドとそれぞれのラベルをインスタンス化します。offersCheckBox のラベルが設定され、setupItemsTable() 関数が呼び出され、itemsTable の設定と入力が行われます。QDialogButtonBox オブジェクト、buttonBox は、OK とCancel ボタンとともにインスタンス化される。このbuttonBox のaccepted() とrejected() シグナルはDetailsDialog のverify() とreject() スロットに接続されています。
DetailsDialog::DetailsDialog(const QString &title, QWidget *parent)
    : QDialog(parent)
{
    nameLabel = new QLabel(tr("Name:"));
    addressLabel = new QLabel(tr("Address:"));
    addressLabel->setAlignment(Qt::AlignLeft | Qt::AlignTop);

    nameEdit = new QLineEdit;
    addressEdit = new QTextEdit;

    offersCheckBox = new QCheckBox(tr("Send information about products and "
                                      "special offers"));

    setupItemsTable();

    buttonBox = new QDialogButtonBox(QDialogButtonBox::Ok
                                     | QDialogButtonBox::Cancel);

    connect(buttonBox, &QDialogButtonBox::accepted, this, &DetailsDialog::verify);
    connect(buttonBox, &QDialogButtonBox::rejected, this, &DetailsDialog::reject);
QGridLayout は、すべてのオブジェクトをDetailsDialog に配置するために使用されます。
    QGridLayout *mainLayout = new QGridLayout;
    mainLayout->addWidget(nameLabel, 0, 0);
    mainLayout->addWidget(nameEdit, 0, 1);
    mainLayout->addWidget(addressLabel, 1, 0);
    mainLayout->addWidget(addressEdit, 1, 1);
    mainLayout->addWidget(itemsTable, 0, 2, 2, 1);
    mainLayout->addWidget(offersCheckBox, 2, 1, 1, 2);
    mainLayout->addWidget(buttonBox, 3, 0, 1, 3);
    setLayout(mainLayout);

    setWindowTitle(title);
}
setupItemsTable() 関数はQTableWidget オブジェクトitemsTable をインスタンス化し、QStringList オブジェクトitems に基づいて行数を設定する。列の数は2に設定され、"名前 "と "数量 "のレイアウトを提供する。for itemsTable 、name 項目のフラグはQt::ItemIsEnabled またはQt::ItemIsSelectable に設定される。デモンストレーションのため、quantity 項目は 1 に設定され、itemsTable のすべての項目は数量にこの値を持つ。しかし、これは実行時にセルの内容を編集することで変更できる。
void DetailsDialog::setupItemsTable()
{
    items << tr("T-shirt") << tr("Badge") << tr("Reference book")
          << tr("Coffee cup");

    itemsTable = new QTableWidget(items.count(), 2);

    for (int row = 0; row < items.count(); ++row) {
        QTableWidgetItem *name = new QTableWidgetItem(items[row]);
        name->setFlags(Qt::ItemIsEnabled | Qt::ItemIsSelectable);
        itemsTable->setItem(row, 0, name);
        QTableWidgetItem *quantity = new QTableWidgetItem("1");
        itemsTable->setItem(row, 1, quantity);
    }
}
orderItems() 関数はitemsTable からデータを抽出し、QList<QPair<QString,int>>の形式で返します。各QPair はアイテムと注文数量に対応しています。
QList<QPair<QString, int> > DetailsDialog::orderItems()
{
    QList<QPair<QString, int> > orderList;

    for (int row = 0; row < items.count(); ++row) {
        QPair<QString, int> item;
        item.first = itemsTable->item(row, 0)->text();
        int quantity = itemsTable->item(row, 1)->data(Qt::DisplayRole).toInt();
        item.second = qMax(0, quantity);
        orderList.append(item);
    }

    return orderList;
}
senderName() 関数は、注文フォームの名前フィールドを格納するために使用されるQLineEdit の値を返すために使用されます。
QString DetailsDialog::senderName() const
{
    return nameEdit->text();
}
senderAddress() 関数は、オーダーフォームの住所を格納するQTextEdit の値を返すために使用される。
QString DetailsDialog::senderAddress() const
{
    return addressEdit->toPlainText();
}
sendOffers() 関数は、true またはfalse の値を返すために使用される。この値は、オーダーフォームの顧客が、会社のオファーやプロモーションに関する詳細情報の受信を希望するかどうかを判断するために使用される。
bool DetailsDialog::sendOffers()
{
    return offersCheckBox->isChecked();
}
verify() 関数は、ユーザーがDetailsDialog に入力した詳細を確認するために使用される追加実装スロットです。 入力された詳細が不完全な場合、QMessageBox が表示され、ユーザーにDetailsDialog を破棄するオプションを提供します。そうでない場合、詳細が受理され、accept() 関数が呼び出されます。
void DetailsDialog::verify()
{
    if (!nameEdit->text().isEmpty() && !addressEdit->toPlainText().isEmpty()) {
        accept();
        return;
    }

    QMessageBox::StandardButton answer;
    answer = QMessageBox::warning(this, tr("Incomplete Form"),
        tr("The form does not contain all the necessary information.\n"
           "Do you want to discard it?"),
        QMessageBox::Yes | QMessageBox::No);

    if (answer == QMessageBox::Yes)
        reject();
}
メインウィンドウの定義
MainWindow クラスはQMainWindow のサブクラスで、openDialog() とprintFile() の2つのスロットを実装している。また、QTabWidget のプライベート・インスタンスletters も含んでいる。
class MainWindow : public QMainWindow
{
    Q_OBJECT

public:
    MainWindow();
    void createSample();

public slots:
    void openDialog();
    void printFile();

private:
    void createLetter(const QString &name, const QString &address,
                      QList<QPair<QString,int> > orderItems,
                      bool sendOffers);

    QAction *printAction;
    QTabWidget *letters;
};
MainWindow の実装
MainWindow コンストラクタはfileMenu と、必要なアクションであるnewAction とprintAction をセットアップします。これらのアクションのtriggered() シグナルは、追加実装された openDialog() スロットとデフォルトの close() スロットに接続されています。QTabWidget,letters がインスタンス化され、ウィンドウの中心ウィジェットとして設定されます。
MainWindow::MainWindow()
{
    QMenu *fileMenu = new QMenu(tr("&File"), this);
    QAction *newAction = fileMenu->addAction(tr("&New..."));
    newAction->setShortcuts(QKeySequence::New);
    printAction = fileMenu->addAction(tr("&Print..."), this, &MainWindow::printFile);
    printAction->setShortcuts(QKeySequence::Print);
    printAction->setEnabled(false);
    QAction *quitAction = fileMenu->addAction(tr("E&xit"));
    quitAction->setShortcuts(QKeySequence::Quit);
    menuBar()->addMenu(fileMenu);

    letters = new QTabWidget;

    connect(newAction, &QAction::triggered, this, &MainWindow::openDialog);
    connect(quitAction, &QAction::triggered, this, &MainWindow::close);

    setCentralWidget(letters);
    setWindowTitle(tr("Order Form"));
}
createLetter() 関数は、QTextEdit 、editor を親として新しいQTabWidget を作成します。この関数は、editor を "埋める "ために、DetailsDialog で取得したパラメータに対応する4つのパラメータを受け取る。
void MainWindow::createLetter(const QString &name, const QString &address,
                              QList<QPair<QString,int> > orderItems,
                              bool sendOffers)
{
    QTextEdit *editor = new QTextEdit;
    int tabIndex = letters->addTab(editor, name);
    letters->setCurrentIndex(tabIndex);
次に、QTextEdit::textCursor ()を使用して、editor のカーソルを取得する。そして、QTextCursor::Start を使ってcursor をドキュメントの先頭に移動します。
    QTextCursor cursor(editor->textCursor());
    cursor.movePosition(QTextCursor::Start);
リッチテキストドキュメントの構造を思い出してください。そこでは、フレームやテーブルのシーケンスは常にテキストブロックで区切られており、そのうちのいくつかは情報を含まないかもしれません。
オーダーフォームの例の場合、この部分の文書構造は以下の表で説明されます:
| 参照FrameFormatを持つフレーム | |
| ブロック | A company |
| ブロック | |
| ブロック | 321 City Street |
| ブロック | |
| ブロック | Industry Park |
| ブロック | |
| ブロック | Another country |
これは以下のコードで実現できる:
    QTextFrame *topFrame = cursor.currentFrame();
    QTextFrameFormat topFrameFormat = topFrame->frameFormat();
    topFrameFormat.setPadding(16);
    topFrame->setFrameFormat(topFrameFormat);

    QTextCharFormat textFormat;
    QTextCharFormat boldFormat;
    boldFormat.setFontWeight(QFont::Bold);

    QTextFrameFormat referenceFrameFormat;
    referenceFrameFormat.setBorder(1);
    referenceFrameFormat.setPadding(8);
    referenceFrameFormat.setPosition(QTextFrameFormat::FloatRight);
    referenceFrameFormat.setWidth(QTextLength(QTextLength::PercentageLength, 40));
    cursor.insertFrame(referenceFrameFormat);

    cursor.insertText("A company", boldFormat);
    cursor.insertBlock();
    cursor.insertText("321 City Street");
    cursor.insertBlock();
    cursor.insertText("Industry Park");
    cursor.insertBlock();
    cursor.insertText("Another country");
topFrame はeditor'の最上位フレームであり、ドキュメント構造には表示されないことに注意。
次に、cursor'の位置をtopFrame の最後の位置に戻し、顧客の名前(コンストラクタによって提供される)と住所を入力します - 範囲ベースのforループを使用して、QString 、address を走査します。
    cursor.setPosition(topFrame->lastPosition());

    cursor.insertText(name, textFormat);
    const QStringList lines = address.split('\n');
    for (const QString &line : lines) {
        cursor.insertBlock();
        cursor.insertText(line);
    }
cursor はtopFrame に戻り、上記のコードのドキュメント構造は次のようになります:
| ブロック | Donald |
| ブロック | 47338 Park Avenue |
| ブロック | Big City |
間隔を空けるため、insertBlock ()を2回呼び出している。currentDate ()が取得され、表示される。setWidth() を使ってbodyFrameFormat の幅を広げ、その幅で新しいフレームを挿入する。
    cursor.insertBlock();
    cursor.insertBlock();

    QDate date = QDate::currentDate();
    cursor.insertText(tr("Date: %1").arg(date.toString("d MMMM yyyy")),
                      textFormat);
    cursor.insertBlock();

    QTextFrameFormat bodyFrameFormat;
    bodyFrameFormat.setWidth(QTextLength(QTextLength::PercentageLength, 100));
    cursor.insertFrame(bodyFrameFormat);
次のコードは、注文フォームに標準テキストを挿入します。
    cursor.insertText(tr("I would like to place an order for the following "
                         "items:"), textFormat);
    cursor.insertBlock();
    cursor.insertBlock();
文書構造のこの部分には、日付、bodyFrameFormat のフレーム、および標準テキストが含まれるようになりました。
| ブロック | |
| ブロック | |
| ブロック | Date: 25 May 2007 |
| ブロック | |
| bodyFrameFormatを持つフレーム | |
| ブロック | I would like to place an order for the following items: |
| ブロック | |
| ブロック |
QTextTableFormat オブジェクト、orderTableFormat は、商品の種類と注文数量を保持するために使われる。
    QTextTableFormat orderTableFormat;
    orderTableFormat.setAlignment(Qt::AlignHCenter);
    QTextTable *orderTable = cursor.insertTable(1, 2, orderTableFormat);

    QTextFrameFormat orderFrameFormat = cursor.currentFrame()->frameFormat();
    orderFrameFormat.setBorder(1);
    cursor.currentFrame()->setFrameFormat(orderFrameFormat);
orderTable のヘッダーを設定するために、cellAt ()を使用する。
    cursor = orderTable->cellAt(0, 0).firstCursorPosition();
    cursor.insertText(tr("Product"), boldFormat);
    cursor = orderTable->cellAt(0, 1).firstCursorPosition();
    cursor.insertText(tr("Quantity"), boldFormat);
次に、QPair オブジェクトのQList を繰り返し処理し、orderTable を生成する。
    for (int i = 0; i < orderItems.count(); ++i) {
        QPair<QString,int> item = orderItems[i];
        int row = orderTable->rows();

        orderTable->insertRows(row, 1);
        cursor = orderTable->cellAt(row, 0).firstCursorPosition();
        cursor.insertText(item.first, textFormat);
        cursor = orderTable->cellAt(row, 1).firstCursorPosition();
        cursor.insertText(QString("%1").arg(item.second), textFormat);
    }
このセクションの文書構造は以下のようになる:
orderTable orderTableFormat | |
| ブロック | Product |
| ブロック | Quantity |
| ブロック | T-shirt |
| ブロック | 4 |
| ブロック | Badge |
| ブロック | 3 |
| ブロック | Reference book |
| ブロック | 2 |
| ブロック | Coffee cup |
| ブロック | 5 |
その後、cursor はtopFrame のlastPosition() に戻され、さらに標準的なテキストが挿入される。
    cursor.setPosition(topFrame->lastPosition());

    cursor.insertBlock();
    cursor.insertText(tr("Please update my records to take account of the "
                         "following privacy information:"));
    cursor.insertBlock();
別のQTextTable が挿入され、オファーに関する顧客の希望が表示される。
    QTextTable *offersTable = cursor.insertTable(2, 2);

    cursor = offersTable->cellAt(0, 1).firstCursorPosition();
    cursor.insertText(tr("I want to receive more information about your "
                         "company's products and special offers."), textFormat);
    cursor = offersTable->cellAt(1, 1).firstCursorPosition();
    cursor.insertText(tr("I do not want to receive any promotional information "
                         "from your company."), textFormat);

    if (sendOffers)
        cursor = offersTable->cellAt(0, 0).firstCursorPosition();
    else
        cursor = offersTable->cellAt(1, 0).firstCursorPosition();

    cursor.insertText("X", boldFormat);
この部分の文書構造は
| ブロック | |
| ブロック | Please update my... |
| ブロック | |
offersTable | |
| ブロック | I want to receive... |
| ブロック | I do not want to receive... |
| ブロック | X |
cursor 、顧客名とともに「Sincerely」を挿入する。スペーシングのため、さらにブロックが挿入されています。printAction は、注文書が印刷できるようになったことを示すために有効になっています。
    cursor.setPosition(topFrame->lastPosition());
    cursor.insertBlock();
    cursor.insertText(tr("Sincerely,"), textFormat);
    cursor.insertBlock();
    cursor.insertBlock();
    cursor.insertBlock();
    cursor.insertText(name);

    printAction->setEnabled(true);
}
文書構造の下部は
| ブロック | |
| ブロック | Sincerely, |
| ブロック | |
| ブロック | |
| ブロック | |
| ブロック | Donald |
createSample() 関数は説明のために使用され、注文書のサンプルを作成します。
void MainWindow::createSample()
{
    DetailsDialog dialog("Dialog with default values", this);
    createLetter("Mr. Smith", "12 High Street\nSmall Town\nThis country",
                 dialog.orderItems(), true);
}
openDialog() 関数はDetailsDialog オブジェクトを開きます。dialog の詳細が受理されると、dialog から抽出されたパラメータを使用してcreateLetter() 関数が呼び出されます。
void MainWindow::openDialog()
{
    DetailsDialog dialog(tr("Enter Customer Details"), this);

    if (dialog.exec() == QDialog::Accepted) {
        createLetter(dialog.senderName(), dialog.senderAddress(),
                     dialog.orderItems(), dialog.sendOffers());
    }
}
注文書を印刷するために、以下に示すようにprintFile() 関数が含まれています:
void MainWindow::printFile()
{
#if defined(QT_PRINTSUPPORT_LIB) && QT_CONFIG(printdialog)
    QTextEdit *editor = static_cast<QTextEdit*>(letters->currentWidget());
    QPrinter printer;

    QPrintDialog dialog(&printer, this);
    dialog.setWindowTitle(tr("Print Document"));
    if (editor->textCursor().hasSelection())
        dialog.setOption(QAbstractPrintDialog::PrintSelection);
    if (dialog.exec() != QDialog::Accepted) {
        return;
    }

    editor->print(&printer);
#endif
}
この関数では、文書全体を印刷する代わりに、QTextCursor::hasSelection() で選択した領域を印刷することもできます。
main() 関数
main() 関数はMainWindow をインスタンス化し、show() 関数とcreateSample() 関数を呼び出す前に、そのサイズを 640x480 ピクセルに設定します。
int main(int argc, char *argv[])
{
    QApplication app(argc, argv);
    MainWindow window;
    window.resize(640, 480);
    window.show();
    window.createSample();
    return app.exec();
}
© 2025 The Qt Company Ltd. Documentation contributions included herein are the copyrights of their respective owners. The documentation provided herein is licensed under the terms of the GNU Free Documentation License version 1.3 as published by the Free Software Foundation. Qt and respective logos are trademarks of The Qt Company Ltd. in Finland and/or other countries worldwide. All other trademarks are property of their respective owners.

