ウィンドウフラグの例
ウィンドウフラグの例では、Qtで利用可能なウィンドウフラグの使い方を説明します。
ウィンドウ・フラグには、型とヒントがあります。タイプは、ウィジェットの様々なウィンドウシステムプロパティを指定するために使用されます。ウィジェットは1つのタイプしか持つことができず、デフォルトはQt::Widget です。 しかし、ウィジェットは0個以上のヒントを持つことができます。ヒントは、トップレベル・ウィンドウの外観をカスタマイズするために使用されます。
ウィジェットのフラグは、フラグのORの組み合わせを格納するQt::WindowFlags 型に格納されます。

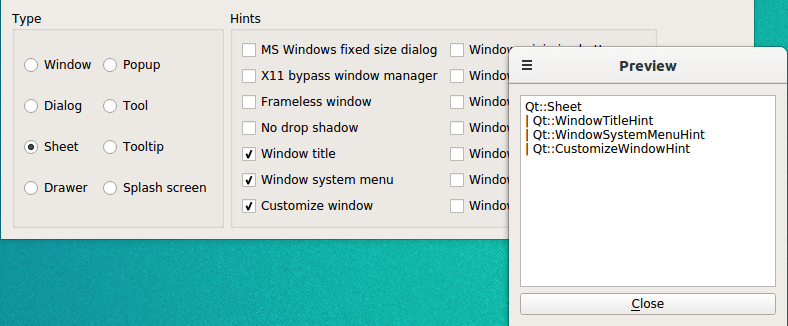
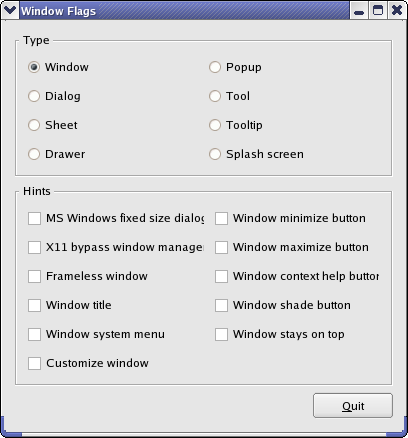
ウィンドウフラグの例のスクリーンショット
この例は2つのクラスから構成されています:
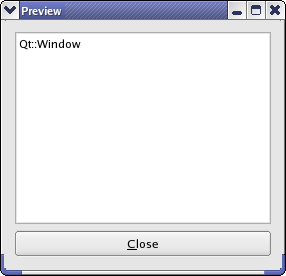
ControllerWindowはメイン・アプリケーション・ウィジェットで、利用可能なウィンドウ・フラグの中からユーザーが選択し、その効果を別のプレビュー・ウィンドウに表示します。PreviewWindowは、現在設定されているウィンドウ・フラグの名前を読み取り専用のテキストエディタで表示するカスタムウィジェットです。
まず、ControllerWindow クラスを確認し、次にPreviewWindow クラスを見ていきます。
ControllerWindowクラスの定義
class ControllerWindow : public QWidget
{
    Q_OBJECT

public:
    ControllerWindow(QWidget *parent = nullptr);

private slots:
    void updatePreview();

private:
    void createTypeGroupBox();
    void createHintsGroupBox();
    QCheckBox *createCheckBox(const QString &text);
    QRadioButton *createRadioButton(const QString &text);

    PreviewWindow *previewWindow;

    QGroupBox *typeGroupBox;
    QGroupBox *hintsGroupBox;
    QPushButton *quitButton;

    QRadioButton *windowRadioButton;
    QRadioButton *dialogRadioButton;
    QRadioButton *sheetRadioButton;
    QRadioButton *drawerRadioButton;
    QRadioButton *popupRadioButton;
    QRadioButton *toolRadioButton;
    QRadioButton *toolTipRadioButton;
    QRadioButton *splashScreenRadioButton;

    QCheckBox *msWindowsFixedSizeDialogCheckBox;
    QCheckBox *x11BypassWindowManagerCheckBox;
    QCheckBox *framelessWindowCheckBox;
    QCheckBox *windowNoShadowCheckBox;
    QCheckBox *windowTitleCheckBox;
    QCheckBox *windowSystemMenuCheckBox;
    QCheckBox *windowMinimizeButtonCheckBox;
    QCheckBox *windowMaximizeButtonCheckBox;
    QCheckBox *windowCloseButtonCheckBox;
    QCheckBox *windowContextHelpButtonCheckBox;
    QCheckBox *windowShadeButtonCheckBox;
    QCheckBox *windowStaysOnTopCheckBox;
    QCheckBox *windowStaysOnBottomCheckBox;
    QCheckBox *customizeWindowHintCheckBox;
};
ControllerWindow クラスはQWidget を継承しています。このウィジェットは、ユーザが利用可能なウィンドウフラグを選択し、その効果を別のプレビューウィンドウに表示します。
ユーザーがウィンドウ・フラグを変更するたびにプレビュー・ウィンドウをリフレッシュするために、updatePreview() スロットを宣言します。
また、コンストラクタを簡単にするために、いくつかのプライベート関数を宣言します:createTypeGroupBox() 関数を呼び出して、createButton() 関数を使用して、利用可能なウィンドウ・タイプごとにラジオ・ボタンを作成し、グループ・ボックス内に集めます。同様に、createHintsGroupBox() 関数を使用して、createCheckBox() プライベート関数を使用して、利用可能なヒントごとにチェックボックスを作成します。
さまざまなラジオボタンとチェックボックスに加えて、現在選択されているウィンドウフラグの効果を表示するために、関連するPreviewWindow 。

ControllerWindowクラスの実装
ControllerWindow::ControllerWindow(QWidget(*parent) : QWidget(parent) { previewWindow= newPreviewWindow(this); createTypeGroupBox(); createHintsGroupBox(); quitButton= newQPushButton(tr("&Quit")); connect(quitButton, &)QPushButton::clicked、            qApp, &QCoreApplication::quit);

    QHBoxLayout*bottomLayout = newQHBoxLayoutbottomLayout->addStretch(); bottomLayout->addWidget(quitButton);    QHBoxLayout*mainLayout = newQHBoxLayoutmainLayout->addWidget(typeGroupBox); mainLayout->addWidget(hintsGroupBox); mainLayout->addLayout(bottomLayout); setLayout(mainLayout); setWindowTitle(tr("Window Flags")); updatePreview(); }
コンストラクタでは、まずプレビュー・ウィンドウを作成します。次に、createTypeGroupBox() 関数とcreateHintsGroupBox() 関数を使用して、使用可能なウィンドウ・フラグを含むグループ・ボックスを作成します。さらに、Quit ボタンを作成します。WindowFlag ウィジェットの右下隅にボタンが表示されるように、ボタンと伸縮可能なスペースを別のレイアウトに配置します。
最後に、ボタンのレイアウトと2つのグループボックスをQVBoxLayout 、ウィンドウタイトルを設定し、updatePreview() スロットを使用してプレビューウィンドウをリフレッシュします。
void ControllerWindow::updatePreview()
{
    Qt::WindowFlags flags;

    if (windowRadioButton->isChecked())
        flags = Qt::Window;
    else if (dialogRadioButton->isChecked())
        flags = Qt::Dialog;
    else if (sheetRadioButton->isChecked())
        flags = Qt::Sheet;
    else if (drawerRadioButton->isChecked())
        flags = Qt::Drawer;
    else if (popupRadioButton->isChecked())
        flags = Qt::Popup;
    else if (toolRadioButton->isChecked())
        flags = Qt::Tool;
    else if (toolTipRadioButton->isChecked())
        flags = Qt::ToolTip;
    else if (splashScreenRadioButton->isChecked())
        flags = Qt::SplashScreen;
updatePreview() スロットは、ユーザーがウィンドウフラグを変更するたびに呼び出されます。まず、空のQt::WindowFlags flags を作成し、次に、チェックされているタイプのどれかを決定し、それをflags に追加します。
    if (msWindowsFixedSizeDialogCheckBox->isChecked())
        flags |= Qt::MSWindowsFixedSizeDialogHint;
    if (x11BypassWindowManagerCheckBox->isChecked())
        flags |= Qt::X11BypassWindowManagerHint;
    if (framelessWindowCheckBox->isChecked())
        flags |= Qt::FramelessWindowHint;
    if (windowNoShadowCheckBox->isChecked())
        flags |= Qt::NoDropShadowWindowHint;
    if (windowTitleCheckBox->isChecked())
        flags |= Qt::WindowTitleHint;
    if (windowSystemMenuCheckBox->isChecked())
        flags |= Qt::WindowSystemMenuHint;
    if (windowMinimizeButtonCheckBox->isChecked())
        flags |= Qt::WindowMinimizeButtonHint;
    if (windowMaximizeButtonCheckBox->isChecked())
        flags |= Qt::WindowMaximizeButtonHint;
    if (windowCloseButtonCheckBox->isChecked())
        flags |= Qt::WindowCloseButtonHint;
    if (windowContextHelpButtonCheckBox->isChecked())
        flags |= Qt::WindowContextHelpButtonHint;
    if (windowShadeButtonCheckBox->isChecked())
        flags |= Qt::WindowShadeButtonHint;
    if (windowStaysOnTopCheckBox->isChecked())
        flags |= Qt::WindowStaysOnTopHint;
    if (windowStaysOnBottomCheckBox->isChecked())
        flags |= Qt::WindowStaysOnBottomHint;
    if (customizeWindowHintCheckBox->isChecked())
        flags |= Qt::CustomizeWindowHint;

    previewWindow->setWindowFlags(flags);
また、どのヒントにチェックを入れるかを決定し、OR演算子を使ってflags に追加する。flags を使用して、プレビュー・ウィンドウのウィンドウ・フラグを設定する。
    QPoint pos = previewWindow->pos();
    if (pos.x() < 0)
        pos.setX(0);
    if (pos.y() < 0)
        pos.setY(0);
    previewWindow->move(pos);
    previewWindow->show();
}
プレビュー・ウィンドウの位置を調整する。なぜそうするかというと、ウィンドウのフレームを弄ると、プラットフォームによってはウィンドウの位置が背後で変わってしまうことがあるからです。ウィンドウが画面の左上隅にある場合、ウィンドウの一部が見えないことがあります。そのため、ウィジェットの位置を調整して、このような場合でもウィンドウが画面の境界内に移動するようにします。最後に、QWidget::show ()を呼び出して、プレビュー・ウィンドウが表示されていることを確認します。
void ControllerWindow::createTypeGroupBox()
{
    typeGroupBox = new QGroupBox(tr("Type"));

    windowRadioButton = createRadioButton(tr("Window"));
    dialogRadioButton = createRadioButton(tr("Dialog"));
    sheetRadioButton = createRadioButton(tr("Sheet"));
    drawerRadioButton = createRadioButton(tr("Drawer"));
    popupRadioButton = createRadioButton(tr("Popup"));
    toolRadioButton = createRadioButton(tr("Tool"));
    toolTipRadioButton = createRadioButton(tr("Tooltip"));
    splashScreenRadioButton = createRadioButton(tr("Splash screen"));
    windowRadioButton->setChecked(true);

    QGridLayout *layout = new QGridLayout;
    layout->addWidget(windowRadioButton, 0, 0);
    layout->addWidget(dialogRadioButton, 1, 0);
    layout->addWidget(sheetRadioButton, 2, 0);
    layout->addWidget(drawerRadioButton, 3, 0);
    layout->addWidget(popupRadioButton, 0, 1);
    layout->addWidget(toolRadioButton, 1, 1);
    layout->addWidget(toolTipRadioButton, 2, 1);
    layout->addWidget(splashScreenRadioButton, 3, 1);
    typeGroupBox->setLayout(layout);
}
privatecreateTypeGroupBox() 関数はコンストラクタから呼び出されます。
まずグループ・ボックスを作成し、次にウィンドウ・フラグの中から利用可能なタイプごとにラジオ・ボタンを作成します(privatecreateRadioButton() 関数を使用)。最初に適用されるタイプはQt::Window 。ラジオボタンをQGridLayout 、グループ・ボックスにレイアウトします。
デフォルトのQt::Widget 。その理由は、他のタイプとは多少動作が異なるからです。ウィジェットにタイプが指定されておらず、親がない場合、ウィジェットはウィンドウです。しかし、親がある場合は、標準の子ウィジェットになります。他の型はすべてトップレベル・ウィンドウであり、ヒントはトップレベル・ウィンドウにしか影響しないので、Qt::Widget 。
void ControllerWindow::createHintsGroupBox()
{
    hintsGroupBox = new QGroupBox(tr("Hints"));

    msWindowsFixedSizeDialogCheckBox =
            createCheckBox(tr("MS Windows fixed size dialog"));
    x11BypassWindowManagerCheckBox =
            createCheckBox(tr("X11 bypass window manager"));
    framelessWindowCheckBox = createCheckBox(tr("Frameless window"));
    windowNoShadowCheckBox = createCheckBox(tr("No drop shadow"));
    windowTitleCheckBox = createCheckBox(tr("Window title"));
    windowSystemMenuCheckBox = createCheckBox(tr("Window system menu"));
    windowMinimizeButtonCheckBox = createCheckBox(tr("Window minimize button"));
    windowMaximizeButtonCheckBox = createCheckBox(tr("Window maximize button"));
    windowCloseButtonCheckBox = createCheckBox(tr("Window close button"));
    windowContextHelpButtonCheckBox =
            createCheckBox(tr("Window context help button"));
    windowShadeButtonCheckBox = createCheckBox(tr("Window shade button"));
    windowStaysOnTopCheckBox = createCheckBox(tr("Window stays on top"));
    windowStaysOnBottomCheckBox = createCheckBox(tr("Window stays on bottom"));
    customizeWindowHintCheckBox= createCheckBox(tr("Customize window"));

    QGridLayout *layout = new QGridLayout;
    layout->addWidget(msWindowsFixedSizeDialogCheckBox, 0, 0);
    layout->addWidget(x11BypassWindowManagerCheckBox, 1, 0);
    layout->addWidget(framelessWindowCheckBox, 2, 0);
    layout->addWidget(windowNoShadowCheckBox, 3, 0);
    layout->addWidget(windowTitleCheckBox, 4, 0);
    layout->addWidget(windowSystemMenuCheckBox, 5, 0);
    layout->addWidget(customizeWindowHintCheckBox, 6, 0);
    layout->addWidget(windowMinimizeButtonCheckBox, 0, 1);
    layout->addWidget(windowMaximizeButtonCheckBox, 1, 1);
    layout->addWidget(windowCloseButtonCheckBox, 2, 1);
    layout->addWidget(windowContextHelpButtonCheckBox, 3, 1);
    layout->addWidget(windowShadeButtonCheckBox, 4, 1);
    layout->addWidget(windowStaysOnTopCheckBox, 5, 1);
    layout->addWidget(windowStaysOnBottomCheckBox, 6, 1);
    hintsGroupBox->setLayout(layout);
}
privatecreateHintsGroupBox() 関数もコンストラクタから呼び出されます。
ここでも、最初にグループボックスを作成します。次に、プライベートcreateCheckBox() 関数を使用して、ウィンドウフラグの中から利用可能なヒントごとにチェックボックスを作成します。チェックボックスをQGridLayout 、グループボックスにレイアウトします。
QCheckBox *ControllerWindow::createCheckBox(const QString &text)
{
    QCheckBox *checkBox = new QCheckBox(text);
    connect(checkBox, &QCheckBox::clicked,
            this, &ControllerWindow::updatePreview);
    return checkBox;
}
プライベートcreateCheckBox() 関数はcreateHintsGroupBox() から呼び出されます。
提供されたテキストでQCheckBox を作成し、プライベートupdatePreview() スロットに接続し、チェックボックスへのポインタを返すだけです。
QRadioButton *ControllerWindow::createRadioButton(const QString &text)
{
    QRadioButton *button = new QRadioButton(text);
    connect(button, &QRadioButton::clicked,
            this, &ControllerWindow::updatePreview);
    return button;
}
privatecreateRadioButton() 関数では、提供されたテキストでQRadioButton を作成し、privateupdatePreview() スロットに接続します。この関数はcreateTypeGroupBox() から呼び出され、ボタンへのポインタを返します。
PreviewWindow クラス定義
class PreviewWindow : public QWidget
{
    Q_OBJECT

public:
    PreviewWindow(QWidget *parent = nullptr);

    void setWindowFlags(Qt::WindowFlags flags);

private:
    QTextEdit *textEdit;
    QPushButton *closeButton;
};
PreviewWindow クラスはQWidget を継承しています。これは、現在設定されているウィンドウ・フラグの名前を読み取り専用のテキストエディタで表示するカスタムウィジェットです。また、ウィンドウを閉じるQPushbuttonも提供されています。
Close ボタンとテキストエディタを作成するコンストラクタと、ウィンドウ・フラグの名前を表示するQWidget::setWindowFlags() 関数を再実装します。

PreviewWindow クラスの実装
PreviewWindow::PreviewWindow(QWidget *parent)
    : QWidget(parent)
{
    textEdit = new QTextEdit;
    textEdit->setReadOnly(true);
    textEdit->setLineWrapMode(QTextEdit::NoWrap);

    closeButton = new QPushButton(tr("&Close"));
    connect(closeButton, &QPushButton::clicked,
            this, &PreviewWindow::close);

    QVBoxLayout *layout = new QVBoxLayout;
    layout->addWidget(textEdit);
    layout->addWidget(closeButton);
    setLayout(layout);

    setWindowTitle(tr("Preview"));
}
コンストラクタでは、まずQTextEdit を作成し、読み取り専用であることを確認します。
また、QTextEdit::setLineWrapMode ()関数を使用して、テキストエディタでの行の折り返しを禁止しています。その結果、ウィンドウ・フラグの名前がエディタの幅を超えると、水平スクロール・バーが表示される。これは、表示されるテキストを組み込みの改行で構成しているので、妥当な解決策である。改行が保証されていない場合は、別のQTextEdit::LineWrapMode 。
次に、Close ボタンを作成し、ウィンドウ・タイトルを設定する前に、両方のウィジェットをQVBoxLayout に入れます。
void PreviewWindow::setWindowFlags(Qt::WindowFlags flags)
{
    QWidget::setWindowFlags(flags);

    QString text;

    Qt::WindowFlags type = (flags & Qt::WindowType_Mask);
    if (type == Qt::Window)
        text = "Qt::Window";
    else if (type == Qt::Dialog)
        text = "Qt::Dialog";
    else if (type == Qt::Sheet)
        text = "Qt::Sheet";
    else if (type == Qt::Drawer)
        text = "Qt::Drawer";
    else if (type == Qt::Popup)
        text = "Qt::Popup";
    else if (type == Qt::Tool)
        text = "Qt::Tool";
    else if (type == Qt::ToolTip)
        text = "Qt::ToolTip";
    else if (type == Qt::SplashScreen)
        text = "Qt::SplashScreen";

    if (flags & Qt::MSWindowsFixedSizeDialogHint)
        text += "\n| Qt::MSWindowsFixedSizeDialogHint";
    if (flags & Qt::X11BypassWindowManagerHint)
        text += "\n| Qt::X11BypassWindowManagerHint";
    if (flags & Qt::FramelessWindowHint)
        text += "\n| Qt::FramelessWindowHint";
    if (flags & Qt::NoDropShadowWindowHint)
        text += "\n| Qt::NoDropShadowWindowHint";
    if (flags & Qt::WindowTitleHint)
        text += "\n| Qt::WindowTitleHint";
    if (flags & Qt::WindowSystemMenuHint)
        text += "\n| Qt::WindowSystemMenuHint";
    if (flags & Qt::WindowMinimizeButtonHint)
        text += "\n| Qt::WindowMinimizeButtonHint";
    if (flags & Qt::WindowMaximizeButtonHint)
        text += "\n| Qt::WindowMaximizeButtonHint";
    if (flags & Qt::WindowCloseButtonHint)
        text += "\n| Qt::WindowCloseButtonHint";
    if (flags & Qt::WindowContextHelpButtonHint)
        text += "\n| Qt::WindowContextHelpButtonHint";
    if (flags & Qt::WindowShadeButtonHint)
        text += "\n| Qt::WindowShadeButtonHint";
    if (flags & Qt::WindowStaysOnTopHint)
        text += "\n| Qt::WindowStaysOnTopHint";
    if (flags & Qt::WindowStaysOnBottomHint)
        text += "\n| Qt::WindowStaysOnBottomHint";
    if (flags & Qt::CustomizeWindowHint)
        text += "\n| Qt::CustomizeWindowHint";

    textEdit->setPlainText(text);
}
setWindowFlags() 関数の再実装では、まずQWidget::setWindowFlags() 関数を使用してウィジェットのフラグを設定します。次に、利用可能なウィンドウ・フラグを実行し、flags パラメータに一致するフラグの名前を含むテキストを作成します。最後に、ウィジェットのテキストエディタにテキストを表示します。
© 2025 The Qt Company Ltd. Documentation contributions included herein are the copyrights of their respective owners. The documentation provided herein is licensed under the terms of the GNU Free Documentation License version 1.3 as published by the Free Software Foundation. Qt and respective logos are trademarks of The Qt Company Ltd. in Finland and/or other countries worldwide. All other trademarks are property of their respective owners.

