Verifications
The Verifications view provides a detailed view of the results of a test run. It shows the passed and failed verifications, as well as log messages, error messages, stack traces, and screenshots taken during a test run.
The results are organized by reports, which you can select in Batch Reports. To filter the result table, select Fails, Warnings, or Passes.
You can open the Verifications view from the dashboard and the Explore view by clicking the passed ( ) or failed (
 ) icons.
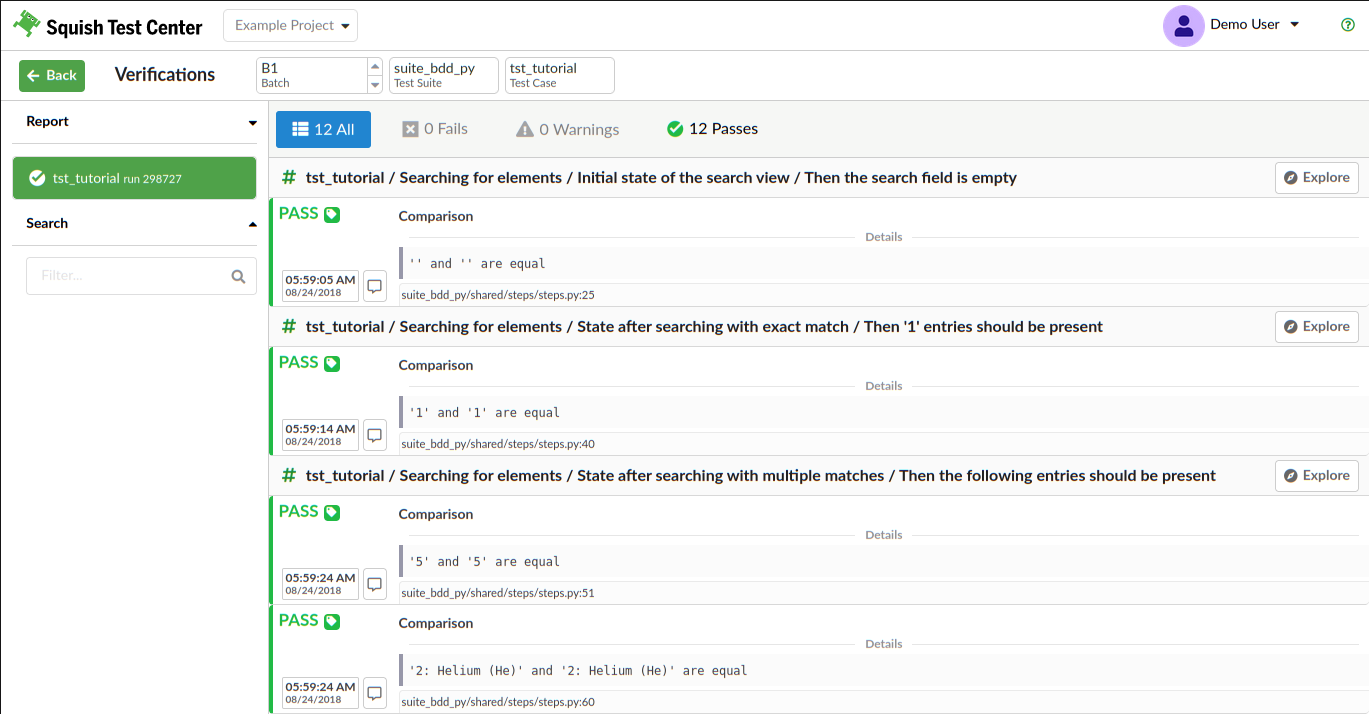
Verifications view
Click the Test Suite breadcrumb button to show verifications for each test case of the suite. Click the Batch breadcrumb button to show all the test suite runs of that batch.
The up and down arrow buttons next to the Batch breadcrumb button switch to verifications for the next or previous batch.
Video and events
When a Squish result contains a video, the Verification view shows a film icon next to every events part of the video. Click the icon to open the Test Center video dialog at the time when the event (PASS/FAIL/etc.) happened.
The video dialog contains:
- A video player
- A Last Replayed Event area
- A timeline that displays a time indicator and all events part of the video
All three areas are synchronized: while the video is playing, the timeline indicator advances and the Last Replayed Event is updated accordingly. This synchronization between video and timeline is bidirectional, meaning that:
- When you forward the video, the timeline indicator and Last Replayed Event will follow.
- When you click on the timeline or an event in the timeline, the video displays the clicked event.
To configure the Test Center video dialog, click Configure Player. You have the following options:
- Show/Hide the Last Replayed Event.
- Overlay events toast on the video.
- Show/Hide the timeline or Scenarios/Steps/Sections in it.
Messages with screenshots or verification points
Messages with a screenshot as well as failed visual and table verifications have a camera icon for a link to the image file or visual or table result file.

Screenshot verification point
Click the camera icon for a screenshot comparison failure to open the Screenshot Verification Point dialog that shows the component screenshot taken during the verification. Right-click the camera icon to save the actual screenshot to disk.
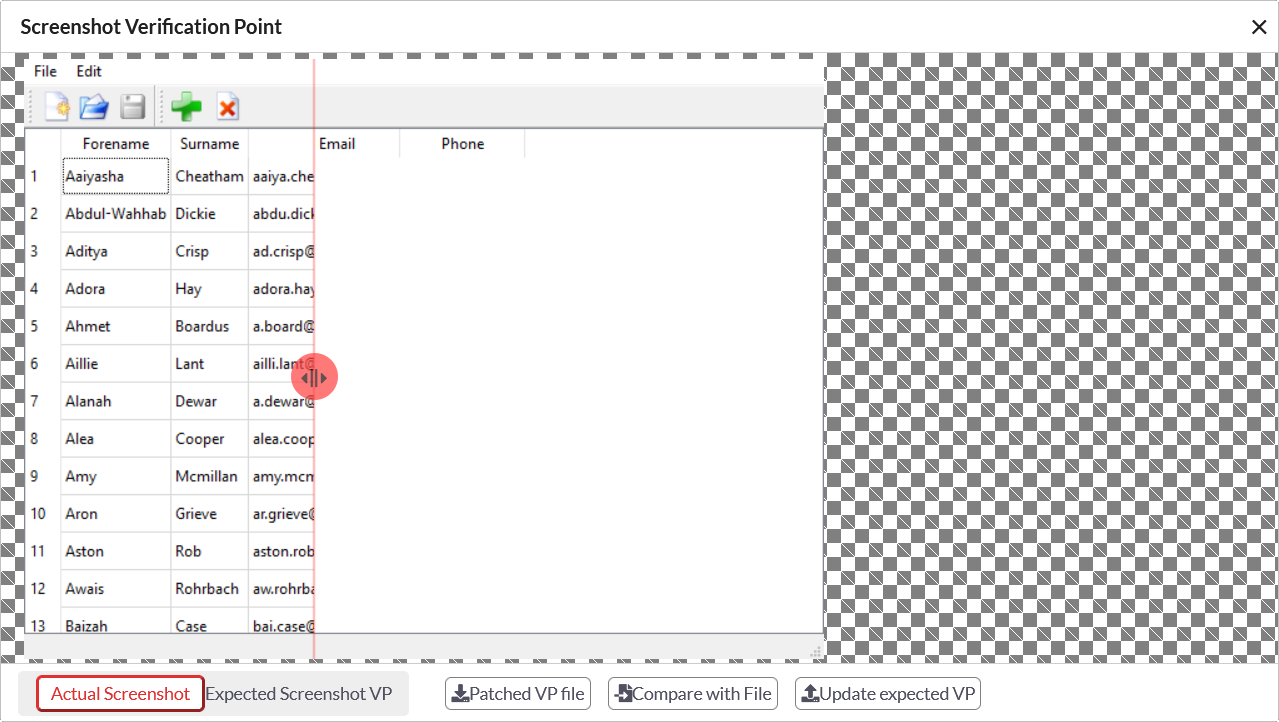
Screenshot Verification Point dialog
To close the dialog, click X or reload the page.
If you have set up a repository in Global Settings, Test Center tries to locate the corresponding verification point file from the test suite. If it finds the file, it loads the expected image. When a Git repository is used, you can specify the commit hash that a test run was based on using the .git.revision label to get the exact revision of the expected verification point file that was used for the test execution. Select the Actual Screenshot and Expected Screenshot VP buttons to switch between the actual and expected screenshot. An image slider can also help you spot differences between the actual and expected screenshots. Grab the red handle with the mouse to move the slider.
If the verification point file cannot be located or no repository is set up, the dialog will show setup instructions instead of the expected screenshot. Click Compare with File to manually upload the verification point file for a comparison of the actual and expected screenshots.
If the verification point file was located successfully in the linked repository, you can select Update expected VP to update the expected screenshot within the located verification point file to the actual screenshot encountered during the test run. See Update verification point files with repository integration for further details.
As an alternative to the verification point update via the repository, clicking Patched VP file creates a screenshot verification point file by replacing the image in the uploaded VP with the actual one and asks for a download location. The downloaded file can replace the matching VP file used in the Squish test suite.
Table verification point
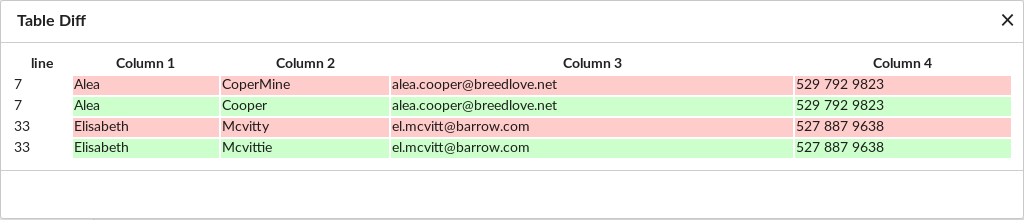
Table verification
Clicking the camera icon for a table comparison failure shows a simple row-by-row difference. Green rows replace the pink expected rows of the table verification point.
Visual verification point
With a visual verification point (VVP) failure during a Squish test run, a dump of the application actual user interface (UI) is saved in the results. As mentioned, the camera icon represents the link to the failed VVP results. Right-click the result file to save it for later viewing with the Squish uibrowser or visualvpeditor utilities. To show this dump in Test Center, click the camera icon. This opens the Visual Verification Point dialog.
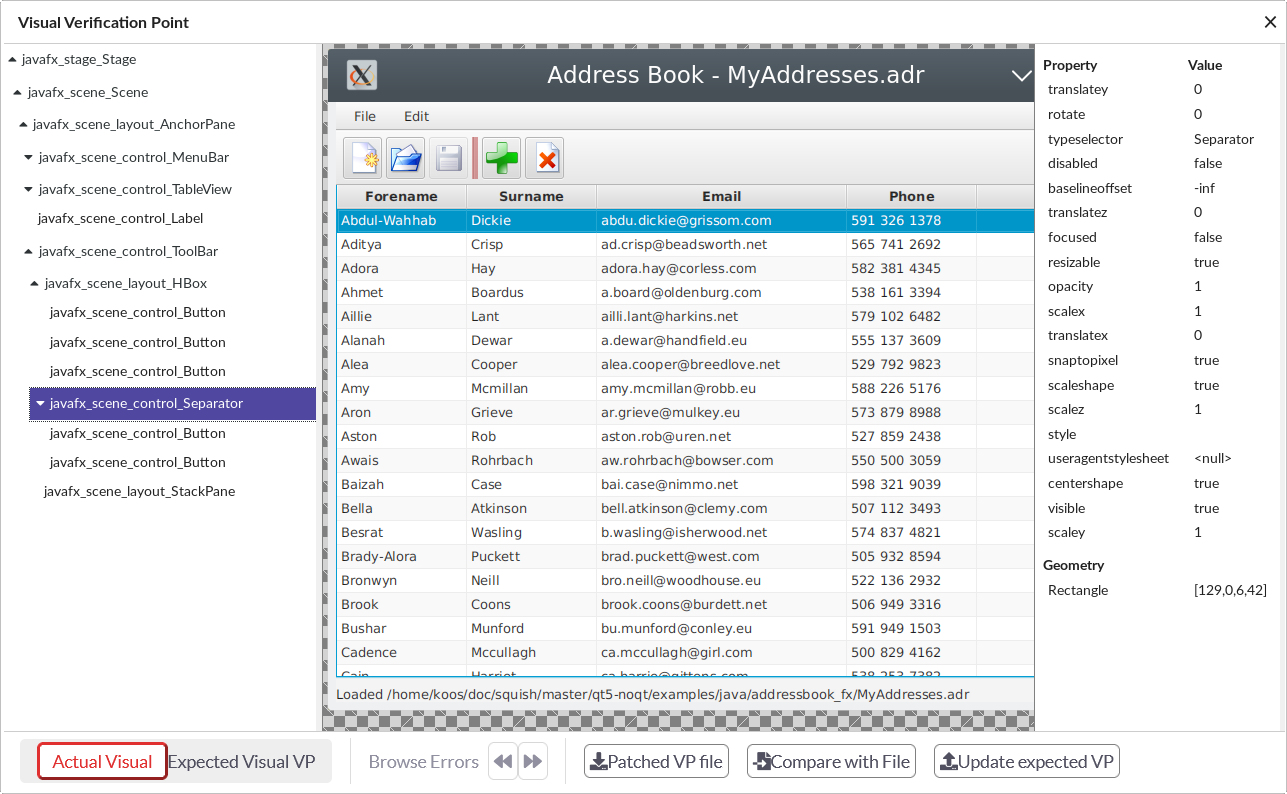
Actual VVP view
The left side shows a hierarchy of application objects. The center shows the image and highlights the currently selected application object. The right side shows the properties of the selected object.
There are two ways to upload visual verification points. An administrator can set up repository mappings in Global Settings, so that the verification point can be loaded automatically from the repository each time the Visual Verification Point dialog is opened (see Repository Integration). When a Git repository is used, you can specify the commit hash that a test run was based on using the .git.revision label to get the exact revision of the expected verification point file that was used for the test execution. Alternatively, if no repositories are set up, click the Compare with File button to manually select a visual verification point file from the local filesystem by using the upload form. Once the visual verification point file is uploaded, Test Center performs a comparison between the uploaded expected UI and the one from the results, the actual UI.
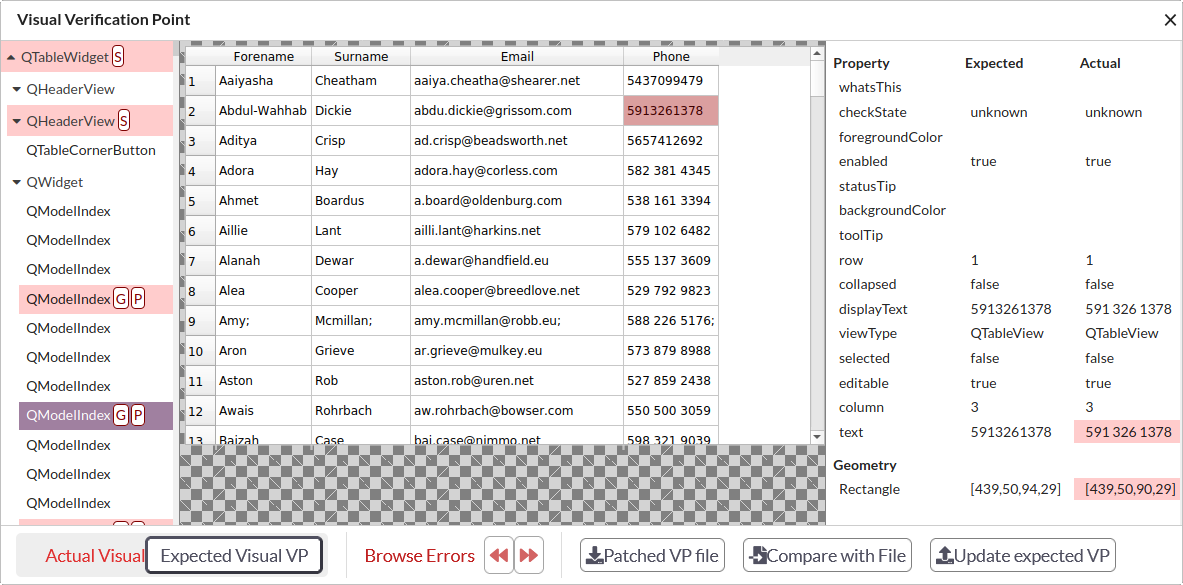
Expected VVP compared with actual VPP
The letter icons in the application objects tree represent Geometry, Hierarchical, Property (or properties), Screenshot, or Type errors. The geometry and/or property errors are highlighted in red within the property panel. When a property is not available because a similar object can not be found in the actual UI, an N/A icon is displayed.
Select Actual Visual and Expected Visual VP to switch between the actual and expected images. An image slider can also help you spot the differences between them. Grab the red handle with the mouse to move the slider. If the verification point file cannot be located or no repository is set up, the dialog will show setup instructions instead of the expected images.
When you are looking at the expected visual verification point, you can select the Browse Errors buttons to move to the next or previous object with an error. The hierarchy elements with errors are selected and highlighted in the visual representation of the verification point file within the dialog.
If the verification point file was located successfully in the linked repository, you can use the Update expected VP button to update the expected images and verifications within the located verification point file to the actual images and properties encountered during the test run. See Update verification point files with repository integration for further details.
Note: Failed wildcard, regular expression and range checks are replaced by simpler checks that verify basic equality to the encountered values in the actual snapshot.
As an alternative to the verification point update via the repository, you can select the Patched VP file button to download an updated verification point file to manually replace the verification point file within the test suite.
To close the dialog, click X or reload the page.
© 2024 The Qt Company Ltd.
Documentation contributions included herein are the copyrights of
their respective owners.
The documentation provided herein is licensed under the terms of the GNU Free Documentation License version 1.3 as published by the Free Software Foundation.
Qt and respective logos are trademarks of The Qt Company Ltd. in Finland and/or other countries worldwide. All other trademarks are property
of their respective owners.
