Calqlatr
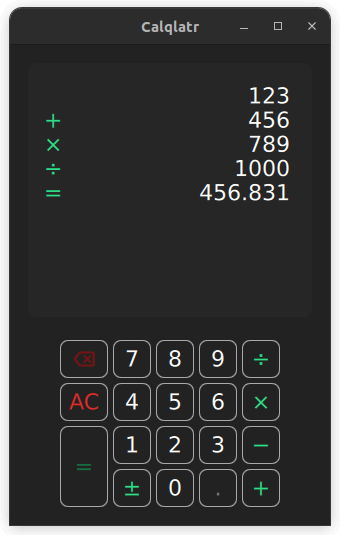
横向きと縦向きのデバイス用にデザインされた電卓。ユーザーインターフェイスにはQt Quick カスタムコンポーネントとレスポンシブレイアウトを、アプリケーションロジックには JavaScript を使用しています。

Calqlatrは、カスタムコンポーネントの表示やレスポンシブレイアウトの使用など、様々なQMLと Qt Quickカスタムコンポーネントの表示やレスポンシブレイアウトの使用など、さまざまなQMLとその特徴を示しています。アプリケーションロジックはJavaScript、UIはQMLで実装されています。
サンプルを実行する
からサンプルを実行するには Qt Creatorからサンプルを実行するには、Welcome モードを開き、Examples からサンプルを選択します。詳細については、Qt Creator:Tutorialを参照してください:ビルドと実行サンプルを実行すると、標準的な電卓としてアプリケーションを使用できるようになります。
カスタムコンポーネントの表示
Calqlatrアプリケーションでは、カスタムタイプが使用されます。これらはそれぞれ別の.qmlファイルで定義されています:
BackspaceButton.qmlCalculatorButton.qmlDisplay.qmlNumberPad.qml
これらのカスタムタイプをMain.qml で使用するには、content フォルダにインポート ステートメントを追加します:
import "content"例えば、NumberPad タイプは、電卓の数字パッドを作成するためにMain.qml で使用されます。これはQt Quick のすべてのビジュアルアイテムの基本タイプであるItem タイプの中にネストされています:
        NumberPad {
            id: numberPad
            Layout.margins: root.margin
        }
カスタムコンポーネントはどのようなQMLファイルでも定義できるQMLタイプで、NumberPad.qml のように独自の.qmlファイルで定義されたコンポーネントと同じ動作をします。NumberPad.qml では、DigitButton コンポーネントとOperatorButton コンポーネントが定義されています。これらのコンポーネントでは、新しいプロパティを追加したり、既存のプロパティを変更したりすることができます。ここで、onReleased ハンドラーは、カスタム・コンポーネントの両方に対して上書きされます。
    component DigitButton: CalculatorButton {
        onReleased: {
            root.digitPressed(text);
            updateDimmed();
        }
    }

    component OperatorButton: CalculatorButton {
        onReleased: {
            root.operatorPressed(text);
            updateDimmed();
        }
        textColor: controller.qtGreenColor
        implicitWidth: 48
        dimmable: true
    }
さらに、NumberPad のさまざまなボタンには、CalculatorButton タイプを使用します。CalculatorButton.qml はボタンの基本プロパティを定義しており、NumberPad.qml で各インスタンスごとに変更します。数字ボタンと演算子ボタンには、text 、width 、dimmable プロパティなど、いくつかの追加プロパティがあります。電卓エンジンがそのボタンからの入力を受け付けないときはいつでも、dimmable を使用してボタンを視覚的に無効にします。
                DigitButton {
                    text: "e"
                    dimmable: true
                    implicitWidth: 48
                }
content ディレクトリにはBackSpaceButton.qml という別のファイルがあります。これはCalculatorButton の特殊なケースで、テキストではなく画像をボタンにレンダリングします。このボタンはOperatorButton と同じですが、text ではなくicon を含んでいます。
レスポンシブレイアウト
この例では、レスポンシブ・レイアウトは、さまざまなUIコンポーネントを縦向きと横向きの両方に配置します。また、この2つのモードを切り替えることもできます。このことは、Main.qml でわかります。ColumnLayout はポートレートモード用、RowLayout はランドスケープモード用です。
        ColumnLayout {
            id: portraitMode
            anchors.fill: parent
            visible: true

            LayoutItemProxy {
                target: display
                Layout.minimumHeight: display.minHeight
            }
            LayoutItemProxy {
                target: numberPad
                Layout.alignment: Qt.AlignHCenter
            }
        }

        RowLayout {
            id: landscapeMode
            anchors.fill: parent
            visible: false

            LayoutItemProxy {
                target: display
            }
            LayoutItemProxy {
                target: numberPad
                Layout.alignment: Qt.AlignVCenter
            }
        }
ColumnLayout はアプリケーションのポートレート・レイアウトを表し、RowLayout はランドスケープ・レイアウトを表します。visible プロパティは、ある時点でどちらのレイアウトが使用されるかを処理します。NumberPad とDisplay コンポーネントのid プロパティは、LayoutItemProxy タイプのtarget プロパティを設定するために使用されます。これにより、両方のレイアウトで同じコンテンツ・アイテムを使用することができます。さらに、LayoutItemProxy アイテム内のプロパティをtarget 自身に転送することもできます。例えば、NumberPad がインスタンス化されると、両方のレイアウトは異なるLayout.alignment を必要とします。
2つのレイアウトを切り替えるには、isPortraitMode プロパティのシグナルハンドラで、それぞれの可視性を設定します:
        onIsPortraitModeChanged: {
            if (isPortraitMode) {
                portraitMode.visible = true;
                landscapeMode.visible = false;
            } else {
                portraitMode.visible = false;
                landscapeMode.visible = true;
            }
        }
これは、QMLがすべての自己宣言プロパティに対してシグナルハンドラを作成するためです。この場合、on<Property>Changed ハンドラで、<property> はisPortraitMode プロパティです。
レスポンシブ・レイアウトは、NumberPad.qml 、NumberPad 自体の縦長と横長のレイアウトを定義する際にも使われます。
        RowLayout {
            spacing: controller.spacing

            GridLayout {
                id: scientificGrid
                columns: 3
                columnSpacing: controller.spacing
                rowSpacing: controller.spacing
                visible: !isPortraitMode

                OperatorButton { text: "x²" }
                OperatorButton { text: "⅟x" }
                OperatorButton { text: "√" }
                OperatorButton { text: "x³" }
                OperatorButton { text: "sin" }
                OperatorButton { text: "|x|" }
                OperatorButton { text: "log" }
                OperatorButton { text: "cos" }
                DigitButton {
                    text: "e"
                    dimmable: true
                    implicitWidth: 48
                }
                OperatorButton { text: "ln" }
                OperatorButton { text: "tan" }
                DigitButton {
                    text: "π"
                    dimmable: true
                    implicitWidth: 48
                }
            }

            GridLayout {
                id: mainGrid
                columns: 5
                columnSpacing: controller.spacing
                rowSpacing: controller.spacing

                BackspaceButton {}
                DigitButton { text: "7" }
                DigitButton { text: "8" }
                DigitButton { text: "9" }
                OperatorButton {
                    text: "÷"
                    implicitWidth: 38
                }

                OperatorButton {
                    text: "AC"
                    textColor: controller.backspaceRedColor
                    accentColor: controller.backspaceRedColor
                }
                DigitButton { text: "4" }
                DigitButton { text: "5" }
                DigitButton { text: "6" }
                OperatorButton {
                    text: "×"
                    implicitWidth: 38
                }

                OperatorButton {
                    text: "="
                    implicitHeight: 81
                    Layout.rowSpan: 2
                }
                DigitButton { text: "1" }
                DigitButton { text: "2" }
                DigitButton { text: "3" }
                OperatorButton {
                    text: "−"
                    implicitWidth: 38
                }

                OperatorButton {
                    text: "±"
                    implicitWidth: 38
                }
                DigitButton { text: "0" }
                DigitButton {
                    text: "."
                    dimmable: true
                }
                OperatorButton {
                    text: "+"
                    implicitWidth: 38
                }
            }
        } // RowLayout
この場合、2つのLayoutItemProxy アイテムが作成されます。それらのtarget プロパティは、すべての科学的ボタンを含むGrid タイプのscientificGrid と、すべての標準ボタンを含むGrid タイプのmainGrid に設定されます。
ボタンのテキスト色のアニメーション
CalculatorButton.qml では、数字パッド・ボタンのテキスト色もアニメーション化される。
        ...
        color: getTextColor()
        Behavior on color {
            ColorAnimation {
                duration: 120
                easing.type: Easing.OutElastic
            }
}色の変更は、color プロパティにBehavior を定義することでアニメーション化されます。ボタンがdimmed = true に設定されると、ボタンは暗く表示されます。ボタンが押されると、緑色に点灯します。NumberPad 上のすべてのボタンのdimmed プロパティを動的に変更するには、buttonPressed シグナルがNumberPad のupdateDimmed() 関数を呼び出します。
    function updateDimmed() {
        for (let i = 0; i < mainGrid.children.length; i++) {
            mainGrid.children[i].dimmed = root.isButtonDisabled(mainGrid.children[i].text);
        }
        for (let j = 0; j < scientificGrid.children.length; j++) {
            scientificGrid.children[j].dimmed = root.isButtonDisabled(
                        scientificGrid.children[j].text);
        }
    }
計算の実行
calculator.jsファイルは電卓のエンジンを定義します。このファイルには、電卓の状態を保存する変数と、ユーザが数字や演算子のボタンを押したときに呼び出される関数が含まれています。このエンジンを使用するには、CalcEngine というエイリアスを使用して、calculator.js をMain.qml ファイルにインポートします:
import "content/calculator.js" as CalcEngineデフォルトでは、QMLからJavaScriptファイルをインポートすると、そのファイルの新しいインスタンスが作成され、そのファイルに含まれる状態はそのインスタンスに固有のものとなります。.pragma library を使用することで、スクリプトのすべてのユーザー間で状態を共有することができます。
.pragma library
ユーザーが数字を押すと、その数字のテキストがディスプレイに表示されます。演算子を押すと、適切な計算が実行され、等号(=)演算子を使用して結果を表示できる。オールクリア(AC)演算子は、電卓エンジンをリセットする。
ソースファイル
Squish GUIのテスト
このアプリケーションには、Qt for Androidを対象としたSquish GUIテストが付属しています。テストはSquish for Qtで作成され、Pythonで書かれており、アプリケーションのtestディレクトリにあります。
Squish for Qt for Androidを使用する場合は、必ずQt組み込みのフックを使用し、adbでSquishポートを転送してください。dlopen が失敗して "Cannot load library" というエラーが表示される場合は、CMake 設定からQT_USE_TARGET_ANDROID_BUILD_DIR を無効にするか、Qt Creator のProjects->Build Settings->CMake->Current Configuration からクリアしてください。
Squishのライセンスを持っていない場合は、無料トライアルを入手できます。
QMLアプリケーションも参照してください 。
© 2025 The Qt Company Ltd. Documentation contributions included herein are the copyrights of their respective owners. The documentation provided herein is licensed under the terms of the GNU Free Documentation License version 1.3 as published by the Free Software Foundation. Qt and respective logos are trademarks of The Qt Company Ltd. in Finland and/or other countries worldwide. All other trademarks are property of their respective owners.

