シンプルなMQTTクライアント
最小限の遠隔測定アプリケーションの作成

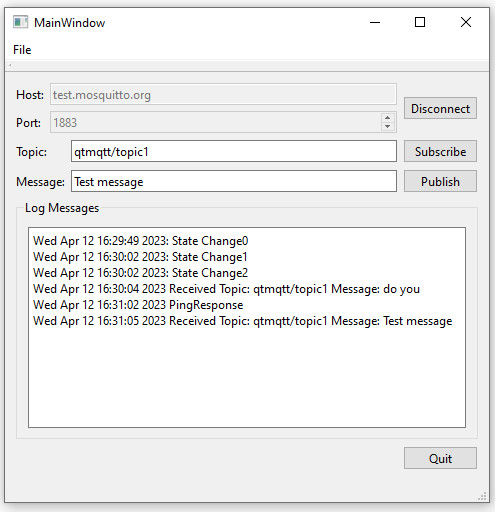
Simple MQTT Clientは、最小限のクライアント・アプリケーションを作成する方法を示します。
このアプリケーションを使用するには、まず、ホスト、ポート、セキュアのオン/オフ、WebSockets のオン/オフ、およびプロトコルを指定します。それから接続をクリックする。その後、トピックを購読し、メッセージを送信することができます。アプリケーションを2回実行することもできます。一方をPublishし、もう一方をSubscribeすると、メッセージが送信されます。
simpleclient オプション
- ホスト - test.mosquitto.org または broker.hivemq.com を指定します。
- Port - 接続するポート。WebSockets の選択と Secure の選択に依存します。
- WebSockets - 選択 (有効) または未選択 (無効) を指定します。
- Secure - 選択 (有効) または未選択 (無効) を指定します。
- プロトコル - 指定できます。
- mqtt 3.1
- mqtt 3.1.1
- mqtt 5.0
- Topic - 公開または購読するトピック。
- Message - 公開する場合にトピックに送信するメッセージ。
接続設定
これらは通常の組み合わせで、test.mosquitto.orgで動作します。broker.hivemq.comについては、リンク先の情報を確認してください。Secure が有効になっている場合、コンピュータに証明書をインストールする必要があるかもしれないことに注意してください。また、コードでmqttクライアントに証明書を追加する必要がある場合もあります。
- ポート1883、Secure=無効、WebSockets=無効 - mqtt over tcp
- ポート8883、Secure=有効、WebSockets=無効 - mqtt over ssl
- ポート8080、Secure=無効、WebSockets=有効 - ウェブソケット経由のmqtt
- ポート8081、Secure=有効、WebSockets=有効 - セキュア・ウェブソケット経由のmqtt
ブローカーの詳細については、以下を参照のこと:
注: ポート番号1883および8080は暗号化されていないため、開発およびテスト目的にのみ適しています。本番環境では、常に暗号化された接続を使用してください。
注意: WebAssembly は、WebSocket が有効な場合のみサポートします。
クライアントの作成
まず、QMqttClient クラスを使用して MQTT クライアントを作成します。このクラスは、一意のクライアント ID と、接続先のブローカホスト名とポートを設定するプロパティを提供します:
    m_client = new QMqttClient(this);
    m_client->setHostname(ui->lineEditHost->text());
    m_client->setPort(static_cast<quint16>(ui->spinBoxPort->value()));
クライアント ID は設定しないため、自動的に生成されます。
次にQMqttClient::messageReceived() に接続し、ブローカーに送信されたすべてのメッセージを受信します:
    connect(m_client, &QMqttClient::messageReceived, this, [this](const QByteArray &message, const QMqttTopicName &topic) {
        const QString content = QDateTime::currentDateTime().toString()
                    + " Received Topic: "_L1
                    + topic.name()
                    + " Message: "_L1
                    + message
                    + u'\n';
        ui->editLog->insertPlainText(content);
    });
ユーザーがクライアントでトピックを購読すると、指定したトピックでQMqttClient::subscribe() を呼び出します:
void MainWindow::on_buttonSubscribe_clicked()
{
    auto subscription = m_client->subscribe(ui->lineEditTopic->text());
    if (!subscription) {
        QMessageBox::critical(this, u"Error"_s,
                              u"Could not subscribe. Is there a valid connection?"_s);
        return;
    }
この例では、すべてのトピックを購読しています。特定のトピックに関するメッセージを受信する方法の詳細については、MQTT Subscriptions の例を参照してください。
Qt Quick アプリケーションでQMqttClient クラスを使用する方法の例については、Qt Quick Subscription を参照してください。
ファイルを参照してください:
© 2025 The Qt Company Ltd. Documentation contributions included herein are the copyrights of their respective owners. The documentation provided herein is licensed under the terms of the GNU Free Documentation License version 1.3 as published by the Free Software Foundation. Qt and respective logos are trademarks of The Qt Company Ltd. in Finland and/or other countries worldwide. All other trademarks are property of their respective owners.

