
OpenGL ES 2.0 キューブの実例
ユーザー入力に基づいて、テクスチャが適用された3Dキューブを手動で回転させる方法を示します。
「Cube OpenGL ES 2.0」サンプルでは、Qt を使用した OpenGL ES 2.0 を用いて、ユーザーの入力に応じてテクスチャ付き 3D キューブを手動で回転させる方法を示しています。また、ポリゴンのジオメトリを効率的に処理する方法や、プログラマブルなグラフィックスパイプライン用の簡単な頂点シェーダーおよびフラグメントシェーダーの記述方法についても解説しています。 さらに、3D オブジェクトの向きを表現するためにクォータニオンを使用する方法も示しています。
このサンプルは OpenGL ES 2.0 向けに作成されていますが、非常にシンプルであり、デスクトップ版 OpenGL の API も大部分が共通しているため、デスクトップ版 OpenGL でも動作します。OpenGL サポートがなくてもコンパイルは可能ですが、その場合は OpenGL サポートが必要であることを示すラベルが表示されるだけです。
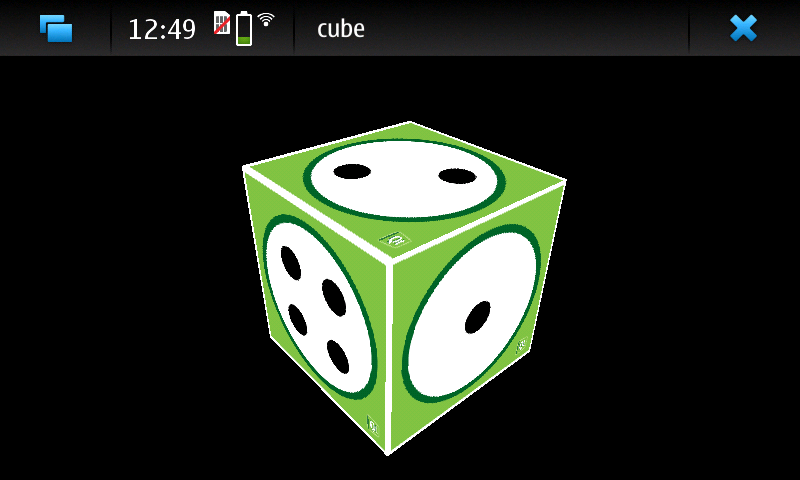
このサンプルは2つのクラスで構成されています:
MainWidgetQOpenGLWidget を継承し、OpenGL ES 2.0の初期化、描画、およびマウス・タイマーイベントの処理を担当しますGeometryEngineポリゴンのジオメトリを処理します。ポリゴンのジオメトリを頂点バッファオブジェクト(VBO)に転送し、VBOからジオメトリを描画します。
まず、MainWidget 内でOpenGL ES 2.0を初期化することから始めます。
OpenGL ES 2.0の初期化
OpenGL ES 2.0 は固定グラフィックスパイプラインをサポートしなくなったため、これを独自に実装する必要があります。これによりグラフィックスパイプラインは非常に柔軟になりますが、一方で、最も単純な例を実行させるだけでもユーザーがグラフィックスパイプラインを実装しなければならないため、難易度が高くなります。また、アプリケーションに必要なパイプラインの種類をユーザーが決定できるため、グラフィックスパイプラインの効率も向上します。
まず、頂点シェーダーを実装する必要があります。頂点シェーダーは、パラメータとして頂点データとモデル・ビュー・投影行列(MVP)を受け取ります。MVP行列を使用して頂点位置をスクリーン空間に変換し、テクスチャ座標をフラグメントシェーダーに渡します。テクスチャ座標は、ポリゴンの面上で自動的に補間されます。
void main()
{
    // Calculate vertex position in screen space
    gl_Position = mvp_matrix * a_position;

    // Pass texture coordinate to fragment shader
    // Value will be automatically interpolated to fragments inside polygon faces
    v_texcoord = a_texcoord;
}
次に、グラフィックスパイプラインの2番目の部分であるフラグメントシェーダーを実装する必要があります。この演習では、テクスチャ処理を行うフラグメントシェーダーを実装します。このシェーダーは、補間されたテクスチャ座標をパラメータとして受け取り、指定されたテクスチャからフラグメントの色を検索します。
void main()
{
    // Set fragment color from texture
    gl_FragColor = texture2D(texture, v_texcoord);
}
QOpenGLShaderProgram を使用すると、シェーダーコードのコンパイル、リンク、およびグラフィックスパイプラインへのバインドを行うことができます。このコードでは、Qtリソースファイルを使用してシェーダーのソースコードにアクセスしています。
void MainWidget::initShaders()
{
    // Compile vertex shader
    if (!program.addShaderFromSourceFile(QOpenGLShader::Vertex, ":/vshader.glsl"))
        close();

    // Compile fragment shader
    if (!program.addShaderFromSourceFile(QOpenGLShader::Fragment, ":/fshader.glsl"))
        close();

    // Link shader pipeline
    if (!program.link())
        close();

    // Bind shader pipeline for use
    if (!program.bind())
        close();
}
以下のコードは、深度バッファリングと背面カリングを有効にします。
    // Enable depth buffer
    glEnable(GL_DEPTH_TEST);

    // Enable back face culling
    glEnable(GL_CULL_FACE);
Qtリソースファイルからのテクスチャの読み込み
QOpenGLWidget インターフェースは、QImage からOpenGLテクスチャメモリへテクスチャを読み込むためのメソッドを実装しています。OpenGLテクスチャユニットの指定やテクスチャフィルタリングオプションの設定については、引き続きOpenGLが提供する関数を使用する必要があります。
void MainWidget::initTextures()
{
    // Load cube.png image
    texture = new QOpenGLTexture(QImage(":/cube.png").flipped());

    // Set nearest filtering mode for texture minification
    texture->setMinificationFilter(QOpenGLTexture::Nearest);

    // Set bilinear filtering mode for texture magnification
    texture->setMagnificationFilter(QOpenGLTexture::Linear);

    // Wrap texture coordinates by repeating
    // f.ex. texture coordinate (1.1, 1.2) is same as (0.1, 0.2)
    texture->setWrapMode(QOpenGLTexture::Repeat);
}
キューブのジオメトリ
OpenGL ではポリゴンをレンダリングする方法は数多くありますが、最も効率的な方法は、トライアングルストリッププリミティブのみを使用し、グラフィックスハードウェアのメモリから頂点をレンダリングすることです。OpenGL には、このメモリ領域にバッファオブジェクトを作成し、頂点データをこれらのバッファに転送する仕組みがあります。OpenGL の用語では、これらは頂点バッファオブジェクト(VBO)と呼ばれます。
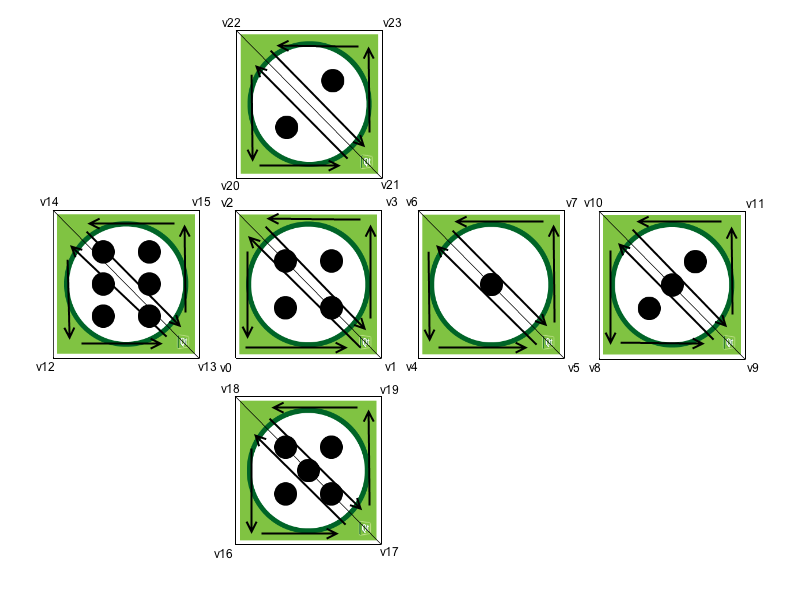
立方体の面は、このように三角形に分解されます。頂点は、トライアングル・ストリップを使用して正しい頂点順序を確保するために、この順序で並べられています。OpenGLは、頂点順序に基づいて三角形の表側と裏側を判別します。 デフォルトでは、OpenGLは前面に対して反時計回りの順序を使用します。この情報は背面カリングに使用され、三角形の背面をレンダリングしないことでレンダリング性能を向上させます。これにより、グラフィックスパイプラインは画面に向いていない三角形の側面をレンダリングから省略することができます。
QOpenGLBuffer を使用すれば、頂点バッファオブジェクトの作成とデータ転送は非常に簡単です。MainWidgetは、GeometryEngineインスタンスが、OpenGLコンテキストがアクティブな状態で作成および破棄されることを保証します。これにより、コンストラクタ内でOpenGLリソースを使用し、デストラクタ内で適切なクリーンアップを実行できます。
GeometryEngine::GeometryEngine()
    : indexBuf(QOpenGLBuffer::IndexBuffer)
{
    initializeOpenGLFunctions();

    // Generate 2 VBOs
    arrayBuf.create();
    indexBuf.create();

    // Initializes cube geometry and transfers it to VBOs
    initCubeGeometry();
}

GeometryEngine::~GeometryEngine()
{
    arrayBuf.destroy();
    indexBuf.destroy();
}
    // Transfer vertex data to VBO 0
    arrayBuf.bind();
    arrayBuf.allocate(vertices, 24 * sizeof(VertexData));

    // Transfer index data to VBO 1
    indexBuf.bind();
    indexBuf.allocate(indices, 34 * sizeof(GLushort));
VBOからプリミティブを描画し、プログラマブルなグラフィックスパイプラインに頂点データの場所を指定するには、いくつかの手順が必要です。まず、使用するVBOをバインドする必要があります。その後、シェーダープログラムの属性名をバインドし、バインドされたVBOにどのようなデータが含まれているかを設定します。最後に、別のVBOからのインデックスを使用して、トライアングルストリッププリミティブを描画します。
void GeometryEngine::drawCubeGeometry(QOpenGLShaderProgram *program)
{
    // Tell OpenGL which VBOs to use
    arrayBuf.bind();
    indexBuf.bind();

    // Offset for position
    quintptr offset = 0;

    // Tell OpenGL programmable pipeline how to locate vertex position data
    int vertexLocation = program->attributeLocation("a_position");
    program->enableAttributeArray(vertexLocation);
    program->setAttributeBuffer(vertexLocation, GL_FLOAT, offset, 3, sizeof(VertexData));

    // Offset for texture coordinate
    offset += sizeof(QVector3D);

    // Tell OpenGL programmable pipeline how to locate vertex texture coordinate data
    int texcoordLocation = program->attributeLocation("a_texcoord");
    program->enableAttributeArray(texcoordLocation);
    program->setAttributeBuffer(texcoordLocation, GL_FLOAT, offset, 2, sizeof(VertexData));

    // Draw cube geometry using indices from VBO 1
    glDrawElements(GL_TRIANGLE_STRIP, 34, GL_UNSIGNED_SHORT, nullptr);
}
透視投影
QMatrix4x4 のヘルパーメソッドを使用すれば、透視投影行列の計算は非常に簡単です。この行列は、頂点をスクリーンスペースに投影するために使用されます。
void MainWidget::resizeGL(int w, int h)
{
    // Calculate aspect ratio
    qreal aspect = qreal(w) / qreal(h ? h : 1);

    // Set near plane to 3.0, far plane to 7.0, field of view 45 degrees
    const qreal zNear = 3.0, zFar = 7.0, fov = 45.0;

    // Reset projection
    projection.setToIdentity();

    // Set perspective projection
    projection.perspective(fov, aspect, zNear, zFar);
}
3Dオブジェクトの向き
クォータニオンは、3Dオブジェクトの向きを表すのに便利な方法です。クォータニオンにはかなり複雑な数学が関わりますが、幸いなことに、クォータニオンの背後にある必要な数学的処理はすべてQQuaternion に実装されています。これにより、立方体の向きをクォータニオンとして保存することができ、指定された軸を中心に立方体を回転させるのも非常に簡単になります。
以下のコードは、マウスイベントに基づいて回転軸と角速度を計算します。
void MainWidget::mousePressEvent(QMouseEvent *e)
{
    // Save mouse press position
    mousePressPosition = QVector2D(e->position());
}

void MainWidget::mouseReleaseEvent(QMouseEvent *e)
{
    // Mouse release position - mouse press position
    QVector2D diff = QVector2D(e->position()) - mousePressPosition;

    // Rotation axis is perpendicular to the mouse position difference
    // vector
    QVector3D n = QVector3D(diff.y(), diff.x(), 0.0).normalized();

    // Accelerate angular speed relative to the length of the mouse sweep
    qreal acc = diff.length() / 100.0;

    // Calculate new rotation axis as weighted sum
    rotationAxis = (rotationAxis * angularSpeed + n * acc).normalized();

    // Increase angular speed
    angularSpeed += acc;
}
QBasicTimer これを使用してシーンをアニメーション化し、立方体の向きを更新します。回転は、クォータニオンを乗算するだけで簡単に連結できます。
void MainWidget::timerEvent(QTimerEvent *)
{
    // Decrease angular speed (friction)
    angularSpeed *= 0.99;

    // Stop rotation when speed goes below threshold
    if (angularSpeed < 0.01) {
        angularSpeed = 0.0;
    } else {
        // Update rotation
        rotation = QQuaternion::fromAxisAndAngle(rotationAxis, angularSpeed) * rotation;

        // Request an update
        update();
    }
}
モデル・ビュー行列は、クォータニオンを使用し、ワールドをZ軸に沿って移動させることで計算されます。この行列に投影行列を乗算することで、シェーダープログラム用のMVP行列が得られます。
    // Calculate model view transformation
    QMatrix4x4 matrix;
    matrix.translate(0.0, 0.0, -5.0);
    matrix.rotate(rotation);

    // Set modelview-projection matrix
program.setUniformValue("mvp_matrix", projection * matrix);© 2026 The Qt Company Ltd. Documentation contributions included herein are the copyrights of their respective owners. The documentation provided herein is licensed under the terms of the GNU Free Documentation License version 1.3 as published by the Free Software Foundation. Qt and respective logos are trademarks of The Qt Company Ltd. in Finland and/or other countries worldwide. All other trademarks are property of their respective owners.
