アドレス帳
アドレス帳の例では、プロキシモデルを使用して、1つのモデルから異なるビューをデータに表示する方法を示します。
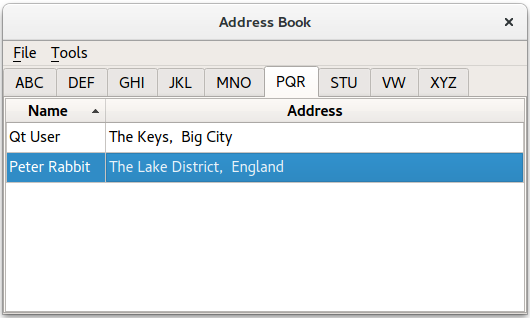
この例では、連絡先をアルファベット順に9つのグループに分けることができるアドレス帳を提供しています:abc, def, ghi, ...vw、...、xyz。これは、QSortFilterProxyModel クラスのインスタンスを使用してフィルタリングされた、同じモデル上の複数のビューを使用することで実現されます。
概要
アドレス帳には5つのクラスがあります:MainWindow AddressWidget 、TableModel 、NewAddressTab 、AddDialog 。MainWindow クラスはAddressWidget を中心ウィジェットとして使用し、File とTools メニューを提供します。
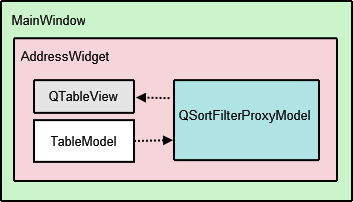
AddressWidget クラスはQTabWidget のサブクラスで、この例で表示される 10 個のタブ (9 個のアルファベット・グループ・タブとNewAddressTab のインスタンス) を操作するために使用されます。NewAddressTab クラスはQWidget のサブクラスで、アドレス帳が空のときにのみ使用され、ユーザーに連絡先を追加するように促します。AddressWidget はTableModel のインスタンスとも相互作用して、アドレス帳にエントリを追加、編集、削除します。
TableModel はQAbstractTableModel のサブクラスで、データにアクセスするための標準的なモデル/ビュー API を提供します。これは、追加された連絡先のリストを保持します。しかし、このデータは1つのタブですべて表示されるわけではありません。その代わりに、QTableView は、アルファベットグループに従って、同じデータの9つの異なるビューを提供するために使用されます。
QSortFilterProxyModel は各グループの連絡先のフィルタリングを担当するクラスです。各プロキシモデルは、QRegularExpression を使用して、対応するアルファベットグループに属さない連絡先をフィルタリングします。AddDialog クラスは、アドレス帳の情報をユーザから取得するために使用されます。このQDialog サブクラスは、NewAddressTab によってインスタンス化されて連絡先を追加し、AddressWidget によってインスタンス化されて連絡先を追加および編集します。
まず、TableModel の実装から見ていきます。
TableModel クラスの定義
TableModel クラスはQAbstractTableModel をサブクラス化することで、連絡先リストのデータにアクセスするための標準 API を提供します。そのために実装しなければならない基本的な関数は以下の通りである:rowCount() columnCount(),data(),headerData() です。TableModel が編集可能であるためには、insertRows() 、removeRows() 、setData() 、flags() 関数を実装する必要があります。
struct Contact
{
    QString name;
    QString address;

    bool operator==(const Contact &other) const
    {
        return name == other.name && address == other.address;
    }
};

inline QDataStream &operator<<(QDataStream &stream, const Contact &contact)
{
    return stream << contact.name << contact.address;
}

inline QDataStream &operator>>(QDataStream &stream, Contact &contact)
{
    return stream >> contact.name >> contact.address;
}

class TableModel : public QAbstractTableModel
{
    Q_OBJECT

public:
    TableModel(QObject *parent = nullptr);
    TableModel(const QList<Contact> &contacts, QObject *parent = nullptr);

    int rowCount(const QModelIndex &parent) const override;
    int columnCount(const QModelIndex &parent) const override;
    QVariant data(const QModelIndex &index, int role) const override;
    QVariant headerData(int section, Qt::Orientation orientation, int role) const override;
    Qt::ItemFlags flags(const QModelIndex &index) const override;
    bool setData(const QModelIndex &index, const QVariant &value, int role = Qt::EditRole) override;
    bool insertRows(int position, int rows, const QModelIndex &index = QModelIndex()) override;
    bool removeRows(int position, int rows, const QModelIndex &index = QModelIndex()) override;
    const QList<Contact> &getContacts() const;

private:
    QList<Contact> contacts;
};
2つのコンストラクタが使用され、TableModel'自身のQList<Contact> を使用するデフォルトのコンストラクタと、便宜上QList<Contact> を引数として取るコンストラクタがあります。
TableModel クラスの実装
ヘッダーファイルで定義されている2つのコンストラクタを実装します。番目のコンストラクタは、モデル内のコンタクトのリストをパラメータ値で初期化します。
TableModel::TableModel(QObject *parent)
    : QAbstractTableModel(parent)
{
}

TableModel::TableModel(const QList<Contact> &contacts, QObject *parent)
    : QAbstractTableModel(parent), contacts(contacts)
{
}
rowCount() とcolumnCount() 関数はモデルの寸法を返します。rowCount()'の値はアドレス帳に追加される連絡先の数によって変わりますが、columnCount()'の値は常に2です。これはName列とAddress列のスペースが必要だからです。
int TableModel::rowCount(const QModelIndex &parent) const
{
    return parent.isValid() ? 0 : contacts.size();
}

int TableModel::columnCount(const QModelIndex &parent) const
{
    return parent.isValid() ? 0 : 2;
}
data() 関数は、指定されたモデルインデックスの内容に基づいてNameまたはAddress を返します。モデルインデックスに格納された行番号は、連絡先リストの項目を参照するために使用されます。選択は、QItemSelectionModel で処理されます。AddressWidget で説明します。
QVariant TableModel::data(const QModelIndex &index, int role) const
{
    if (!index.isValid())
        return QVariant();

    if (index.row() >= contacts.size() || index.row() < 0)
        return QVariant();

    if (role == Qt::DisplayRole) {
        const auto &contact = contacts.at(index.row());

        switch (index.column()) {
            case 0:
                return contact.name;
            case 1:
                return contact.address;
            default:
                break;
        }
    }
    return QVariant();
}
headerData() 関数は、テーブルのヘッダー、名前、住所を表示します。アドレス帳に番号付きの項目が必要な場合は、この例では非表示にしている縦書きのヘッダーを使用することができます(AddressWidget の実装を参照してください)。
QVariant TableModel::headerData(int section, Qt::Orientation orientation, int role) const
{
    if (role != Qt::DisplayRole)
        return QVariant();

    if (orientation == Qt::Horizontal) {
        switch (section) {
            case 0:
                return tr("Name");
            case 1:
                return tr("Address");
            default:
                break;
        }
    }
    return QVariant();
}
insertRows() 関数は新しいデータが追加される前に呼び出されます。そうしないとデータは表示されません。beginInsertRows() 、endInsertRows() 関数が呼び出され、接続されているすべてのビューが変更を認識できるようにします。
bool TableModel::insertRows(int position, int rows, const QModelIndex &index)
{
    Q_UNUSED(index);
    beginInsertRows(QModelIndex(), position, position + rows - 1);

    for (int row = 0; row < rows; ++row)
        contacts.insert(position, { QString(), QString() });

    endInsertRows();
    return true;
}
removeRows() 関数は、データを削除するために呼び出されます。この場合も、beginRemoveRows() とendRemoveRows() が呼び出され、接続されているすべてのビューが変更を認識できるようにします。
bool TableModel::removeRows(int position, int rows, const QModelIndex &index)
{
    Q_UNUSED(index);
    beginRemoveRows(QModelIndex(), position, position + rows - 1);

    for (int row = 0; row < rows; ++row)
        contacts.removeAt(position);

    endRemoveRows();
    return true;
}
setData() 関数は、行ごとではなく項目ごとにテーブルにデータを挿入する関数です。つまり、アドレス帳の1行を埋めるには、setData() を2回呼び出す必要があります。dataChanged() シグナルを発信することは、接続されているすべてのビューに表示を更新するよう指示するため、重要です。
bool TableModel::setData(const QModelIndex &index, const QVariant &value, int role)
{
    if (index.isValid() && role == Qt::EditRole) {
        const int row = index.row();
        auto contact = contacts.value(row);

        switch (index.column()) {
            case 0:
                contact.name = value.toString();
                break;
            case 1:
                contact.address = value.toString();
                break;
            default:
                return false;
        }
        contacts.replace(row, contact);
        emit dataChanged(index, index, {Qt::DisplayRole, Qt::EditRole});

        return true;
    }

    return false;
}
flags() 関数は、指定されたインデックスのアイテム・フラグを返します。
Qt::ItemFlags TableModel::flags(const QModelIndex &index) const
{
    if (!index.isValid())
        return Qt::ItemIsEnabled;

    return QAbstractTableModel::flags(index) | Qt::ItemIsEditable;
}
TableModel を編集できるようにしたいので、Qt::ItemIsEditable フラグを設定します。この例では、QTableView オブジェクトの編集機能は使用しませんが、他のプログラムでモデルを再利用できるように、ここで編集機能を有効にしています。
TableModel の最後の関数getContacts() は、アドレス帳のすべての連絡先を保持するQList<Contact>オブジェクトを返します。後でこの関数を使用して連絡先のリストを取得し、既存のエントリーをチェックしたり、連絡先をファイルに書き込んだり、読み込んだりします。さらなる説明は、AddressWidget 。
const QList<Contact> &TableModel::getContacts() const
{
    return contacts;
}
AddressWidgetクラスの定義
AddressWidget クラスは、連絡先の追加、編集、削除、ファイルへの保存、ファイルからの読み込みの機能を提供するため、技術的にはこの例のメインクラスです。
class AddressWidget : public QTabWidget
{
    Q_OBJECT

public:
    AddressWidget(QWidget *parent = nullptr);
    void readFromFile();
    void writeToFile();

public slots:
    void showAddEntryDialog();
    void addEntry(const QString &name, const QString &address);
    void editEntry();
    void removeEntry();

signals:
    void selectionChanged (const QItemSelection &selected);

private:
    void setupTabs();

    inline static QString fileName =
        QStandardPaths::standardLocations(QStandardPaths::TempLocation).value(0)
        + QStringLiteral("/addressbook.dat");
    TableModel *table;
    NewAddressTab *newAddressTab;
};
AddressWidget は、10個のタブ(NewAddressTab と9個のアルファベット・グループ・タブ)を保持するためにQTabWidget を拡張し、また、table 、TableModel オブジェクト、proxyModel 、エントリーをフィルタリングするために使用するQSortFilterProxyModel オブジェクト、tableView 、QTableView オブジェクトを操作します。
AddressWidgetクラスの実装
AddressWidget コンストラクタは、親ウィジェットを受け入れ、NewAddressTab 、TableModel 、QSortFilterProxyModel をインスタンス化します。アドレス帳が空であることを示すために使用されるNewAddressTab オブジェクトが追加され、残りの9つのタブはsetupTabs() で設定されます。
AddressWidget::AddressWidget(QWidget *parent)
    : QTabWidget(parent),
      table(new TableModel(this)),
      newAddressTab(new NewAddressTab(this))
{
    connect(newAddressTab, &NewAddressTab::sendDetails,
        this, &AddressWidget::addEntry);

    addTab(newAddressTab, tr("Address Book"));

    setupTabs();
}
setupTabs() 関数を使用して、9つのアルファベットグループタブ、テーブルビュー、プロキシモデルがAddressWidget で設定される。各プロキシモデルは、大文字小文字を区別しないQRegularExpression オブジェクトを使用して、関連するアルファベットグループに従ってコンタクト名をフィルタリングするように設定されます。また、テーブルビューは、対応するプロキシモデルのsort() 関数を使用して昇順にソートされます。
各テーブル・ビューのselectionMode はQAbstractItemView::SingleSelection に、selectionBehavior はQAbstractItemView::SelectRows に設定され、ユーザーは1行のすべての項目を同時に選択することができます。各QTableView オブジェクトには、選択されたインデックスを追跡するQItemSelectionModel が自動的に与えられます。
void AddressWidget::setupTabs()
{
    using namespace Qt::StringLiterals;
    const auto groups = { "ABC"_L1, "DEF"_L1, "GHI"_L1, "JKL"_L1, "MNO"_L1, "PQR"_L1,
                          "STU"_L1, "VW"_L1, "XYZ"_L1 };

    for (QLatin1StringView str : groups) {
        const auto regExp = QRegularExpression(QLatin1StringView("^[%1].*").arg(str),
                                               QRegularExpression::CaseInsensitiveOption);

        auto proxyModel = new QSortFilterProxyModel(this);
        proxyModel->setSourceModel(table);
        proxyModel->setFilterRegularExpression(regExp);
        proxyModel->setFilterKeyColumn(0);

        QTableView *tableView = new QTableView;
        tableView->setModel(proxyModel);
        tableView->setSelectionBehavior(QAbstractItemView::SelectRows);
        tableView->horizontalHeader()->setStretchLastSection(true);
        tableView->verticalHeader()->hide();
        tableView->setEditTriggers(QAbstractItemView::NoEditTriggers);
        tableView->setSelectionMode(QAbstractItemView::SingleSelection);
        tableView->setSortingEnabled(true);

        connect(tableView->selectionModel(), &QItemSelectionModel::selectionChanged,
                this, &AddressWidget::selectionChanged);

        connect(this, &QTabWidget::currentChanged, this, [this, tableView](int tabIndex) {
            if (widget(tabIndex) == tableView)
                emit selectionChanged(tableView->selectionModel()->selection());
        });

        addTab(tableView, str);
    }
}
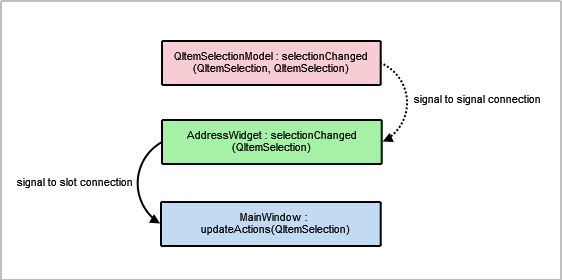
QItemSelectionModel クラスはselectionChanged シグナルを提供し、これはAddressWidget のselectionChanged() シグナルに接続されています。また、QTabWidget::currentChanged() シグナルをラムダ式に接続し、AddressWidget'のselectionChanged() 。これらの接続は、MainWindow'の「ツール」メニューでEdit Entry... とRemove Entry のアクションを有効にするために必要である。これについてはMainWindow の実装で詳しく説明する。
アドレス帳の各テーブルビューは、グループのQStringList から取得した関連するラベルを持つQTabWidget にタブとして追加される。
addEntry() 関数を2つ用意しました:1つはユーザー入力を受け付けるためのもので、もう1つはアドレス帳に新しいエントリーを追加する実際のタスクを実行するものです。newAddressTab 、ダイアログをポップアップすることなくデータを挿入できるように、エントリを追加する責任を2つの部分に分割しています。
最初のaddEntry() 関数はMainWindow のAdd Entry... アクションに接続されたスロットです。この関数はAddDialog オブジェクトを作成し、2番目のaddEntry() 関数を呼び出して実際にtable にコンタクトを追加します。
void AddressWidget::showAddEntryDialog()
{
    AddDialog aDialog;

    if (aDialog.exec())
        addEntry(aDialog.name(), aDialog.address());
}
アドレス帳の重複エントリを防ぐために、2番目のaddEntry() 関数で基本的なバリデーションが行われます。TableModel で述べたように、これがゲッターメソッドgetContacts() を必要とする理由の一部です。
void AddressWidget::addEntry(const QString &name, const QString &address)
{
    if (!name.front().isLetter()) {
        QMessageBox::information(this, tr("Invalid name"),
            tr("The name must start with a letter."));
    } else if (!table->getContacts().contains({ name, address })) {
        table->insertRows(0, 1, QModelIndex());

        QModelIndex index = table->index(0, 0, QModelIndex());
        table->setData(index, name, Qt::EditRole);
        index = table->index(0, 1, QModelIndex());
        table->setData(index, address, Qt::EditRole);
        removeTab(indexOf(newAddressTab));
    } else {
        QMessageBox::information(this, tr("Duplicate Name"),
            tr("The name \"%1\" already exists.").arg(name));
    }
}
モデルに同じ名前のエントリがまだ含まれていなければ、setData() を呼び出して、名前と住所を1列目と2列目に挿入します。そうでない場合は、QMessageBox を表示してユーザーに知らせます。
注: newAddressTab は、アドレス帳が空でなくなるため、コンタクトが追加されると削除されます。
この例では、ユーザーが既存の連絡先の名前を変更することができないため、エントリを編集することは、連絡先のアドレスのみを更新する方法です。
まず、QTabWidget::currentWidget ()を使って、アクティブなタブのQTableView オブジェクトを取得します。次に、tableView からselectionModel を抽出し、選択されたインデックスを取得します。
void AddressWidget::editEntry()
{
    QTableView *temp = static_cast<QTableView*>(currentWidget());
    QSortFilterProxyModel *proxy = static_cast<QSortFilterProxyModel*>(temp->model());
    QItemSelectionModel *selectionModel = temp->selectionModel();

    const QModelIndexList indexes = selectionModel->selectedRows();
    QString name;
    QString address;
    int row = -1;

    for (const QModelIndex &index : indexes) {
        row = proxy->mapToSource(index).row();
        QModelIndex nameIndex = table->index(row, 0, QModelIndex());
        QVariant varName = table->data(nameIndex, Qt::DisplayRole);
        name = varName.toString();

        QModelIndex addressIndex = table->index(row, 1, QModelIndex());
        QVariant varAddr = table->data(addressIndex, Qt::DisplayRole);
        address = varAddr.toString();
    }
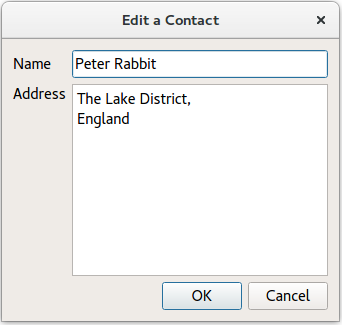
次に、ユーザーが編集しようとしている行からデータを抽出します。このデータは、AddDialog のインスタンスに別のウィンドウ・タイトルで表示されます。aDialog のデータに変更が加えられた場合のみ、table が更新される。
    AddDialog aDialog;
    aDialog.setWindowTitle(tr("Edit a Contact"));
    aDialog.editAddress(name, address);

    if (aDialog.exec()) {
        const QString newAddress = aDialog.address();
        if (newAddress != address) {
            const QModelIndex index = table->index(row, 1, QModelIndex());
            table->setData(index, newAddress, Qt::EditRole);
        }
    }
}
エントリーはremoveEntry() 関数を使用して削除される。選択された行は、QItemSelectionModel オブジェクト、selectionModel からアクセスして削除されます。newAddressTab は、ユーザーがアドレス帳のすべての連絡先を削除した場合にのみ、AddressWidget に再追加されます。
void AddressWidget::removeEntry()
{
    QTableView *temp = static_cast<QTableView*>(currentWidget());
    QSortFilterProxyModel *proxy = static_cast<QSortFilterProxyModel*>(temp->model());
    QItemSelectionModel *selectionModel = temp->selectionModel();

    const QModelIndexList indexes = selectionModel->selectedRows();

    for (QModelIndex index : indexes) {
        int row = proxy->mapToSource(index).row();
        table->removeRows(row, 1, QModelIndex());
    }

    if (table->rowCount(QModelIndex()) == 0)
        insertTab(0, newAddressTab, tr("Address Book"));
}
writeToFile() 関数を使用して、アドレス帳のすべての連絡先を含むファイルを保存します。ファイルはカスタムフォーマット(.dat )で保存されます。連絡先リストの内容は、QDataStream を使用してfile に書き込まれます。ファイルを開けない場合は、関連するエラーメッセージとともにQMessageBox が表示されます。
void AddressWidget::writeToFile()
{
    QFile file(fileName);

    if (!file.open(QIODevice::WriteOnly)) {
        QMessageBox::information(this, tr("Unable to open file"), file.errorString());
        return;
    }

    QDataStream out(&file);
    out << table->getContacts();
}
readFromFile() 関数は、writeToFile() を使用して保存されたアドレス帳のすべての連絡先を含むファイルを読み込みます。QDataStream を使用して、.dat ファイルの内容を連絡先リストに読み込み、addEntry() を使用して各連絡先を追加します。
void AddressWidget::readFromFile()
{
    QFile file(fileName);

    if (!file.open(QIODevice::ReadOnly)) {
        QMessageBox::information(this, tr("Unable to open file"),
            file.errorString());
        return;
    }

    QList<Contact> contacts;
    QDataStream in(&file);
    in >> contacts;

    if (contacts.isEmpty()) {
        QMessageBox::information(this, tr("No contacts in file"),
                                 tr("The file you are attempting to open contains no contacts."));
    } else {
        for (const auto &contact: std::as_const(contacts))
            addEntry(contact.name, contact.address);
    }
}
NewAddressTabクラスの定義
NewAddressTab クラスは、アドレス帳が空であることをユーザに知らせる情報タブを提供します。AddressWidget の実装で述べられているように、アドレス帳の内容に応じて表示されたり消えたりします。
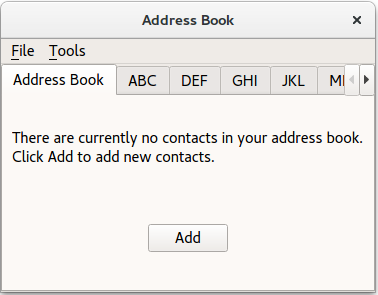
NewAddressTab クラスはQWidget を継承し、QLabel とQPushButton を含んでいます。
class NewAddressTab : public QWidget
{
    Q_OBJECT

public:
    NewAddressTab(QWidget *parent = nullptr);

public slots:
    void addEntry();

signals:
    void sendDetails(const QString &name, const QString &address);
};
NewAddressTab クラスの実装
コンストラクタはaddButton 、descriptionLabel をインスタンス化し、addButton のシグナルをaddEntry() スロットに接続する。
NewAddressTab::NewAddressTab(QWidget *parent)
    : QWidget(parent)
{
    auto descriptionLabel = new QLabel(tr("There are currently no contacts in your address book. "
                                          "\nClick Add to add new contacts."));

    auto addButton = new QPushButton(tr("Add"));

    connect(addButton, &QAbstractButton::clicked, this, &NewAddressTab::addEntry);

    auto mainLayout = new QVBoxLayout;
    mainLayout->addWidget(descriptionLabel);
    mainLayout->addWidget(addButton, 0, Qt::AlignCenter);

    setLayout(mainLayout);
}
addEntry() 関数は、AddressWidget のaddEntry() と似ていますが、どちらもAddDialog オブジェクトをインスタンス化します。ダイアログのデータは抽出され、sendDetails() シグナルを発することによってAddressWidget'のaddEntry() スロットに送られます。
void NewAddressTab::addEntry()
{
    AddDialog aDialog;

    if (aDialog.exec())
        emit sendDetails(aDialog.name(), aDialog.address());
}

AddDialogクラスの定義
AddDialog クラスはQDialog を継承し、アドレス帳にデータを入力するためのQLineEdit とQTextEdit をユーザに提供します。
class AddDialog : public QDialog
{
    Q_OBJECT

public:
    AddDialog(QWidget *parent = nullptr);

    QString name() const;
    QString address() const;
    void editAddress(const QString &name, const QString &address);

private:
    QLineEdit *nameText;
    QTextEdit *addressText;
};
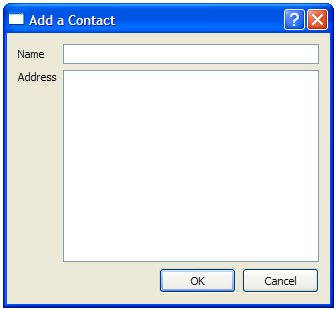
AddDialogクラスの実装
AddDialog のコンストラクタは、ユーザインタフェースを設定し、必要なウィジェットを作成し、レイアウトに配置します。
AddDialog::AddDialog(QWidget *parent)
    : QDialog(parent),
      nameText(new QLineEdit),
      addressText(new QTextEdit)
{
    auto nameLabel = new QLabel(tr("Name"));
    auto addressLabel = new QLabel(tr("Address"));
    auto okButton = new QPushButton(tr("OK"));
    auto cancelButton = new QPushButton(tr("Cancel"));

    auto gLayout = new QGridLayout;
    gLayout->setColumnStretch(1, 2);
    gLayout->addWidget(nameLabel, 0, 0);
    gLayout->addWidget(nameText, 0, 1);

    gLayout->addWidget(addressLabel, 1, 0, Qt::AlignLeft|Qt::AlignTop);
    gLayout->addWidget(addressText, 1, 1, Qt::AlignLeft);

    auto buttonLayout = new QHBoxLayout;
    buttonLayout->addWidget(okButton);
    buttonLayout->addWidget(cancelButton);

    gLayout->addLayout(buttonLayout, 2, 1, Qt::AlignRight);

    auto mainLayout = new QVBoxLayout;
    mainLayout->addLayout(gLayout);
    setLayout(mainLayout);

    connect(okButton, &QAbstractButton::clicked, this, &QDialog::accept);
    connect(cancelButton, &QAbstractButton::clicked, this, &QDialog::reject);

    setWindowTitle(tr("Add a Contact"));
}

QString AddDialog::name() const
{
    return nameText->text();
}

QString AddDialog::address() const
{
    return addressText->toPlainText();
}

void AddDialog::editAddress(const QString &name, const QString &address)
{
    nameText->setReadOnly(true);
    nameText->setText(name);
    addressText->setPlainText(address);
}
ダイアログに必要な動作を与えるために、OK とCancel ボタンをダイアログのaccept() とreject() スロットに接続します。ダイアログは名前と住所情報のコンテナとしてのみ機能するので、他の関数を実装する必要はありません。
MainWindowクラスの定義
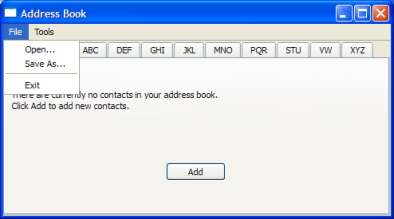
MainWindow クラスはQMainWindow を継承し、アドレス帳の操作に必要なメニューとアクションを実装しています。
 |  |
class MainWindow : public QMainWindow
{
    Q_OBJECT

public:
    MainWindow();

private slots:
    void updateActions(const QItemSelection &selection);
    void openFile();
    void saveFile();

private:
    void createMenus();

    AddressWidget *addressWidget;
    QAction *editAct;
    QAction *removeAct;
};
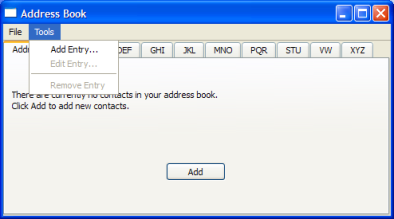
MainWindow クラスはAddressWidget を中心ウィジェットとして使用し、Open 、Close 、Exit のアクションを持つ File メニューと、Add Entry... 、Edit Entry... 、Remove Entry のアクションを持つTools メニューを提供します。
MainWindow クラスの実装
MainWindow のコンストラクタは、AddressWidget をインスタンス化し、中心ウィジェットとして設定し、createMenus() 関数を呼び出します。
MainWindow::MainWindow()
    : QMainWindow(),
      addressWidget(new AddressWidget)
{
    setCentralWidget(addressWidget);
    createMenus();
    setWindowTitle(tr("Address Book"));
}
createMenus() 関数は、File とTools メニューを設定し、アクションをそれぞれのスロットに接続します。Edit Entry... 、Remove Entry の両アクションは、空のアドレス帳では実行できないため、デフォルトでは無効になっています。一つ以上の連絡先が追加された時のみ有効になります。
void MainWindow::createMenus()
{
    QMenu *fileMenu = menuBar()->addMenu(tr("&File"));

    QAction *openAct = new QAction(tr("&Open..."), this);
    fileMenu->addAction(openAct);
    connect(openAct, &QAction::triggered, this, &MainWindow::openFile);
    ...

    editAct = new QAction(tr("&Edit Entry..."), this);
    editAct->setEnabled(false);
    toolMenu->addAction(editAct);
    connect(editAct, &QAction::triggered, addressWidget, &AddressWidget::editEntry);

    toolMenu->addSeparator();

    removeAct = new QAction(tr("&Remove Entry"), this);
    removeAct->setEnabled(false);
    toolMenu->addAction(removeAct);
    connect(removeAct, &QAction::triggered, addressWidget, &AddressWidget::removeEntry);

    connect(addressWidget, &AddressWidget::selectionChanged,
        this, &MainWindow::updateActions);
}
すべてのアクションのシグナルをそれぞれのスロットに接続する以外に、AddressWidget のselectionChanged() シグナルをupdateActions() スロットに接続します。
openFile() 関数は、アドレス帳の連絡先を含むカスタムaddressbook.dat ファイルを開きます。この関数はFile メニューのopenAct に接続されたスロットです。
void MainWindow::openFile()
{
    addressWidget->readFromFile();
}
saveFile() 関数は、アドレス帳の連絡先を含むカスタムaddressbook.dat ファイルを保存します。この関数は、File メニューのsaveAct に接続されているスロットです。
void MainWindow::saveFile()
{
    addressWidget->writeToFile();
}
updateActions() 関数は、アドレス帳の内容に応じてEdit Entry... とRemove Entry を有効または無効にします。アドレス帳が空の場合、これらのアクションは無効になり、そうでない場合は有効になります。この関数はAddressWidget のselectionChanged() シグナルに接続されたスロットである。
void MainWindow::updateActions(const QItemSelection &selection)
{
    QModelIndexList indexes = selection.indexes();

    if (!indexes.isEmpty()) {
        removeAct->setEnabled(true);
        editAct->setEnabled(true);
    } else {
        removeAct->setEnabled(false);
        editAct->setEnabled(false);
    }
}
main() 関数
アドレス帳のメイン関数は、イベントループを実行する前に、QApplication をインスタンス化し、MainWindow を開きます。
int main(int argc, char *argv[])
{
    QApplication app(argc, argv);
    MainWindow mw;
    mw.show();
    return app.exec();
}
© 2025 The Qt Company Ltd. Documentation contributions included herein are the copyrights of their respective owners. The documentation provided herein is licensed under the terms of the GNU Free Documentation License version 1.3 as published by the Free Software Foundation. Qt and respective logos are trademarks of The Qt Company Ltd. in Finland and/or other countries worldwide. All other trademarks are property of their respective owners.

