
マップビューア (QML)
「マップビューア」のサンプルでは、地図の表示や操作、住所の検索、経路案内(ドライビングディレクション)の取得方法について解説しています。
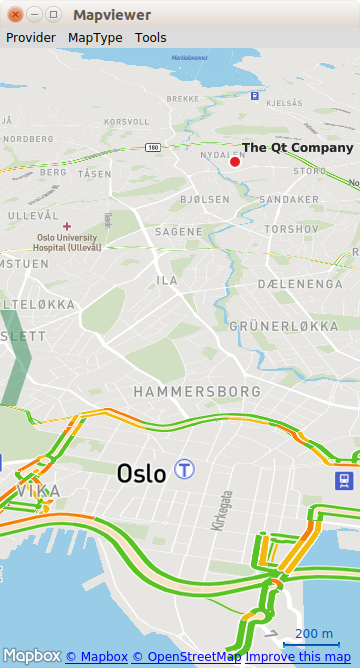
これは、Qt Location における地図、位置情報、ナビゲーションサービスの多くの基本的な用途を網羅した大規模なサンプルです。このページは、これらの各機能領域を扱うセクションに分かれており、各セクションにはコードのスニペットが掲載されています。
例の動作確認
サンプルは次の手順で実行できます。
- Qt Creator
Welcome モードを開き、Examples からこのサンプルを選択します。詳細については、Qt Creator の「チュートリアル: ビルドと実行」を参照してください。
- Qt Extension for Visual Studio Code
Command Palette から `Qt: Open Qt examples ` コマンドを実行し、リストからサンプルを選択します。詳細については、Qt Extension for Visual Studio Code の「チュートリアル:ビルドと実行」を参照してください。
このサンプルは、利用可能などのジオサービスプラグインでも動作します。ただし、一部のプラグインでは、正しく機能させるために追加のplugin parameters が必要になる場合があります。Plugin parameters は、--plugin 引数を使用してコマンドラインから指定できます。その形式は以下の通りです:
--plugin.<parameter name> <parameter value>各ジオサービスプラグインがサポートするパラメータの詳細については、各プラグインのドキュメントを参照してください。この例で使用されるデフォルトのプラグインは、Qt Location Open Street Map Plugin であり、このプラグインはパラメータを必要としません。
概要
この例で示されている QML タイプ:
- 地図の表示
- 住所の検索
- 道順と移動ルート
地図の表示
画面上に地図を描画するには、以下に示すようにMapView 型を使用します。
MapView {
    id: view
    map.zoomLevel: (maximumZoomLevel - minimumZoomLevel)/2
    map.center {
        // The Qt Company in Oslo
        latitude: 59.9485
        longitude: 10.7686
    }
}
MapView はmap を基にしており、基本的なナビゲーション機能のために拡張されています。この例では、緯度と経度を設定して、マップの初期中心位置をgeoCoordinate に指定します。また、初期ズームレベルを50%(最大と最小の中間)に設定します。
住所の検索(ジオコーディング)
地図上で特定の住所や場所を特定するには、ジオコーディングと呼ばれるプロセスを使用します。ジオコーディング操作を実行するには、まず結果を受け取れるように Map オブジェクトを設定する必要があります。
ジオコーディングの結果の受信は、GeocodeModel を通じて行われます:
GeocodeModel {
    id: geocodeModel
    plugin: view.map.plugin
    onStatusChanged: {
        if ((status == GeocodeModel.Ready) || (status == GeocodeModel.Error))
            view.geocodeFinished()
    }
    onLocationsChanged:
    {
        if (count === 1) {
            view.map.center.latitude = get(0).coordinate.latitude
            view.map.center.longitude = get(0).coordinate.longitude
        }
    }
}
GeocodeModel の内容を表示するには、MapItemView を使用します:
MapItemView {
    parent: view.map
    model: geocodeModel
    delegate: pointDelegate
}
MapItemView delegate と呼ばれるオブジェクトを使用し、それによって生成される項目のテンプレートとして機能させます。これには任意のMapオブジェクトを含めることができますが、この例ではマーカーの画像を含む を表示します:MapQuickItem
Component {
    id: pointDelegate

    MapQuickItem {
        id: point
        parent: view.map
        coordinate: locationData.coordinate

        sourceItem: Image {
            id: pointMarker
            source: "../resources/marker_blue.png"
        }
    }
}
これら3つのオブジェクトがあれば、Geocodeの応答を受け取り、マップ上に表示するのに十分です。最後に、実際のGeocodeリクエストを送信します。
Geocodeリクエストを送信するには、まずAddress オブジェクトを作成し、必要なパラメータを設定します。
Address {
    id :fromAddress
    street: "Sandakerveien 116"
    city: "Oslo"
    country: "Norway"
    state : ""
    postalCode: "0484"
}次に、geocodeModel.query に設定済みのAddress を割り当て、GeocodeModel のupdate()を呼び出します。
// send the geocode request
geocodeModel.query = fromAddress
geocodeModel.update()
道順と移動ルート
GeocodeModel と同様に、Qt Location もRouteModel 型を備えており、これにより2つ以上の地点間のルート(例えば、自動車での道順)に関する情報を取得し、Map で利用することができます。
ここでも、RouteModel をMapのプロパティとしてインスタンス化します:
RouteModel {
    id: routeModel
    plugin : view.map.plugin
    query:  RouteQuery {
        id: routeQuery
    }
    onStatusChanged: {
        if (status == RouteModel.Ready) {
            switch (count) {
            case 0:
                // technically not an error
                view.routeError()
                break
            case 1:
                view.showRouteList()
                break
            }
        } else if (status == RouteModel.Error) {
            view.routeError()
        }
    }
}モデルの内容をユーザーに表示するには、ビューが必要です。ここでもMapItemView を使用し、ルート情報をマップ上のオブジェクトとして表示します:
MapItemView {
    parent: view.map
    model: routeModel
    delegate: routeDelegate
ビューに生成させたいオブジェクトのテンプレートとして機能させるため、デリゲートコンポーネントを作成します:
Component {
    id: routeDelegate

    MapRoute {
        id: route
        route: routeData
        line.color: "#46a2da"
        line.width: 5
        smooth: true
        opacity: 0.8
モデル、ビュー、デリゲートが完成したため、あとはルートリクエストプロセスを開始するためのモデル制御コンポーネントだけが必要です。最も単純なケースでは、すでに利用可能な 2 つの `coordinates` を使用してルートリクエストを作成できます:
property variant fromCoordinate: QtPositioning.coordinate(59.9483, 10.7695)
property variant toCoordinate: QtPositioning.coordinate(59.9645, 10.671)
次のスニペットでは、リクエストオブジェクトの設定方法と、モデルに更新を指示する方法を示します。また、ルート検索リクエストの出発座標を中心にマップを表示するように指示します。
// clear away any old data in the query
routeQuery.clearWaypoints();
// add the start and end coords as waypoints on the route
routeQuery.addWaypoint(startCoordinate)
routeQuery.addWaypoint(endCoordinate)
routeQuery.travelModes = RouteQuery.CarTravel
routeQuery.routeOptimizations = RouteQuery.FastestRoute
routeModel.update();
// center the map on the start coord
view.map.center = startCoordinate;
これで、地図上にルートを表示するために必要な処理はすべて完了です。ただし、作成された道順や移動ルートの説明を取得できる機能も便利です。 この例では、これらはListView 要素内に表示されています。このコンテンツを作成するために、標準のListModelとListView の組み合わせを使用します。ListModel内のデータは、routeModelの出力に基づいて構築されます:
ListView {
    interactive: true
    model: ListModel { id: routeInfoModel }
    header: RouteListHeader {}
    delegate:  RouteListDelegate{
        routeIndex.text: index + 1
        routeInstruction.text: instruction
        routeDistance.text: distance
    }
}
RouteModel 内では、上記のようにonStatusChanged ハンドラを追加しています。このハンドラはshowRouteList() を呼び出し、routeInfoModel を更新します:
routeInfoModel.clear()
if (routeModel.count > 0) {
    for (var i = 0; i < routeModel.get(0).segments.length; i++) {
        routeInfoModel.append({
            "instruction": routeModel.get(0).segments[i].maneuver.instructionText,
             "distance": Helper.formatDistance(routeModel.get(0).segments[i].maneuver.distanceToNextInstruction)
        });
    }
}© 2026 The Qt Company Ltd. Documentation contributions included herein are the copyrights of their respective owners. The documentation provided herein is licensed under the terms of the GNU Free Documentation License version 1.3 as published by the Free Software Foundation. Qt and respective logos are trademarks of The Qt Company Ltd. in Finland and/or other countries worldwide. All other trademarks are property of their respective owners.
