
「Quick Speech」のサンプル
「Quick Speech」のサンプルは、ユーザーが指定したテキストを読み上げます。
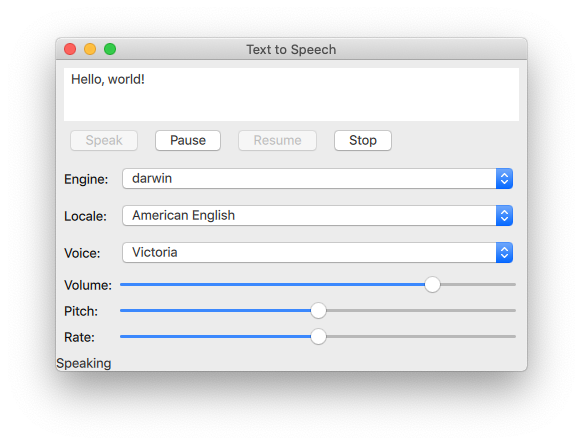
「Quick Speech」のサンプルでは、TextToSpeech 型をアプリケーション内でどのように使用して Qt Quick テキストを読み上げたり、音声の制御を行ったりする方法を示しています。
このサンプルでは、Qt Quick コントロールを使用して、音声のピッチ、音量、速度を制御します。また、ユーザーがエンジン、言語、音声を選択することもできます。
TextToSpeechの初期化
まず、テキスト読み上げオブジェクト `tts` を初期化します。
    TextToSpeech {
        id: tts
        volume: volumeSlider.value
        pitch: pitchSlider.value
        rate: rateSlider.value
ステータスの取得
switch文を使用して、フッターにある「statusLabel 」ラベルを更新します。
        onStateChanged: updateStateLabel(state)

        function updateStateLabel(state)
        {
            switch (state) {
                case TextToSpeech.Ready:
                    statusLabel.text = qsTr("Ready")
                    break
                case TextToSpeech.Speaking:
                    statusLabel.text = qsTr("Speaking")
                    break
                case TextToSpeech.Paused:
                    statusLabel.text = qsTr("Paused...")
                    break
                case TextToSpeech.Error:
                    statusLabel.text = qsTr("Error!")
                    break
            }
        }
発話中の単語のハイライト表示
TextArea input を使用し、入力テキストを取得するとともに、onSayingWord シグナルをトリガーとして利用し、読み上げ中の単語をハイライトする位置を特定します。
        onSayingWord: (word, id, start, length)=> {
            input.select(start, start + length)
        }
TextArea (input )は、ここで宣言されています:
    ColumnLayout {
        anchors.fill: parent
        anchors.margins: 8
        id: inputForm

        TextArea {
            id: input
            wrapMode: TextEdit.WordWrap
            text: qsTr("Hello, world!")
            Layout.fillWidth: true
            Layout.minimumHeight: implicitHeight
            font.pointSize: 24
        }
音声制御
Button タイプはRowLayout で配置され、TextToSpeech のtts を制御するように設定されています。
「Speak」ボタン
「Speak」というラベルの付いたButton が作成されます。これは、tts のstateプロパティがPaused またはReady のいずれかである場合に有効になります。ボタンがクリックされると、対象デバイスで利用可能な音声が取得され、tts.voice にはvoicesComboBox で現在選択されている音声が設定されます。その後、TextToSpeech::say()が呼び出され、inputbox 内のテキストが引数として渡されます。
        RowLayout {
            Button {
                text: qsTr("Speak")
                enabled: [TextToSpeech.Paused, TextToSpeech.Ready].includes(tts.state)
                onClicked: {
                    let voices = tts.availableVoices()
                    tts.voice = voices[voicesComboBox.currentIndex]
                    tts.say(input.text)
                }
            }
一時停止、再開、停止ボタン
これらのボタンは、Speak ボタンの実装と類似しています:
            Button {
                text: qsTr("Pause")
                enabled: tts.state == TextToSpeech.Speaking
                onClicked: tts.pause()
                visible: tts.engineCapabilities & TextToSpeech.Capabilities.PauseResume
            }
            Button {
                text: qsTr("Resume")
                enabled: tts.state == TextToSpeech.Paused
                onClicked: tts.resume()
                visible: tts.engineCapabilities & TextToSpeech.Capabilities.PauseResume
            }
            Button {
                text: qsTr("Stop")
                enabled: [TextToSpeech.Speaking, TextToSpeech.Paused].includes(tts.state)
                onClicked: tts.stop()
            }
テキスト読み上げオプションの選択
GridLayout を使用することで、テキスト読み上げ合成におけるエンジン、ロケール、音声、音量、ピッチ、読み上げ速度の各オプションを選択するためのコントロールやラベルを配置します。
エンジン、ロケール、音声の選択
これらのパラメータを選択するために、一連のComboBox コンポーネントが使用されます。
エンジン選択用のComboBox では、モデルとしてtts.availableEngines() が使用されます。
onActivated は、ComboBoxの現在のインデックスにあるテキストをtts.engineに割り当てる処理をトリガーします。
            Label {
                text: qsTr("Engine:")
            }
            ComboBox {
                id: enginesComboBox
                Layout.fillWidth: true
                model: tts.availableEngines()
                onActivated: {
                    tts.engine = textAt(currentIndex)
                    updateLocales()
                    updateVoices()
                }
            }
上記のコードスニペットの最後の 2 行は、利用可能なロケールと音声が、選択されたエンジンに依存するため、この時点で更新されることも示しています。これらの関数については、次のセクションで説明します。
localesComboBox はengineComboBox と同じ方法で実装されていますが、利用可能なエンジンの更新は行われません。
            Label {
                text: qsTr("Locale:")
            }
            ComboBox {
                id: localesComboBox
                Layout.fillWidth: true
                onActivated: {
                    let locales = tts.availableLocales()
                    tts.locale = locales[currentIndex]
                    updateVoices()
                }
            }
            Label {
                text: qsTr("Voice:")
            }
            ComboBox {
                id: voicesComboBox
                Layout.fillWidth: true
            }
音量、ピッチ、および発話速度の選択
これらのコントロールは、Sliders を使用して次のように実装されています:
            Label {
                text: qsTr("Volume:")
            }
            Slider {
                id: volumeSlider
                from: 0
                to: 1.0
                stepSize: 0.2
                value: 0.8
                Layout.fillWidth: true
            }
            Label {
                text: qsTr("Pitch:")
            }
            Slider {
                id: pitchSlider
                from: -1.0
                to: 1.0
                stepSize: 0.5
                value: 0
                Layout.fillWidth: true
            }
            Label {
                text: qsTr("Rate:")
            }
            Slider {
                id: rateSlider
                from: -1.0
                to: 1.0
                stepSize: 0.5
                value: 0
                Layout.fillWidth: true
            }
        }
    }
利用可能なオプションの更新
Component.onCompleted シグナルを使用することで、ルートとなるApplicationWindow がインスタンス化されると、以下の処理が行われます。
enginesComboBoxのインデックスは、ttsで現在設定されているエンジンに設定されます。- 利用可能なロケールと音声が更新されます。
ttsの現在の状態が通知されます。
    Component.onCompleted: {
        enginesComboBox.currentIndex = tts.availableEngines().indexOf(tts.engine)
        // some engines initialize asynchronously
        if (tts.state == TextToSpeech.Ready) {
            engineReady()
アプリケーション全体で使用される `updateLocales() ` および `updateVoice() ` 関数は、次のように実装されています:
        } else {
            tts.stateChanged.connect(root.engineReady)
        }

        tts.updateStateLabel(tts.state)
    }

    function engineReady() {
        tts.stateChanged.disconnect(root.engineReady)
        if (tts.state != TextToSpeech.Ready) {
            tts.updateStateLabel(tts.state)
            return;
        }
        updateLocales()
        updateVoices()
    }

    function updateLocales() {
        let allLocales = tts.availableLocales().map((locale) => locale.nativeLanguageName)
        let currentLocaleIndex = allLocales.indexOf(tts.locale.nativeLanguageName)
        localesComboBox.model = allLocales
        localesComboBox.currentIndex = currentLocaleIndex
    }

    function updateVoices() {
        voicesComboBox.model = tts.availableVoices().map((voice) => voice.name)
        let indexOfVoice = tts.availableVoices().indexOf(tts.voice)
        voicesComboBox.currentIndex = indexOfVoice
例の動作確認
サンプルは次の手順で実行できます:
- Qt Creator
Welcome モードを開き、Examples からサンプルを選択します。詳細については、Qt Creator: チュートリアル「ビルドと実行」を参照してください。
- Qt Extension for Visual Studio Code
Command Palette から `Qt: Open Qt examples ` コマンドを実行し、リストからサンプルを選択します。詳細については、Qt Extension for Visual Studio Code の「チュートリアル:ビルドと実行」を参照してください。
© 2026 The Qt Company Ltd. Documentation contributions included herein are the copyrights of their respective owners. The documentation provided herein is licensed under the terms of the GNU Free Documentation License version 1.3 as published by the Free Software Foundation. Qt and respective logos are trademarks of The Qt Company Ltd. in Finland and/or other countries worldwide. All other trademarks are property of their respective owners.
