Helix ALM Integration
Helix ALM, formerly known as TestTrack TCM, is a test management tool from Perforce.
Squish tests can be executed from within Helix ALM by a script agent called squishTcmAgent. It processes a .squishtcm description file that contains all the information necessary to run a Squish test.
Obtaining the Helix ALM Plugin
The plugin is supplied as a .zip file.
Note: This add-on was previously offered as a paid product and is now available free of charge. It is provided as is, without ongoing support, and its functionality has not been fully validated. No additional resources for it's further development, maintenance, or troubleshooting will be allocated. To request access, please create a support ticket, and a download link will be provided.
Installing the Helix ALM Plugin
The zip file contains the plugin compiled for Linux and for Windows. For Linux, use the file which ends with .tar.gz. For Windows, use the file which ends with .zip.
To install the plugin, extract the respective .tar.gz or .zip archive and copy the squishTcmAgent executable and the defaultTestCaseResolver executable into the Helix ALM's script agent directory. The default directory is ScriptAgents and in the Helix ALM installation directory.
Configuring the Helix ALM Plugin
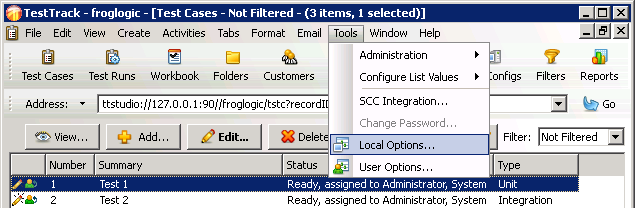
To run Squish tests within Helix ALM, associate the .squishtcm file with the Squish script agent. In Helix ALM, select Tools > LocalOptions to open the Local Options dialog.
In the Local Options dialog, click the View File item in the list shown on the left to open the View File Settings dialog. Use this dialog to associate the .squishtcm file extension with the squishTcmAgent executable.
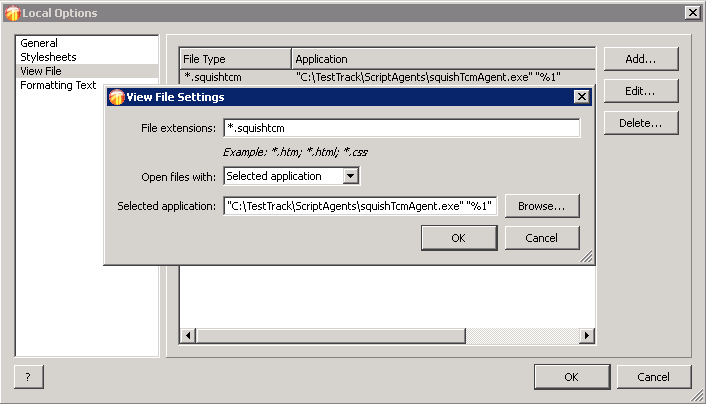
The path to the executable may be different from the one shown in the screenshot, so adapt the path as necessary depending on where you installed Helix ALM.
The .squishtcm Description File
The .squishtcm file describes the Squish test that should be executed. The file is formatted as plain text with one key/value item per line. Two key/value pairs must be specified:
| Key | Value | Example |
|---|---|---|
| testCase | Name of the test case | testCase = "tst_adding" |
| configFile | Name of the used configuration file | configFile = "master_win32" |
For maximum flexibility, the test case folder which is needed to run a Squish test is provided by a program called testCaseResolver. The default testCaseResolver which is shipped with the plugin (defaultTestCaseResolver) echoes the value assigned to the testCase key of the .squishtcm file. Thus, to use the default testCaseResolver, the absolute path to the test case folder has to be assigned to the testCase key.
Alternatively, write a custom testCaseResolver program. When executed, the program is passed the value which has been used for the testCase key of the .squishtcm file, as its sole command line argument. The plugin expects testCaseResolver to respond by outputting the absolute test case path to stdout. The path to testCaseResolver must be specified in the configuration file.
The plugin uses the environment variable SQUISH_TCM_CONFIGDIR to search for the configuration file which is named inside the .squishtcm file for the configFile key.
The Configuration File
The configuration file describes the general settings which are used to execute a Squish test case.
| Key | Value | Required | Example |
|---|---|---|---|
| squishDir | Path to the Squish root directory | yes | squishDir = "C:\\Squish" |
| testCaseResolverPath | Absolute path to the testCaseResolver responsible for providing the absolute path of the test case folder to the plugin on stdout | yes | testCaseResolverPath = "C:\\HelixALM\\ScriptAgents\\defaultTestCaseResolver.exe"or:
|
| testCaseResolverScript | Absolute path to a script which is executed by the testCaseResolver which is specified by the testCaseResolverPath key. This key is only required if testCaseResolver requires a script as argument. For example, if Python is specified at testCaseResolverPath, the Python script to be executed must be specified by using this key. | yes / no | testCaseResolverScript = "C:\\myTestCaseResolver.py" |
| wrapper | The wrapper Squish needs to use | yes | wrapper = "Qt" |
| aut | This can be omitted if the test case uses the ApplicationContext startApplication(autName) function to start the AUT; otherwise the AUT must be specified | no | aut = "addressbook" |
| cwd | This can be omitted if the default behavior of using the current working directory is acceptable. Otherwise, see the --cwd option in Executing a Test Case (Advanced) for alternatives | no | cwd = "@server" |
| host | This can be omitted if the squishserver should be started locally; otherwise set this to the IP Address or host name of the remote PC where squishserver is running | no | host = "192.168.0.42" |
| port | This can be omitted if the default behavior of using any random free port is acceptable; otherwise specify a port | no | port = "4711" |
| objectMapPath | The absolute path to the object map which is used by the test case | no | objectMapPath = "C:\\Squish\\examples\\qt4\\suite_addressbook_py\\objects.map" |
| preExecutable | The absolute path to an executable which will be executed at the beginning of a test case. The current working directory where the result and log files are stored is passed as argument. | no | preExecutable = "C:\\preTask.exe" |
| postExecutable | The absolute path to an executable which will be executed at the end of a test case. The current working directory where the result and log files are stored is passed as first argument and the test run ID is passed as second argument. | no | postExecutable = "C:\\postTask.bat" |
| pythonExecutable | Absolute path to a Python interpreter. This is only required if the Squish package specified by the squishDir key is not shipped with a Python interpreter. Python 3.6 or newer is required. | yes / no | pythonExecutable = "C:\\Python38\\python.exe" |
As the table shows, the paths to the Squish directory and to the testCaseResolver program are required, as is the wrapper to use, while the other key/value pairs are—or can be—optional.
Note that if Windows-style paths are used each backslash must be escaped and the paths quoted; however, on all platforms, forward slashes can be used instead and these do not require escaping. (Paths that contain spaces must be quoted though.)
Example: How to Run a Squish Test Case
This example shows how to setup the configuration and .squishtcm files to run a Squish test in Helix ALM. It uses the test case tst_adding from the test suite suite_py of a Squish for Qt package. Squish is assumed to be installed at C:\Squish, the test suite is located inside the Squish folder at C:\Squish\examples\qt4\addressbook\suite_py.
We decide to not use the default testCaseResolver as we don't want to specify the absolute path to the test case folder inside the .squishtcm file. If we would use the absolute path, every time the location of the test case folder changes we would have to touch the .squishtcm file attached to the Helix ALM test. This can happen for example if the test should be executed on another host.
For this example, we'll create a Python script at C:\myTestCaseResolver.py and use it as testCaseResolver. The Python script is quite simple, it just prepends the absolute path to the test suite to the test case name and prints this path to stdout:
import sys
testCaseName = sys.argv[1]
print "C:\\Squish\\examples\\qt4\\addressbook\\suite_py\\" + testCaseName
The next step is to create the configuration file. The configuration file can have any file extension or none. For the example, we'll create the configuration file at C:\master_win32 with no file extension:
squishDir="C:\\Squish"
testCaseResolverPath="C:\\Squish\\python\\python.exe"
testCaseResolverScript="C:\\myTestCaseResolver.py"
wrapper="Qt"
objectMapPath="C:\\Squish\\examples\\qt4\\addressbook\\suite_py\\objects.map"
To specify where Squish is installed, we set the value of the squishDir key. As we want to use a Python script as testCaseResolver, we specify the script by setting the value of the testCaseResolverScript key. Further, as the plugin needs to know how to run a Python script, we need to specify a Python interpreter too by setting the value of the testCaseResolverPath key. Fortunately, the default Squish packages for Windows are shipped with a Python interpreter inside the Squish subfolder C:\Squish\python so we can use that one. Finally, we need to specify the wrapper and the absolute path to the object map as the test case tst_adding uses symbolic names which are stored inside the object map.
After the configuration file has been created, we need the .squishtcm file which will be attached to the Helix ALM test later. For the example, we'll create the .squishtcm file at C:\test_a.squishtcm. The content consists of two lines:
testCase="tst_adding"
configFile="master_win32"
The first line specifies the test case we want to execute. As we're using our Python script as testCaseResolver, which prepends the absolute path to the test suite, we can just enter the name of the test case. The second line specifies the configuration file we want to use. Here we have to enter only the file name of the configuration file, not its absolute path. The path the plugin will search for configuration files will be configured by using the environment variable SQUISH_TCM_CONFIGDIR. The reason for this is similar to why we're not putting an absolute path into the .squishtcm file. If the test case should be executed on a different host that installed Squish e.g. at S:\tools\squish, we only have to create a separate configuration file for this host and adapt the Squish installation path of the squishDir key there. Again, the .squishtcm file which resides inside Helix ALM does not have to be touched for this.
Before starting Helix ALM, we need to set up the environment variable SQUISH_TCM_CONFIGDIR to tell the plugin where to search for configuration files. To do this we can either set up the environment variable inside Windows or create a batch file which does this for us. Let's create a batch file at C:\helixalm.bat:
set SQUISH_TCM_CONFIGDIR=C:\
"C:\Program Files\Perforce\HelixALM\TestTrack Client.exe"
which assumes that Helix ALM is installed at C:\Program Files\Perforce\HelixALM.
After the custom testCaseResolver, configuration, and .squishtcm files have been created and Helix ALM is started by using the batch file C:\helixalm.bat, create a test case in Helix ALM and switch to the test case's Files tab:

The Edit Helix ALM Test Case view
Now click the Select Scripts button to choose the C:\test_a.squishtcm description file:
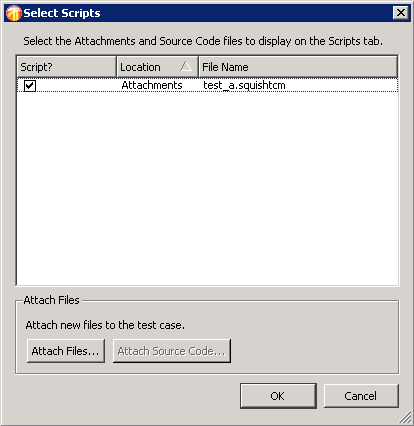
The Select Scripts dialog
Close the Select Scripts dialog by clicking the OK button, and apply the changes by clicking the Apply button. To run the Squish test, select the recently added script in the Files tab and click the Run Script button. This runs the test and opens the {Script File Status} dialog.
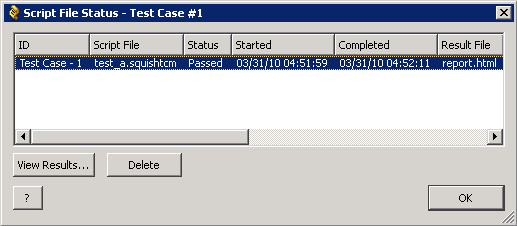
The Script File Status dialog
After the test has finished, the results file can be shown by clicking the Script File Status dialog's View Results button:
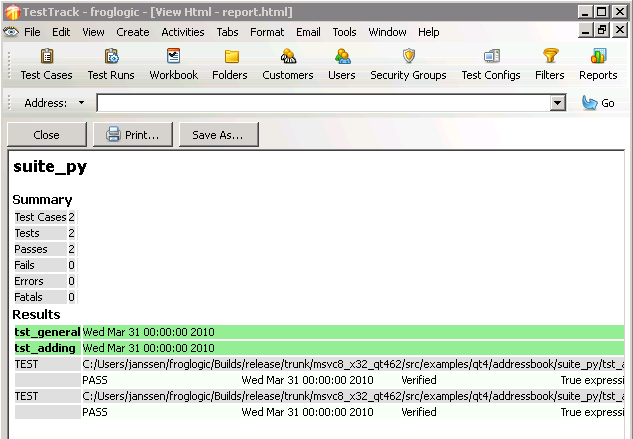
Squish Tests Results in Helix ALM
The results shown are only stored temporarily. As soon as the Script File Status dialog's OK button is clicked, the results are deleted. This happens because Helix ALM associates executed tests with test runs, which have to be generated for the test case.
The temporary results are written to the ScheduledScripts directory in the Helix ALM installation path. The directory contains the following files after running a Squish test:
| Filename | Description |
|---|---|
test_a.squishtcm | A copy of the Squish description file. |
test_a.trjob | An interface file for synchronizing Helix ALM and the squishTcmAgent. |
report.html | The test results in HTML format. |
report.xml | The test results in XML format. |
squishTcmAgent.log | The squishTcmAgent program's log file. |
server.log | The squishserver's log file. |
runner.log | The squishrunner's log file. |
© 2025 The Qt Company Ltd.
Documentation contributions included herein are the copyrights of
their respective owners.
The documentation provided herein is licensed under the terms of the GNU Free Documentation License version 1.3 as published by the Free Software Foundation.
Qt and respective logos are trademarks of The Qt Company Ltd. in Finland and/or other countries worldwide. All other trademarks are property
of their respective owners.
