AUTs and Settings
This section discusses many aspects of applications under test, such as how they are located, how they can be specified, and various special settings that can be used with Squish.
AUT Class Name and Classpath for Java
A Java application can be configured in the Test Suite's Test Suite Settings view. The AUT can be set in the following ways:
- Leave the Application as
<No Application>and enter the name of the class that has the application's staticmainmethod in the Main Class edit box. For example,MyApplication.class. This approach cannot be used for Java/SWT applications unless theCLASSPATHpoints to theswt.jarfile. - Set the Application to be the name of a
.classfile—providing that this file has the application's staticmainmethod. This approach cannot be used for Java/SWT applications unless theCLASSPATHpoints to theswt.jarfile. - Set the Application to be the name of a
.jararchive, if the archive contains a suitableMANIFESTfile that lists the application class that has the application's staticmainmethod. This approach cannot be used for Java/SWT applications. - Set the Application to be the name of a script or other executable.
Note: When testing RCP applications, it is sufficient to set the Application to be the name of the launcher executable.
Java/SWT Applications
For Java/SWT applications, one approach is to create a shell script or batch file to set as the Application.
On Unix-like systems, create a one-line shell script to use as the AUT that includes the swt.jar in the class path. For example:
java -cp "$PWD":"$PWD/../swt/swt.jar" MyApplication
Similarly, on Windows, create a one-line batch file. For example:
start javaw -cp "%CD%;%CD%\..\swt\swt.jar" MyApplication
In both examples, we have assumed that the swt.jar file is in a parallel directory called swt. Simply modify one of the above to point to your swt.jar file and to the .class that contains your AUT's main function.
An alternative to using a shell script or batch file is to set the CLASSPATH environment variable to point to the swt.jar file. In this case the .class file that contains your AUT's main function can be set as the AUT.
The CLASSPATH environment variable can be set either in the Test Suite's Test Suite Settings view's Classpath edit box or outside of Squish as an environment variable for the system in the usual way for the platform you are using. Only one of these need be used, not both. If you set the CLASSPATH inside Squish, do not use quotes.
AUT Paths and Mapped AUTs
In Squish, only the name of the application under test is stored in the test suite's configuration file, not its absolute path. This is because the test runner (squishrunner) doesn't execute the AUT itself, but instead it tells the squishserver to start the AUT. The squishserver can be running on multiple machines, and the AUT could be located on a different path on each of them. When squishrunner gives the squishserver the name of an AUT to run, it is the responsibility of the squishserver to locate the AUT and to start it running.
The following sections describe how to tell the squishserver where an executable is located. Registering and unregistering AUT paths and AUTs can be done using the Squish IDE. For more information, see Manage AUTs panel.
AUT Path
The AUT Path is a variable in squishserver's settings which specifies a list of paths, just like the operating system's own PATH environment variable. When the squishserver is given the name of an AUT to start, it searches all of the paths in the AUT Path variable, and as soon as it finds a path that contains an executable with the name it was given, it starts it running.
To add a path to the squishserver's AUT Path variable, execute:
squishserver --config addAppPath <path>
To remove a path from the AUT Path variable, execute:
squishserver --config removeAppPath <path>
The same can be done using the Squish IDE's Manage AUTs dialog. Click Edit > ServerSettings > Manage AUTs to invoke it. To add a path to the AUT Path, click the AUT Paths item, then click the Add button, and choose a path from the file dialog that pops up. Similarly, to remove an AUT Path, expand the AUT Paths item, click the unwanted path, then click the Remove button.
Mapped AUT
Instead of having the squishserver look through all the AUT Path's paths for an AUT's executable, we can create mappings that directly relate AUT names to their corresponding paths. If we do this, when the squishserver is given the name of an AUT to execute, it starts by seeing if the name is mapped to a path—and if it is, squishserver starts the application directly using the mapped path. This avoids the (usually insignificant) overhead of searching all the AUT Path's paths.
An additional benefit of using the mapping approach is that it prevents the possibility of accidentally executing the wrong AUT. Without using a mapping this could happen if two different executables have the same name and when trying to execute one of them the other is unintentionally executed because its path comes earlier in the AUT Path list.
To map the application myapplication to the path /home/jane/bin/, execute:
squishserver --config addAUT myapplication /home/jane/bin
This way, if squishserver is given the name myapplication to start, it will not search all the paths in the AUT Path list, but instead will use the mapped path and directly execute /home/jane/bin/myapplication.
It is just as easy to remove a mapping:
squishserver --config removeAUT myapplication
When a new test suite is created using the Squish IDE and the AUT is specified in the New Test Suite wizard, behind the scenes, the Squish IDE calls the squishserver with the addAUT option to add the new AUT as a mapped AUT.
The same can be done using the Squish IDE's Manage AUTs dialog. Click Edit > Server Settings > Manage AUTs to invoke it. To add a mapped AUT to the Mapped AUTs, click the Mapped AUTs item, then click the Add button, and choose an AUT from the file dialog that pops up. Similarly, to remove a mapped AUT, expand the Mapped AUTs item, click the unwanted mapping, then click the Remove button.
See also, the Manage AUTs panel.
Setting Environment Variables
Some applications, including Squish's tools, read environment variables and may alter their behavior depending on the environment. For example, an environment variable might be used to provide a path that may vary on different machines.
In the context of testing, there are two different environments to consider. The environment that the Squish tools (including test scripts) execute in and the environment that the AUT executes in.
To set up Squish's environment (for the tools and for test scripts), we must set the relevant environment variables before running any Squish tools, so that when they are run they can detect the environment that has been created for them. The environment variables that Squish uses are described in Environment Variables. They only have to be set if you want to override the defaults.
When Squish does a startApplication(), squishserver provides the AUT with an environment based on the one that squishserver itself inherited from the operating system. This environment will include PATH (on Windows), LD_LIBRARY_PATH (Unix, but not macOS), or DYLD_LIBRARY_PATH (macOS). These variables are altered by Squish and must not be deleted, although it is safe to append or prepend additional paths to them. It is also possible to create AUT-specific environment variables that Squish will set up for the AUT—this is covered in the following subsection.
Setting Environment Variables for the AUT
In some cases an application needs a special environment to be set up before it can be started successfully. This might include setting some environment variables, running a helper application, or checking for some other conditions, such as whether there is enough memory available. Usually this is done by using a shell script or Windows batch file to do this pre-initialization work and which then starts the actual application. For more information about such shell scripts and batch files. see Shell Scripts and .bat-Files as AUT.
However, if all that is required to run an application successfully is to set up some environment variables, there is no need to create a shell script or batch file at all, since this can be handled by Squish. And in fact, the preferred approach when only environment variables are needed, is to let Squish take care of them.
When the AUT is started with startApplication(), it receives the environment that squishserver provides for it.
To specify additional environment variables, open the Squish IDE's Test Suite Settings view, and scroll to the Environment area, as shown in the screenshot.
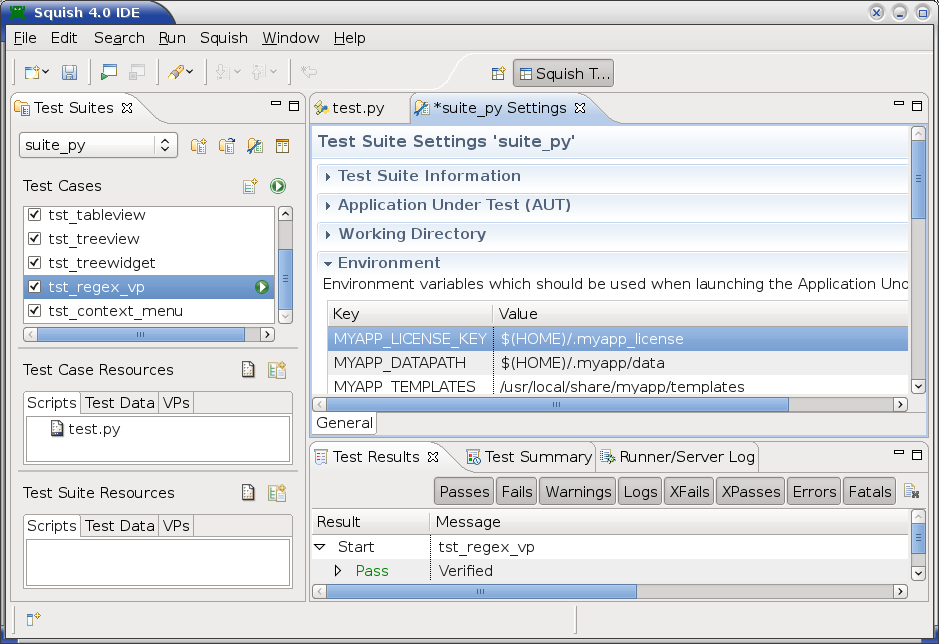
The values may themselves be or contain references to other environment variables using the syntax $(NAME), as the screenshot illustrates.
The table always shows a blank row into which a new key (environment variable name) and value can be entered. Just click a cell in the table to start adding or editing a key or value. To delete a row, delete the key and click elsewhere.
Now, whenever the squishserver is told to run the AUT, it will first set up the environment in the normal way, then add the environment variables that identify the suite and test case, and then add any environment variables that we have set here, so that when the AUT starts it has the context we want.
Variables
Squish recognizes its own set of environment variables which can be set to affect aspects of Squish's behavior. Those that are used to control aspects of running and recording tests can be set in the Test Suite Settings dialog's Environment tab, as described above. For an example of such an environment variable, see Using an environment variable in Wrapping custom classes.
However, those environment variables that affect how Squish IDE and command line tools behave must be set before running the Squish IDE or tools, and so cannot be set in the Test Suite Settings dialog. See Environment Variables for more about these environment variables, and also for details of how test scripts can access an AUT's environment variables.
It is also possible for test scripts to access environment variables. For more information, see How to Read Environment Variables inside Test Scripts.
Shell Scripts and .bat-Files as AUT
In situations where starting an application requires more than just setting up some environment variables. See Setting Environment Variables for the AUT for details. The best solution is to create a startup shell script or batch file to perform the necessary setup and to start the application, and to specify this startup script or batch file as the AUT, instead of the actual application's executable.
Qt-based Applications
On Unix
On Linux or macOS, when using a shell script as the AUT to start other binary executables, you must make those executables known to Squish. Squish will only hook into child-processes started by the shell script that are white-listed. White-listing is done by adding the executable as Mapped AUT, or by adding its path to the AUT Path list. Either method can be done in the Squish IDE or by using Squish's command line tools. For more information, see AUT Paths and Mapped AUTs.
On macOS
On modern macOS platforms, a couple of environment variables need to be set at the top of the actual shell script, to allow hooking:
export DYLD_INSERT_LIBRARIES=$SQUISH_PREFIX/lib/libsquishqtpre.dylib
export DYLD_LIBRARY_PATH=$SQUISH_PREFIX/lib
Do not set DYLD_FRAMEWORK_PATH to point to the Qt directory here. The correct way to set the location of the Qt libraries is to use squishconfig --qt=/path/to/qt.
On Windows
On Windows, once the batch file is created, it is necessary to make one small adjustment to the line where the application is started. To allow Squish to hook into the application, the AUT must be started with a small helper application called dllpreload.exe.
The change is easy to make. Let's assume that the application we want to test is called myapp.exe. Normally we could run it simply by putting its name in the batch file on a line of its own like this:
myapp.exeBut to make it accessible to Squish we must run it from the helper, so we must change the line to this:
"%SQUISH_PREFIX%\bin\dllpreload.exe" myapp.exe
The environment variable, SQUISH_PREFIX, is set if the AUT was started through squishserver; it points to Squish's base directory.
This will start myapp.exe and allow Squish to hook into it. But in practice you only want to do this when testing the application, otherwise the application should be started normally. This can be done by putting the following code into the batch file at the point where the application binary should be started:
IF "%1"=="-testing" (
    "%SQUISH_PREFIX%\bin\dllpreload.exe" myapp.exe
) ELSE (
    myapp.exe
)
By default, myapp.exe will be run normally. To make it run from Squish's helper we must specify -testing as an argument in the Test Suite Settings dialog's Arguments field, so that it will be passed to the AUT (the batch file in this case) by Squish on startup.
See also Record / Replay on Sub-Processes started by the AUT and Attaching to Running Applications.
Eclipse/RCP-based Applications
Squish hooks into Java applications by providing a customized Java VM shared library, the Squish Java VM. To make the standard Oracle Java launchers (java, java.exe, javaw.exe, javaws, and javaws.exe) use the Squish Java VM, Squish sets the environment variable JDK_ALTERNATE_VM to the directory of the Squish Java VM shared library file. The standard Oracle Java launchers support this environment variable.
Unfortunately, Eclipse does not support the JDK_ALTERNATE_VM mechanism, and so must be explicitly told which VM to use. This is easily done by calling Eclipse with the -vm option.
For example, on Windows, instead of executing eclipse.exe, we would do this instead:
eclipse.exe -vm "%JDK_ALTERNATE_VM%" -noSplash
The -vm option should be passed before any other option.
There is no need to use the -vm option when running an Eclipse/RCP application using eclipse.exe from within Squish, since Squish will automatically pass the appropriate -vm itself.
Setup Custom Java Security Policy
Squish for Java installs its own security policy. A policy file set by the AUT gets lost. To overcome this, squishserver will merge a given policy file when set in an AUT specific ini file.
[general]
SecurityPolicy = "c:/Users/me/secure.policy"
See AUT file for Wrapper.
Testing Java Applets
To test a Java applet, in the Test Suite Settings dialog, specify the Java appletviewer (which is part of the Java SDK/JDK) as the AUT (application under test), and enter the URL of the HTML file containing the applet in the Arguments field. Nothing more is required.
Using Squish for Web, it is also possible to test Java applets embedded in a web browser. If you want to test an applet running in Microsoft Internet Explorer 11, contact us for a suitable 64bit Squish for Web package for Windows.
Testing Java Web Start
For testing Java applications launched via Java Web Start, in the AUT tab of Test Suite Settings specify <No Application> for Application and enter the URL to the JNLP file of your web start application in the Java Web Start field.
When using Squish with some versions of Java, such as OpenJDK 1.8, you may instead need to use javaws for the Application and the JNLP URL for Arguments. This article has further information about Automating Java web start applications.
AUT .ini File for Wrapper
Some options that are specific to the Squish wrapper for a specific AUT can be configured by using a manual written .ini file.
Using squishserver
Once the .ini has been created, the squishserver can then be used to register it. The syntax of the command is:
squishserver --config setConfig <name-of-AUT> <path/file.ini>
The name of the application must be exactly the same as the name used in the Test Suite Settings dialog.
It is also possible to unregister a .ini file, using the removeConfig option with a very similar syntax to before:
squishserver --config removeConfig <name-of-AUT> <path/file.ini>
Using an Environment Variable
It is also possible to make use of a .ini file without explicitly registering it with squishserver. This is done by creating the SQUISH_WRAPPER_CONFIG environment variable in the Test Suite Settings dialog (see Setting Environment Variables for the AUT) and making its value the path and filename of the .ini file.
Change Object Picking Tooltip for Java
By default, when picking an object, Squish will show the generated object name in a tooltip of the object being hovered with the mouse. However this may drag when the user interface is quite complex. Therefore it is possible to override this behavior. The option is called ObjectPickerTooltip and must be under section Java Wrapper. E.g.
[Java Wrapper]
ObjectPickerTooltip = "ClassName"
to only show the object its Java class name. Alternatively, tooltips can be turned off entirely by using Off.
Wrapping Custom Java Classes
We might need to access a class that for some reason isn't wrapped by default. One way of doing this is to extend the list of wrapped classes, making additional classes accessible just like the predefined wrapped classes. This is done by creating a .ini file that lists the classes that must be wrapped, and then telling Squish's wrapper for the Java process where to find this file. This is discussed in a moment— Creating the file.
The easiest way to access unregistered classes is to use Java's introspection capabilities. This is done in a few easy steps:
- Use one of the following methods to get a class instances:
- If the class is in
rt.jarfrom Java, then the static methodforNameofjava_lang_Classcan be used. - If an application class and the application doesn't have its own class loaders, the method
loadClasson the class loader instance returned from the static methodgetSystemClassLoaderofjava_lang_ClassLoader. can be used. - If an application has its own class loader, use the class loader from a UI element. E.g. Eclipse/RCP applications have their own class loaders. And these must be used to load classes from the
pluginsdirectory. For examplename = "{type='org.eclipse.swt.widgets.Shell' visible='true'}" win = waitForObject(name) win.getClass().getClassLoader().loadClass("org.eclipse.swt.SWT") ok = org_eclipse_swt_SWT.OK
- If the class is in
- Use the script language specific
newoperator to get an instance. - Optionally call methods on the instance to get it into the state we need.
- Use the instance.
Here is an example (taken from the examples/java/paymentform/suite_*/tst_card_mode test case) where we want to use the java.text.SimpleDateFormat class even though Squish doesn't wrap it by default and even though it isn't used in the AUT and therefore doesn't get dynamically wrapped.
    java_lang_Class.forName("java.text.SimpleDateFormat")
    formatter = java_text_SimpleDateFormat()
    formatter.applyPattern("yyyy-MM-dd")
    test.verify(formatter.format(model.getStart()) ==
                formatter.format(date))
java_lang_Class.forName("java.text.SimpleDateFormat");
var formatter = new java_text_SimpleDateFormat();
formatter.applyPattern("yyyy-MM-dd");
test.verify(formatter.format(model.getStart()) ==
formatter.format(threeYearsAgo)); java_lang_Class::forName("java.text.SimpleDateFormat");
my $formatter = new java_text_SimpleDateFormat();
$formatter->applyPattern("yyyy-MM-dd");
test::verify($formatter->format($model->getStart()) eq
$formatter->format($date)); LC::Java_lang_Class.forName("java.text.SimpleDateFormat")
formatter = LC::Java_text_SimpleDateFormat.new
formatter.applyPattern("yyyy-MM-dd")
Test.verify(formatter.format(model.getStart()) ==
formatter.format(date)) invoke java_lang_Class forName "java.text.SimpleDateFormat"
set formatter [construct java_text_SimpleDateFormat]
invoke $formatter applyPattern "yyyy-MM-dd"
set minimumAllowed [invoke $formatter format [invoke $model getStart]]
set minimumDate [invoke $formatter format [invoke $calendar getTime]]
test compare $minimumAllowed $minimumDateAnother example of this technique is shown in How to Create Semi-Automatic Tests that Query for User Input.
If this approach is used there is no need to create or register classes using a .ini file. However, if you need to access a lot of different unwrapped classes, using a .ini file might prove more convenient.
Creating the .ini File
The .ini file's format is illustrated by the example below, which asks Squish to wrap two classes, com.example.product.Example, and com.example.product.Main.
[general]
AutClasses="com/example/product/Example", "com/example/product/Main"
Note: For applications such as Eclipse, either using an ini file or using forName might load the class in the wrong classloader instance or the default classloader might not be able to find the class. Use a custom class loader to get a Java class wrapped into Squish.
The class names must be relative to the CLASSPATH. You can wrap classes in Java's standard libraries if they aren't wrapped by default, for example:
[general]
AutClasses="java.util.Calendar","java.util.Date",\
"java.text.DateFormat","java.text.SimpleDateFormat"
When an extra class is wrapped, all super classes, classes from method arguments, and return type classes will be wrapped as well.
In some cases it is possible that the wrapping could fail. If this happens the class that failed to be wrapped will be identified as having type Unknown in the Spy tool.
Additionally, an extra CLASSPATH can be set that might be needed if the application extends its CLASSPATH during execution. For example, when testing Java applets with Squish for Web, the CLASSPATH is extended by the ARCHIVE attribute of the APPLET HTML tag. So, continuing from the first example, a CLASSPATH setting can be added as shown below.
[general]
AutClasses="com/example/product/Example", "com/example/product/Main"
AutClassPath="demo.jar"
AutClassBaseUrl="http://www.example.com/product/"
The AutClassPath entry uses the same syntax as the CLASSPATH environment variable, with ';' (Windows) or ':' (Mac/Linux/Unix) used as separators. The entire value must be quoted, as shown in the example.
It is also possible to set an AutClassBaseUrl. This is optional, but when set it adds a prefix to all paths in the AutClassPath entry and the AutClassBaseUrl itself is added to the CLASSPATH.
Excluding Properties
The automatic addition from public getter function as property (see How to Access Object Properties) to the wrapped class is not always desirable. When traversing the application object tree, these properties will be fetched. That will subsequently call the getter method.
To exclude a certain property use JavaWrappingBlackList. This config option takes a list of one of more class.property names. The class package separator must be a slash. For example:
[general]
JavaWrappingBlackList="java/awt/Component.locationonscreen"
Configuring the Recognition of Native Windows Controls
Creating an INI File for Squish to Recognize Native Windows Controls
Squish can be told about native Windows controls simply by putting some information into a suitable .ini file. This is very similar in principle to how Java classes are handled; see Wrapping custom classes.
It isn't necessary to create the file from scratch. Instead, copy the winwrapper.ini file from Squish's etc folder, and then modify this file as described in the following sections.
Once you have copied and modifed the winwrapper.ini file, you must let Squish know that the file exists so that Squish will read it when necessary. This is done by registering the file for each AUT that you want to make use of it. For more information, see AUT file for Wrapper.
Using a copy of the winwrapper.ini file rather than the original ensures that you can always refer to the original file. For example, to see the default values of the various configuration items. And, of course, when you upgrade Squish, your copied file won't get overwritten (so long as you don't keep it in Squish's directory).
If you already have an .ini file, perhaps because you created one to work with Squish for Java, as described in Wrapping custom classes, you can use the existing file, and simply add new Windows-specific lines to it. Squish doesn't care what the file's name is or where it is located, so long as it is a .ini file that has the right information in the right format.
Resolving Conflicting Ways to Identify GUI Controls
By default, Squish will only record actions on native controls—such as embedded ActiveX controls—if it can clearly identify the controls as such. However, with Java, it's not possible for Squish to be certain whether something is a native control or a Java control. In view of this, it is necessary to tell Squish about the native controls being used, so that Squish can correctly record actions on them.
For example, to inform Squish that a control called MyCalendarCtrl is a native control, create a configuration file as described in Creating an INI file for to recognize native Windows controls with the following contents:
[Windows Wrapper]
Whitelist="MyCalendarCtrl"
Note: If you don't know the native control's class name, ask the application's developers. Alternatively, you can use a tool like Spy++ (which is supplied with Microsoft Visual Studio) or AutoIt Window Info.
To have more than one class listed in the Squish whitelist, separate them with commas, and put each name in quotes. For example:
[Windows Wrapper]
Whitelist="MyCalendarCtrl","AnotherControl","InternetExplorerCtrl"
It is also possible to tell Squish to record events on native Windows programs which are launched by your application. To do this, you must tell Squish the window title bar caption used by the Windows application which is launched, so that Squish knows that it belongs to your main application. This is done by adding an Extra Windows entry to your .ini file, for example:
[Windows Wrapper]
Whitelist="MyCalendarCtrl","AnotherControl","InternetExplorerCtrl"
Extra Windows="Microsoft Word"
Note: The Extra Windows's values must be quoted and comma-separated. Either the exact window title must be specified, or wildcards must be used. * matches any number of characters, while ? matches any single character.
Accessing the Properties of ActiveX-based and COM Controls
Squish can be used to access all the properties exposed by ActiveX-based controls. This ActiveX functionality is also used to automate the controls supplied by various third-party vendors, such as Infragistics and Exontrol. This feature is disabled by default since it may incur a small runtime cost in performance and test stability, but it is easy to to activate it.
To activate the recognition of ActiveX controls—in fact, recognition of all COM controls—edit the .ini file described in Creating an INI file for to recognize native Windows controls to add a COM Object Detection entry, and give this entry a value of 1 to turn it on.
[Windows Wrapper]
COM Object Detection=1
winwrapper.ini Reference
The winwrapper.ini's [Windows Wrapper] section supports a number of key=value pairs, as described below in alphabetical order.
The Blacklist key is used to identify window class names that the Windows wrapper should not attempt to record or playback. The matching is based on the class name, although wildcards (* to match zero or more of any characters) are also supported.
[Windows Wrapper]
Blacklist="#76423", "Outlook*"
The Blacklisted Objects key is used to identify objects that the Windows wrapper should not attempt to record or playback. Such objects are identified using Squish real (multi-property) names.
[Windows Wrapper]
Blacklisted Objects="{type='WindowsControl' text='OK'}", "{type='WindowsControl' text='Cancel'}"
Note: For performance reasons, only object names using type='WindowsControl' or object names specifying no type at all, e.g. class='QWidget' text='Hello' can be used.
The Blacklisted Processes key is used to identify executables that the Windows wrapper should not attempt to record or playback. The matching is done on the filename of the executable, but case-insensitively.
[Windows Wrapper]
Blacklisted Processes="notepad.exe"
The COM Object Detection key is described in Accessing the properties of ActiveX-based and COM controls.
The Extra Windows key is used to make it possible for Squish to hook into additional arbitrary processes based on their window titles. The value may use simple glob-style wildcards (* for zero or more of any character, ? for any single character). For example, to match any OpenOffice window or the Calculator window we could use:
[Windows Wrapper]
Extra Windows="*OpenOffice*", "Calculator"
The Whitelist key is used to identify window class names that the Windows wrapper should record and playback. The matching is based on the class name, although wildcards (* to match zero or more of any characters) are also supported.
[Windows Wrapper]
Whitelist="#31482", "Notepad++"
The Whitelisted Objects key is used to identify objects that the Windows wrapper should record and playback. Such objects are identified using Squish real (multi-property) names.
[Windows Wrapper]
Whitelisted Objects="{type='WindowsControl' text='OK'}", "{type='WindowsControl' text='Cancel'}"
Note: For performance reasons, only object names using type='WindowsControl' or object names specifying no type at all, e.g. class='QWidget' text='Hello' can be used.
Launcher Arguments for Android
Some special options can be set in Launcher Arguments field on the test suite settings page. These option are command line options for androidobserver, which handles the connection to an Android AUT. Options without arguments can be set in the startApplication string, but without the – prefix. Available options are:
© 2025 The Qt Company Ltd.
Documentation contributions included herein are the copyrights of
their respective owners.
The documentation provided herein is licensed under the terms of the GNU Free Documentation License version 1.3 as published by the Free Software Foundation.
Qt and respective logos are trademarks of The Qt Company Ltd. in Finland and/or other countries worldwide. All other trademarks are property
of their respective owners.
