Squish for iOS Tutorials
Learn how to test iOS applications.
- Tutorial: Starting to Test iOS Applications
- Tutorial: Designing Behavior Driven Development (BDD) Tests
- Tutorial: Migration of existing tests to BDD
Tutorial: Starting to Test iOS Applications
Note: iOS apps can only be tested on Apple hardware, either on the devices themselves or inside the iOS Simulator that runs on macOS.
Note: There is a 45-minute Online course about Squish Basic Usage at the ![]() if you desire some video guidance.
if you desire some video guidance.
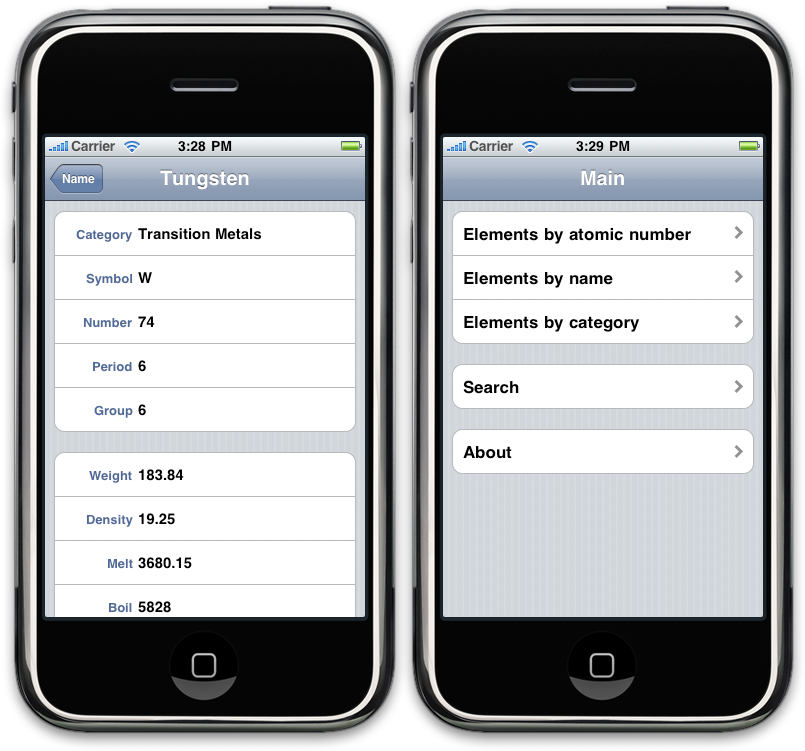
For this chapter we will use a simple Elements application as our AUT. The application is shipped with Squish in <SQUISHDIR>/examples/ios/elements. This is a very basic application that shows information about the elements (Hydrogen, Helium, etc.), and that allows users to scroll through the elements by name or by category or to search for an element by typing in some search text. Despite the application's simplicity, it has many of the key features that most standard iOS applications have: buttons to click, a list to scroll, and an edit box for entering text. All the ideas and practices that you learn to test this application can easily be adapted to your own applications. For more examples of testing various iOS-specific features and standard editing widgets, see How to Create Test Scripts and How to Test iOS Applications.
The screenshot shows the application in action; the left hand image shows an element being displayed and the right hand image shows the application's main window.
Squish Multi-Process Architecture and IPC
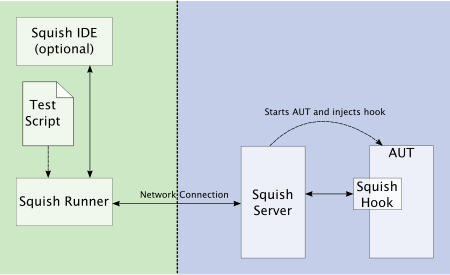
Squish runs a small server, squishserver, that handles the communication between the AUT and the test script. The test script is executed by the squishrunner tool, which in turn connects to squishserver. squishserver starts the instrumented AUT on the device, which starts the Squish Hook. With the hook in place, squishserver can query AUT objects regarding their state and can execute commands on behalf of squishrunner. squishrunner directs the AUT to perform whatever actions the test script specifies.
All the communication takes place using network sockets which means that everything can be done on a single machine, or the test script can be executed on one machine and the AUT can be tested over the network on another machine.
The following diagram illustrates how the individual Squish tools work together.
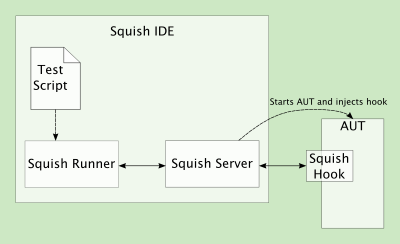
Tests can be written and executed using the Squish IDE, in which case squishserver is started and stopped automatically, and the test results are displayed in the Squish IDE's Test Results view. The following diagram illustrates what happens behind the scenes when the Squish IDE is used.
Under the covers, squishrunner is used to execute test cases. If we need to automate the execution of test cases from a script, we would use this command directly.
Creating Test Suites from Squish IDE
Start up the Squish IDE, by clicking or double-clicking the Squish IDE icon, by launching Squish IDE from the taskbar menu or by executing squishide on the command line, whichever you prefer and find suitable for the platform you are using.
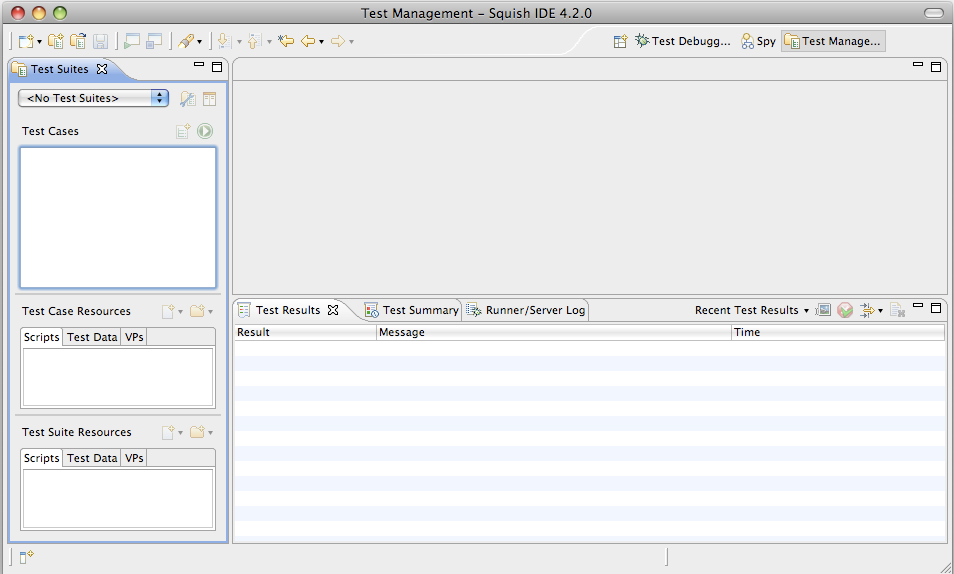
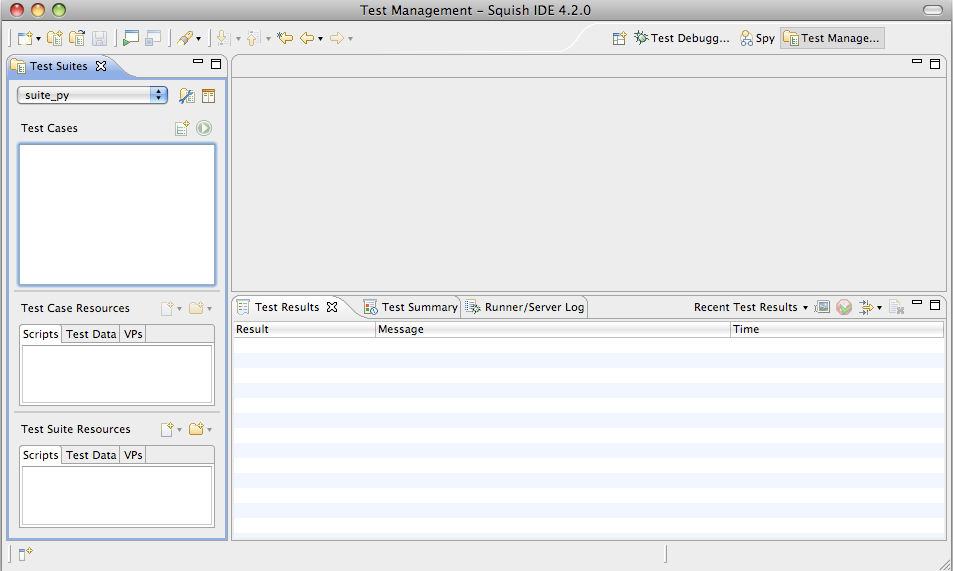
Once Squish starts up, you might be greeted with a Welcome Page. Click the Workbench button in the upper right to dismiss it. Then, the Squish IDE will look similar to the screenshot.
Creating Test Suites from Squish IDE
Start up the Squish IDE, by clicking or double-clicking the Squish IDE icon, by launching Squish IDE from the taskbar menu or by executing squishide on the command line, whichever you prefer and find suitable for the platform you are using.
Once Squish starts up, you might be greeted with a Welcome Page. Click the Workbench button in the upper right to dismiss it. Then, the Squish IDE will look similar to the screenshot.
Once Squish has started, click File > New Test Suite to pop-up the New Test Suite wizard shown below.
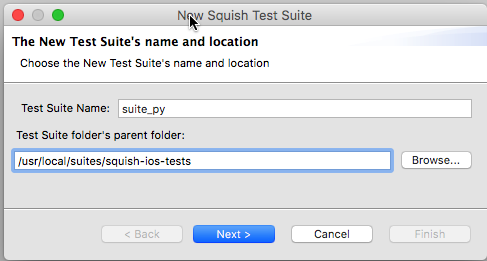
Enter a name for your test suite and choose the folder where you want the test suite to be stored. In the screenshot we have called the test suite suite_py and put it in a squish-ios-test folder; the actual example code is in <SQUISHDIR>examples/ios/elements folder. Once the details are complete, click Next to go on to the Toolkit (or Scripting Language) page.
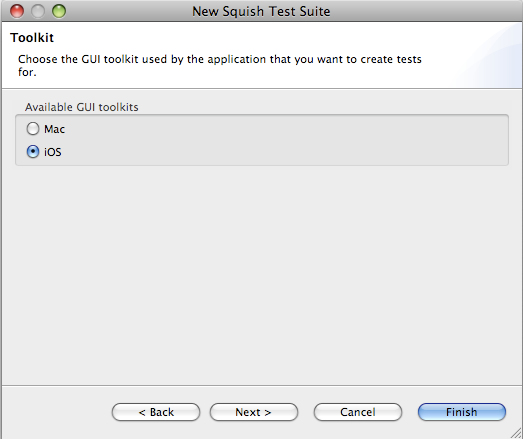
If you get this wizard page, select the toolkit your AUT uses. For this example, you must click iOS since we are testing an iOS application. Then click Next to go to the Scripting Language page.
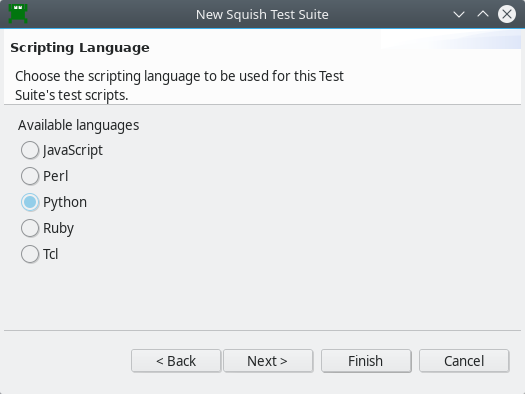
Choose your desired scripting language on this page. The functionality offered by Squish is the same for all languages.
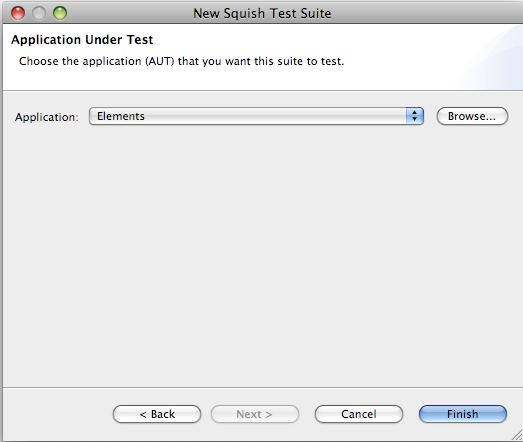
If you are creating a new test suite for an AUT that Squish already knows about, simply click the combobox to drop-down the list of AUTs and choose the one you want. If the combobox is empty or your AUT isn't listed, click the Browse button to the right of the combobox—this will pop-up a file open dialog from which you can choose your AUT. In the case of iOS programs, the AUT is the application's executable (e.g., Elements on iOS). Once you have chosen the AUT, click Finish. The wizard will then close and Squish IDE will look similar to the screenshot below.
We are now ready to start creating tests. Read on to learn how to create test suites without using the Squish IDE, or skip ahead to Recording Tests and Verification Points.
Creating Test Suites from Command Line
To create a new test suite from the command line:
- Create a new directory to hold the test suite—the directory's name should begin with
suite. In this example we have created the <SQUISHDIR>/examples/ios/elements/suite_pydirectory for Python tests. We also have similar subdirectories for other languages but this is purely for the sake of example, since normally we only use one language for all our tests. - Register the AUT with the squishserver.
Note: Each AUT must be registered with the squishserver so that test scripts do not need to include the AUT's path, thus making the tests platform-independent. Another benefit of registering is that AUTs can be tested without the Squish IDE — for example, when doing regression testing.
This is done by executing the squishserver on the command line with the
--configoption and theaddAUTcommand. For example, assuming we are in the <SQUISHDIR> directory on macOS:squishserver --config addAUT Elements \ \SQUISHDIR/examples/ios/elements
We must give the
addAUTcommand the name of the AUT's executable and—separately—the AUT's path. In this case the path is to the executable that was added as the AUT in the test suite configuration file. For more information about application paths, see AUTs and Settings. For more information about the squishserver's command line options, see squishserver. - Create a plain text file (ASCII or UTF-8 encoding) called
suite.confin the suite subdirectory. This is the test suite's configuration file, and at the minimum it must identify the AUT, the scripting language used for the tests, and the wrappers (i.e., the GUI toolkit or library) that the AUT uses. The format of the file iskey = value, with one key–value pair per line. For example:AUT = Elements LANGUAGE = Python LAUNCHER = iphonelauncher WRAPPERS = iOS OBJECTMAPSTYLE = script
The AUT is the iOS executable. The LANGUAGE can be set to JavaScript, Python, Perl, Ruby, or Tcl, depending on how Squish was installed. The WRAPPERS should be set to
iOSand the LAUNCHER toiphonelauncher.
We are now ready to record our first test.
Creating Tests
Recordings are made into existing test cases. You can create a New Script Test Case in the following ways:
- Select File > New Test Case to open the New Squish Test Case wizard, enter the name for the test case, and select Finish.
- Click the New Script Test Case (
 ) toolbar button to the right of the Test Cases label in the Test Suites view. This creates a new test case with a default name, which you can easily change.
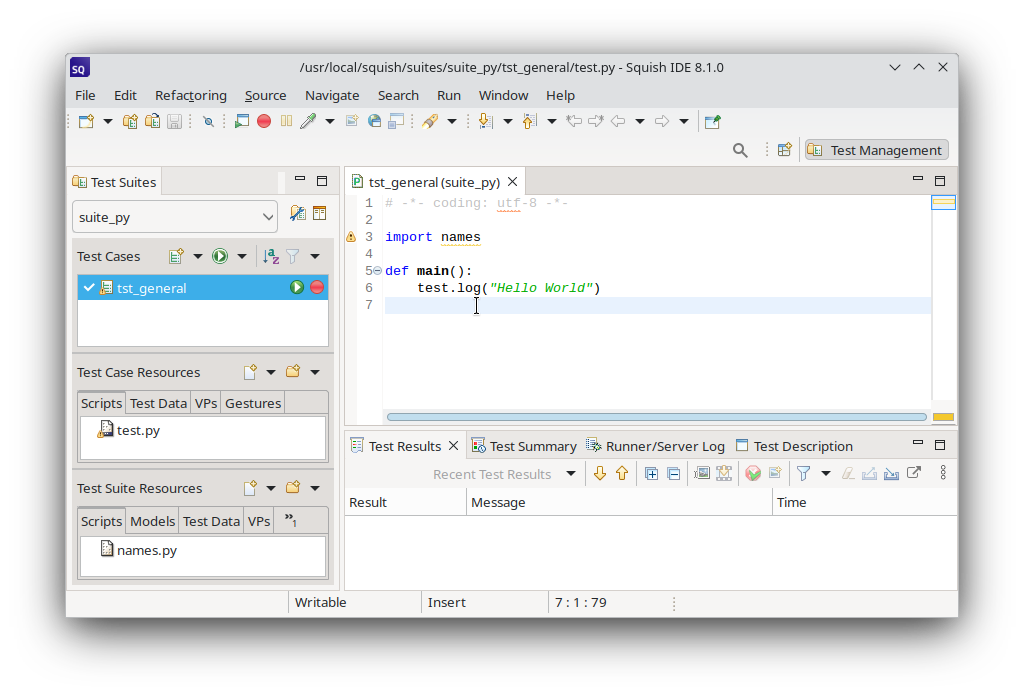
Give the new test case the name tst_general.
Squish automatically creates a sub-folder inside the test suite's folder with this name and also a test file, for example test.py. If you choose JavaScript as the scripting language, the file is called test.js, and correspondingly for Perl, Ruby, or Tcl.
Initially, the script's main() function logs Hello World to the test results.
If you get a sample .feature file instead of a "Hello World" script, click the arrow left of the Run Test Suite ( ) and select New Script Test Case ().

To make the test script file (such as, test.js or test.py) appear in an Editor view, click or double-click the test case, depending on the Preferences > General > Open mode setting. This selects the Script as the active one and makes visible its corresponding Record ( ) and Run Test Case (
 ) buttons.
The checkboxes are used to control which test cases are run when the Run Test Suite () toolbar button is clicked. We can also run a single test case by clicking its Run Test Case () button. If the test case is not currently active, the button may be invisible until the mouse is hovered over it.
Once the new test case has been created, we are free to write test code manually or to record a test. Clicking on the test case's Record () button replaces the test's code with a new recording. Alternatively, you can record snippets and insert them into existing test cases, as instructed in How to Edit and Debug Test Scripts.
Recording Our First Test
Before we dive into recording let's briefly review our very simple test scenario:
- Click the Elements by name option.
- Click the Argon element.
- Verify that the Category is "Noble Gases"
- Return to the main window.
- Click Search.
- Enter a search term of "pluto" and click the Search button.
- Verify that element 94, Plutonium is found.
- Finish.
We are now ready to record our first test. Click the Record () to the right of the tst_general test case shown in the Test Suites view's Test Cases list. This will cause Squish to run the AUT so that you can interact with it. Once the simulator has started and the Elements AUT is running, perform the following actions—and don't worry about how long it takes since Squish doesn't record idle time:
- Click the Elements by name item. Once the list of elements appears, click the Argon (Ar) item.
- When the Argon screen appears you want to verify that it has the correct Category. For this verification you will take a slightly long-winded approach. First, click the Verify (
 ) toolbar button in the Squish Control Bar Window (the second button from the left) and select Properties.
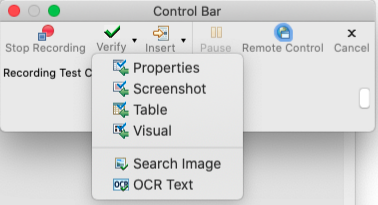
This makes the Squish IDE reappear. In the Application Objects view, expand the
Elementsitem (by clicking its gray triangle), then theUI_Window_0item, then theUILayoutContainerView_0item, then theUINavigationTransitionView_0item, then theUIViewControllerWrapperView_0item, and then theUITableView_0item. Now the table's items should be visible. Now expand theCategory_UITableViewCell_8item and then theUITableViewCellContentView_0item. Now click theNoble Gases_UITableViewLabel_0item. At last we've found the item we want. (Don't worry, when you do the next verification you'll make Squish find the item for you!) - In the Properties view expand the label's
textproperty. Now click the checkbox beside the stringValue subproperty. Squish should now look similar to the screenshot. The Squish IDE showing a verification point about to be inserted Now click the Save and Insert Verifications button. This will insert the Category verification into the recorded script. The Squish IDE will disappear and you can continue to record interactions with the AUT. - Back in the Elements AUT, click Name to return to the list of elements by name, then click Main to return to the main window.
- Click the Search item and in the Search window enter the text "pluto" in the Name Contains line edit. Then click the Search button.
- When the Search Results appears you want to verify that element 94, Plutonium was found. This time, you will make Squish find the relevant object for you. Once again click the Insert Verifications toolbar button in the Squish Control Bar and choose Properties. As before, this will make the Squish IDE appear.
- In the Application Objects view click the Object Picker (
 ) to make the Squish IDE disappear. Hover the mouse over the "94: Plutonium (Pu)" text in the Search Results window and click this text. The Squish IDE will now reappear and Squish will have found and highlighted the relevant widget.
 - In the Properties view, expand the widget's
textproperty. Now click the checkbox beside the stringValue subproperty. Squish should now look similar to the screenshot. The Squish IDE showing a verification point about to be inserted Now click the Save and Insert Verifications button. This will insert the verification into the recorded script. The Squish IDE will disappear and you can continue to record interactions with the AUT. - We have now finished our test and inserted the verifications. Click the Stop Recording toolbar button in the Squish Control Bar. The Elements AUT and the simulator will stop and the Squish IDE will reappear.
Once you stop recording, the recorded test will appear in Squish IDE as the screenshot illustrates. The exact code that is recorded will vary depending on how you interact with the AUT and which scripting language you have chosen.
After recording is finished, you can play it back to see that it works as expected by clicking the tst_general's Play button in the Test Cases view.
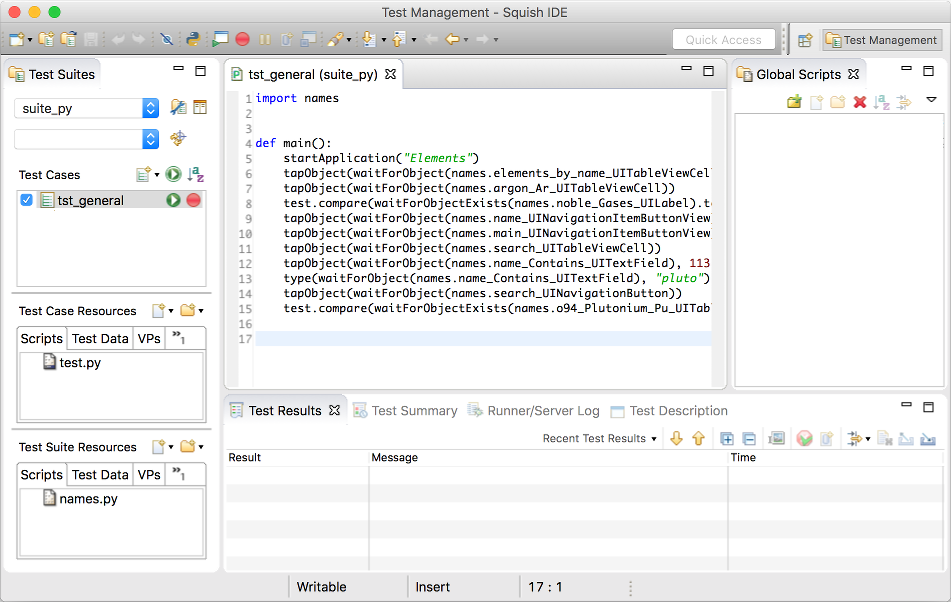
If the recorded test doesn't appear, click (or double-click depending on your platform and settings) the tst_general test case—or click the test.py file in the Test Case Resources list—this will make Squish show the test's test.py file in an editor window as shown in the screenshot.
Now that we've recorded the test, we are able to play it back, i.e., run it. This in itself is useful in that if the play back failed it might mean that the application has been broken. Furthermore, the two verifications we put in will be checked on play back as the screenshot shows.
Inserting verification points during test recording is very convenient. Here we inserted two separately, but we can insert as many as we like as often as we like during the test recording process. However, sometimes we might forget to insert a verification, or later on we might want to insert a new verification. We can easily insert additional verifications into a recorded test script as we will see in the next section, Inserting Additional Verification Points.
Running Tests from IDE
To run a test case in the Squish IDE, click the Run Test Case () that appears when the test case is hovered or selected in the Test Suites view.
To run two or more test cases one after another or to run only the selected test cases, click Run Test Suite ().
Running Tests from Command Line
To playback a recorded test from the command line, we execute the squishrunner program. We provide squishrunner the path to a test suite, and optionally also the name of a test case.
A squishserver must be running when running a test, and we can provide squishrunner an IP/Port of an already running one, or use the --local option which creates one for the duration of the process. For more information, see squishserver.
For example, assuming we are in the directory that contains the test suite's directory:
squishrunner --testsuite suite_py --testcase tst_general --local
Examining the Generated Code
If you look at the code in the screenshot (or the code snippet shown below) you will see that it consists of lots of Object waitForObject(objectOrName) calls as parameters to various other calls such as tapObject(objectOrName) and type(objectOrName, text). The Object waitForObject(objectOrName) function waits until a GUI object is ready to be interacted with (i.e., becomes visible and enabled), and is then followed by some function that interacts with the object. The typical interactions are click a button, or type in some text.
import names


def main():
    startApplication("Elements")
    tapObject(waitForObject(names.elements_by_name_UITableViewCell))
    tapObject(waitForObject(names.argon_Ar_UITableViewCell))
    test.compare(waitForObjectExists(names.noble_Gases_UILabel).text.stringValue, "Noble Gases")
    tapObject(waitForObject(names.name_UINavigationItemButtonView))
    snooze(1)
    tapObject(waitForObject(names.main_UINavigationItemButtonView))
    tapObject(waitForObject(names.search_UITableViewCell))
    tapObject(waitForObject(names.o_UISearchBarTextField), 113, 14)
    type(waitForObject(names.o_UISearchBarTextField), "pluto")
    tapObject(waitForObject(names.search_UINavigationButton))
    test.compare(waitForObjectExists(names.o94_Plutonium_Pu_UITableViewCell).text.stringValue, "94: Plutonium (Pu)")
import * as names from 'names.js'; function main() { startApplication("Elements"); tapObject(waitForObject(names.elementsByNameUITableViewCell)); tapObject(waitForObject(names.argonArUITableViewCell)); test.compare(waitForObjectExists(names.nobleGasesUILabel).text.stringValue, "Noble Gases"); tapObject(waitForObject(names.nameUINavigationItemButtonView)); snooze(1); tapObject(waitForObject(names.mainUINavigationItemButtonView)); tapObject(waitForObject(names.searchUITableViewCell)); tapObject(waitForObject(names.uISearchBarTextField), 113, 14); type(waitForObject(names.uISearchBarTextField), "pluto"); tapObject(waitForObject(names.searchUINavigationButton)); test.compare(waitForObjectExists(names.o94PlutoniumPuUITableViewCell).text.stringValue, "94: Plutonium (Pu)"); }
require 'names.pl';

sub main {
    startApplication("Elements");
    tapObject(waitForObject($Names::elements_by_name_uitableviewcell));
    tapObject(waitForObject($Names::argon_ar_uitableviewcell));
    test::compare(waitForObjectExists($Names::noble_gases_uilabel)->text->stringValue,
        "Noble Gases");
    tapObject(waitForObject($Names::name_uinavigationitembuttonview));
    snooze(1);
    tapObject(waitForObject($Names::main_uinavigationitembuttonview));
    tapObject(waitForObject($Names::search_uitableviewcell));
    tapObject(waitForObject($Names::uisearchbartextfield), 113, 14);
    type(waitForObject($Names::uisearchbartextfield), "pluto");
    tapObject(waitForObject($Names::search_uinavigationbutton));
    test::compare(waitForObjectExists($Names::o94_plutonium_pu_uitableviewcell)->text->stringValue,
        "94: Plutonium (Pu)");
}
require 'names';

# encoding: UTF-8
require 'squish'
include Squish

def main
    startApplication("Elements")
    tapObject(waitForObject(Names::Elements_by_name_UITableViewCell))
    tapObject(waitForObject(Names::Argon_Ar_UITableViewCell))
    Test.compare(waitForObjectExists(Names::Noble_Gases_UILabel).text.stringValue,
                 "Noble Gases")
    tapObject(waitForObject(Names::Name_UINavigationItemButtonView))
    snooze(1)
    tapObject(waitForObject(Names::Main_UINavigationItemButtonView))
    tapObject(waitForObject(Names::Search_UITableViewCell))
    tapObject(waitForObject(Names::UISearchBarTextField), 113, 14)
    type(waitForObject(Names::UISearchBarTextField), "pluto")
    tapObject(waitForObject(Names::Search_UINavigationButton))
    Test.compare(waitForObjectExists(Names::O94_Plutonium_Pu_UITableViewCell).text.stringValue,
                 "94: Plutonium (Pu)")
end
source [findFile "scripts" "names.tcl"]

proc main {} {
    startApplication "Elements"
    invoke tapObject [waitForObject $names::Elements_by_name_UITableViewCell]
    invoke tapObject [waitForObject $names::Argon_Ar_UITableViewCell]
    test compare [property get [property get \
        [waitForObjectExists $names::Noble_Gases_UILabel] text] stringValue] "Noble Gases"
    invoke tapObject [waitForObject $names::Name_UINavigationItemButtonView]
    snooze 1
    invoke tapObject [waitForObject $names::Main_UINavigationItemButtonView]
    invoke tapObject [waitForObject $names::Search_UITableViewCell]
    invoke tapObject [waitForObject $names::UISearchBarTextField] 113 14
    invoke type [waitForObject $names::UISearchBarTextField] "pluto"
    invoke tapObject [waitForObject $names::Search_UINavigationButton]
    test compare [property get [property get \
        [waitForObjectExists $names::94_Plutonium_Pu_UITableViewCell] text] stringValue] \
        "94: Plutonium (Pu)"
}
We have quoted the entire test script here since it is so short. Every Squish test must have a main function which is what Squish calls to begin the test. Here the recorded test script begins in the standard way by calling the ApplicationContext startApplication(autName) function.
The rest of the function calls are concerned with replaying the interactions that were recorded, in this case, clicking widgets and typing in text using the tapObject(objectOrName) and type(objectOrName, text) functions.
Symbolic Names
Squish recordings refer to objects using variables that begin with a names. prefix. These are known as Symbolic Names. Each variable contains, as a value, the corresponding Real Name.
The advantage of using symbolic names (instead of real names) in your scripts, is that if the application changes in a way that results in different names being needed, it is possible to update Squish's Object Map and thereby avoid the need to change our test scripts.
When a Symbolic Name is under the cursor, the editor's context menu allows you to Open Symbolic Name, showing its entry in the Object Map, or Convert to Real Name, which places an inline mapping in your script language at the cursor, allowing you to hand-edit the properties in the script itself.
See How to Identify and Access Objects for more details.
Inserting Additional Verification Points
In the previous section we saw how easy it is to insert verification points during the recording of test scripts. Verification points can also be inserted into existing test scripts, either by setting a breakpoint and using the Squish IDE, or simply by editing a test script and putting in calls to Squish's test functions such as test.compare-function and test.verify-function.
Squish supports many kinds of verification points: those that verify that object properties have particular values—known as "Object Property Verifications"; those that verify that an entire table has the contents we expect—known as "Table Verifications"; those that verify that two images match—known as "Screenshot Verifications"; and a hybrid verification type that includes properties and screenshots from multiple objects, known as "Visual Verifications". In addition, it is possible to verify that a search image exists somewhere on the screen, or that certain text is found by OCR. The most commonly used kind is object property verifications, and it is these that we will cover in the tutorial. For further reading, see How to Create and Use Verification Points).
Regular (non-scriptified) property verification points are stored as XML files in the test case or test suite resources, and contain the value(s) that need to be passed to test.compare(). These verification points can be reused across test cases, and can verify many values in a single line of script code.
Scriptified property verification points are direct calls to the test.compare-function function, with two arguments—the value of a particular property for a particular object, and an expected value. We can manually insert calls to the test.compare-function function in a recorded or hand written script, or we can get Squish to insert them for us using scriptified verification points. In the previous section we showed how to use the Squish IDE to insert verifications during recording. Here we will first show how to use the Squish IDE to insert verifications into an existing test script, and then we will show how to insert a verification by hand.
Before asking Squish to insert verification points, it is best to make sure that we have a list of what we want to verify and when. There are many potential verifications we could add to the tst_general test case, but since our concern here is simply to show how to do it, we will only do two—we will verify that the Argon element's Symbol is "Ar" and that its Number is 18. We will put these verifications immediately after the one we inserted during recording that verified its Category.
To insert a verification point using the Squish IDE we start by putting a break point in the script (whether recorded or manually written—it does not matter to Squish), at the point where we want to verify.
For clarity we have created a new test called tst_argon. First we clicked the Squish IDE's New Script Test Case () button, then we renamed the test, and finally we copied and pasted the entire tst_general's code into the new test. So, at this point both tests have the same code, but we will modify the tst_argon test by adding new verifications to it. (In practice you would just add the verifications to an existing test.)
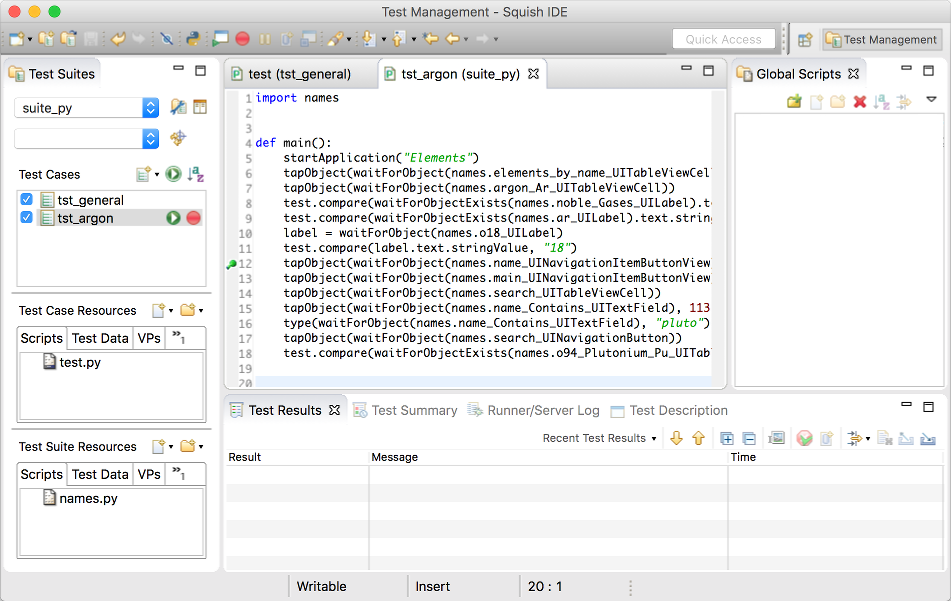
As the above screenshot shows, we have set a breakpoint at line 9. This is done simply by Ctrl+Clicking the line number and then clicking the Add Breakpoint menu item in the context menu. We chose this line because it follows the first verification point we added during recording, so at this point the details of Argon will be visible on the screen. Your line number may be different if you recorded the test in a different way.
Having set the breakpoint, we now run the test as usual by clicking the Run Test button, or by clicking the Run > Run Test Case menu option. Unlike a normal test run the test will stop when the breakpoint is reached (i.e., at line 9, or at whatever line you set), and Squish's main window will reappear (which will probably obscure the AUT). At this point the Squish IDE will automatically switch to the Test Debugging Perspective.
Perspectives and Views
The Squish IDE works just like the Eclipse IDE. If you aren't used to Eclipse, it is crucial to understand the following key concepts: Views and Perspectives. In Eclipse, and therefore in the Squish IDE, a View is essentially a child window, such as a dock window or a tab in an existing window. A Perspective is a collection of views arranged together. Both are accessible through the Window menu.
The Squish IDE is supplied with the following perspectives:
- Test Management Perspective that the Squish IDE starts with, and that is shown in all previous screenshots
- Test Debugging Perspective
- Spy Perspective
You can modify these perspectives to show additional views, to hide views that you don't want, or to create your own perspectives with exactly the views you want.
If you notice all of your Views change dramatically, it just means that the perspective changed. Use the Window menu to change back to the perspective you want. Keep in mind, Squish automatically changes perspectives to reflect the current situation, so you should not need to change perspective manually very often.
When Squish stops at a breakpoint, the Squish IDE automatically changes to the Test Debugging Perspective. The perspective shows the Variables view, the Editor view, the Debug view, the Application Objects view, and the Properties view, Methods view, and Test Results view.
The normal Test Management Perspective can be returned to at any time by choosing it from the Window menu (or by clicking its toolbar button), although the Squish IDE will automatically return to it if you Terminate( ) or Resume(
 ) to completion.
Inserting Verification Points
As the screenshot below shows, when Squish stops at a breakpoint the Squish IDE automatically changes to the Test Debugging Perspective. The perspective shows the Variables view, the Editor view, the Debug view, the Application Objects view, and the Properties view, Methods view, and Test Results view.
To insert a verification point, we can use the Object Picker () or expand tree nodes in the Application Objects view until we find the object we want to verify. In this example we want to verify the Symbol's UILabel's text, so we expand items all the way to the UITableView, and then the Symbol's UITableViewCell. Once we have selected the appropriate UILabel we expand its text in the Properties view view and check the stringValue subproperty.
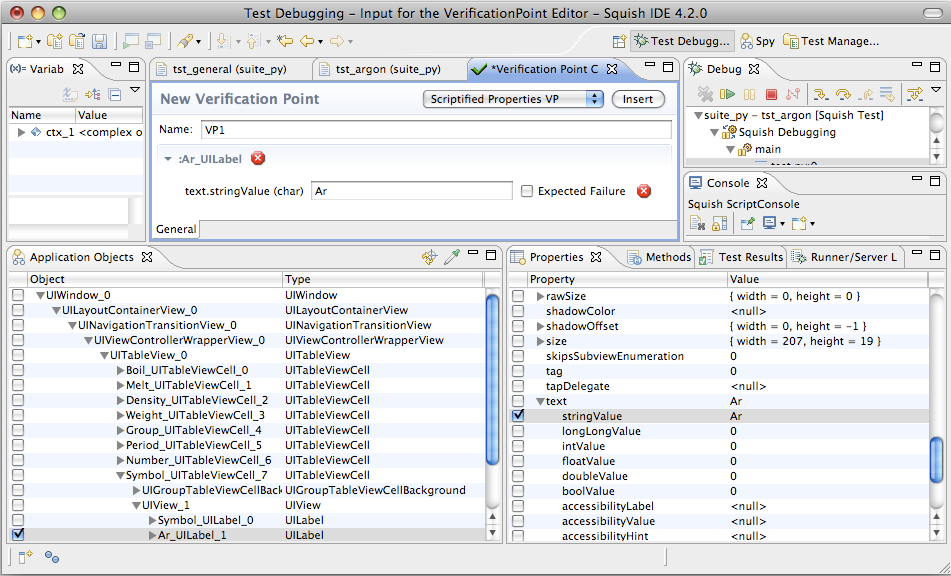
To add the verification point we must click the verification point editor's Save and Insert Verifications button. After the insertion the test replay remains stopped: we can either continue by clicking the Resume toolbar button in the Debug view (or press F8), or we can stop by clicking the Terminate toolbar button. This is to allow us to enter more verifications. In this example we have finished for now, so either resume or terminate the test.
Incidentally, the normal Test Management Perspective can be returned to at any time by choosing it from the Window menu (or by clicking its toolbar button), although the Squish IDE will automatically return to it if you stop the script or run it to completion.
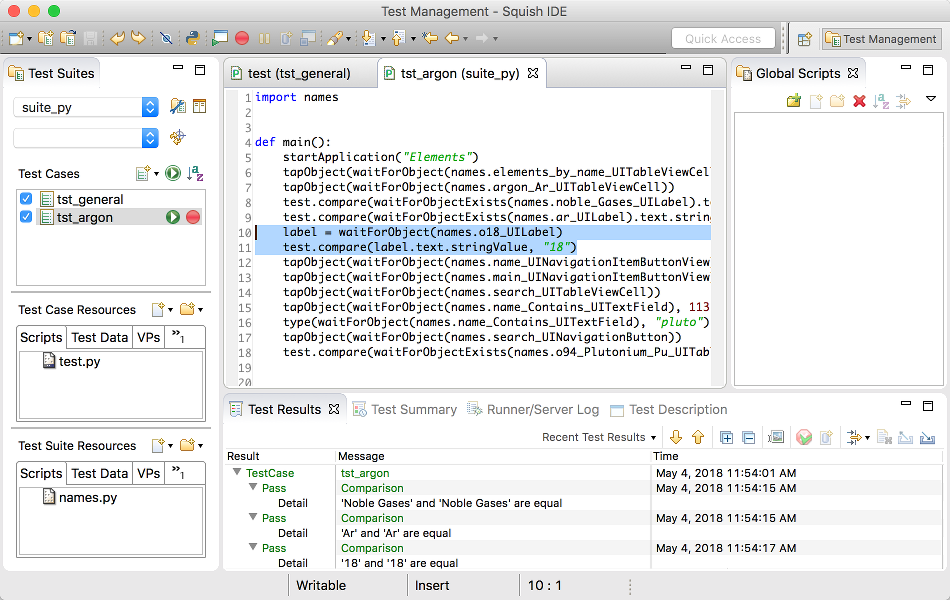
Once we have finished inserting verifications we should now disable the break point. Just Ctrl+Click the break point and click the Disable Breakpoint menu option in the context menu. We are now ready to run the test without any breakpoints but with the verification points in place. Click the Run Test button. This time we will get some test results—as the screenshot shows—all of which we have expanded to show their details. (We have also selected the lines of code that Squish inserted to perform the verification—notice that the code is structurally identical to the code inserted during recording.)

Manually Written Property Verifications
Another way to insert verification points is to write the code manually. We can add our own calls to Squish's test. functions, such as test.compare() and test.verify() in an existing script.
- Set a breakpoint where we intend on adding our verifications.
- Run Test Case () until it stops there.
- Use the Object Picker () or navigate in the Application Objects tree for the the object we want to verify.
- Right click the Application Object entry and select the Copy Symbolic Name context menu option—this adds the object to the Object Map if necessary.
Now we can edit the test script, paste the name into the script where we need to find the object.
(Don't forget to disable the break point once it isn't needed any more.)
For this manual verification, we want to check the number of addresses present in the table after reading in the MyAddresses.adr file, then after the new address is added, and finally after the first address is removed. The screenshot shows two of the lines of code we entered to get one of these three verifications, plus the results of running the test script.
When writing scripts by hand, we use Squish's test module's functions to verify conditions at certain points during our test script's execution. As the screenshot (and the code snippets below)show, we begin by retrieving a reference to the object we are interested in. Using the Object waitForObject(objectOrName) function is standard practice for manually written test scripts. This function waits for the object to be available (i.e., visible and enabled), and then returns a reference to it. (Otherwise it times out and raises a catchable exception.) We then use this reference to access the item's properties and methods—in this case the UILabel's stringValue subproperty—and verify that the value is what we expect it to be using the test.compare-function function.
Here is the code for all the Argon verifications.
    test.compare(waitForObjectExists(names.noble_Gases_UILabel).text.stringValue, "Noble Gases")
    test.compare(waitForObjectExists(names.ar_UILabel).text.stringValue, "Ar")
    label = waitForObject(names.o18_UILabel)
    test.compare(label.text.stringValue, "18")
test.compare(waitForObjectExists(names.nobleGasesUILabel).text.stringValue,
"Noble Gases");
test.compare(waitForObjectExists(names.arUILabel).text.stringValue, "Ar");
var label = waitForObject(names.o18UILabel);
test.compare(label.text.stringValue, "18") test::compare(waitForObjectExists($Names::noble_gases_uilabel)->text->stringValue,
"Noble Gases");
test::compare(waitForObjectExists($Names::ar_uilabel)->text->stringValue, "Ar");
my $label = waitForObject($Names::o18_uilabel);
test::compare($label->text->stringValue, "18"); Test.compare(waitForObjectExists(Names::Noble_Gases_UILabel).text.stringValue,
"Noble Gases")
Test.compare(waitForObjectExists(Names::Ar_UILabel).text.stringValue, "Ar")
label = waitForObject(Names::O18_UILabel)
Test.compare(label.text.stringValue, "18") test compare [property get [property get \
[waitForObjectExists $names::Noble_Gases_UILabel] text] stringValue] "Noble Gases"
test compare [property get [property get \
[waitForObjectExists $names::Ar_UILabel] text] stringValue] "Ar"
set label [waitForObject $names::18_UILabel]
test compare [property get [property get $label text] stringValue] "18"The coding pattern is very simple: we retrieve a reference to the object we are interested in and then verify its properties using one of Squish's verification functions. (Recall that we got the UILabel's symbolic name from the clipboard where we'd pasted it earlier.) And we can, of course, call methods on the object to interact with it if we wish.
Test Results
After each test run finishes, the test results—including those for the verification points—are shown in the Test Results view at the bottom of the Squish IDE.
This is a detailed report of the test run and would also contain details of any failures or errors, etc. If you click on a Test Results item, the Squish IDE highlights the script line which generated it. If you expand the item, you can see additional details of it.
Squish's interface for reporting test results is very flexible. The default report generator simply prints the results to stdout when Squish is run from the command line, or to the Test Results view when Squish IDE is being used. You can save the test results from the Squish IDE as XML by right clicking on the Test Results and choosing the Export Results menu option. For a list of report generators, see squishrunner –reportgen: Generating Reports.
It is possible to Upload the Results to Test Center, where they are stored in a database for analysis later.
These test scripts could be shorter if we moved our common code into a shared location. Each script language has its own mechanism for creating and importing libraries, but in addition, Squish has Shared Scripts and Global Scripts that you can use to locate and access shared code.
Learning More
We have now completed the tutorial. Squish can do much more than we have shown here, but the aim has been to get you started with basic testing as quickly and easily as possible. The How to Create Test Scripts, and How to Test Applications - Specifics sections provide many more examples, including those that show how tests can interact with particular input elements, such as selects, select-ones, texts, and text-areas.
The API Reference and Tools Reference give full details of Squish's testing API and the numerous functions it offers to make testing as easy and efficient as possible. The time you invested will be repaid because you'll know what functionality Squish provides out of the box and can avoid reinventing things that are already available.
Notes on Testing iOS Apps in the iOS Simulator
Squish for iOS allows you to test your iOS apps in the iOS Simulator that is included in Xcode installations. This makes it much easier and more convenient to test iOS AUTs without having to use an actual iOS device.
- The iOS Simulator is part of Xcode. So you need an Xcode installation in order to run Squish tests in the simulator.
- In the iOS Simulator you can only run applications that were built for the simulator, not applications that were built for running on a device. So please make sure that you choose the correct build of the iOS app as the AUT in the test suite wizard.
- You have to use the application (i.e., the file with the
.appextension) in Squish as the AUT. The.xcodeprojis the Xcode project that contains the information to build the application. The.xcodeprojcan't be used as the AUT.Use Xcode to open the
.xcodeproj. Choose a simulator target in Product > Destination, and then select Product > Build For > Running to build the application. Depending on the Xcode version, it might be different, but Xcode 8.3 places the .app in a folder under~/Library/Developer/Xcode/DerivedData(in your home directory).
There are further options in the test suite that allow you to control how the iOS Simulator is started. In order to use these, open the test suite settings in the Squish IDE and enter one or more of the following options into the Launcher Arguments line edit:
--device-id=uuidIf you are using Xcode 6 or later, you can specify the device ID of the simulated device to be used.Use Window > Devices in Xcode to see the device IDs for the simulated devices available. Or run Squish's
iphonelaunchercommand with the option--list-devicesin the terminal to determine the device ID.You can't use the
--deviceor--sdkin conjunction with this option since the device ID already defines the simulated hardware and SDK and these value can't be overriden.--device=device-familyIf your application is a universal application (i.e., runs on both iPhone and iPad), you can use this option to specify whether Squish should start the application in a simulated iPhone or iPad. Fordevice-familyyou can use eitheriPhoneoriPad.If you are using Xcode 5.0 or newer, you have more fine grained control over the exact device type and you can also specify
iPhone-retina-3.5-inch,iPhone-retina-4-inchandiPad-retinaas thedevice-family.--sdk=versionSquish tries to automatically determine the iOS SDK version that was used to when compiling the app. If this fails or if you want to start the simulator with a different SDK, use this option to overwrite the automatically determined version.For example, if your want to enforce the app to start with SDK 4.2, specify the option
--sdk=4.2.
Notes on Testing iOS Apps in an iPhone or iPad
It is perfectly possible—albeit slightly less convenient—to test iOS Apps on an actual iPhone or iPad device. To do this you must add a Squish-specific wrapper library to Xcode, make a small modification to your application's main function, and make sure that your Mac is set up correctly.
Your desktop computer and the iOS device communicate through a TCP/IP network connection. The device has to be reachable from the desktop computer so that Squish can connect to the AUT on the iOS device.
Modify the AUT's main Function
First you must modify your application's main function that it calls Squish's squish_allowAttaching function when running for testing. Here is a typical main function for iOS applications with the necessary modifications. Depending on your concrete source code, the main function might vary and you should not simply copy the below code; rather modify your existing source code to add the highlighted lines at the appropriate places.
#import <UIKit/UIKit.h>
#import "AppDelegate.h"

#if defined(SQUISH_TESTING) && !TARGET_IPHONE_SIMULATOR
extern bool squish_allowAttaching(unsigned short port);
#endif

int main(int argc, char *argv[])
{
    NSAutoreleasePool * pool = [[NSAutoreleasePool alloc] init];

#if defined(SQUISH_TESTING) && !TARGET_IPHONE_SIMULATOR
    squish_allowAttaching(11233);
#endif

    int retVal = UIApplicationMain(argc, argv, nil, NSStringFromClass([AppDelegate class]));
    [pool release];
    return retVal;
}
- The
defined(SQUISH_TESTING)means that we compile the Squish specific modifications only if SQUISH_TESTING is defined. We will later set up the Xcode project that we have a special build configuration that sets this compiler define. So you can easily switch between building a version of the app for Squish testing and one normal version that you can also submit to the app store.And the
!TARGET_IPHONE_SIMULATORmeans that we only compile the Squish specific modifications into the iOS app only if we are building for the device (and not for simulator builds). - We need to call the
squish_allowAttachingfunction later on in the main function. This function is implemented in a static library provided by Squish. So here we need to declare the function so that the compiler knows about this function when we later try call it. You have to add this before themainfunction where you actually call this function. - Add a call to
squish_allowAttaching(11233)after creating the autorelease pool and before entering the event loop. The argument11233is a TCP/IP port number that Squish will use to connect to the applicaiton running on the device.
If you have a Swift-only project, you lack the main function. In this case, simply add a new source file, squish_loading.c to you app target with the following content:
#if defined(SQUISH_TESTING) && !TARGET_IPHONE_SIMULATOR

#include <stdbool.h>

extern bool squish_allowAttaching(unsigned short port);

__attribute__((constructor)) static void initializer()
{
    squish_allowAttaching(11233);
}

#endif
Add the Wrapper to Xcode
After the modifications to the application's main function, we also have to link the app against the static library libsquishioswrapper.a that is shipped with the Squish package and can be found in the package's lib/arm directory.
Note: The following steps use Xcode 7.3. Different Xcode versions might vary slightly in the exact user interface steps (especially with respect to the screenshots), but the overall process is the same for all Xcode versions.
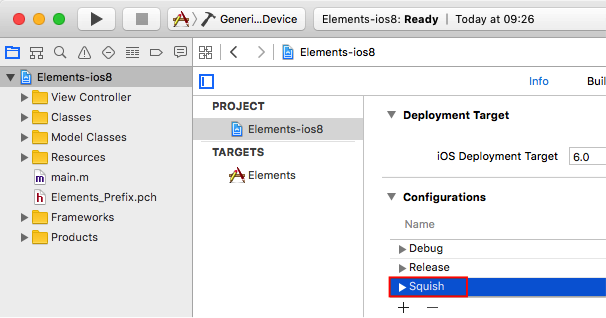
First we create a new build configuration in the Xcode project. This allows us to easily switch between Squish builds of your application and normal builds of your application (without the modifications required by Squish): click on the project to open the project settings. In the Info tab of the project's settings, you can choose to duplicate an existing build configuration. You can base your builds on any of existing build configurations; in our example we choose to duplicate the "Release" build configuration (i.e., we base the Squish specific configuration on release builds).
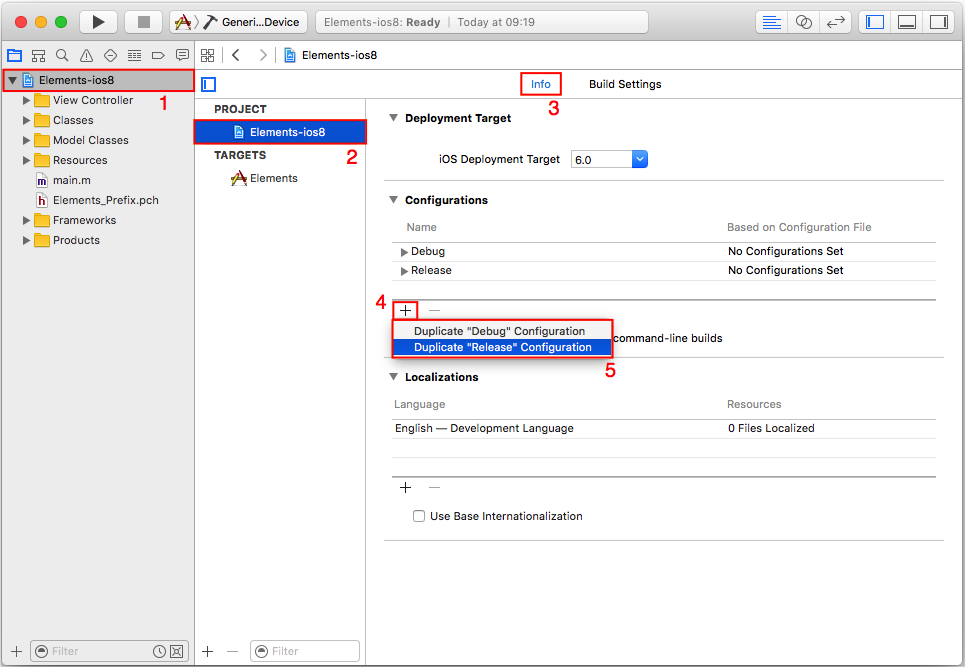
Give the new build configuration a name, for our example we simply choose "Squish".
Next, we have to make sure that the compiler defines SQUISH_TESTING when we build the project with the "Squish" build configuration (this is the define we are checking for in our modified main function):
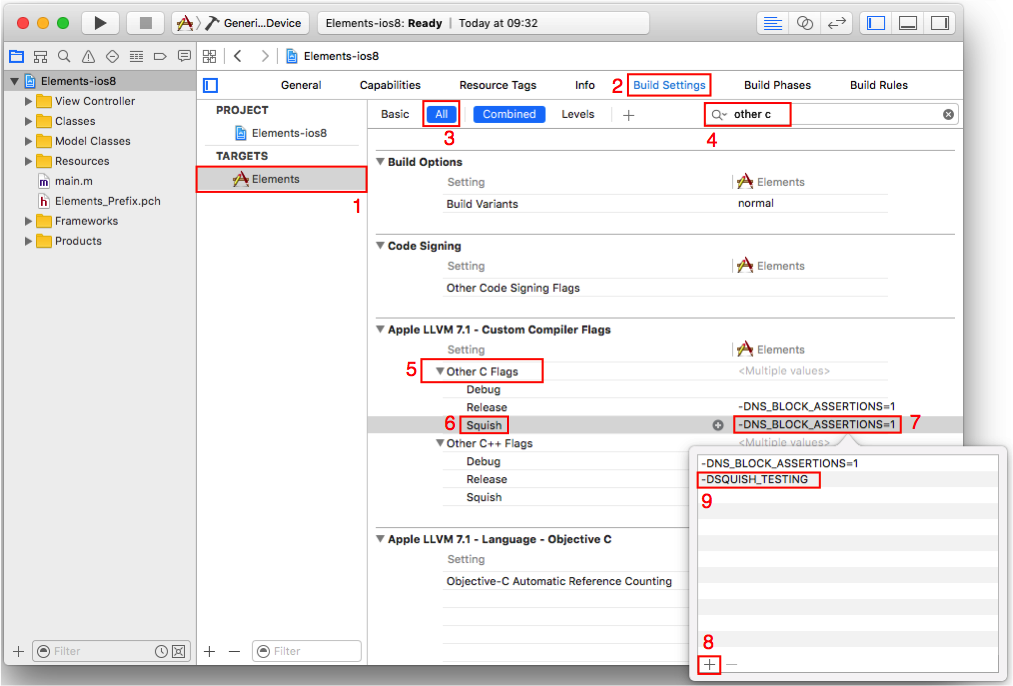
- Choose the target app you want to test with Squish (in the example the Elements target).
- Switch to the Build Settings tab in the project settings.
- Ensure that All build settings are displayed (and not only the Basic ones).
- Search for the "Other C Flags" build settings.
- Make sure to expand the Other C Flags entry
- Select the Squish build configuration.
- Double click on the Other C Flags entry of the Squish build configuration in the column for your target (in the example the Elements column).
- Click the + button in the popup to add a new flag.
- Enter the flag
-DSQUISH_TESTINGand click outside the popup to accept the new setting.
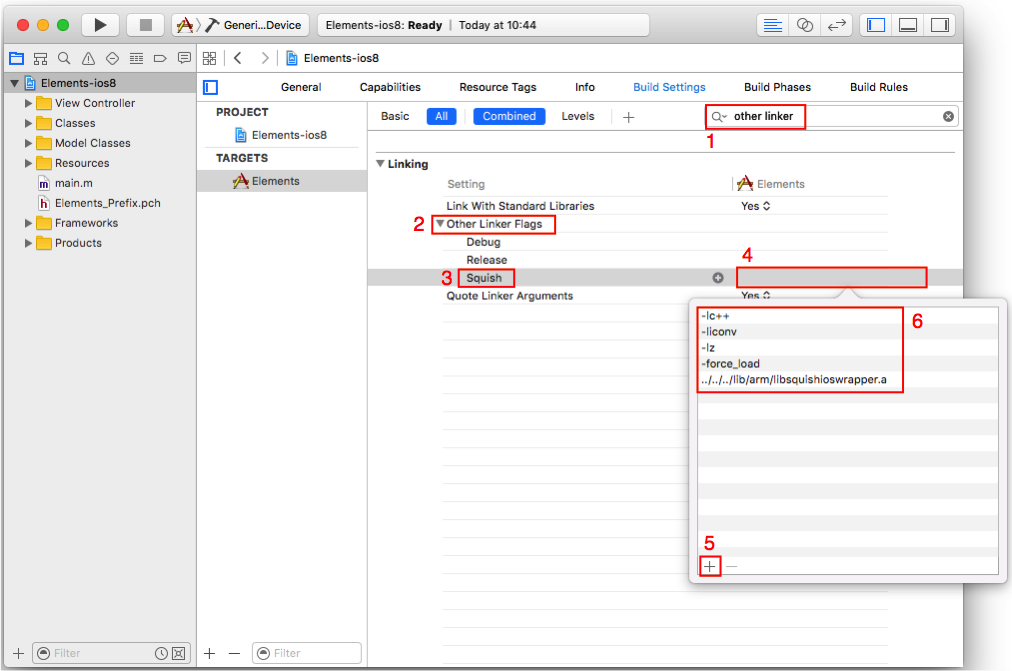
Then, we also have to add the Squish static library to the linker flags:
- Search for the "Other Linker Flags" build settings.
- Make sure to expand the Other Linker Flags.
- Select the Squish build configuration.
- Double click on the Other Linker Flags entry of the Squish build configuration in the column for your target (in the example the Elements column).
- Click the + button in the popup to add the new flags.
- Enter the following flags (the order is important):
-lc++-liconv-lz-force_loadsquishdir/lib/arm/libsquishioswrapper.a
and click outside the popup to accept the changes. Make sure that you replace <squishdir> by the full path (or relative path) to the directory of your Squish installation. Alterantively, you can also copy the library into the project directory of your application and specify the
libsquishioswrapper.awithout any path.
Note: When updating your Squish installation to a new version, use the libsquishioswrapper.a library of the new package, and rebuild your application with the new version of the library.
Then, you have to disable bitcode support for the "Squish" configuration:
- Search for the "Bitcode" build settings.
- Make sure to expand the Enable Bitcode.
- Select the Squish build configuration.
- Change the setting to No for the Squish build configuration in the column for your target (in the example the Elements column).

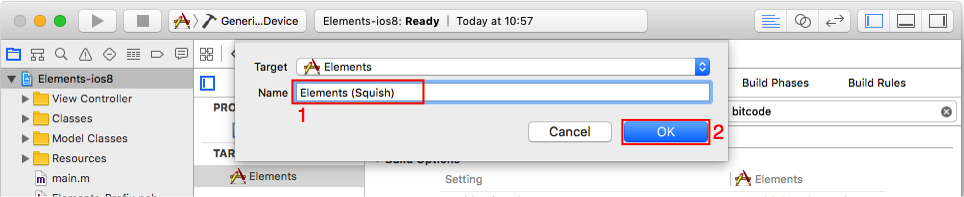
The last step is to really build the iOS app with the newly created "Squish" configuration. For this, we create a separate scheme in Xcode. This allows us to quickly change between building for Squish testing and for other purposes of the application.
Choose New Scheme from the scheme popup in Xcode.
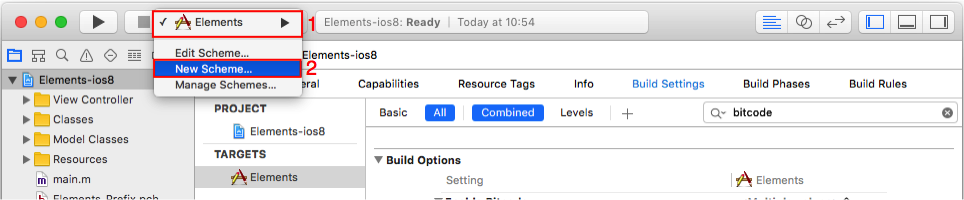
Give the newly created scheme a good name, in the example we use "Elements (Squish)", stressing that this builds the Elements app for Squish testing.
The newly created scheme has default settings. So we now need to edit the scheme and change the build configuration to be used. So make sure that the new scheme is the active one and choose Edit Scheme from the popup.
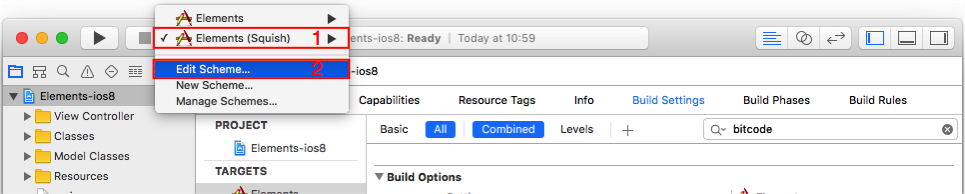
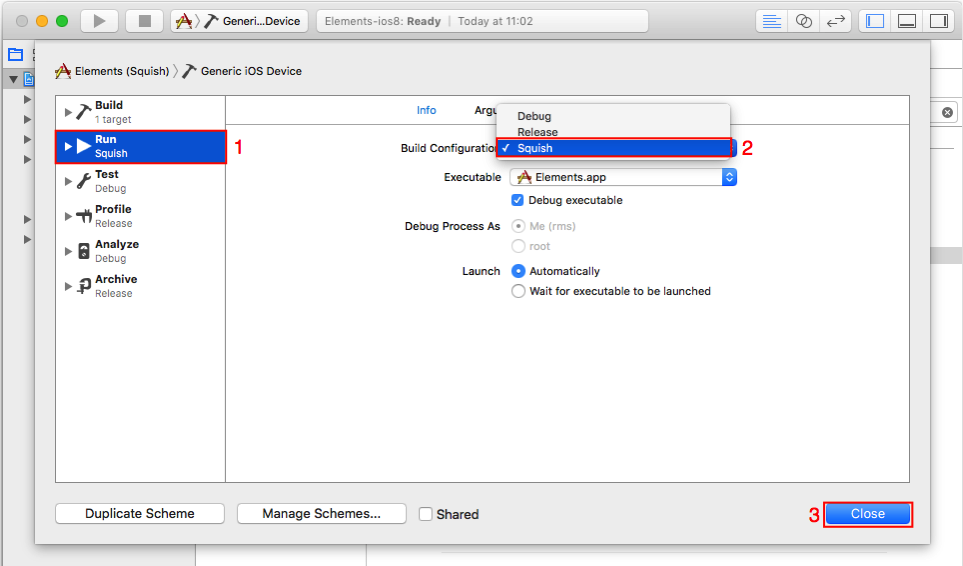
In the dialog to edit the schemes, make sure that you selected the Run action. Then change the Build Configuration setting to Squish. You should do the same thing for the other actions that take a build configuration as well (i.e., for Test, Profile, Analyze, and Archive). So all builds done with the "Elements (Squish)" scheme build the app in a way that it is suitable for testing with Squish.
Now you only have to build the app for your device and install it there and you can start testing it on a physical device (after you follow the last steps of setting up a testsuite in Squish on the your desktop computer).
As a quick test to see if all the above modifications are correct, execute the app on the device through Xcode's debugger. Take a closer look at the debugger console in Xcode: if you see the message Listening on port 11233 for incoming connections on startup of the app, then the modifications were correct. If you don't see this message, you missed one of the above steps.
Setting Up a Computer for iOS Device Testing
Although the iOS application you want to test will run on the iOS device, Squish itself runs on a computer. Here is how to set up the computer to support iOS testing.
- You have to turn off the firewall on the computer. Naturally it is very important that you turn the firewall back on after the testing is finished.
- Register the host and port number of the iOS device as an attachable AUT. This is done inside the Squish IDE; click the Edit > Server > Settings > Manage AUTs menu item, then click the Attachable AUTs item. Now click the Add button. Give the configuration a name, for example, "iPhoneDevice". Enter the iOS device's IP address as the host and for the port give the number used when calling the
squish_allowAttachingfunction (e.g., 11233).
Now that the computer is set up you can play back or create tests for your iOS applications.
If you want to play back tests you created with the simulator, you have to change the startApplication("iPhoneApp") in your test script to attachToApplication("iPhoneDevice") (or using whatever configuration name you chose if different).
Now you can start the application on the device and then replay the test script you recorded on the iOS Simulator.
You can also record the test directly on the device. In this case, please open the test suite settings of your iOS test suite and make sure that the selection for the AUT is <No Application>. Then start the application on the device and if you choose to record a test case in the Squish IDE, you are asked the application. Choose iPhoneDevice (attachable) (or whatever name you used when registering the attachable AUT). Now all user interactions you do on the device are recorded until you end the recording in the Squish IDE's control bar.
The iOS devices are pretty much locked down so it is not possible for Squish to start (or end) the AUT. So the application has to be started manually and when you execute a test script make sure that the application is running in the foreground and that the device is not locked or sleeping.
If you keep the application running, you can execute multiple test cases after each other and each test case then connects to the same application. This means that you have to ensure in your test cases that the application is left in a state that the next test case can run successfully (or you have to write your test cases in a way that on start, they bring the application into a well-known state).
Tutorial: Designing Behavior Driven Development (BDD) Tests
This tutorial will show you how to create, run, and modify Behavior Driven Development (BDD) tests for an example application. You will learn about Squish's most frequently used features. By the end of the tutorial you will be able to write your own tests for your own applications.
For this chapter we will use the Elements app as our Application Under Test (AUT). This app searches and displays information on chemical elements. You find it in Squish's examples/ios directory. The screenshot shows the application in action.
Introduction to Behavior Driven Development
Behavior-Driven Development (BDD) is an extension of the Test-Driven Development approach which puts the definition of acceptance criteria at the beginning of the development process as opposed to writing tests after the software has been developed. With possible cycles of code changes done after testing.
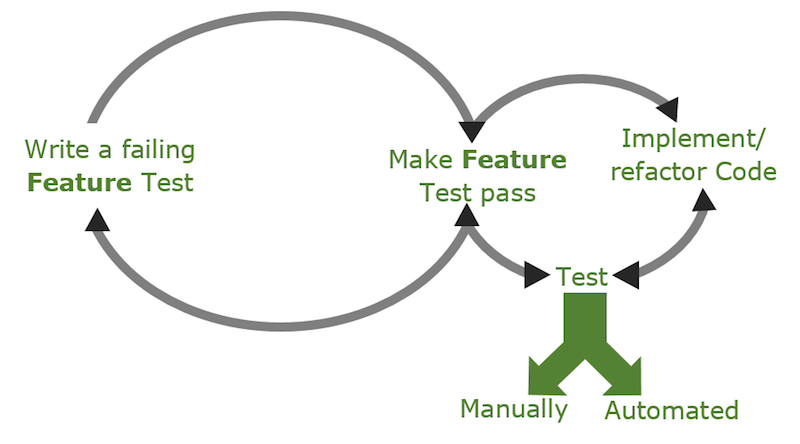
Behavior Driven Tests are built out of a set of Feature files, which describe product features through the expected application behavior in one or many Scenarios. Each Scenario is built out of a sequence of steps which represent actions or verifications that need to be tested for that Scenario.
BDD focuses on expected application behavior, not on implementation details. Therefore BDD tests are described in a human-readable Domain Specific Language (DSL). As this language is not technical, such tests can be created not only by programmers, but also by product owners, testers or business analysts. Additionally, during the product development, such tests serve as living product documentation. For Squish usage, BDD tests shall be created using Gherkin syntax. The previously written product specification (BDD tests) can be turned into executable tests. This step by step tutorial presents automating BDD tests with Squish IDE support.
Gherkin syntax
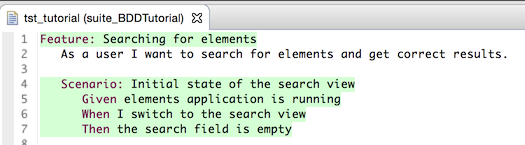
Gherkin files describe product features through the expected application behavior in one or many Scenarios. An example showing the searching feature of the elements example application.
Feature: Searching for elements
    As a user I want to search for elements and get correct results.

    Scenario: Initial state of the search view
        Given elements application is running
        When I switch to the search view
        Then the search field is empty
Most of the above is free form text (does not have to be English). It's just the Feature/Scenario structure and the leading keywords like Given, And, When and Then that are fixed. Each of those keywords marks a step, defining preconditions, user actions or expected results. The application behavior description above can be passed to software developers to implement these features and at the same time the same description can be passed to software testers to implement automated tests.
Test implementation
Creating Test Suite
First, we need to create a Test Suite, which is a container for all Test Cases. Start the Squish IDE and select File > New Test Suite. Please follow the New Test Suite wizard, provide a Test Suite name, choose the iOS Toolkit and scripting language of your choice and finally register Elements app as AUT. Please refer to Creating a Test Suite for more details about creating new Test Suites.
Creating Test Case
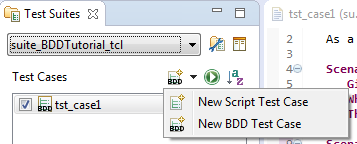
Squish offers two types of Test Cases: "Script Test Case" and "BDD Test Case". As "Script Test Case" is the default one, in order to create new "BDD Test Case" we need to use the context menu by clicking on the expander next to New Test Case button and choosing the option New BDD Test Case. The Squish IDE will remember your choice and the "BDD Test Case" will become the default when clicking on the button in the future.
The newly created BDD Test Case consists of a test.feature file (filled with a Gherkin template while creating a new BDD test case), a file named test.(py|js|pl|rb|tcl) which will drive the execution (there is no need to edit this file), and a Test Suite Resources file named steps/steps.(py|js|pl|rb|tcl) where step implementation code will be placed.
We need to replace the Gherkin template with a Feature for the addressbook example application. To do this, copy the Feature description below and paste it into the Feature file.
Feature: Searching for elements
    As a user I want to search for elements and get correct results.

    Scenario: Initial state of the search view
        Given elements application is running
        When I switch to the search view
        Then the search field is empty
When editing the test.feature file, a warning No implementation found is displayed for each undefined step. The implementations are in the steps subdirectory, in Test Case Resources, or in Test Suite Resources. Running our Feature test now will currently fail at the first step with a No Matching Step Definition and the following steps will be skipped.
Recording Step implementation
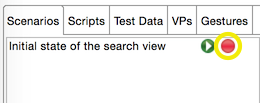
In order to record the Scenario, press the Record () next to the respective Scenario that is listed in the Scenarios tab in Test Case Resources view.
This will cause Squish to run the AUT so that we can interact with it. Additionally, the Control Bar is displayed with a list of all steps that need to be recorded. Now all interaction with the AUT or any verification points added to the script will be recorded under the first step Given elements application is running (which is bolded in the step list on the Control Bar). Since Squish automatically records the start of the application, we are already done with our first step.
When we are done with each step, we can move to the next undefined step (playing back the ones that were previously defined) by clicking on the Finish Recording Step( ) arrow button in the Control Bar that is located to the left of the current step.
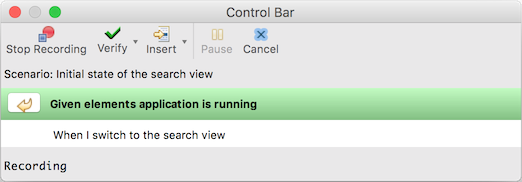
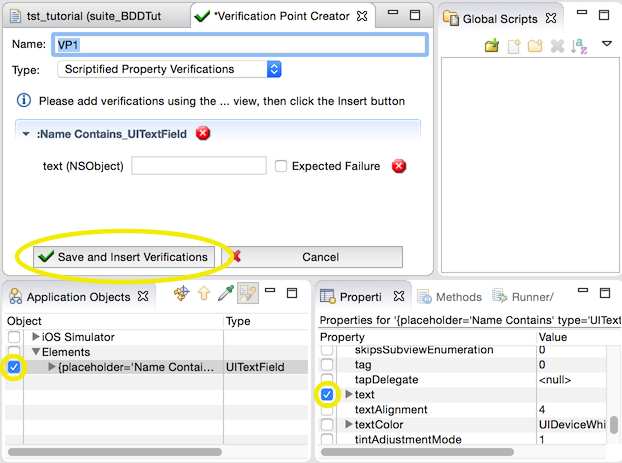
Now the step When I switch to the search view is active. Record the necessary action by clicking the Search menu item in the AUT. Clicking on the Finish Recording Step() button again proceeds to the recording of the last step, the search field is empty. To record this verification, click on Verify () while recording, and select Properties. In the Application Objects view, navigate or use the Object Picker () to select (not check) the text field for the search. In the Properties view expand the widget's text property. Now click the checkbox beside the stringValue subproperty and insert the verification point. Finally, click on Finish Recording Step() one last time.
As a result, Squish will generate the following step definitions in the steps.* file (at Test Suites > Test Suite Resources):
@Given("elements application is running")
def step(context):
    startApplication("Elements")

@When("I switch to the search view")
def step(context):
    tapObject(waitForObject(names.search_UILabel), 179, 9)

@Then("the search field is empty")
def step(context):
    test.compare(waitForObjectExists(names.o_UISearchBarTextField).text, "")
Given("elements application is running", function(context) {
    startApplication("Elements");
});

When("I switch to the search view", function(context) {
    tapObject(waitForObject(names.searchUILabel), 179, 9);
});

Then("the search field is empty", function(context) {
    test.compare(waitForObjectExists(names.uISearchBarTextField).text, "");
});
Given("elements application is running", sub {
    my $context = shift;
    startApplication("Elements");
});

When("I switch to the search view", sub {
    my $context = shift;
    tapObject(waitForObject($Names::search_uilabel), 179, 9);
});

Then("the search field is empty", sub {
    my $context = shift;
    test::compare(waitForObjectExists($Names::uisearchbartextfield)->text, "");
});
Given("elements application is running") do |context|
    startApplication("Elements")
end

When("I switch to the search view") do |context|
    tapObject(waitForObject(Names::Search_UILabel), 179, 9)
end

Then("the search field is empty") do |context|
    Test.compare(waitForObjectExists(Names::UISearchBarTextField).text, "")
end
Given "elements application is running" {context} {
    startApplication "Elements"
}

When "I switch to the search view" {context} {
    invoke tapObject [waitForObject $names::Search_UILabel] 179 9
}

Then "the search field is empty" {context} {
    test compare [property get [waitForObjectExists $names::UISearchBarTextField] text] ""
}
The application is automatically started at the beginning of the first step due to the recorded startApplication() call. At the end of each Scenario, the OnScenarioEnd hook is called, causing detach() to be called on the application context. Because the AUT was started with startApplication(), this causes it to terminate. This hook function is found in the file bdd_hooks.(py|js|pl|rb|tcl), which is located in the Scripts tab of the Test Suite Resources view. You can define additional hook functions here. For a list of all available hooks, please refer to Performing Actions During Test Execution Via Hooks.
@OnScenarioEnd
def OnScenarioEnd():
    for ctx in applicationContextList():
        ctx.detach()
OnScenarioEnd(function(context) {
applicationContextList().forEach(function(ctx) { ctx.detach(); });
});OnScenarioEnd(sub {
foreach (applicationContextList()) {
$_->detach();
}
});OnScenarioEnd do |context| applicationContextList().each { |ctx| ctx.detach() } end
OnScenarioEnd {context} {
    foreach ctx [applicationContextList] {
        applicationContext $ctx detach
    }
}
Step parametrization
So far, our steps did not use any parameters, and all values were hardcoded. Squish has different types of parameters like any, integer or word, allowing our step definitions to be more reusable. Let us add a new Scenario to our Feature file which will provide step parameters for both the Test Data and the expected results. Copy the below section into your Feature file.
Scenario: State after searching with exact match
    Given elements application is running
    When I switch to the search view
    And I enter 'helium' into the search field and tap Search
    Then '1' entries should be present
After auto-saving the Feature file, the Squish IDE provides a hint that only 2 steps need to be implemented: And I enter 'helium' into the search field and tap Search and Then '1' entries should be present. The remaining steps already have a matching step implementation.
To record the missing steps, click Record () next to the test case name in the Test Suites view. The script will play until it gets to the missing step and then prompt you to implement it. Click Finish Recording Step() to move to the next step. For the second missing step, we can record an object property verification like we did with the step the search field is empty.
Now we parametrize the generated step implementation by replacing the values with parameter types. Since we want to be able to add different names, replace 'helium' with '|word|'. Each parameter will be passed to the step implementation function in the order of appearance in the descriptive name of the step. Finish parametrizing by editing code to look like this example step:
@When("I enter '|word|' into the search field and tap Search")
def step(context, search):
    tapObject(waitForObject(names.o_UISearchBarTextField), 25, 13)
    type(waitForObject(names.o_UISearchBarTextField), search)
    tapObject(waitForObject(names.search_UINavigationButton))

    # synchronization: wait until search result view is visible
    waitFor("not object.exists(names.o_UISearchBarTextField)", 10000)

    context.userData["search"] = search

@Then("'|integer|' entries should be present")
def step(context, numOfEntries):
    test.compare(waitForObjectExists(names.o_UITableView).numberOfRowsInSection_(0), numOfEntries)
When("I enter '|word|' into the search field and tap Search", function(context, search) {
tapObject(waitForObject(names.uISearchBarTextField), 25, 13);
type(waitForObject(names.uISearchBarTextField), search);
tapObject(waitForObject(names.searchUINavigationButton));
// synchronization: wait until search result view is visible
waitFor("!object.exists(names.uISearchBarTextField)", 10000);
context.userData["search"] = search;
});
Then("'|integer|' entries should be present", function(context, numOfEntries) {
test.compare(waitForObjectExists(names.uITableView).numberOfRowsInSection_(0), numOfEntries);
});When("I enter '|word|' into the search field and tap Search", sub {
my $context = shift;
my $search = shift;
tapObject(waitForObject($Names::uisearchbartextfield), 25, 13);
type(waitForObject($Names::uisearchbartextfield), $search);
tapObject(waitForObject($Names::search_uinavigationbutton));
# synchronization: wait until search result view is visible
waitFor("!object::exists(\$Names::uisearchbartextfield)", 10000);
$context->{userData}{"search"} = $search;
});
Then("'|integer|' entries should be present", sub {
my $context = shift;
my $numOfEntries = shift;
test::compare(waitForObjectExists($Names::o_uitableview)->numberOfRowsInSection_(0), $numOfEntries);
});When("I enter '|word|' into the search field and tap Search") do |context, search|
tapObject(waitForObject(Names::O_UISearchBarTextField), 25, 13)
type(waitForObject(Names::O_UISearchBarTextField), search)
tapObject(waitForObject(Names::Search_UINavigationButton))
# synchronization: wait until search result view is visible
waitFor("!Squish::Object.exists(Names::O_UISearchBarTextField)", 10000);
context.userData[:search] = search
end
Then("'|integer|' entries should be present") do |context, numOfEntries|
Test.compare(waitForObjectExists(Names::O_UITableView).numberOfRowsInSection_(0), numOfEntries)
endWhen "I enter '|word|' into the search field and tap Search" {context search} {
invoke tapObject [waitForObject $names::UISearchBarTextField] 25 13
invoke type [waitForObject $names::UISearchBarTextField] $search
invoke tapObject [waitForObject $names::Search_UINavigationButton]
# synchronization: wait until search result view is visible
waitFor { ![object exists $names::UISearchBarTextField] } 10000
set userData [$context userData]
dict set userData "search" $search
$context userData $userData
}
Then "'|integer|' entries should be present" {context numOfEntries} {
test compare [invoke [waitForObjectExists $names::UITableView] numberOfRowsInSection_ 0] $numOfEntries
}Providing parameters for Steps in a table
The next Scenario will test a search result with multiple elements found. Instead of using multiple steps for verifying this, we use a single step and pass a table as an argument to the step.
Scenario: State after searching with multiple matches
    Given elements application is running
    When I switch to the search view
    And I enter 'he' into the search field and tap Search
    Then the following entries should be present
        | Number | Symbol | Name          |
        | 2      | He     | Helium        |
        | 44     | Ru     | Ruthenium     |
        | 75     | Re     | Rhenium       |
        | 104    | Rf     | Rutherfordium |
        | 116    | Uuh    | Ununhexium    |
The step implementation to handle such tables looks like this:
@Then("the following entries should be present")
def step(context):
    table = context.table
    table.pop(0) # Drop initial row with column headers

    tableView = waitForObject(names.o_UITableView)
    dataSource = tableView.dataSource
    numberOfRows = tableView.numberOfRowsInSection_(0)

    test.compare(numberOfRows, len(table))
    for i in range(numberOfRows):
        number = table[i][0]
        symbol = table[i][1]
        name = table[i][2]
        expectedText = number + ": " + name + " (" + symbol + ")"

        indexPath = NSIndexPath.indexPathForRow_inSection_(i, 0)
        cell = dataSource.tableView_cellForRowAtIndexPath_(tableView, indexPath)
        test.compare(cell.text, expectedText)
Then("the following entries should be present", function(context) {
var table = context.table;
table.shift(); // Drop initial row with column headers
var tableView = waitForObject(names.uITableView);
var dataSource = tableView.dataSource;
var numberOfRows = tableView.numberOfRowsInSection_(0);
test.compare(numberOfRows, table.length);
for (var i = 0; i < table.length; ++i) {
var number = table[i][0];
var symbol = table[i][1];
var name = table[i][2];
var expectedText = number + ": " + name + " (" + symbol + ")";
var indexPath = NSIndexPath.indexPathForRow_inSection_(i, 0);
var cell = dataSource.tableView_cellForRowAtIndexPath_(tableView, indexPath);
test.compare(cell.text, expectedText);
}
});Then("the following entries should be present", sub {
my $context = shift;
my $table = $context->{'table'};
shift(@{$table}); # Drop initial row with column headers
my $tableView = waitForObject($Names::o_uitableview);
my $dataSource = $tableView->dataSource;
my $numberOfRows = $tableView->numberOfRowsInSection_(0);
test::compare($numberOfRows, scalar @{$table});
for (my $i = 0; $i < @{$table}; $i++) {
my $number = @{@{$table}[$i]}[0];
my $symbol = @{@{$table}[$i]}[1];
my $name = @{@{$table}[$i]}[2];
my $expectedText = $number . ": " . $name . " (" . $symbol . ")";
my $indexPath = NSIndexPath::indexPathForRow_inSection_($i, 0);
my $cell = $dataSource->tableView_cellForRowAtIndexPath_($tableView, $indexPath);
test::compare($cell->text, $expectedText);
}
});Then("the following entries should be present") do |context|
table = context.table
table.shift # Drop initial row with column headers
tableView = waitForObject(Names::O_UITableView)
dataSource = tableView.dataSource
numberOfRows = tableView.numberOfRowsInSection_(0)
Test.compare(numberOfRows, table.length)
for i in 0...numberOfRows do
number = table[i][0]
symbol = table[i][1]
name = table[i][2]
expectedText = number + ": " + name + " (" + symbol + ")"
indexPath = NSIndexPath.indexPathForRow_inSection_(i, 0)
cell = dataSource.tableView_cellForRowAtIndexPath_(tableView, indexPath)
Test.compare(cell.text, expectedText)
end
endThen "the following entries should be present" {context} {
# Drop initial row with column headers
set table [$context table]
set table [lrange $table 1 end]
set tableView [waitForObject $names::UITableView]
set dataSource [property get $tableView dataSource]
set numberOfRows [invoke $tableView numberOfRowsInSection_ 0]
test compare $numberOfRows [llength $table]
for {set i 0} {$i < $numberOfRows} {incr i} {
set number [lindex $table $i 0]
set symbol [lindex $table $i 1]
set name [lindex $table $i 2]
set expectedText "$number: $name ($symbol)"
set indexPath [invoke NSIndexPath indexPathForRow_inSection_ $i 0]
set cell [invoke $dataSource tableView_cellForRowAtIndexPath_ $tableView $indexPath]
test compare [property get $cell text] $expectedText
}
}Sharing data between Steps and Scenarios
Lets add a new Scenario to the Feature file. This time we would like to check that in the detailed search results, the title of the detail view is the same as our search term. Because we enter data into the search field in one Step and verify them in another, we must share information about entered data among those Steps in order to perform a verification.
Scenario: State of the details when searching
    Given elements application is running
    When I switch to the search view
    And I enter 'Carbon' into the search field and tap Search
    And I tap on the first search result
    Then the previously entered search term is the title of the view
To share this data, the context.userData property can be used.
@When("I enter '|word|' into the search field and tap Search")
def step(context, search):
    tapObject(waitForObject(names.o_UISearchBarTextField), 25, 13)
    type(waitForObject(names.o_UISearchBarTextField), search)
    tapObject(waitForObject(names.search_UINavigationButton))

    # synchronization: wait until search result view is visible
    waitFor("not object.exists(names.o_UISearchBarTextField)", 10000)

    context.userData["search"] = search
When("I enter '|word|' into the search field and tap Search", function(context, search) {
tapObject(waitForObject(names.uISearchBarTextField), 25, 13);
type(waitForObject(names.uISearchBarTextField), search);
tapObject(waitForObject(names.searchUINavigationButton));
// synchronization: wait until search result view is visible
waitFor("!object.exists(names.uISearchBarTextField)", 10000);
context.userData["search"] = search;
});When("I enter '|word|' into the search field and tap Search", sub {
my $context = shift;
my $search = shift;
tapObject(waitForObject($Names::uisearchbartextfield), 25, 13);
type(waitForObject($Names::uisearchbartextfield), $search);
tapObject(waitForObject($Names::search_uinavigationbutton));
# synchronization: wait until search result view is visible
waitFor("!object::exists(\$Names::uisearchbartextfield)", 10000);
$context->{userData}{"search"} = $search;
});When("I enter '|word|' into the search field and tap Search") do |context, search|
tapObject(waitForObject(Names::O_UISearchBarTextField), 25, 13)
type(waitForObject(Names::O_UISearchBarTextField), search)
tapObject(waitForObject(Names::Search_UINavigationButton))
# synchronization: wait until search result view is visible
waitFor("!Squish::Object.exists(Names::O_UISearchBarTextField)", 10000);
context.userData[:search] = search
endWhen "I enter '|word|' into the search field and tap Search" {context search} {
invoke tapObject [waitForObject $names::UISearchBarTextField] 25 13
invoke type [waitForObject $names::UISearchBarTextField] $search
invoke tapObject [waitForObject $names::Search_UINavigationButton]
# synchronization: wait until search result view is visible
waitFor { ![object exists $names::UISearchBarTextField] } 10000
set userData [$context userData]
dict set userData "search" $search
$context userData $userData
}All data stored in context.userData can be accessed in all steps and Hooks in all Scenarios of the given Feature. Finally, we need to implement the step Then the previously entered search term is the title of the view.
@Then("the previously entered search term is the title of the view")
def step(context):
    # synchronization: wait until the search result view is not visible
    waitFor('waitForObjectExists(names.o_UINavigationItemView).title != "Search Results"', 10000)

    test.compare(waitForObjectExists(names.o_UINavigationItemView).title, context.userData["search"])
Then("the previously entered search term is the title of the view", function(context) {
// synchronization: wait until the search result view is not visible
waitFor('waitForObjectExists(names.uINavigationItemView).title != "Search Results"', 10000);
test.compare(waitForObjectExists(names.uINavigationItemView).title, context.userData["search"]);
});Then("the previously entered search term is the title of the view", sub {
my $context = shift;
# synchronization: wait until the search result view is not visible
waitFor("waitForObjectExists(\$Names::o_uinavigationitemview).title ne \"Search Results\"", 10000);
test::compare(waitForObjectExists($Names::o_uinavigationitemview)->title, $context->{userData}{"search"});
});Then("the previously entered search term is the title of the view") do |context|
# synchronization: wait until the search result view is not visible
waitFor('waitForObjectExists(Names::O_UINavigationItemView).title != "Search Results"', 10000)
Test.compare(waitForObjectExists(Names::O_UINavigationItemView).title, context.userData[:search])
endThen "the previously entered search term is the title of the view" {context} {
# synchronization: wait until the search result view is not visible
waitFor { [property get [waitForObjectExists $names::UINavigationItemView] title] != "Search Results" } 10000
test compare [property get [waitForObjectExists $names::UINavigationItemView] title] [dict get [$context userData] "search"]
}Scenario Outline
Assume our Feature contains the following two Scenarios:
Scenario: State after searching with exact match
    Given elements application is running
    When I switch to the search view
    And I enter 'Hydrogen' into the search field and tap Search
    Then the entry '1: Hydrogen (H)' should be present

Scenario: State after searching with exact match
    Given elements application is running
    When I switch to the search view
    And I enter 'Helium' into the search field and tap Search
    Then the entry '2: Helium (He)' should be present
As we can see, those Scenarios perform the same actions using different test data. The same can be achieved by using a Scenario Outline (a Scenario template with placeholders) and Examples (a table with parameters).
Scenario Outline: Doing a search with exact match multiple times
  Given elements application is running
  When I switch to the search view
  And I enter '<Name>' into the search field and tap Search
  Then the entry '<Number>: <Name> (<Symbol>)' should be present
  Examples:
     | Name     | Number | Symbol |
     | Hydrogen | 1      | H      |
     | Helium   | 2      | He     |
     | Carbon   | 6      | C      |
The OnScenarioEnd hook will be executed at the end of each loop iteration in a Scenario Outline.
Test Execution
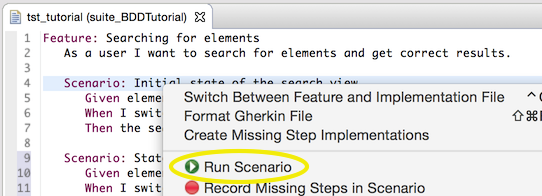
In the Squish IDE, users can execute all Scenarios in a Feature, or execute only one selected Scenario. In order to execute all Scenarios, the proper Test Case has to be executed by clicking on the Play button in the Test Suites view.
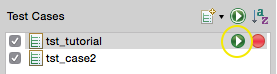
In order to execute only one Scenario, you need to open the Feature file, right-click on the given Scenario and choose Run Scenario. An alternative approach is to click on the Play button next to the respective Scenario in the Scenarios tab in Test Case Resources.
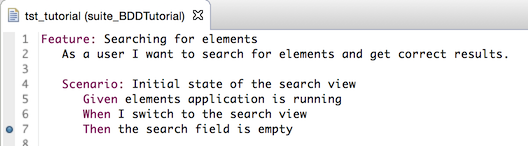
After a Scenario is executed, the Feature file is colored according to the execution results. More detailed information (like logs) can be found in the Test Results View.
Test debugging
Squish offers the possibility to pause an execution of a Test Case at any point in order to check script variables, spy application objects or run custom code in the Squish Script Console. To do this, a breakpoint has to be placed before starting the execution, either in the Feature file at any line containing a step or at any line of executed code (i.e., in middle of step definition code).
After the breakpoint is reached, you can inspect all application objects and their properties. If a breakpoint is placed at a step definition or a hook is reached, then you can additionally add Verification Points or record code snippets.
Re-using Step definitions
BDD test maintainability can be increased by reusing step definitions in test cases located in another directory. For more information, see collectStepDefinitions().
Tutorial: Migration of existing tests to BDD
This chapter is aimed at users that have existing Squish script-based tests and who would like to introduce Behavior Driven Testing. The first section describes how to keep the existing tests and add new tests with the BDD approach. The second section describes how to convert existing tests to BDD.
Extend existing tests to BDD
The first option is to keep any existing Squish tests and extend them by adding new BDD tests. It's possible to have a Test Suite containing script-based Test Cases and also BDD Test Cases. Simply open an existing Test Suite with Test Cases and choose New BDD Test Case option from drop down list.
Assuming your existing Test Cases make use of a library and you are calling shared functions to interact with the AUT, those functions can also be used from step implementations. In the example below, a function is used from multiple script-based Test Cases:
def switchToSearchView():
    tapObject(waitForObject(":Search_UITableViewLabel"), 179, 9)
function switchToSearchView(){
tapObject(waitForObject(":Search_UITableViewLabel"), 179, 9);
}sub switchToSearchView{
tapObject(waitForObject(":Search_UITableViewLabel"), 179, 9);
}def switchToSearchView tapObject(waitForObject(":Search_UITableViewLabel"), 179, 9) end
proc switchToSearchView {} {
    invoke tapObject [waitForObject ":Search_UITableViewLabel"] 179 9
}
New BDD Test Cases can easily use the same function:
@When("I switch to the search view")
def step(context):
switchToSearchView()When("I switch to the search view", function(context) { switchToSearchView(); });
When("I switch to the search view", sub {
    my $context = shift;
    switchToSearchView();
});
When("I switch to the search view") do |context|
    switchToSearchView()
end
When "I switch to the search view" {context} {
    switchToSearchView
}
Convert existing tests to BDD
The second option is to convert an existing Test Suite that contains script-based Tests into behavior driven tests. Since a Test Suite can contain script-based Test Cases and BDD Tests, migration can be done gradually. A Test Suite containing a mix of both test case types can be executed and results analyzed without any extra effort required.
The first step is to review all Test Cases of the existing Test Suite and group them by the Feature they test. Each script-based Test Case will be transformed into a Scenario, which is a part of a Feature. For example, assume we have 5 script-based tests. After review, we realize that they examine two Features. Therefore, when migration is completed, our Test Suite will contain two BDD Test Cases, each of them containing one Feature. Each Feature will contain multiple Scenarios. In our example the first Feature contains three Scenarios and the second Feature contains two Scenarios.
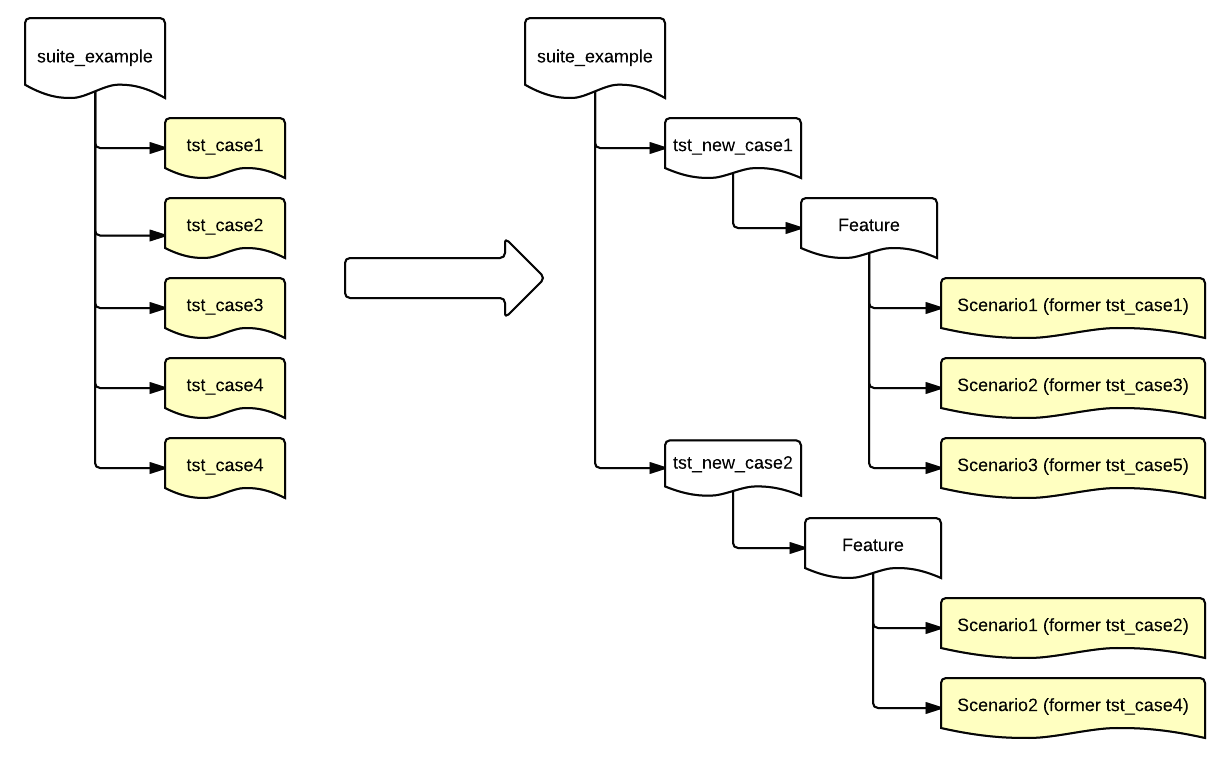
At the beginning, open a Test Suite in the Squish IDE that contains script-based Squish tests that are planned to be migrated to BDD. Next, create a new Test Case by choosing New BDD Test Case option from the context menu. Each BDD Test Case contains a test.feature file that can be filled with maximum one Feature. Next, open the test.feature file to describe the Features using the Gherkin language. Following the syntax from the template, edit the Feature name and optionally provide a short description. Next, analyze which actions and verifications are performed in the script-based Test Case that need to be migrated. This is how an example test case for the Elements application might look:
def main():
    startApplication("Elements")
    tapObject(waitForObject(names.search_UILabel), 179, 9)
    test.compare(waitForObjectExists(names.o_UISearchBarTextField).text, "")
function main() {
startApplication("Elements");
tapObject(waitForObject(names.searchUILabel), 179, 9);
test.compare(waitForObjectExists(names.uISearchBarTextField).text, "");
}sub main {
startApplication("Elements");
tapObject(waitForObject($Names::search_uilabel), 179, 9);
test::compare(waitForObjectExists($Names::uisearchbartextfield)->text, "");
}def main
startApplication("Elements")
tapObject(waitForObject(Names::Search_UILabel), 179, 9)
test.compare(waitForObjectExists(Names::UISearchBarTextField).text, "")
endproc main {} {
startApplication "Elements"
invoke tapObject [waitForObject $names::Search_UILabel] 179 9
test compare [property get [waitForObjectExists $names::UISearchBarTextField] text] ""
}After analyzing the above Test Case we can create the following Scenario and add it to test.feature:
Scenario: Initial state of the search view
    Given elements application is running
    When  I switch to the search view
    Then  the search field is empty
Next, right-click on the Scenario and choose the option Create Missing Step Implementations from the context menu. This will create a skeleton of step definitions:
@Given("elements application is running")
def step(context):
    test.warning("TODO implement elements application is running")

@When("I switch to the search view")
def step(context):
    test.warning("TODO implement I switch to the search view")

@Then("the search field is empty")
def step(context):
    test.warning("TODO implement the search field is empty")
Given("elements application is running", function(context) {
    test.warning("TODO implement elements application is running");
});

When("I switch to the search view", function(context) {
    test.warning("TODO implement I switch to the search view");
});

Then("the search field is empty", function(context) {
    test.warning("TODO implement the search field is empty");
});
Given("elements application is running", sub {
    my $context = shift;
    test::warning("TODO implement elements application is running");
});

When("I switch to the search view", sub {
    my $context = shift;
    test::warning("TODO implement I switch to the search view");
});

Then("the search field is empty", sub {
    my $context = shift;
    test::warning("TODO implement the search field is empty");
});
Given("elements application is running") do |context|
    Test.warning "TODO implement elements application is running"
end

When("I switch to the search view") do |context|
    Test.warning "TODO implement I switch to the search view"
end

Then("the search field is empty") do |context|
    Test.warning "TODO implement the search field is empty"
end
Given "elements application is running" {context} {
    test warning "TODO implement elements application is running"
}

When "I switch to the search view" {context} {
    test warning "TODO implement I switch to the search view"
}

Then "the search field is empty" {context} {
    test warning "TODO implement the search field is empty"
}
Now we put code snippets from the script-based Test Case into respective step definitions and remove the lines containing test.warning. If your script-based Tests make use of shared scripts, you can call those functions from the step definitions as well. For example, the final result could look like this:
@Given("elements application is running")
def step(context):
    startApplication("Elements")

@When("I switch to the search view")
def step(context):
    tapObject(waitForObject(names.search_UILabel), 179, 9)

@Then("the search field is empty")
def step(context):
    test.compare(waitForObjectExists(names.o_UISearchBarTextField).text, "")
Given("elements application is running", function(context) {
    startApplication("Elements");
});

When("I switch to the search view", function(context) {
    tapObject(waitForObject(names.searchUILabel), 179, 9);
});

Then("the search field is empty", function(context) {
    test.compare(waitForObjectExists(names.uISearchBarTextField).text, "");
});
Given("elements application is running", sub {
    my $context = shift;
    startApplication("Elements");
});

When("I switch to the search view", sub {
    my $context = shift;
    tapObject(waitForObject($Names::search_uilabel), 179, 9);
});

Then("the search field is empty", sub {
    my $context = shift;
    test::compare(waitForObjectExists($Names::uisearchbartextfield)->text, "");
});
Given("elements application is running") do |context|
    startApplication("Elements")
end

When("I switch to the search view") do |context|
    tapObject(waitForObject(Names::Search_UILabel), 179, 9)
end

Then("the search field is empty") do |context|
    Test.compare(waitForObjectExists(Names::UISearchBarTextField).text, "")
end
Given "elements application is running" {context} {
    startApplication "Elements"
}

When "I switch to the search view" {context} {
    invoke tapObject [waitForObject $names::Search_UILabel] 179 9
}

Then "the search field is empty" {context} {
    test compare [property get [waitForObjectExists $names::UISearchBarTextField] text] ""
}
The above example was simplified for this tutorial. In order to take full advantage of Behavior Driven Testing in Squish, please familiarize yourself with the section Behavior Driven Testing in API Reference.
© 2025 The Qt Company Ltd.
Documentation contributions included herein are the copyrights of
their respective owners.
The documentation provided herein is licensed under the terms of the GNU Free Documentation License version 1.3 as published by the Free Software Foundation.
Qt and respective logos are trademarks of The Qt Company Ltd. in Finland and/or other countries worldwide. All other trademarks are property
of their respective owners.
