Squish for VNC Tutorials
Learn how to test applications running in remote displays, such as VNC.
Tutorial: Starting to Test Remote Applications using Squish for VNC
Squish Concepts
Squish for VNC can be used in 2 ways:
- Using the VNC protocol, where only the VNC server must be installed and running on the Tested System.
- Natively, where Squish for VNC must be installed and running on the Test Driver and also the Tested System.
In both cases, Squish runs a small server (squishserver) that handles the communication between a Virtual AUT and the test script. We say the AUT is virtual because it actually represents an open network connection, either VNC or "Native", between the squishserver and the remote display. When the connection is terminated, we say the AUT is not running.
The test script is executed by the squishrunner tool, which in turn connects to the squishserver. The squishserver starts the Virtual AUT, or establishes a remote display connection, and injects the Squish hook into it. The hook is a small library that makes the Virtual AUT accessible and that can communicate with the squishserver. With the hook in place, the squishserver can automate the remote display, and can execute commands—all on behalf of the squishrunner. The squishrunner itself requests that the Virtual AUT performs whatever actions the test script specifies.
The following diagrams illustrate the two ways that the individual Squish tools work together. The first shows the most common use-case, where Squish is used to automate displays that have a running VNC server. In this case, it is not necessary to install/configure any of Squish for VNC on the Tested system.
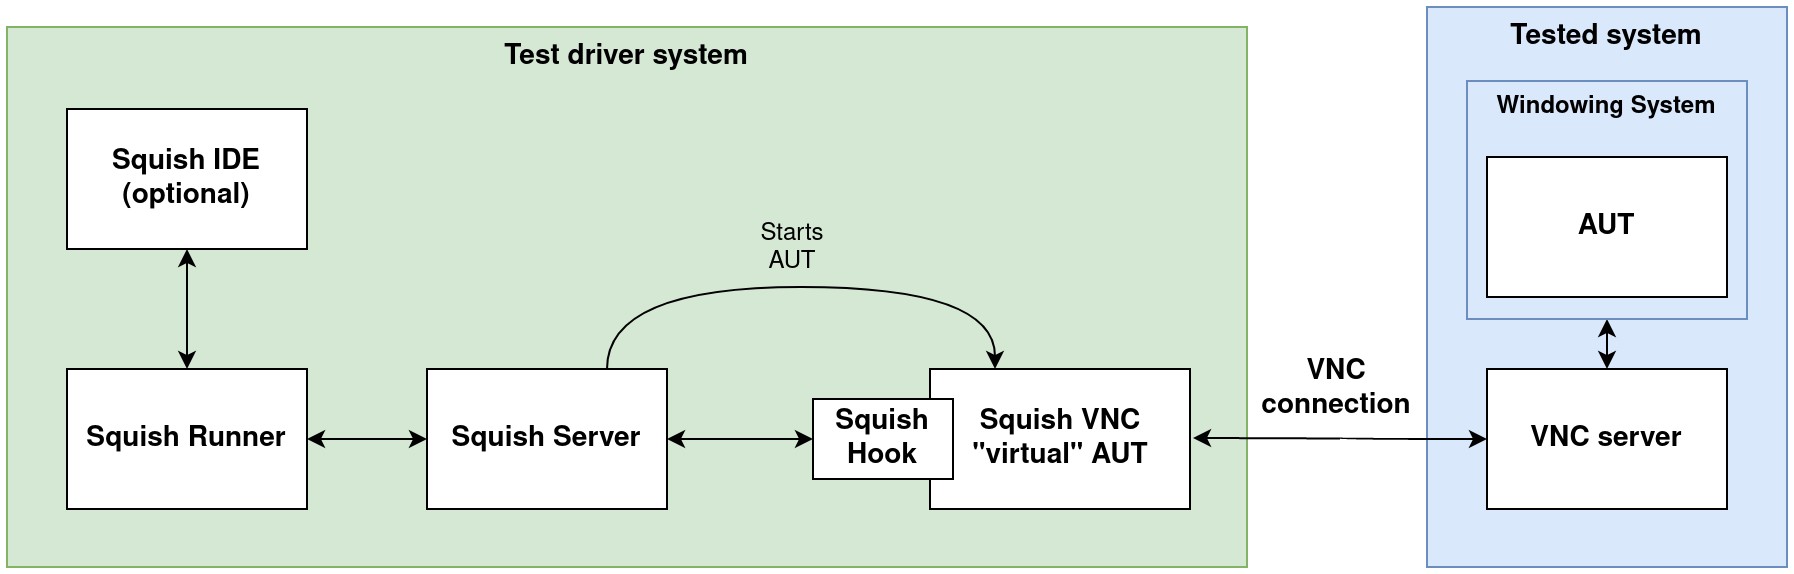
Using Squish for VNC with the VNC Protocol
The second diagram shows the squishserver installed and configured on the Tested system. Instead of VNC, tests can use Squish's own Native proprietary remote protocol which allows a similar remote control and display.
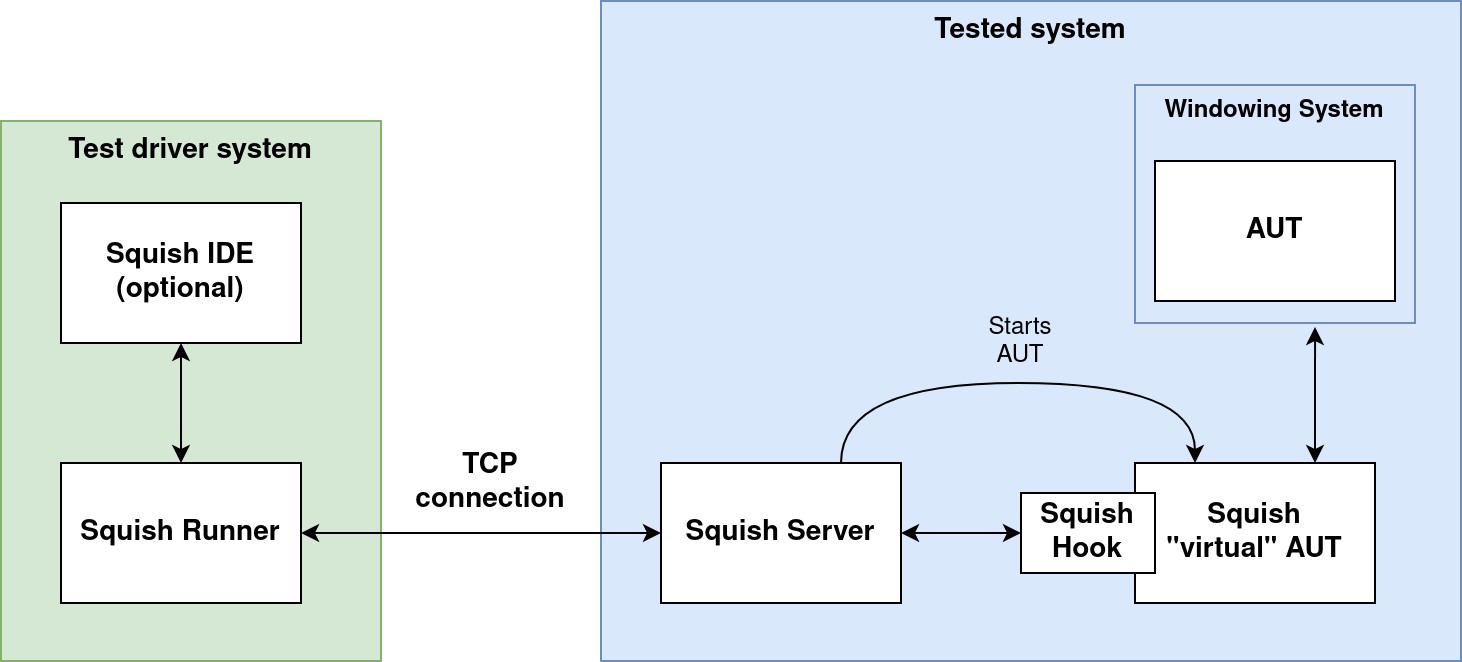
Using Squish for VNC with the Native protocol
Limitations of Squish for VNC
Unlike other toolkit-based Squish editions, Squish for VNC does not have the ability to:
- Introspect objects
- Record taps, mouse clicks, or gestures from the device
The typical way that people use Squish for VNC to test remote devices is by using Image Based Testing or OCR, both of which allow you to Insert ( ) and Verify (
 ) things about your remote display in your test cases.
In the case of Squish for VNC, this is typically done from the Remote Control Window or the Squish Control Bar.
Creating a Test Suite
A test suite is a collection of one or more test cases (tests). Using a test suite is convenient since it makes it easy to share tests scripts and test data between tests.
Creating Test Suites from Squish IDE
Start up the Squish IDE, by clicking or double-clicking the Squish IDE icon, by launching Squish IDE from the taskbar menu or by executing squishide on the command line, whichever you prefer and find suitable for the platform you are using.
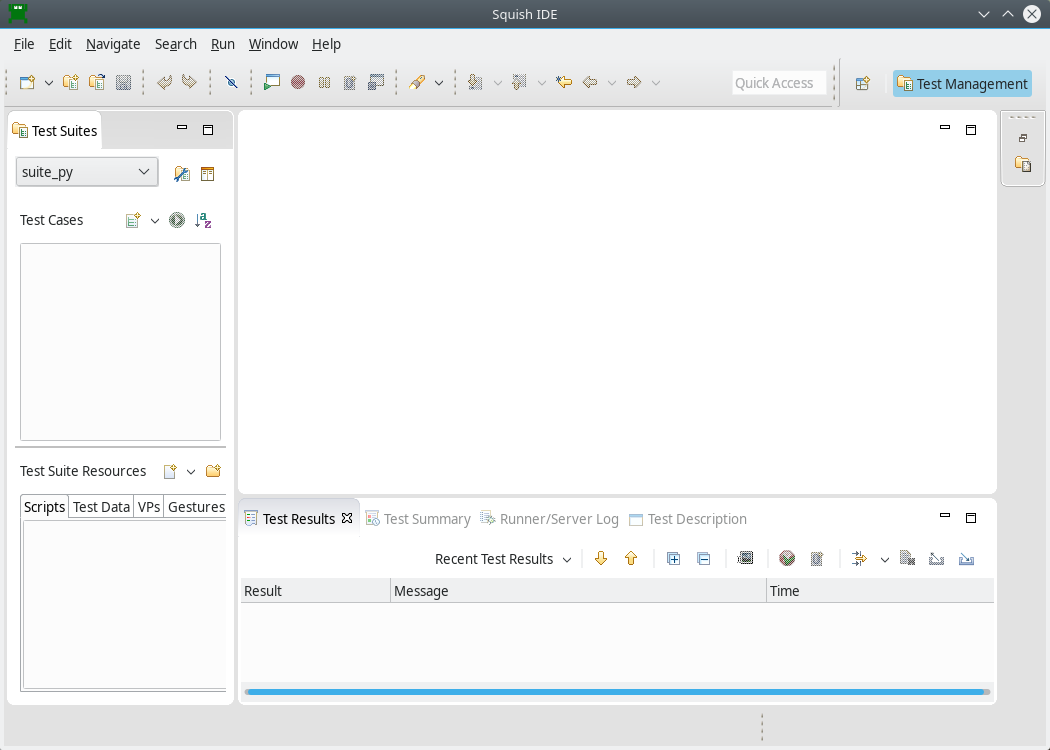
Once Squish starts up, you might be greeted with a Welcome Page. Click the Workbench button in the upper right to dismiss it. Then, the Squish IDE will look similar to the screenshot.

The Squish IDE with no Test Suites
Once Squish has started, click File > New Test Suite to pop-up the New Squish Test Suite wizard shown below.
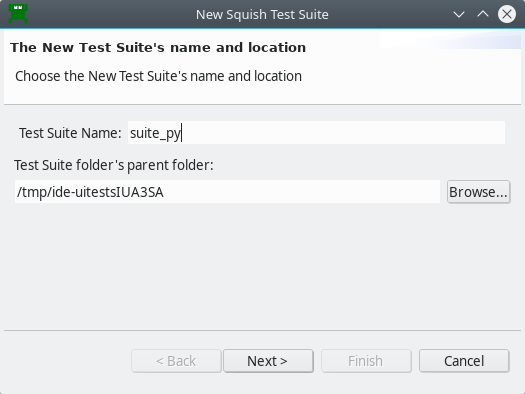
Name & Directory page
Enter a name for your test suite and choose the folder where you want the test suite to be stored. In the screenshot we have called the test suite suite_py and will put it inside the addressbook folder. (For your own tests you might use a more meaningful name such as "suite_addressbook"; we chose "suite_py" because for the sake of the tutorial we will create several suites, one for each scripting language that Squish supports.) Naturally, you can choose whatever name and folder you prefer. Once the details are complete, click Next to go on to the Toolkit (or Scripting Language) page.

Toolkit / Edition page
On this wizard page, we choose the Squish Edition we are using. For this example, we select VNC since we are automating a remote desktop. Then click Next to go to the Scripting Language page.
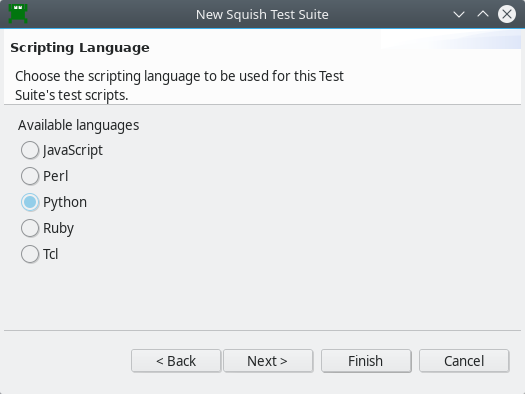
Choose your desired scripting language on this page. The functionality offered by Squish is the same for all languages.
Setup for Desktop Automation using VNC Protocol
If VNC is the desired protocol, select VNC from the Protocol drop down menu. From here you can configure how Squish connects to a remote target.
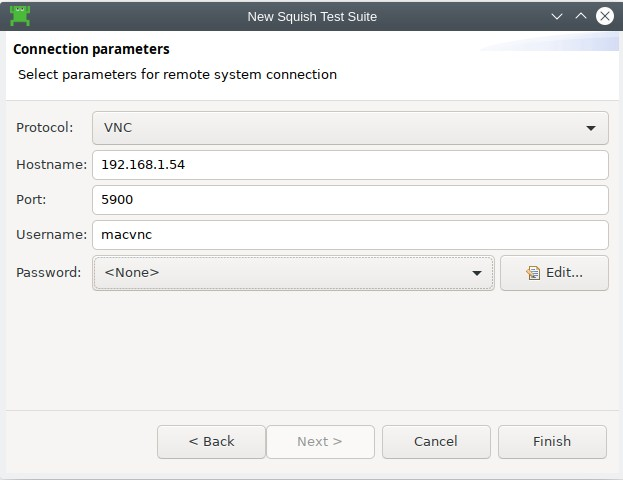
VNC connection page
In this form you can enter the needed settings for your specific VNC server.
- Enter the hostname of the machine running the VNC server.
- If your VNC server uses a custom port, enter it, otherwise Squish will use the default port (5900) for VNC.
- Squish for VNC supports basic authentication, so if your VNC server is only accessible with a valid username password combination, enter it here.
To avoid hardcoding passwords in the test cases, Squish offers a separate GUI for entering passwords, and a separate file for storing them. The Password drop-down is initially empty. You can add entries to the dropdown by clicking on Edit to the right of that. A Passwords dialog pops up.
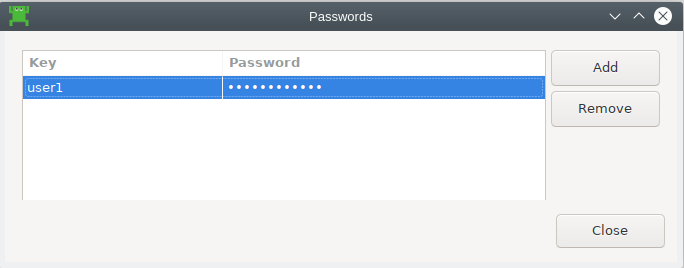
Passwords Dialog
Passwords can be added here, and/or later added/modified from the Test Suite Settings, Password Information tab.
Setup for Desktop Automation using Native Protocol
If, in the Connection settings, the Protocol chosen is Native, this means that instead of VNC, we use Squish's Remote Control protocol between squishrunner and squishserver, and squishserver must be installed and running on the Tested System.
First, follow these steps on the Tested System:
- Install Squish for VNC
- Edit <SQUISHDIR>
/etc/squishserverrcand include Test Driver IP address for ALLOWED HOSTS. See Distributed Tests for details. - Start
squishserverfrom the command line (use the default port or pick one).
Next, on the Test Driver system, in the Squish IDE go to Preferences > Squish > Servers > Add > Remote Server, and enter the IP address (and port if you specified one when you started squishserver) of the Tested System.
After the New Test Suite wizard is finished, the connection parameters can later be configured from Test Suite Settings > Connection Information.
This configuration is what is used whenever the Virtual AUT needs to be started, which is whenever you record or play a test, or explicitly select Run > Launch AUT.
We are now ready to start creating tests.
The suite_py test suite
Creating Tests
Recordings are made into existing test cases. You can create a New Script Test Case in the following ways:
- Select File > New Test Case to open the New Squish Test Case wizard, enter the name for the test case, and select Finish.
- Click the New Script Test Case (
 ) toolbar button to the right of the Test Cases label in the Test Suites view. This creates a new test case with a default name, which you can easily change.
Give the new test case the name tst_general.
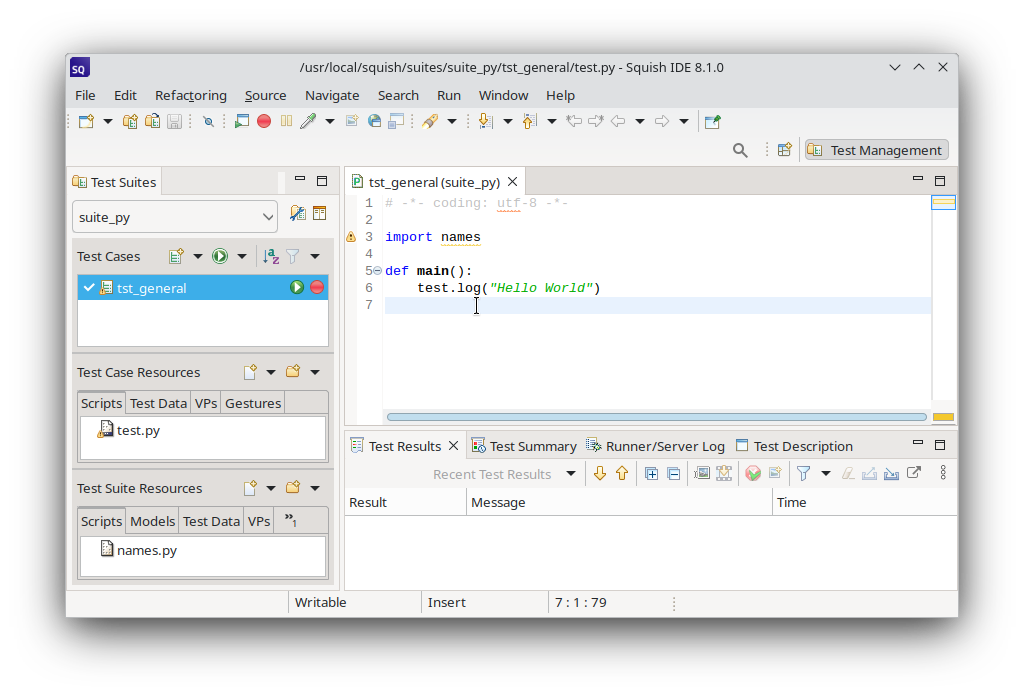
Squish automatically creates a sub-folder inside the test suite's folder with this name and also a test file, for example test.py. If you choose JavaScript as the scripting language, the file is called test.js, and correspondingly for Perl, Ruby, or Tcl.
Initially, the script's main() function logs Hello World to the test results.
If you get a sample .feature file instead of a "Hello World" script, click the arrow left of the Run Test Suite ( ) and select New Script Test Case ().

To make the test script file (such as, test.js or test.py) appear in an Editor view, click or double-click the test case, depending on the Preferences > General > Open mode setting. This selects the Script as the active one and makes visible its corresponding Record ( ) and Run Test Case (
 ) buttons.
The checkboxes are used to control which test cases are run when the Run Test Suite () toolbar button is clicked. We can also run a single test case by clicking its Run Test Case () button. If the test case is not currently active, the button may be invisible until the mouse is hovered over it.
Once the new test case has been created, we are free to write test code manually or to record a test. Clicking on the test case's Record () button replaces the test's code with a new recording. Alternatively, you can record snippets and insert them into existing test cases, as instructed in How to Edit and Debug Test Scripts.
Recording Our First Test
We are now ready to record our first test. Click the Record () toolbar button to the right of the tst_general test case shown in the Test Suites view's Test Cases list. This will cause Squish to connect to the squishserver, hide the Squish IDE, open the Control Bar, and also the Squish Remote Control window which displays the screen of the target display. This window will be your way to interact with the remote server.
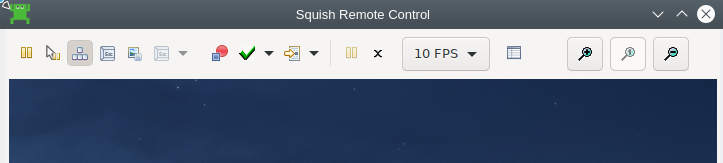
The Remote Control window of Squish for VNC
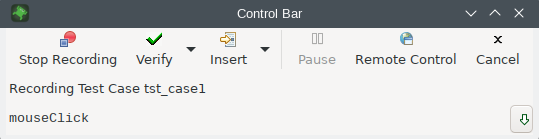
The Squish Control Bar
Inserting Taps or Mouse Clicks
The Squish Remote Control window is able to record key presses directly but not mouse clicks, although the remote display will still react to your mouse. To insert mouse clicks, use the Insert () drop-down button, (one exists on the Control Bar, and also on the Squish Remote Control window) combined with Search Image or OCR, to pick the location of the desired click. This helps avoid the need for recording mouse clicks with desktop coordinates. See How to Do Image-Based Testing for more information.
Inserting Verifications
From the Control Bar, or from the Squish Remote Control window, you can click Verify () to drop-down a menu. From here, you can verify Search Image or OCR Text. For more information about OCR search and verification, see OCR setup.
After you are done with recording, press Stop Recording( ) to save it as a script.
If the recorded test doesn't appear, click (or double-click depending on your platform and settings) the tst_general test case; this will make Squish show the test's test.py file in an editor window as shown in the screenshot.
Now that we've recorded the test we can try to play it back, i.e., run it. This in itself is useful in that if the play back failed it might mean that we forgot to insert a mouse-click somewhere. Furthermore, every verification we inserted will be checked.
While replaying a test, the Squish Remote Control window can be hidden/shown with the Remote Control button ( ) in the Control Bar. However, opening and closing the Squish Remote Control window is not the same as starting and stopping the Virtual AUT. To actually close the Virtual AUT's VNC or Native connection, use the Quit AUT (
 ) button.
When Image Search Fails
With Image Search, playback may fail due to a single different pixel in the expected versus actual image. For example, there could be differences due to changes in hardware, color profile, brightness of surroundings (in the case where a device has a light sensor), time of day (for example Day Mode vs Night Mode), lossy compression, or sub-pixel antialiasing rendering. Or maybe the image is different and needs to be acquired again.
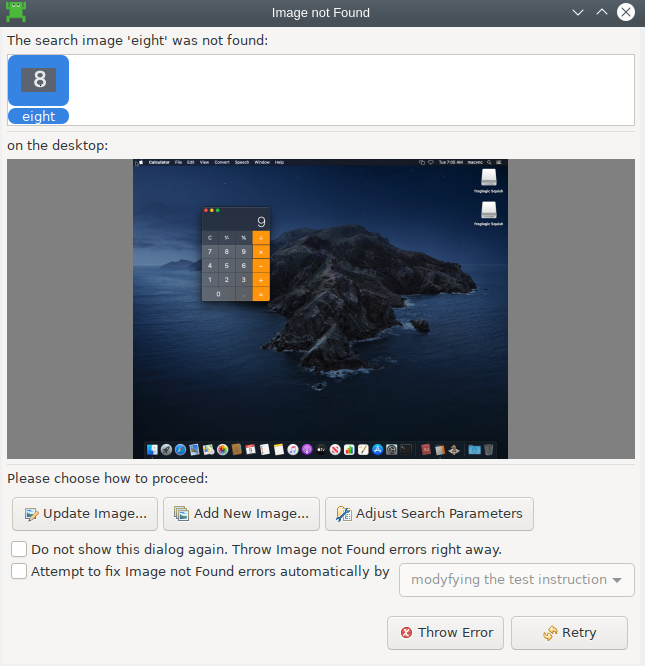
Image Not Found dialog
If this happens, the Image Not Found dialog pops up. At this point, there are lots of things you can do.
- If the expected image is out of date, you can Update the image from the current desktop.
- If you wish to add this image as an acceptable image, you can Add New Image... which will create (if necessary) an Image Group and add your image to it.
- If you want to relax the image search parameters for that particular statement, you can click Adjust Search Parameters.
- If you want to apply a default tolerant image search for your test suite based on how closely the current actual matches the expected, click Attempt to fix image search errors automatically followed by Change Defaults.
You can view or set default tolerance levels for the test suite in Test Suite Settings > Image Search.
See How to Do Image-Based Testing for more information.
Recording Snippets
After playback is finished, the Virtual AUT terminates. The Squish Remote Control window is tinted red and not responding to events, or invisible. By selecting Run > Launch AUT, the VNC or Native connection is re-established and the Squish Remote Control window responds to the mouse and keyboard, and can be used as a terminal for your remote display.
The Squish IDE is now in Spy perspective, neither recording nor playing back a test case. Click to focus the cursor anywhere in your test script, and then Record () a snippet to be inserted at that location. Click Stop Recording() to see the snippet inserted into your test script.
Test Results
After each test run finishes, the test results—including those for the verification points—are shown in the Test Results view at the bottom of the Squish IDE.
This is a detailed report of the test run and would also contain details of any failures or errors, etc. If you click on a Test Results item, the Squish IDE highlights the script line which generated it. If you expand the item, you can see additional details of it.
Squish's interface for reporting test results is very flexible. The default report generator simply prints the results to stdout when Squish is run from the command line, or to the Test Results view when Squish IDE is being used. You can save the test results from the Squish IDE as XML by right clicking on the Test Results and choosing the Export Results menu option. For a list of report generators, see squishrunner –reportgen: Generating Reports.
It is possible to Upload the Results to Test Center, where they are stored in a database for analysis later.
© 2025 The Qt Company Ltd.
Documentation contributions included herein are the copyrights of
their respective owners.
The documentation provided herein is licensed under the terms of the GNU Free Documentation License version 1.3 as published by the Free Software Foundation.
Qt and respective logos are trademarks of The Qt Company Ltd. in Finland and/or other countries worldwide. All other trademarks are property
of their respective owners.
