How to Create and Use Verification Points
Verification points are a central feature of automated testing. To create a verification point, we must first drive the AUT so that it reaches the state we want to verify, and then we must check that the AUT behaves as it should and has the correct state at the point we have reached. This is done by using verification points—these verify that object property values or screenshots or other testable aspects of the AUT are what they are expected to be.
Verification points can be created purely in code using the Squish API's Verification Functions, or using the Squish IDE's point & click interface with the Verification Point Creator view, or using a mixture of both.
How to Create and Use Property Verifications
The most common type of verification is to compare the value of one of an object's properties with an expected value. For example, after some text has been typed in, we could compare the line editor's text property's value with the text that was entered using one of Squish's test functions, such as test.compare() and test.verify().
Verification points like this can easily be inserted into a test script using Squish IDE's point & click interface. For a detailed step-by-step description on how to insert a property verification point, see Tutorial: Starting to Test Qt Applications, Tutorial: Starting to Test AWT/Swing Applications, Tutorial: Starting to Test Web Applications, and so on, depending on the GUI toolkit you use.
Some objects are containers for other objects. For example, tree, table, and list widgets, as well as menus with their menu items and submenus. Squish provides access to both container objects and to the objects they contain. See for example, How to Test Items in Item Views, Item Widgets, and Models or How to Test JList, JTable, and JTree widgets (Java—AWT/Swing), and so on, depending on the GUI toolkit you use.
How to Create and Use Table Verifications
With Squish it is possible to verify entire tables (and grids and similar widgets) using a table verification point rather than having to do so manually in code. This feature is supported for Qt, macOS, Java, Web, and Windows applications.
If you are using a toolkit for which there is no table verification support, you can achieve the same effect using hand written code. For examples of such code, see How to Test Table Widgets and Use External Data Files, How to Test JTable, or How to Test Table.
The steps for creating a table verification point are very similar to those needed to create object property, screenshot, or visual verifications.
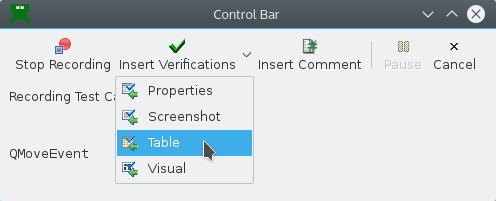
While recording a test, whenever you want a table verification point, click the Control Bar Window's Verify ( ) dropdown button, and select Table:
If you have an existing test script and want to include a table verification point, put a breakpoint on the line after where you want the verification to take place. Use several breakpoints to insert several table verifications. Now replay the test: it will stop at the first breakpoint.
When playback is stopped at a breakpoint, you can insert a new table verification point there. To do this, select the table, either directly in the Application Objects view, or visually with the object picker, to open the Verification Point Creator view. Verify that the verification Type combobox is set to Table. Verify that the table's checkbox is still checked in the Application Objects view, so that the table is visible in the Verification Point Creator, and you are able to click the Save and Insert Verifications button. The recording or playback can now continue. After playback is stopped or finished, you can see the verification points inserted into your testcase.
If a table verification fails, a Fail entry will be added to the test results. Invoke this entry's context menu (e.g., right-click it on many platforms) and choose the View Differences menu item to see the differences.
By default table verification does an exact textual match on every single cell, but if this fails, Squish tries to do a regular expression match on the cell's contents. This is useful because in some cases, a cell's contents might vary every run (e.g., a column of timestamp values). To allow for such cases, it is possible to replace a cell's contents with a regular expression. For example, using the text .* in a cell will mean that the cell will match any text, including no text at all. To do this, click the table verification point in the Test Suites view's Test Case Resources list's VP tab to show the table in an editable view. Then click a cell and replace its text with a regular expression, repeating this for as many cells as necessary. See also Regular Expression Matching.
How to Do Screenshot Verifications
This section discusses how to create and work with screenshot verification points.
How to Create and Use Screenshot Verifications
By far the most common kind of verifications are object property verifications, but in some situations it is useful to be able to visually compare how a widget (or group of widgets) appears with an image of how we expect them to appear. For this to work we must provide Squish with an image (e.g., a screenshot) that shows the widget(s) as they should look, so that Squish has something to compare with.
Although Squish makes it very easy to set up screenshot verifications, they are not always as useful or convenient as we might expect, and in most cases using object property verifications to compare values is the best approach. Screenshot verifications essentially work by comparing pixels, but this can very easily lead to incorrectly failing verifications. For example, if the test is run on a machine that is different from the one on which the original screenshot was taken, the screenshots taken during the test may differ if the test is run on a different operating system, or on a machine with a screen that has a different resolution. And even if the tests are run on the same machine, if the fonts or theme are changed the screenshots will differ. However, if we are careful about these issues, there are situations where screenshot verifications make sense.
One example where screenshot verifications are useful is when we need to verify that a graph or diagram has been drawn correctly.
It is just as easy to insert a screenshot verification as it is to insert an object property verification—in fact, the steps are almost the same. See Inserting Additional Verification Points. One way is to set a breakpoint and run the test until the breakpoint is reached; another way is to invoke the Verify > Screenshot action during test recording. In either case, at this point the Application Objects view is shown. To verify ascreenshot of a particular object (or of the whole window), first, check the object's check box. This will make the Verification Point Creator view appear. If the object you're interested in isn't listed, interact with the AUT until the object you want is shown and either refresh the Application Objects view or use the object picker to select the object.
At this point the verification point has not been inserted. Choose Screenshot VP in the combobox and click the Save and Insert Verifications button. If you started from an existing test and stopped at a breakpoint, either continue the test run or terminate it; and if you are inserting verifications during recording, simply continue recording and inserting until you are done. For each inserted verification there will be a call to the test.vp() function—at the breakpoint, or at the point in recording where the insertion was made.
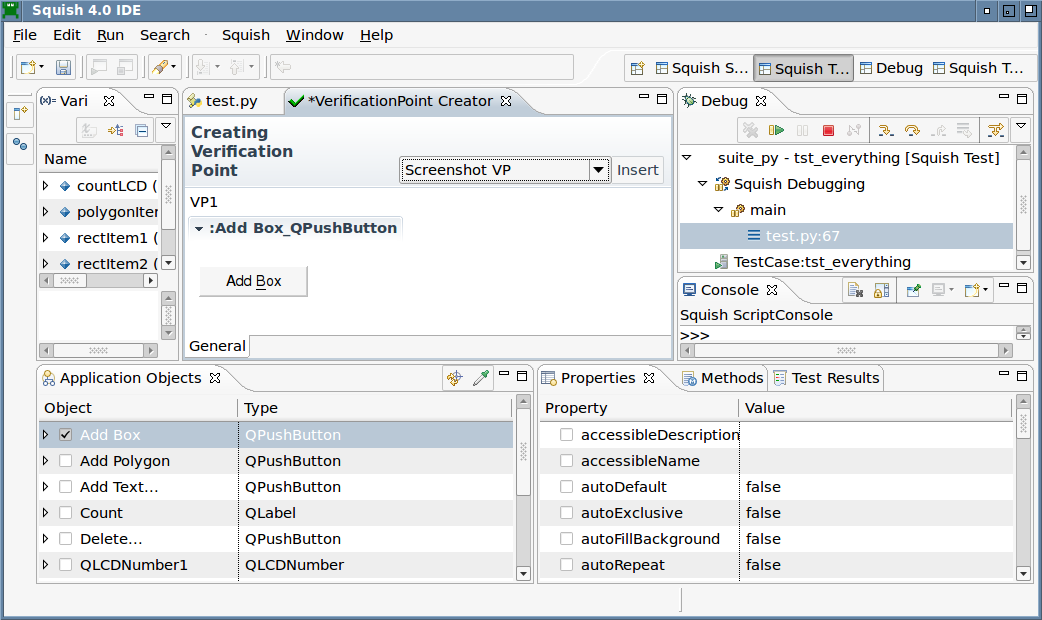
The Squish IDE showing a screenshot verification that is about to be added
When we insert the verification point any screenshots that have been taken are saved along with any object property values, as part of the expected results. Later on, when the test script is replayed, whenever Squish reaches a screenshot verification point it takes a screenshot of the relevant widget and compares this with the corresponding screenshot that it originally took, and reports success or failure for the verification point depending on whether the images are the same or not.
If a screenshot verification fails, in addition to recording the failure in the log, Squish also saves the new (and different) screenshot for later inspection. The Squish IDE also has a facility that allows us to view the differences between the expected image and the actual image by right clicking the failure message in the test log view to pop up the context menu, and choosing the View Differences option.
Squish can show the differences between screenshots using a number of different techniques and algorithms—for example, subtraction of the images, a side-by-side view, and an animation where the expected and actual images are displayed quickly one after the other in a loop. If the actual image is correct (perhaps because of a change to the AUT that has made the original screenshot out of date), we can set the actual image as the new expected result.
Image Masks
When comparing screenshots, it is possible that the expected image contains more information than we need in our verification. We can mask parts of this image by either creating a Positive Mask, where the region outside the mask is ignored, or a Negative Mask, where the region inside the mask is ignored. The masking is done before the images are compared.
More information about masks can be found in Setting Masks.
How to Do Visual Verifications
This section discusses how to create and work with visual verification points.
Note: When using an XML report generation format, make sure you are not using a legacy version, since xml3.1 or later is required to see the proper results in a test report. Generally, the latest version offered is recommended.
How to Create and Use Visual Verifications
Visual verifications can check the on-screen display of dialogs, whole application windows or subsections thereof. Unlike screenshot verifications they do not just treat the rendered screen content as a single surface. Instead, the area is divided and compared per individual UI control. And prior to a check of rendered pixels the position, size and content properties are compared against expected values.
Conceptually visual verifications are a hybrid form of property verifications and screenshot verifications. Both types of checks are combined into a single and somewhat complex algorithm that considers a set of controls as a whole and tries to find the best match.
By default all checks will be performed in a strict manner that does not allow for changes in state, layout and rendering. An editor is provided that allows modifications of individual checks to make them more tolerant.
One example where visual verifications are useful is when we need to verify that a dialog (or Web page) as a whole still shows the expected text and images (and no more), while the exact layout and UI theme may differ between the test systems or even between AUT versions.
It is just as easy to insert a visual verification as it is to insert an object property verification—in fact, the steps are almost the same. See Inserting Additional Verification Points. One way is to set a breakpoint and run the test until the breakpoint is reached; another way is to invoke the Verify > Visual action during test recording. In either case, at this point the Application Objects view is shown. To verify the visual layout of a particular object (or of the whole window), first check the object's check box to open the Verification Point Creator view. If the object you're interested in isn't listed, interact with the AUT until the object you want is shown, and either Refresh ( ) the Application Objects view or use the Object Picker (
 ) to select the object.
At this point the verification has not been inserted! Make sure that the "Visual Verifications" type is selected in the combobox and click the Save and Insert Verifications button. If you started from an existing test and stopped at a breakpoint, either Resume( ) or Terminate(
 ) it; and if you are inserting verifications during recording, simply continue recording and inserting until you are done. For each inserted verification there will be a call to the test.vp() function—at the breakpoint, or at the point in recording where the insertion was made.
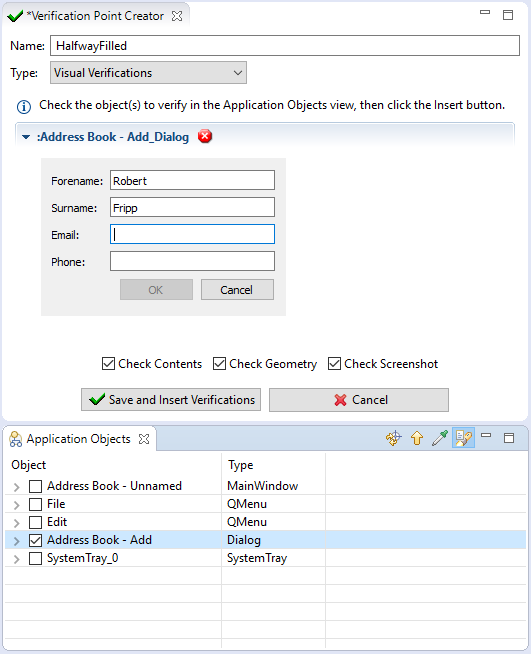
The Squish IDE showing a visual verification that is about to be added
When we insert the verification point, any screenshots that have been taken are saved along with object property values and geometries, as part of the expected results. Later on, when the test script is replayed, whenever Squish reaches a visual verification point it takes a snapshot of the relevant widget and compares this with the corresponding snapshot that it originally took, and reports success or failure for the verification point depending on whether the snapshots are considered to be the same or not.
If a visual verification fails, in addition to recording the failure in the log, Squish also saves the new (and different) snapshot for later inspection. The Squish IDE also has a facility that allows us to view the differences between the expected snapshot and the actual snapshot by right clicking the failure message in the test log view to pop up the context menu, and choosing the View Differences action, which will pop up the View visual differences Dialog.
Squish IDE can show the differences between snapshots side-by-side and allow for tuning of the comparison through changes of the checks. Through wildcards for property values, tolerance ranges for geometries, correlation threshold for image data, for example. If the actual snapshot is correct (perhaps because of a change to the AUT that has made the original layout out of date), we can set the actual snapshot as the new expected result.
The createVisualVP() function is an alternative to the Squish IDE-based creation of a Visual Verification Point.
Visual Verification Check Stages
The ultimate criteria for visual equivalence is a pixel-by-pixel comparison of the appearance as rendered onto the screen. Such a strict requirement is only met if the surrounding conditions are kept stable however. In practice, several factors can lead to deviations from perfect pixel accuracy:
- Screen size and resolution
- User settings like fonts and system themes
- Platform (operating system, Web browser)
- Display of dynamic data (time of day, etc.)
- UI style changes
A testing tool should be able to detect such changes and warn the user about unwanted regressions. At the same time the tool should help the user with getting a good overview. Small changes in e.g. the font size can have drastic consequences. And depending on the use cases some changes in the visual appearance can be in the acceptable perimeter.
When a Visual Verification test is executed the following checks will therefore be performed in the listed order:
Hierarchy Check
Internally elements of user interfaces are typically modeled as a tree. Changes to the tree structure do not necessarily lead to changes in visual appearance. Such changes do provide a very strong hint, however. That is why Squish will perform a check of the actual tree structure found against the expected.
Identify Check
In order to perform a detailed per-object analysis Squish needs to map each object stored in the Visual Verification Point to an object found on the screen. All of the object's type, content properties and optional identifying properties are taken into account by the matching algorithm.
Content Check
Many UI controls base their on-screen rendering on internal properties. For a specific text to be displayed in a label or the state of a toggle button for example.
Similarly to element geometries the comparison of such content properties can aid with finding out the underlying cause of UI changes.
Geometry Check
In case 100% pixel equality is found to not have been achieved it is still worth investigating what happened to the individual components of the screen. Maybe all UI controls are present including their visual appearance but have merely been re-arranged on the screen?
The Visual Verification Point checks include a verification of each UI element's relative screen position and size. A deviation in the expected geometry will likely lead to a deviation of the screen rendering.
Screenshot Check
A pixel-by-pixel comparison of each control's individual screen estate.
A Visual Verification Point can be configured to perform pixel comparisons for selected GUI elements only. That way inherently "unstable" parts of the UI can be omitted from the verification and thus lead to stable test results. An example from visual testing of a Web site: a page's section displaying a chart of a company's stock price will likely be under constant change.
How to Create and Use Property Verification Points in Test Scripts
Although it is possible to insert property verification points through the Squish IDE without having to write a single line of code, it is also possible to add property verifications directly in code. This is especially useful when a verification point needs to be more flexible than can be achieved using the point & click approach—for example, if we want to iterate over every item in a list view to verify each one.
There is no harm in starting by creating verification points using the Squish IDE's point & click interface, especially since it is easy to convert them into pure script code.
When a verification point is created using point & click, there are two possible ways that the verification can be recorded. The default (and recommended) way is to insert using the Scriptified Properties VP option in the Verification Point Creator view's combobox. This will insert the verification using Squish's API, for example, using the test.compare() function. An alternative is to use the Properties VP option, which will insert a call to test.vp() with the details of what to verify saved in an XML file.
To convert a call to the test.vp() function into an explicit verification, click on the call to the test.vp() function and invoke the context menu. Choose the Scriptify Verification Point menu option (this option does not appear for screenshot verifications). This will pop up the Refactoring wizard which shows "before" and "after" views of the test's code. If you are happy with the proposed change click the Finish button and the change will be applied.
For example, if we created a (non-screenshot) verification point through the Squish IDE — for example, to check the text of a button—and it was inserted into our test script like this:
test.vp("VP1")
If we then scriptified the verification point, it would be replaced with code something like this:
test.compare(waitForObjectExists(":Add_QPushButton").text, "Add")
For hand-written verifications we obtain the object reference using waitForObject() function. With that, we can check properties or call methods. Our manual verification might look like this:
test.compare(waitForObject(":Add_QPushButton").text, "Add")
For more details about the script API for verification test statements, see How to Use Test Statements.
Here is a small example which shows a dynamic verification point that iterates over all the items in a Qt list widget—whose contents vary from run to run—and checks that no item's text is empty. Such a verification point cannot be created using the Squish IDE since the number of items is unknown and may be different on each test run. Such flexibility can only be achieved by using a scripting language:
def main():
    listWidget = waitForObject(":Item Views_QListWidget")
    numberEmpty = 0
    for row in range(listWidget.count):
        item = listWidget.item(row)
        if item.text.isEmpty():
            numberEmpty += 1
    if numberEmpty:
        test.fail("Out of %d list items, %d were empty" % (
            listWidget.count, numberEmpty))
    else:
        test.passes("Verified %d non-empty list items" % (
            listWidget.count))
function main()
{
var listWidget = waitForObject(":Item Views_QListWidget");
var numberEmpty = 0;
for (var row = 0; row < listWidget.count; ++row) {
var item = listWidget.item(row);
if (item.text.isEmpty())
++numberEmpty;
}
if (numberEmpty)
test.fail("Out of " + listWidget.count + " list items, " +
numberEmpty + " were empty");
else
test.pass("Verified " + listWidget.count +
" non-empty list items");
}sub main
{
my $listWidget = waitForObject(":Item Views_QListWidget");
my $numberEmpty = 0;
for (my $row = 0; $row < $listWidget->count; ++$row) {
my $item = $listWidget->item($row);
if ($item->text->isEmpty()) {
++$numberEmpty;
}
}
if (numberEmpty) {
test::fail("Out of " . listWidget.count .
" list items, $numberEmpty were empty");
}
else {
test::pass("Verified " . listWidget.count .
" non-empty list items");
}
}# encoding: UTF-8 require 'squish' include Squish def main listWidget = waitForObject(":Item Views_QListWidget") numberEmpty = 0 for row in 0...listWidget.count item = listWidget.item(row) if item.text.isEmpty() numberEmpty += 1 end if numberEmpty != 0 Test.fail("Out of #{listWidget.count} list items, " + "#{numberEmpty} were empty") else Test.pass("Verified #{listWidget.count} non-empty list items") end end
proc main {} {
    set listWidget [waitForObject ":Item Views_QListWidget"]
    set numberEmpty 0
    set count [property get $listWidget count]
    for {set row 0} {$row < $count} {incr row} {
        set item [invoke $listWidget item $row]
        if {[invoke [property get $item text] isEmpty]} {
            incr numberEmpty
        }
    }
    if {numberEmpty != 0} {
        test fail "Out of $count list items, $numberEmpty were empty"
    } else {
        test pass "Verified $count non-empty list items"
    }
}
The test obtains a reference to the list widget, then iterates over every item it contains, keeping a count of those that have empty texts. If any are empty the test.fail() function is called; otherwise the test.pass() function is called.
For examples that show how to iterate over all the items in Qt's item-based convenience widgets and for the models that Qt's views use, see How to Test Items in Item Views, Item Widgets, and Models. There are similar sections for Java tests, for example, How to Test JList, JTable, and JTree widgets (Java—AWT/Swing) and How to Test List, Table, and Tree widgets (/SWT), and also for the other GUI toolkits that Squish supports.
© 2025 The Qt Company Ltd.
Documentation contributions included herein are the copyrights of
their respective owners.
The documentation provided herein is licensed under the terms of the GNU Free Documentation License version 1.3 as published by the Free Software Foundation.
Qt and respective logos are trademarks of The Qt Company Ltd. in Finland and/or other countries worldwide. All other trademarks are property
of their respective owners.
