How to Do Image-Based Testing
This section explains the steps necessary to create test scripts using Image-based lookups. Retrieval of objects based on their screen appearance is a complementary approach to the property-based identification described in How to Identify and Access Objects.
As a sample AUT, we will use Chess 2012, a game developed by Filip Höfer. The application employs several classic controls like push buttons and menus as shown in the screenshot below. Normally, it is recommended to access these controls through multi-property names like {type='Button' text='Start new game'}. For the sake of this how-to, we will restrict ourselves to Image-based object searches for a short test case.
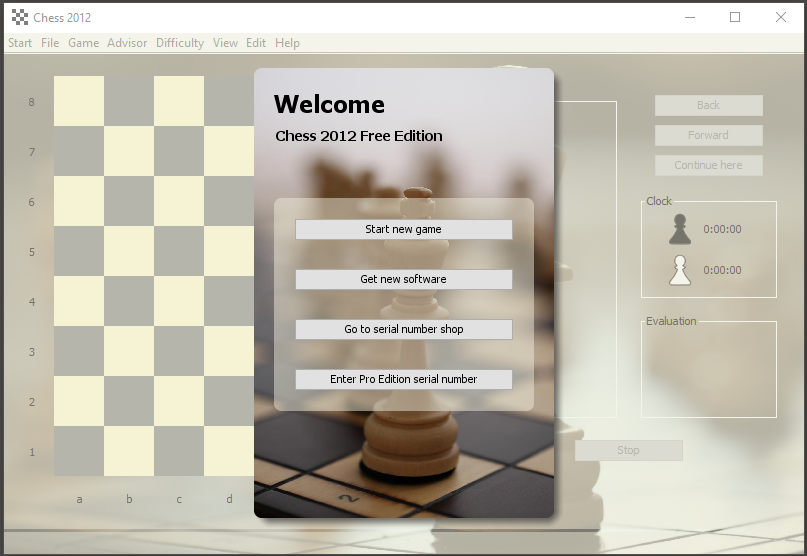
Sample Application - Chess Game
We will automate a minimal sequence of steps:
- Start a new game
- Move the white pawn from square C2 to square C4.
OCR setup
By default, Squish supports the Tesseract OCR engine. In order to use the Tesseract engine, you need to install the Tesseract for Squish package for your operating system:
| Operating system | Package name |
|---|---|
| Microsoft Windows | tesseract-4.1.1-for-squish.exe |
| Linux | tesseract-4.1.1-for-squish.x64.run |
| macOS | tesseract-4.1.1-for-squish.x64.dmg |
The packages are available in the Downloads section of Qt Customer Portal after choosing Squish as a product (you may want to filter the list of packages by edition and select Special as the edition of choice in order to locate the Tesseract packages easily).
The Tesseract package installer can register the chosen installation path with Squish. If this step is omitted during the installation, the path to the OCR engine can be specified later in the OCR preferences of the Squish IDE or in the ocr.ini file.
Squish supports multiple OCR engines, but each require a few steps before they can be used.
Both the OCR.Space and Amazon Rekognition engines require the authentication keys that indentify a particular user of the service. The instruction for obtaining the keys for these engines can be found here and here. The authentication data needs to be specified in the OCR pane, or in the ocr.ini file.
Start a New Game
While we would normally automate the push of the Start new game button through a property-based object access (mouseClick(waitForObject(":Start_Button"))) we will now use Optical Character Recognition (OCR) to interact with that button.
- Record (
 ) the Test Case.
 - Invoke the Insert (
 ) > mouseClick(<OCR>) (
 )
) - Wait for the Squish IDE to grab the screen content and use click-and-drag to draw a selection around the Start new game button label.
- Make sure that the Search text field contains the 'Start new game' text.
- Press the Insert mouseClick button. This will a) perform the click on the button and b) queue the script statement
mouseClick(waitForOcrText("Start new game"))for insertion at the end of recording.

Start New Game
Move the Pawn
The chess figures are not controls recognized by Squish, so we are forced to use their pixel representation. The first image cut out from the chessboard will be the white pawn on square C2:

white_pawn.png
- Invoke the Insert () > mouseClick(<Image>) (
 ) action
 - Wait for the Squish IDE to grab the screen content and move the red selection rectangle around the pawn at the C2 square.
- Enter a meaningful file name like
white_pawn. - Press the Insert mouseClick button. This will a) perform the click on the pawn and b) queue the script statement
mouseClick(waitForImage("white_pawn"))for insertion at the end of recording.
At this point there are still eight such pawns on the board, with four of them placed on the same white background that we have captured. Upon accepting the selection Squish will search the desktop screenshot, find all positions matching the selection and compute the occurrence index. That index will be recorded as a part of the ScreenRectangle waitForImage(imageFile, [parameterMap], [searchRegion]) call. Therefore, it is important to select the specific image of interest, even if there are other identical occurences of it on the screen.
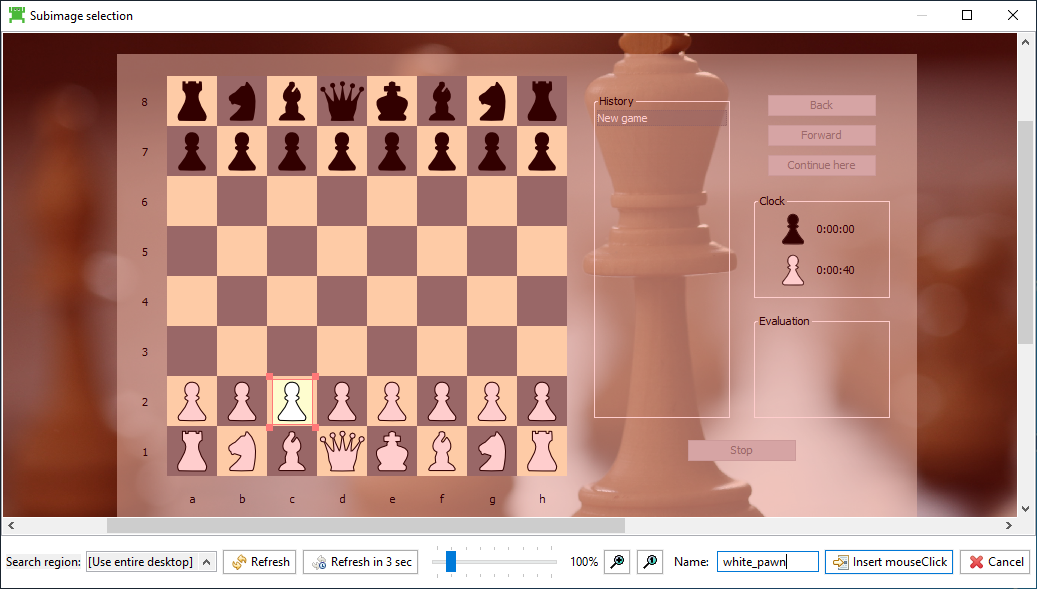
White pawn image selection
A click on square C4 will perform the move. Once we activate the Insert () > mouseClick(<Image>) () action, we can choose previously recorded images:
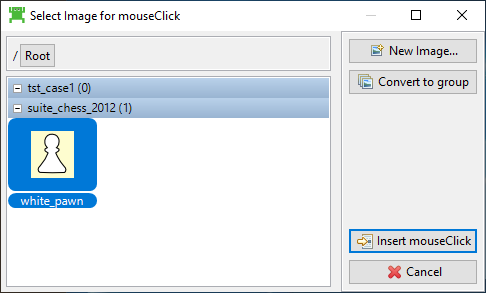
Image Reuse or Creation
The image of the pawn is not applicable for reuse at this point. We will use the New Image button to record an image for the empty square at C4 using the same steps as above.
Recording search images that consist only of a flat background is not recommended. In order to avoid that, the selected image should include the margins of neighboring squares.

white_square.png
As before, other empty white squares will be considered, including the occurrence index recorded as the occurrence parameter to the ScreenRectangle waitForImage(imageFile, [parameterMap], [searchRegion]) function.
The next recorded move is a pawn going from E2 to E4. We Insert () > mouseClick(<Image>) (), and select the previously created white_pawn file. Because there are multiple pawns still visible on the board, Squish will open the Image Search Preview dialog with several matches marked with a red frame.
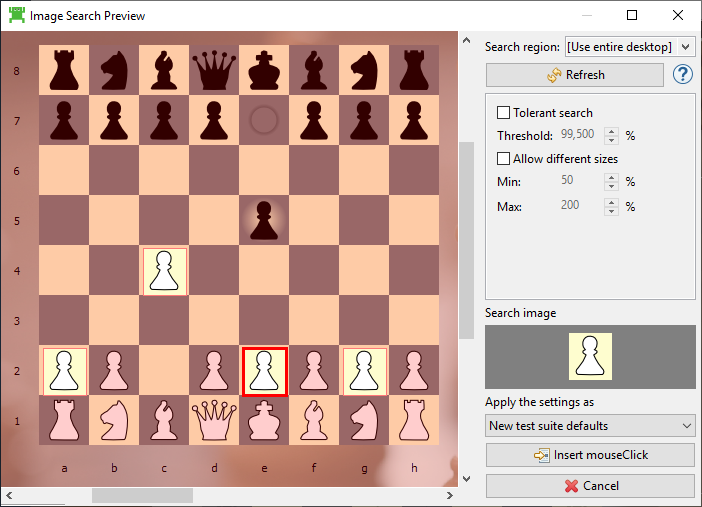
Selection of Image Occurrence
This time the occurrence index recorded in the test script will be based on the selected image.
The same steps can be repeated to use the chess_square.png file to click on the square E4.
The Recorded Script
Once the Image-based action insertions are done, we press Stop Recording( ) in the Control Bar. The generated script will look like this (or equivalent in your chosen scripting language):
function main() {
    startApplication("chess2012");
    mouseClick(waitForOcrText("Start new game"));
    mouseClick(waitForImage("white_pawn", { occurrence: 2 }));
    mouseClick(waitForImage("chess_square", { occurrence: 7 }));
    mouseClick(waitForImage("white_pawn", { occurrence: 3 }));
    mouseClick(waitForImage("chess_square", { occurrence: 4 }));
}
At this point we have automated a test without having access to internals of the chess application. The drawback of this low barrier is the reliance on a particular visual appearance of the application.
Tolerant image search
In situations where small changes in the appearance of the application occur, Squish can introduce a tolerance to the image search in order to find matches against previously captured images.
The Chess 2012 application that we used to record the test script scales its contents according to the amount of available space. By maximizing the application window we can resize the entire chessboard.
function main() {
    startApplication("chess2012");
    mouseClick(waitForImage("start_game"));
    mouseClick(waitForImage("white_pawn"));
}
If the above test case is executed with the Chess 2012 application's window maximized, the image search will fail, and the Squish IDE will show the Image Not Found dialog.
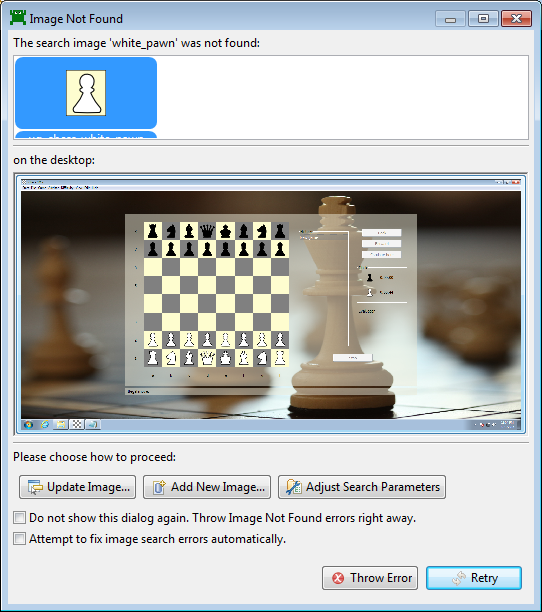
Image Not Found Dialog
We could try to select the Attempt to fix image search errors automatically. checkbox and allow Squish to enable the tolerant image search mode and adjust its parameters. The automatic fix procedure is not perfect and risks relaxing the image search to include incorrect matches. Instead, we will click the Adjust Search Parameters button that opens the Image Search Preview dialog. The dialog will attempt to lower the threshold until any matches are found. It displays the image search parameters and allows manipulating it to observe the search preview according to currently set values.
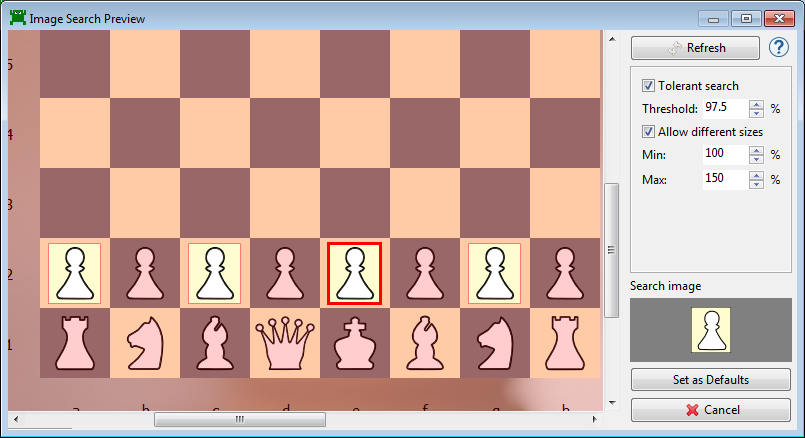
Image Search Preview
For now, the automatically computed values should be correct, and we can confirm them by clicking the Set as Defaults button. This will set the default image search parameters to the values displayed above and continue the test script execution.
The default values of the image search parameters can be edited on the Image Search tab of the Test Suite Settings view.
Verifications by Image-Search
So far the sole purpose of image searches was a later interaction, like a Insert > mouseClick(<Image>) action. The mere existence (or absence) of an image can also be be used for the purpose of testing the GUI state, to answer questions like: Does a warning sign appear? Is a status icon red or green? Or (in the case of a test for our chess application): which player's turn is it?
To verify that it is the white player's turn we will record Search Image Verification Verify > Search Image where we first cut out an image encompassing the text label It is white's turn.. We set Name to whites_turn.
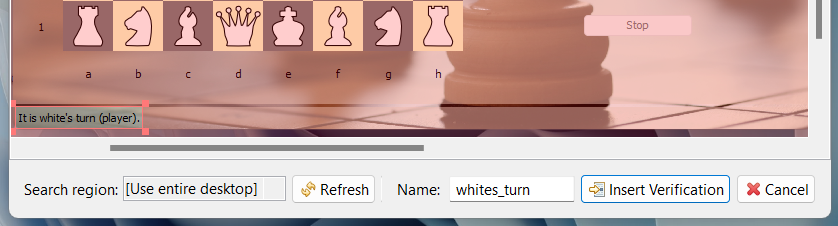
The recorded script statement will be:
test.imagePresent("whites_turn")
Note that a failure to find a specific image does not rule out with 100% safety that the information is not displayed with a differing visual appearance. The absence of one image does not always mean that another state of pixels is present for sure. It is therefore prudent to have the failing check for one image to be followed by the check for its expected alternative. In other words, a failed check for the display reading that it is white's turn is not sufficient for when we expect a visual representation of the text It is black's turn. We would need the expected alternative.
© 2025 The Qt Company Ltd.
Documentation contributions included herein are the copyrights of
their respective owners.
The documentation provided herein is licensed under the terms of the GNU Free Documentation License version 1.3 as published by the Free Software Foundation.
Qt and respective logos are trademarks of The Qt Company Ltd. in Finland and/or other countries worldwide. All other trademarks are property
of their respective owners.
