How to Create and Use Shared Data and Shared Scripts
This section discusses how to split tests into multiple files and how to share, access and use, shared scripts and shared data files. (It is also possible to share an Object Map; see Creating an Object Map for details.)
Note: There is a 1-hour Online course about Data Driven Testing in Squish at the ![]() if you desire some video guidance.
if you desire some video guidance.
Sharing scripts is ideal when you have functionality that is common to more than one test case. However, if you generally create test scripts from scratch and they all tend to have the same basic structure you might find it convenient to create test script templates to save having to copy and paste whenever you create a new test: see Testcase Templates for how to do this.
How to Store and Locate Shared Scripts and Shared Data Files
Each test case contains a default test script file called test.js (JavaScript), test.py (Python), test.pl (Perl), test.rb (Ruby), or test.tcl (Tcl), depending on which scripting language you set for the test suite.
Test cases in test suites often require some common functionality or common data. Squish enables you to create separate script files that contain the common functionality that the test cases can share. Also, Squish enables you to create or import test data for sharing.
For test data, Squish provides two options: test data that is specific to a test case and test data that can be shared by any of a test suite's test cases. For test scripts, Squish provides three options: test scripts that are specific to a test case (in addition to the test.* file), test scripts that can be shared by any of a test suite's test cases, and global test scripts that can be shared by any test case in any test suite. Global scripts are an advanced feature and not recommended for new Squish users.
Let's assume for ease of explanation that we have a test suite in a folder called myapp_suite. Let us further assume that we have two test cases for this suite in the folders myapp_suite/tst_case1 and myapp_suite/tst_case2. If we are using the Python scripting language, the first test case's filename will be myapp_suite/tst_case1/test.py, and it is easy to see what the name would be for the other scripting languages.
Given the above assumptions, if we want to store some test case-specific data for the first test case it must be stored in the myapp_suite/tst_case1/testdata folder, for example, myapp_suite/tst_case1/testdata/case1_data.csv. And if we wanted to store some test data that could be shared by both test cases (and by any others we create later), it must be stored in the myapp_suite/shared/testdata folder. These details are important for command line users, but if you use the Squish IDE, there's no need to remember them since the Squish IDE can be used to create or import test data and will store it in the right place, and only filenames (not paths) are used to access test data in test scripts.
Regardless of whether test data is test case-specific or shared by the whole test suite, we always use the same technique to access the data: we call the Dataset testData.dataset(filename) function with the test data's filename (without any path) to get a reference to an array or tuple (depending on scripting language) that can be used to access the data using the other Test Data Functions functions. (It is also possible to access test data anywhere by giving a filename with a path, but we recommend storing test data in the relevant test suite or test case.)
If we want to have one or more additional scripts to neatly compartmentalize functionality, or to simplify our test.* test script, we can create additional script files. Given the earlier assumptions, if we want to have an extra test case-specific script we must put it in the same directory as the test.* test script, for example, myapp_suite/tst_case1/extra.py. If we have extra functionality that we want to be accessible to all of our test suite's test scripts, we must put the additional script in the test suite's shared scripts folder, e.g., myapp_suite/shared/scripts/common.py. If we want to have functionality that can be shared by any test case in any test suite we can add a global test script to the Global Scripts view.
Regardless of whether the test script is test case-specific or shared by the whole test suite or global to all of our test suites, we always use the same technique to access the script's functionality: we call the source(filename) function with the script's name (including its path). Typically we get the name by calling the String findFile(where, filename) function giving it a first argument of "scripts" and a second argument of the script's name (without any path)—this will work for test case-specific scripts and for scripts shared by any of the test suite's test cases, and also for global shared scripts. Note that on Ruby we use the require function instead of souce.
To create a script that can be shared by any test case in a test suite, in the Squish IDE's Test Suites view's Test Suite Resources section, click the New Test Resource button. This will create a new empty shared script called script_1.py (or script_1.js, and so on, depending on the scripting language in use). Rename the script something more meaningful, either immediately by entering a new name, or later by right-clicking it, and then selecting the Rename option in the context menu. In the screenshot we have renamed the shared script common.py since it contains common functionality.
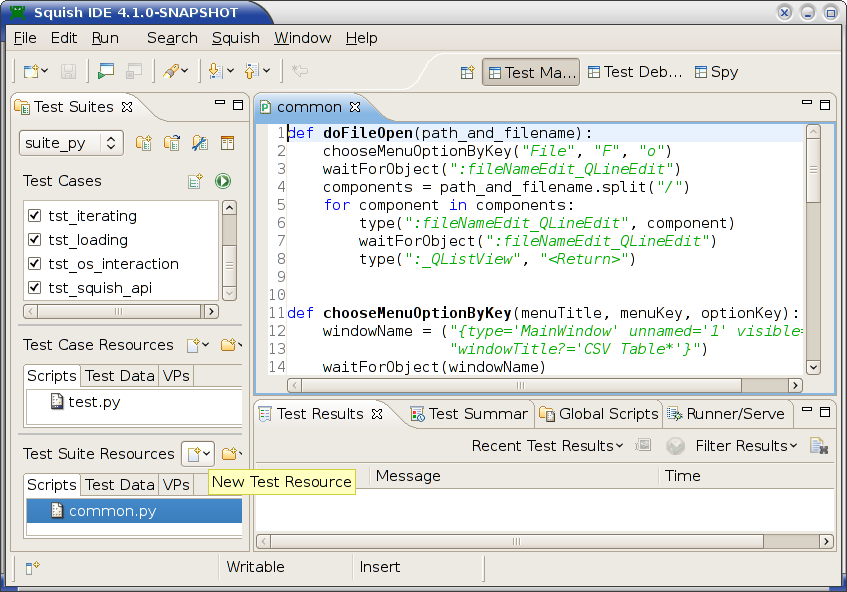
The New Test Resource button in the Test Suites view
Once the shared script has been renamed, click (or double-click depending on your platform and settings) to show it in an Editor view. You can now edit the script to add any shared functionality you require.
It is also possible (although less common) to add a shared script that can only be used by a particular test case. To do this, click the New Test Resource toolbar button in the Test Suites view's Test Case Resources section. You can add an unlimited number of script files to test suites and cases.
You can create a global shared script, that is, one that can be accessed by any test case in any test suite, in the Global Scripts view.
If you want to import an existing script into a test suite's (or test case's) shared script's folder, click File > Import Test Resource. This will pop up the Import Squish Resource dialog. Enter the name of the script file to import (or choose it using the Browse button. Then set the Import As combobox item to "Script". If you want the script to be shared by all of the test suite's test cases (rather than just the current one that is shown), check the Create shared File in Test Suite radio button. This is recommended since it is usually more convenient to share scripts amongst all test cases. Now click the Finish button and the imported script will be available in the Squish IDE.
It is possible to create shared scripts without using the Squish IDE at all. First, in the console, change directory to the test suite's directory. Then create a new subdirectory called shared if it doesn't already exist. Now change into this directory and create a new subdirectory called scripts if it doesn't already exist. Now use your editor or IDE to create the shared script and be sure to save it in the test suite's shared/scripts directory. And if you already have the script simply copy it into that directory. If you want to add a global shared script just create or copy it to the directory (or one of the directories) you want to use for that purpose.
There may be situations where shared functionality might be useful not only in one particular test suite, but in most or all test suites. Squish makes it possible for all test suites to access globally shared scripts. This is achieved by creating one or more directories (wherever you like) that you will put all the globally shared scripts into. Then, to tell Squish that there are such directories, either register them using the Global Scripts view (which will add them to the paths.ini initialization file, or set the SQUISH_SCRIPT_DIR environment variable to one or more paths. For example, on Unix using the bash shell, export SQUISH_SCRIPT_DIR=$HOME/tests/shared_scripts. See also, Environment Variables and Setting Environment Variables for the AUT.
Once a shared script has been created, it can be used by any test case-specific scripts that need it. Note though, that shared scripts are not usually imported using the language-specific import mechanism—after all, not all languages have such a mechanism, for example, JavaScript doesn't. Instead, the Squish API provides the necessary functions.
The standard way to locate a shared script file (or shared data file), is to use the String findFile(where, filename) function. The first argument is the type of file, which for shared scripts should be "scripts". The second argument is the script's filename (with no path). The function will search all the standard locations that Squish uses, and will return the filename including its full path.
Once we have the full path to the shared script, we can include it in our test case's script. This is done by evaluating the shared script using the source(filename) function—this means that it is in effect executed as if the actual text of the shared script was in the test case at the point where we call the source(filename) function. After this is done, all the objects created in the shared script—typically, classes and functions—become accessible in the test case's script.
Here is an example where we want to share a script file called address_utility.py (or address_utility.js, etc., depending on the scripting language being used), so that we can access a function inside it—in this example, the insertDummyNamesAndAddresses function—that populates an addressbook AUT with some names and addresses so that there is some data present for further tests to work on.
def main():
    ...
    source(findFile("scripts", "address_utility.py"))
    insertDummyNamesAndAddresses()
    ...
function main()
{
// ...
source(findFile("scripts", "address_utility.js"));
insertDummyNamesAndAddresses();
// ...
}sub main
{
# ...
source(findFile("scripts", "address_utility.pl"));
insertDummyNamesAndAddresses();
# ...
}# encoding: UTF-8 require 'squish' include Squish def main # ... require findFile("scripts", "address_utility.rb") insertDummyNamesAndAddresses # ... end
proc main {} {
    # ...
    source [findFile scripts "address_utility.tcl"]
    insertDummyNamesAndAddresses
    # ...
}
Here we import the address_utility.py (or similar) script which defines a function called insertDummyNamesAndAddresses, which we are then able to call.
For scripting languages that support importing, such as Python, it is possible to use the language's standard import mechanism. However, Squish's approach is usually more convenient, since in most cases our shared scripts are only relevant to our tests. In general, for shared scripts it is best to use Squish's source(filename) function, but to import standard modules it is best to use the language-specific mechanism (e.g., import in Python and use in Perl). In Ruby, use the standard require function instead of Squish's source function.
Just as we have a test case script, we can also have test case-specific data files. Such files are stored in the test case's testdata directory. However, in some cases, we want to share the test data so that more than one test case can access it. In this case we store the test data in the test suite's shared/testdata directory.
Test data can be added through the Squish IDE by importing files—Squish can read .tsv (tab-separated values format), .csv (comma-separated values format), .xls or .xlsx (Microsoft Excel spreadsheet format). Or we can simply create the directories on the command line in a console and copy our test data into them. The techniques used for adding shared test data, whether using the Squish IDE or manually, are exactly the same as for adding shared test scripts, only we use the appropriate testdata directory (rather than the scripts directory).
Although the top-level directory structure must follow what we have described, within that structure—i.e., under a testdata directory—you are free to create subdirectories and structure them however you like.
Retrieving test data is done using the String findFile(where, filename) function we mentioned earlier, only this time the first argment must be "testdata", and the second argument the name of the test data file you want to access. In practice we don't usually need to use the String findFile(where, filename) function for test data. Instead we use the Dataset testData.dataset(filename) function and access the data using Squish's Test Data Functions API, as we will see in the next section.
How to Do Data-Driven Testing
Data-driven testing is an approach where the test data (input, and expected output), is kept separate from the test script code which only contains the test's logic. The normal practice is for the test data to be read from a file or database one item or record at a time, and for the test script to use the data to test the AUT and then compare the results with those that are expected.
One benefit of this approach is that it makes it possible to modify a test without actually having to change the test case's code—instead we simply add more data which the test then reads and processes along with the rest of the data. This makes it possible to separate responsibility for creating tests between test engineers who have coding skills and those who don't. Those with coding skills can create test scripts and encode the test logic in them, and test engineers who don't have coding skills can create and edit the test data that the test scripts use to test the AUT.
Squish provides an API for handling test data (see Test Data Functions), that makes it easy to create data-driven tests. Here we will look at how to use Squish's script API to read and use test data, and will assume that the test data has already be imported or copied into the appropriate testdata directory.
Test data always contains data in a tabular format. Squish can read files in .tsv (tab-separated values format), .csv (comma-separated values format), .xls or .xlsx (Microsoft Excel spreadsheet format) format). In the case of .csv and .tsv files, Squish assumes that they use the Unicode UTF-8 encoding—the same encoding that is used for test scripts. In .tsv files, records are separated by new lines and fields are separated by tabs. The first record is used to describe the columns. Here is an example .tsv data file—addresses.tsv—with tabs indicated by "\t" and newlines indicated by "\n" characters:
First Name\tLast Name\tAddress\tEmail\tNumber\n
Max\tMustermann\tBakerstreet 55\tmax@mustermann.net\t1\n
John\tKelly\tRhodeo Drv. 678\tjkelly@acompany.com\t2\n
Joe\tSmith\tQueens Blvd. 37\tjoe@smith.com\t3\n
Each field (column) is separated by a tab, and each record (row, or line) is separated by a newline. As is common practice with .tsv (and .csv) files, the first line is not data as such, but instead the field (column) names ("First Name", "Last Name", etc.). All the other lines are data records.
Here is an example where we read each record in turn and print its values to Squish's log:
for record in testData.dataset("addresses.tsv"):
    firstName = testData.field(record, "First Name")
    lastName = testData.field(record, "Last Name")
    address = testData.field(record, "Address")
    email = testData.field(record, "Email")
    test.log("%s %s, %s; email: %s" % (
        firstName, lastName, address, email))
var records = testData.dataset("addresses.tsv");
for (var row = 0; row < records.length; ++row) {
    var record = records[row];
    firstName = testData.field(record, "First Name");
    lastName = testData.field(record, "Last Name");
    address = testData.field(record, "Address");
    email = testData.field(record, "Email");
    test.log(firstName + " " + lastName + ", " + address +
        "; email:" + email);
}
my @records = testData::dataset("addresses.tsv");
for (my $row = 0; $row < scalar(@records); $row++) {
    my $record = $records[$row];
    my $firstName = testData::field($record, "First Name");
    my $lastName = testData::field($record, "Last Name");
    my $address = testData::field($record, "Address");
    my $email = testData::field($record, "Email");
    test::log("$firstName $lastName, $address; email: $email");
}
TestData.dataset("addresses.tsv").each do |record, row|
    firstName = TestData.field(record, "First Name")
    lastName = TestData.field(record, "Last Name")
    address = TestData.field(record, "Address")
    email = TestData.field(record, "Email")
    Test.log("#{firstName} #{lastName}, #{address}; email: #{email}")
end
set records [testData dataset "addresses.tsv"]
for {set row 0} {$row < [llength $data]} {incr row} {
    set record [lindex $records $row]
    set firstName [testData field $record "First Name"]
    set lastName [testData field $record "Last Name"]
    set address [testData field $record "Address"]
    set email [testData field $record "Email"]
    test log "$firstName $lastName, $address; email: $email"
}
Notice that we access fields by name, so the names we use in our test case's code must match those in the first line of the test data file. Also, although the data has a "Number" field at the end, we ignore it because we don't need it.
In typical cases the test data file is found using the Dataset testData.dataset(filename) function which searches for test data in standard locations and returns an array or tuple of records. (It is also possible to give this function the name of a file including a path—for example, as returned by the String findFile(where, filename) function). We then use the String testData.field(record, fieldName) function to access the contents of individual fields within a given record.
By using a for loop we can iterate over every record in the testdata—without having to know in advance how many records there are, so the code is unaffected if records are removed or added. And of course, in a realistic test we would feed the data to the AUT and compare expected with actual results rather than simply printing the data to the log as we have done here.
Most of the tutorials include a complete example of a data-driven test. For a Qt example, see Creating Data Driven Tests; for a Java AWT/Swing example, see Creating Data Driven Tests; for a Java SWT example, see Creating Data Driven Tests; and for a Tk/Tcl example, see Creating Data Driven Tests.
How to Use Test Data in the AUT
So far this section has only discussed using test data in test scripts to create data driven tests. But two other use cases arise in practice. One use case is where test data files are provided for the AUT to read, and another is where we want to retrieve files that the AUT has created during the test run so that they can be verified.
Let's start by looking at the first use case where we provide a data file for the AUT to read. For example, imagine we are using the addressbook AUT and we want it to load a file called customers.adr at the start of the test script so that it has a known set of data to work on. This is easily achieved by storing the data file in the test case's directory, or its testdata directory—or in the test suite's shared/testdata directory, if we want more than one test case to be able to access it.
We want to avoid hard-coding the path to the data file in our test script since we want the flexibility to run our tests on different machines, and even on different platforms. We can copy a data file into the AUT's current working directory (without having to know its path) using the testData.put(filename) function. We only need to give the name of the file to this function since it will automatically look in the test case's directory. If we want to put a file from the test case's testdata directory or from the test suite's shared/testdata directory, we can call the testData.put(filename) function with the results of a call to the String findFile(where, filename) function, giving the latter a first argument of "testdata" and a second argument of the filename (without a path). Another benefit of using the testData.put(filename) function is that once the test run has finished, Squish will automatically clean up for us (i.e., Squish will delete the file from the AUT's working directory).
Here is an example where we copy a test data file from the current test case's directory into the AUT's working directory. Then we access the AUT's main window object (Addressbook), and call that object's fileOpen method with the name of the file we want it to load.
def main():
    ...
    testData.put("customers.adr")
    findObject("Addressbook").fileOpen("customers.adr")
    ...
function main()
{
// ...
testData.put("customers.adr");
findObject("Addressbook").fileOpen("customers.adr");
// ...
}sub main()
{
# ...
testData::put("customers.adr");
findObject("Addressbook")->fileOpen("customers.adr");
# ...
}# encoding: UTF-8 require 'squish' include Squish def main #... TestData.put("customers.adr") findObject("Addressbook").fileOpen("customers.adr") #... end
proc main {} {
    # ...
    invoke testData put "customers.adr"
    [invoke [invoke findObject "Addressbook"] fileOpen "customers.adr"]
    # ...
}
Another use case is where we need to verify that a file which has been created by the AUT has the contents we expect. For example, let's assume that during a test the addressbook AUT loads a data file, customers.adr, performs various operations (adds, edits, and deletes, addresses), and then saves its current address data into a new file, edited-customers.adr. After this has happened we want our test script to compare the edited-customers.adr file with another file, expected-customers.adr which has the contents we expect the file to have after accounting for the changes to the data made earlier in the script.
We can copy a file to the AUT's current directory using the testData.put(filename) function. Here's an example that saves a file to the AUT's current working directory, copies an "expected" file into the AUT's current working directory, and then reads both files and compares them to see if they match.
def main():
    # Load customers.adr and add/edit/delete addresses
    ...
    mainwindow = waitForObject("Addressbook")
    # Use the AUT's API to save the data to the AUT's directory
    mainwindow.saveAs("edited-customers.adr")

    # Copy "expected" from the AUT's directory to the test case's directory
    testData.get("expected-customers.adr")

    edited = open("edited-customers.adr").read()
    expected = open("expected-customers.adr").read()
    test.compare(edited, expected)
function main()
{
// Load customers.adr and add/edit/delete addresses
...
var mainwindow = waitForObject("Addressbook");
// Use the AUT's API to save the data to the AUT's directory
mainwindow.saveAs("edited-customers.adr");
// Copy "expected" from the AUT's directory to the test case's directory
testData.get("expected-customers.adr");
var edited = File.open("edited-customers.adr").read();
var expected = File.open("expected-customers.adr").read();
test.compare(edited, expected);
}sub main
{
# Load customers.adr and add/edit/delete addresses
...
my $mainwindow = waitForObject("Addressbook");
# Use the AUT's API to save the data to the AUT's directory
$mainwindow->saveAs("edited-customers.adr");
# Copy "expected" from the AUT's directory to the test case's directory
testData::get("expected-customers.adr");
open(FH1, "edited-customers.adr");
open(FH2, "expected-customers.adr");
my $edited = join("", <F1>);
my $expected = join("", <F2>);
test.compare($edited, $expected);
}# encoding: UTF-8 require 'squish' include Squish def main # Load customers.adr and add/edit/delete addresses # ... mainwindow = waitForObject("Addressbook") # Use the AUT's API to save the data to the AUT's directory mainwindow.saveAs("edited-customers.adr") # Copy "expected" from the AUT's directory to the test case's directory TestData.get("expected-customers.adr") edited = open("edited-customers.adr").read expected = open("expected-customers.adr").read Test.compare(edited, expected) end
proc main {} {
    # Load customers.adr and add/edit/delete addresses
    ...
    set mainwindow [waitForObject "Addressbook"]
    # Use the AUT's API to save the data to the AUT's working directory
    invoke $mainwindow saveAs "edited-customers.adr"

    # Copy "expected" from the AUT's directory to the test case's directory
    testData get "expected-customers.adr"

    set edited [read [open "edited-customers.adr"]]
    set expected [read [open "expected-customers.adr"]]
    test compare $edited $expected
}
We begin by getting a reference to the AUT's main window object; then we call the main window's saveAs method to save the edited data. Then we open both the newly saved data and the expected data files (the latter copied into the AUT's working directory), and read their entire contents. Finally, we compare the contents of the files using the Boolean test.compare(value1, value2) function.
Squish's data handling API (see Test Data Functions) has other useful functions. For example, if we only need to test that a file has been created without concern for its contents we can call the Boolean testData.exists(filename) function. And if we want to remove a file in the course of a test we can call the testData.remove(filename) function.
© 2025 The Qt Company Ltd.
Documentation contributions included herein are the copyrights of
their respective owners.
The documentation provided herein is licensed under the terms of the GNU Free Documentation License version 1.3 as published by the Free Software Foundation.
Qt and respective logos are trademarks of The Qt Company Ltd. in Finland and/or other countries worldwide. All other trademarks are property
of their respective owners.
