Squish for Android Tutorials
Learn how to test Android applications.
- Tutorial: Starting to Test Android Applications
- Tutorial: Designing Behavior Driven Development (BDD) Tests
- Tutorial: Migration of existing tests to BDD
Tutorial: Starting to Test Android Applications
Note: There is a 45-minute Online course about Squish Basic Usage at the ![]() if you desire some video guidance.
if you desire some video guidance.
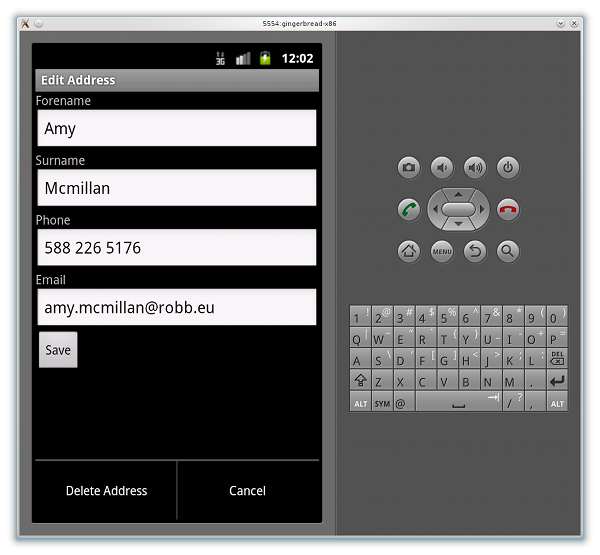
We will test a very simple Address Book application. Users can, via what are called Activities, do things like Add Address via a button, or from the Activity menu ( ) select the Demo Data to load some example addresses. When an existing address is tapped, the user can Edit Address, or from the menu, Delete Address. Although the application is very simple, it has all the standard features that you are likely to want to use in your own tests, including menus, a list, a pop-up dialog, line edits, and buttons. Once you know how to test any of these user interface elements you will be able to apply the same principles to testing elements present in your own applications that are not used in the tutorial, such as spinners and date and time controls. For complete examples, see How to Create Test Scripts. For howto guides, see How to Test Android Applications.
The screenshot shows the application in action with a user adding a new name and address.
The AUT can be found with Squish's examples in <SQUISHDIR>/examples/android/AddressBook/AddressBook-debug.apk. The tests that we will discuss in the following sections are in folders, for example, the versions of the tests using the Python language are in <SQUISHDIR>/examples/android/AddressBook/suite_py, with the tests written in other languages in similarly named sub-folders.
Squish Concepts
In the following sections we will create a test suite and then create some tests, but first we will very briefly review some key Squish concepts.
To perform testing of Android AUTs, these things are required:
- A running Android system that is visible by adb,
- an application to test—known as the Application Under Test (AUT), and
- a test script that exercises the AUT.
Note: For Android devices, make sure USB Debugging is enabled after the device is connected to your PC. This usually requires first enabling Developer Options on the device before you can see the option under Settings.
Note: For Android emulators, make sure to start the emulator manually and not via Android Studio. This will ensure that the emulator accepts the startup command sent with Squish.
Squish Multi-Process Architecture and IPC
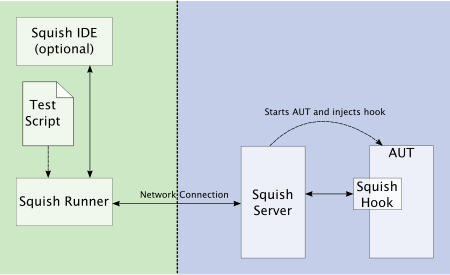
Squish runs a small server, squishserver, that handles the communication between the AUT and the test script. The test script is executed by the squishrunner tool, which in turn connects to squishserver. squishserver starts the instrumented AUT on the device, which starts the Squish Hook. With the hook in place, squishserver can query AUT objects regarding their state and can execute commands on behalf of squishrunner. squishrunner directs the AUT to perform whatever actions the test script specifies.
All the communication takes place using network sockets which means that everything can be done on a single machine, or the test script can be executed on one machine and the AUT can be tested over the network on another machine.
The following diagram illustrates how the individual Squish tools work together.
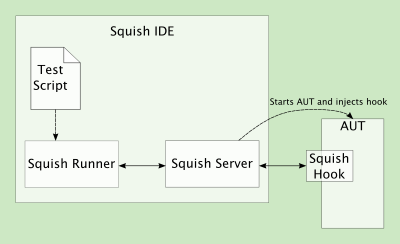
Tests can be written and executed using the Squish IDE, in which case squishserver is started and stopped automatically, and the test results are displayed in the Squish IDE's Test Results view. The following diagram illustrates what happens behind the scenes when the Squish IDE is used.
Under the covers, squishrunner is used to execute test cases. If we need to automate the execution of test cases from a script, we would use this command directly.
Making an Application Testable
When testing Android AUTs, the Instrument and Deploy step causes the application to be instrumented with extra code that includes the Squish hook. This process involves unzipping the package, adding classes, and zipping it up again. Further details can be found in Make the Android app testable.
Creating Test Suites from Squish IDE
Start up the Squish IDE, by clicking or double-clicking the Squish IDE icon, by launching Squish IDE from the taskbar menu or by executing squishide on the command line, whichever you prefer and find suitable for the platform you are using.
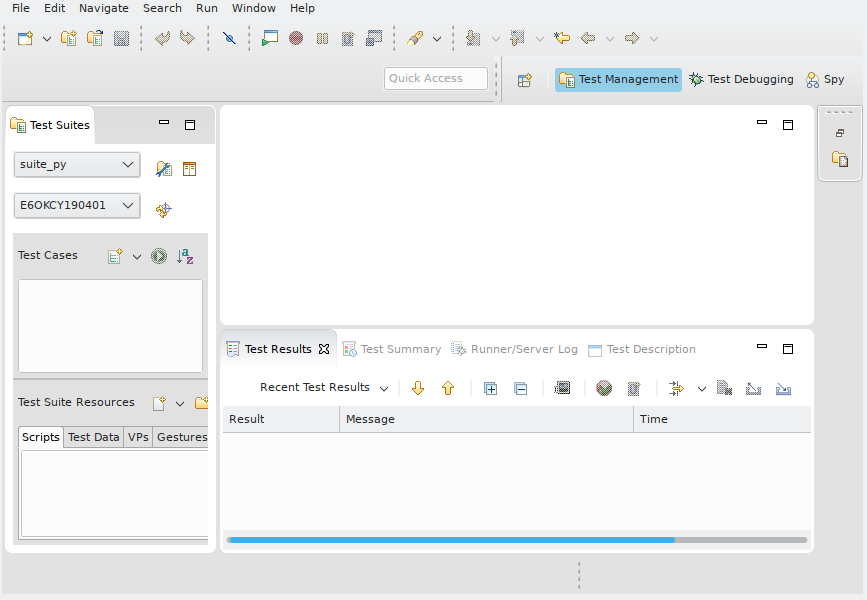
Once Squish starts up, you might be greeted with a Welcome Page. Click the Workbench button in the upper right to dismiss it. Then, the Squish IDE will look similar to the screenshot.
Before You Start
Before going forward, make sure you have a Java JDK, version 7 or higher, installed on your system running Squish.
If you are testing on an Android Virtual Device (AVD), you need to have already installed the Android Developer Studio, and set up a device from the AVD Manager. Otherwise, you should have a physical Android device connected via USB with USB debugging enabled. Either way, the Android device should show up in its own combobox, under the Test Suites combobox in the Test Suites view of squishide.
Make sure no other Android development environment is running that can access the emulator or device. That includes Eclipse with the ADT plugin and Android Developer Studio. These tools prevent Squish from accessing the AUT (the app we're going to test).

Once Squish starts, click File > New Test Suite to open the New Test Suite wizard.
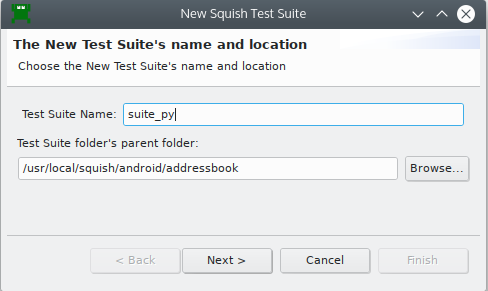
Enter a name for your test suite and choose the folder where you want the test suite to be stored. In the screenshot we have called the test suite suite_py and we have it inside an addressbook folder. Naturally, you can choose whatever name and folder you prefer. Once the details are complete, click Next to go on to the Toolkit (or Scripting Language) page.
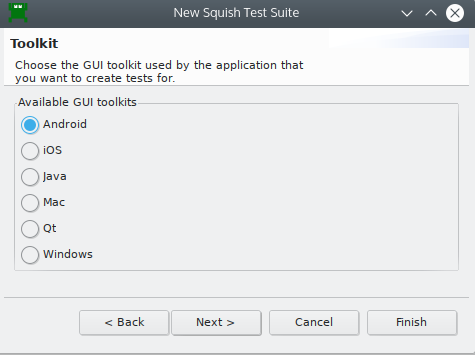
If you get this wizard page, click the toolkit your AUT uses. For this example, we must click Android since we are testing an application for Android. Then click Next to go to the Scripting Language page.
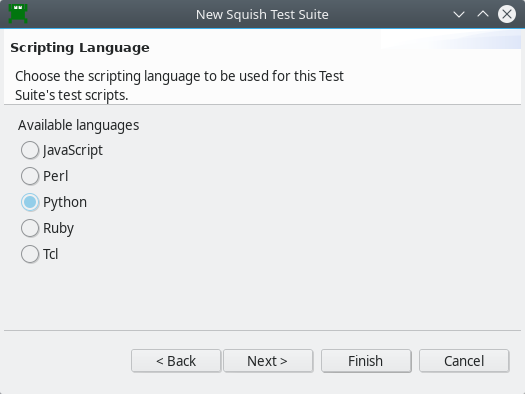
Choose your desired scripting language on this page. The functionality offered by Squish is the same for all languages.
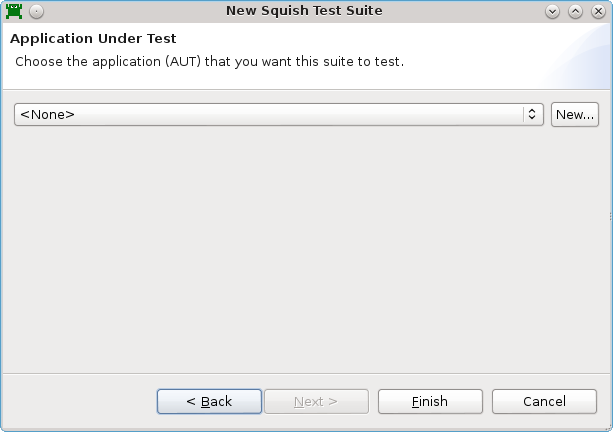
This tutorial uses com.froglogic.addressbook, a very simple address book application.
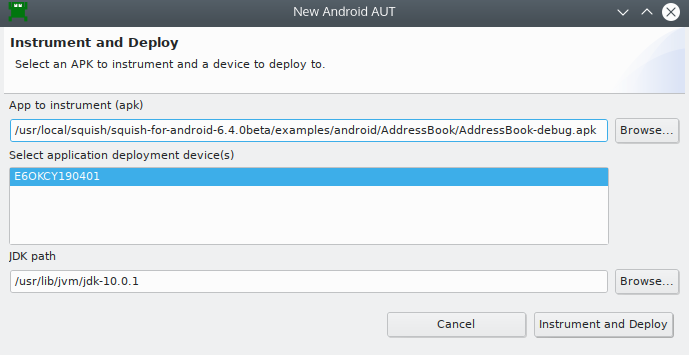
Click New, and fill in the missing fields. Click Browse, and select <SQUISHDIR>/examples/android/AddressBook/AddressBook-debug.apk This file contains the app com.froglogic.addressbook.
You can leave the Path to JDK empty if the JDK's bin directory is in your PATH. Otherwise, the JDK path must be set. Users working on Windows, Linux, or macOS have to specify this directory and should ensure that Java version 7 or higher is installed.
You should see one or more Android Devices listed. Select one or more and press Instrument and Deploy.
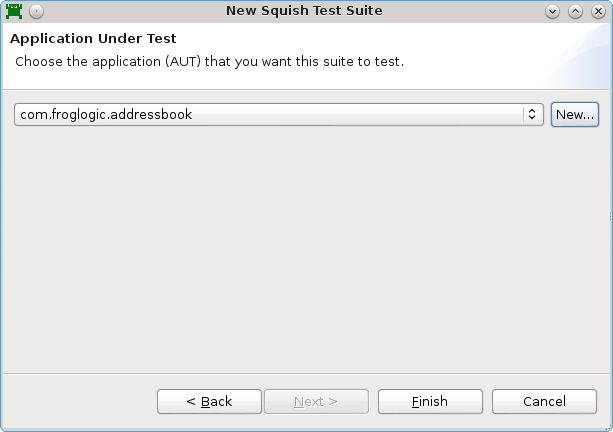
After the AUT is deployed, the wizard will show com.froglogic.addressbook in the AUT combo box.
When you click Finish, Squish creates a sub-folder called suite_suiteName/ and a file in that folder called suite.conf that contains the test suite's configuration details. Squish also registers the AUT with the squishserver. The wizard then closes and Squish IDE will look similar to the screenshot below.
We are now ready to start creating tests. Read on to learn how to create test suites without using the Squish IDE, or skip ahead to Recording Tests and Verification Points.
Creating Test Suites from Command Line
To create a new test suite from the command line:
- Create a new directory to hold the test suite. The directory name should begin with
suite. In this example we have created thesuite_pydirectory for Python tests. - Create a plain text file (ASCII or UTF-8 encoding) called
suite.confin the suite subdirectory. This is the test suite's configuration file, and at the minimum it must identify the AUT, the scripting language used for the tests, and the wrappers (i.e., the GUI toolkit or library) that the AUT uses. The format of the file iskey = value}, with one key–value pair per line. For example:AUT = com.froglogic.addressbook LANGUAGE = Python WRAPPERS = Android OBJECTMAPSTYLE = script
The AUT for programs for Android is the full Java-language-style package name for the application. Run the following command to get a list of all possible AUT's when squishserver and your Android emulators or devices are running:
squishrunner --info androidInstrumentation
The LANGUAGE can be set to JavaScript, Python, Perl, Ruby, or Tcl, depending on how Squish was installed.
- Installing Squish for Android describes how to instrument and deploy the apk file in detail. Basically, from the Squish directory, run on Windows:
bin\squish-apk-tool.exe -m hook -j "C:\Program Files\Java\jdkx.y.z" -p "<your-apk>" -o "%TEMP%" -d <device>
and on Linux or Mac:
bin/squish-apk-tool -m hook -p "<your-apk>" -o /tmp -d <device>
Where
deviceis the target device or emulator. Run the following command to get a list of all connected devices and emulators:squishrunner --info androidDevices
We are now ready to record our first test.
Creating Tests
Recordings are made into existing test cases. You can create a New Script Test Case in the following ways:
- Select File > New Test Case to open the New Squish Test Case wizard, enter the name for the test case, and select Finish.
- Click the New Script Test Case (
 ) toolbar button to the right of the Test Cases label in the Test Suites view. This creates a new test case with a default name, which you can easily change.
Give the new test case the name tst_general.
Squish automatically creates a sub-folder inside the test suite's folder with this name and also a test file, for example test.py. If you choose JavaScript as the scripting language, the file is called test.js, and correspondingly for Perl, Ruby, or Tcl.
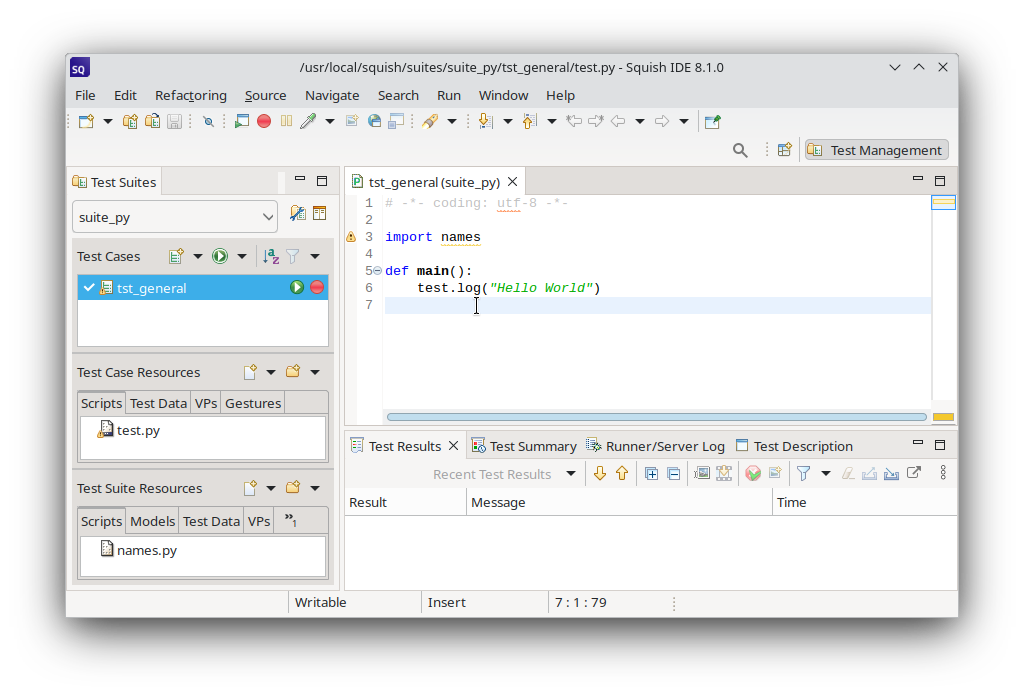
Initially, the script's main() function logs Hello World to the test results.
If you get a sample .feature file instead of a "Hello World" script, click the arrow left of the Run Test Suite ( ) and select New Script Test Case ().

To make the test script file (such as, test.js or test.py) appear in an Editor view, click or double-click the test case, depending on the Preferences > General > Open mode setting. This selects the Script as the active one and makes visible its corresponding Record ( ) and Run Test Case (
 ) buttons.
The checkboxes are used to control which test cases are run when the Run Test Suite () toolbar button is clicked. We can also run a single test case by clicking its Run Test Case () button. If the test case is not currently active, the button may be invisible until the mouse is hovered over it.
Once the new test case has been created, we are free to write test code manually or to record a test. Clicking on the test case's Record () button replaces the test's code with a new recording. Alternatively, you can record snippets and insert them into existing test cases, as instructed in How to Edit and Debug Test Scripts.
Recording Our First Test
Before we dive into recording let's briefly review our very simple test scenario:
- Load addresses.
- Edit the surname of the second address entry.
- Navigate to the first address and remove it.
We are now ready to record our first test. Click Record () to the right of the tst_general test case shown in the Test Suites view's Test Cases list. This will cause Squish to run the AUT so that we can interact with it. Once the AUT is running perform the following actions—and don't worry about how long it takes since Squish doesn't record idle time:
- Tap the menu button on the device and tap Demo Data
- Tap the second row, the Edit Address page will open. Then tap the second line edit somewhere right of the text, tap the backspace a few times and type "Doe". Don't worry about typing mistakes—just backspace delete as normal and fix them. Finally, tap the Save button—just press the back button when the on-screen keyboard is in the way. The second row should now have the adjusted Surname you typed in.
- Now tap the first row. On the Edit Address page, tap the menu button and then tap Delete Address, and then tap the Delete button in the message box. The first row should be gone, so the modified "Doe" entry should now be the first one.
- Click on the Verify (
 ) toolbar button in the Squish Control Bar Window (the second button from the left) and select Properties.
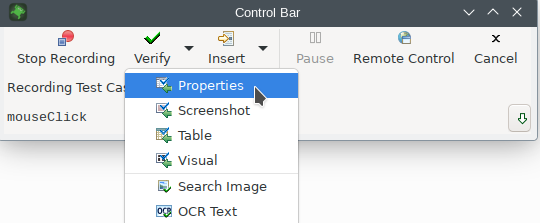
This will make the Squish IDE appear. In the Application Objects view, expand the
AddressBookobject and repeat until theListViewfirstLinearLayoutobject is expanded. For the emulator used in this tutorial, that requires also expanding theFrameLayoutobject and then theLinearLayoutobject. Click theDoeobject to make its properties appear in the Properties view, and then check thetextproperty's checkbox. The Squish IDE a verification point about to be inserted Finally, click the Save and Insert Verifications (at the bottom of the Verification Point Creator view) button to have the surname verification for the first row inserted into the recorded test script. (See the screenshot below.) Once the verification points are inserted the Squish IDE's window will be hidden again and the Control Bar window and the AUT will be back in view. - We've now completed the test, so in the AUT, press the menu button and tap Quit. Finally, if the Control Bar is still there, click the Stop Recording button in it.
Once we quit the AUT, the recorded test will appear in Squish IDE as the screenshot illustrates. The exact code that is recorded will vary depending on how you interact. For example, you might invoke menu options by clicking them or by using key sequences—it doesn't matter which you use, but since they are different, Squish will record them differently.
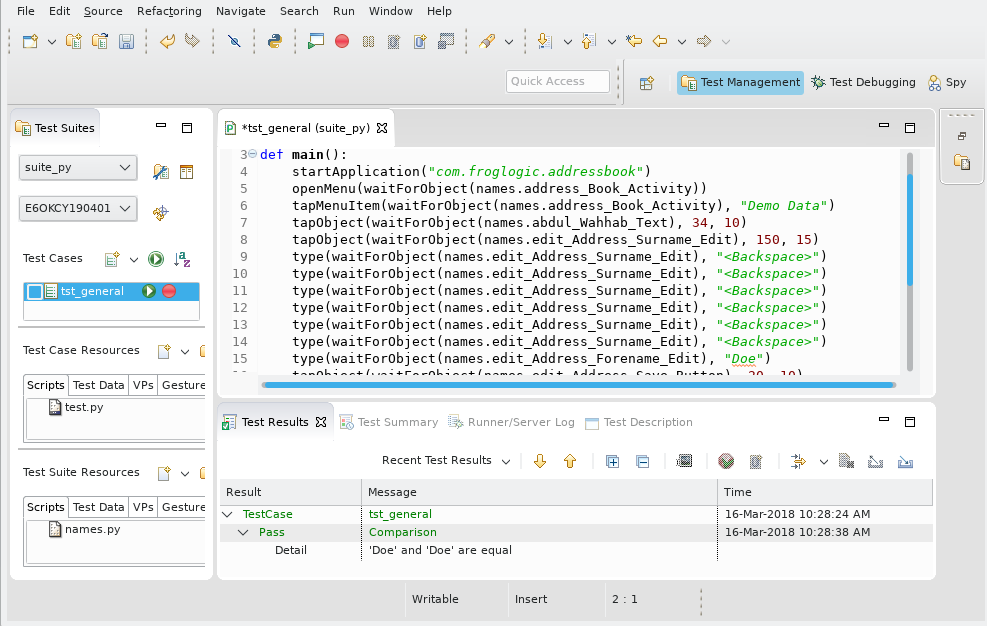
If the recorded test doesn't appear, click (or double-click depending on your platform and settings) the tst_general test case; this will make Squish show the test's test.py file in an editor window as shown in the screenshot.
Now that we've recorded the test we are able to play it back, i.e., run it. This in itself is useful in that if the play back failed it might mean that the application has been broken. Furthermore, the verification that we inserted will be checked on play back (as shown in the screenshot above).
Inserting verification points during test recording is very convenient. Here we inserted only one, but we can insert as many as we like as often as we like during the test recording process. However, sometimes we might forget to insert a verification, or later on we might want to insert a new verification. We can easily insert additional verifications into a recorded test script as we will see in the next section, Inserting Additional Verification Points.
Before going further we will look at how to record a test from the command line. Then we will see how to run a test, and we will also look at some of the code that Squish generated to record the test and discuss some of its features.
Running Tests from IDE
To run a test case in the Squish IDE, click the Run Test Case () that appears when the test case is hovered or selected in the Test Suites view.
To run two or more test cases one after another or to run only the selected test cases, click Run Test Suite ().
Running Tests from Command Line
To playback a recorded test from the command line, we execute the squishrunner program. We provide squishrunner the path to a test suite, and optionally also the name of a test case.
A squishserver must be running when running a test, and we can provide squishrunner an IP/Port of an already running one, or use the --local option which creates one for the duration of the process. For more information, see squishserver.
For example, assuming we are in the directory that contains the test suite's directory:
squishrunner --testsuite suite_AddressBook_py --testcase tst_general --local
When you have multiple devices and/or emulators attached, then you need to specify the target using --device some-device.
Examining the Generated Code
If you look at the code in the screenshot (or the code snippet shown below) you will see that it consists of lots of Object waitForObject(objectOrName) calls as parameters to various other calls such as openMenu(objectOrName), tapMenuItem(objectOrName), tapObject(objectOrName), and type(objectOrName, text). The Object waitForObject(objectOrName) function waits until a GUI object is ready to be interacted with (i.e., becomes visible and enabled), and is then followed by some function that interacts with the object. The typical interactions are activate (pop-up) a menu, tap a menu option or a button, or type in some text.
The generated code is about 23 lines of code. Here's an extract that just shows how Squish records tapping an address entry, changing the surname, and tapping Save at the end to close the page and update the table.
    tapObject(waitForObject(names.abdulWahhabText), 34, 10);
    tapObject(waitForObject(names.editAddressSurnameEdit), 150, 15);
    type(waitForObject(names.editAddressSurnameEdit), "<Backspace>");
    type(waitForObject(names.editAddressSurnameEdit), "<Backspace>");
    type(waitForObject(names.editAddressSurnameEdit), "<Backspace>");
    type(waitForObject(names.editAddressSurnameEdit), "<Backspace>");
    type(waitForObject(names.editAddressSurnameEdit), "<Backspace>");
    type(waitForObject(names.editAddressSurnameEdit), "<Backspace>");
    type(waitForObject(names.editAddressForenameEdit), "Doe");
    tapObject(waitForObject(names.editAddressSaveButton), 20, 10);
tapObject(waitForObject($Names::abdul_wahhab_text), 34, 10);
tapObject(waitForObject($Names::edit_address_surname_edit), 150, 15);
type(waitForObject($Names::edit_address_surname_edit), "<Backspace>");
type(waitForObject($Names::edit_address_surname_edit), "<Backspace>");
type(waitForObject($Names::edit_address_surname_edit), "<Backspace>");
type(waitForObject($Names::edit_address_surname_edit), "<Backspace>");
type(waitForObject($Names::edit_address_surname_edit), "<Backspace>");
type(waitForObject($Names::edit_address_surname_edit), "<Backspace>");
type(waitForObject($Names::edit_address_forename_edit), "Doe");
tapObject(waitForObject($Names::edit_address_save_button), 20, 10); tapObject(waitForObject(names.abdul_Wahhab_Text), 34, 10)
tapObject(waitForObject(names.edit_Address_Surname_Edit), 150, 15)
type(waitForObject(names.edit_Address_Surname_Edit), "<Backspace>")
type(waitForObject(names.edit_Address_Surname_Edit), "<Backspace>")
type(waitForObject(names.edit_Address_Surname_Edit), "<Backspace>")
type(waitForObject(names.edit_Address_Surname_Edit), "<Backspace>")
type(waitForObject(names.edit_Address_Surname_Edit), "<Backspace>")
type(waitForObject(names.edit_Address_Surname_Edit), "<Backspace>")
type(waitForObject(names.edit_Address_Forename_Edit), "Doe")
tapObject(waitForObject(names.edit_Address_Save_Button), 20, 10) tapObject(waitForObject(Names::Abdul_Wahhab_Text), 34, 10)
tapObject(waitForObject(Names::Edit_Address_Surname_Edit), 150, 15)
type(waitForObject(Names::Edit_Address_Surname_Edit), "<Backspace>")
type(waitForObject(Names::Edit_Address_Surname_Edit), "<Backspace>")
type(waitForObject(Names::Edit_Address_Surname_Edit), "<Backspace>")
type(waitForObject(Names::Edit_Address_Surname_Edit), "<Backspace>")
type(waitForObject(Names::Edit_Address_Surname_Edit), "<Backspace>")
type(waitForObject(Names::Edit_Address_Surname_Edit), "<Backspace>")
type(waitForObject(Names::Edit_Address_Forename_Edit), "Doe")
tapObject(waitForObject(Names::Edit_Address_Save_Button), 20, 10) invoke tapObject [waitForObject $names::Abdul_Wahhab_Text] 34 10
invoke tapObject [waitForObject $names::Edit_Address_Surname_Edit] 150 15
invoke type [waitForObject $names::Edit_Address_Surname_Edit] "<Backspace>"
invoke type [waitForObject $names::Edit_Address_Surname_Edit] "<Backspace>"
invoke type [waitForObject $names::Edit_Address_Surname_Edit] "<Backspace>"
invoke type [waitForObject $names::Edit_Address_Surname_Edit] "<Backspace>"
invoke type [waitForObject $names::Edit_Address_Surname_Edit] "<Backspace>"
invoke type [waitForObject $names::Edit_Address_Surname_Edit] "<Backspace>"
invoke type [waitForObject $names::Edit_Address_Forename_Edit] "Doe"
invoke tapObject [waitForObject $names::Edit_Address_Save_Button] 20 10As you can see, the tester used touch to set the input focus on an edit field. If the tester had moved the focus by using the cursor keys from a hardware keyboard, the outcome would be the same, but of course Squish will have recorded the actual actions that were taken.
In the code snippet, there are no explicit delays. To force a delay, use Squish's snooze(seconds) function.) This is because the Object waitForObject(objectOrName) function delays until the object it is given is ready, thus allowing Squish to run as fast as the GUI toolkit can cope with, but no faster.
Symbolic Names
Squish recordings refer to objects using variables that begin with a names. prefix. These are known as Symbolic Names. Each variable contains, as a value, the corresponding Real Name.
The advantage of using symbolic names (instead of real names) in your scripts, is that if the application changes in a way that results in different names being needed, it is possible to update Squish's Object Map and thereby avoid the need to change our test scripts.
When a Symbolic Name is under the cursor, the editor's context menu allows you to Open Symbolic Name, showing its entry in the Object Map, or Convert to Real Name, which places an inline mapping in your script language at the cursor, allowing you to hand-edit the properties in the script itself.
See How to Identify and Access Objects for more details.
Now that we have seen how to record and play back a test and have seen the code that Squish generates, let's go a step further and make sure that at particular points in the test's execution certain conditions hold.
Inserting Additional Verification Points
In the previous section we saw how easy it is to insert verification points during the recording of test scripts. Verification points can also be inserted into existing test scripts, either by setting a breakpoint and using the Squish IDE, or simply by editing a test script and putting in calls to Squish's test functions such as Boolean test.compare(value1, value2) and Boolean test.verify(condition).
Squish supports many kinds of verification points: those that verify that object properties have particular values—known as "Object Property Verifications"; those that verify that an entire table has the contents we expect—known as "Table Verifications"; those that verify that two images match—known as "Screenshot Verifications"; and a hybrid verification type that includes properties and screenshots from multiple objects, known as "Visual Verifications". In addition, it is possible to verify that a search image exists somewhere on the screen, or that certain text is found by OCR. The most commonly used kind is object property verifications, and it is these that we will cover in the tutorial. For further reading, see How to Create and Use Verification Points).
In fact, Scriptified property verifications aresimply calls to the Boolean test.compare(value1, value2) function, with two arguments—the value of a particular property for a particular object, and an expected value. We can manually insert calls to the Boolean test.compare(value1, value2) function in a recorded or hand written script, or we can get Squish to insert them for us using the Squish IDE. In the previous section we showed how to use the Squish IDE to insert verifications during recording. Here we will first show how to use the Squish IDE to insert verifications into an existing test script, and then we will show how to insert a verification by hand.
Note: In preparation for the next step, create a New Script Test Case () called adding, and Record () the adding of an example entry (Zikra Glen is the name we picked), then quitting the AUT. Our subsequent exercises will develop based on this script.
To insert a verification point using the Squish IDE, we start by putting a break point in the script at the point where we want to verify.
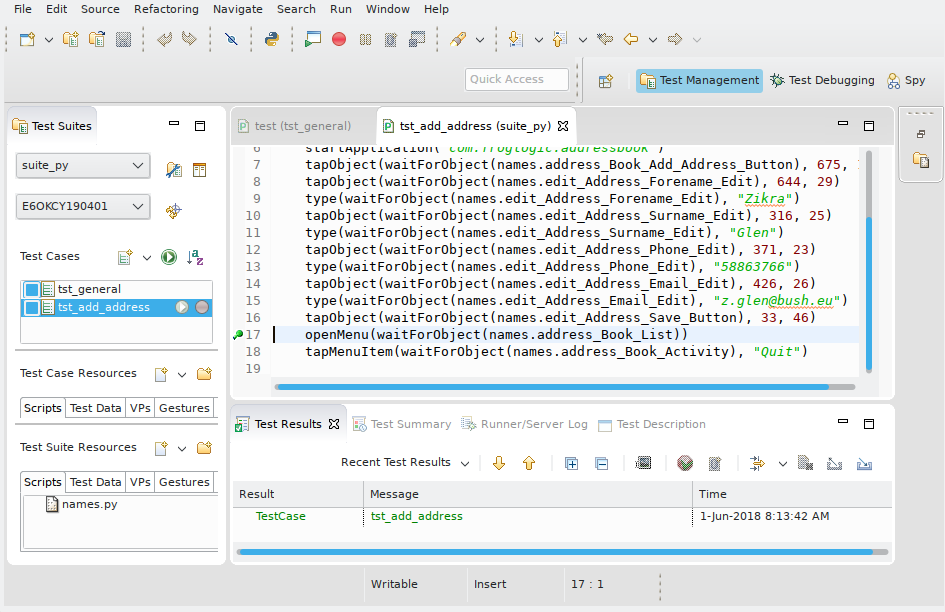
As the above screenshot shows, we have set a breakpoint at line 16. This is done simply by double-clicking, or right-clicking in the gutter (next to the line number in the editor) and selecting the Add Breakpoint context menu item. We chose this line because it follows the script lines where the address is saved, so at this point (just before invoking the menu to quit the application), the first address should be that of "Zikra Glen". Your line number may be different if you recorded the test in a different way, for example, using keyboard shortcuts rather than clicking menu items.
Having set the breakpoint, we now run the test as usual by clicking the Run Test Case () button, or by clicking the Run > Run Test Case menu option. Unlike a normal test run, the test will stop when the breakpoint is reached (i.e., at line 16, or at whatever line you set), and Squish's main window will reappear (which will probably obscure the AUT). At this point the Squish IDE will automatically switch to the Test Debugging Perspective.
Perspectives and Views
The Squish IDE works just like the Eclipse IDE. If you aren't used to Eclipse, it is crucial to understand the following key concepts: Views and Perspectives. In Eclipse, and therefore in the Squish IDE, a View is essentially a child window, such as a dock window or a tab in an existing window. A Perspective is a collection of views arranged together. Both are accessible through the Window menu.
The Squish IDE is supplied with the following perspectives:
- Test Management Perspective that the Squish IDE starts with, and that is shown in all previous screenshots
- Test Debugging Perspective
- Spy Perspective
You can modify these perspectives to show additional views, to hide views that you don't want, or to create your own perspectives with exactly the views you want.
If you notice all of your Views change dramatically, it just means that the perspective changed. Use the Window menu to change back to the perspective you want. Keep in mind, Squish automatically changes perspectives to reflect the current situation, so you should not need to change perspective manually very often.
When Squish stops at a breakpoint, the Squish IDE automatically changes to the Test Debugging Perspective. The perspective shows the Variables view, the Editor view, the Debug view, the Application Objects view, and the Properties view, Methods view, and Test Results view.
The normal Test Management Perspective can be returned to at any time by choosing it from the Window menu (or by clicking its toolbar button), although the Squish IDE will automatically return to it if you Terminate( ) or Resume(
 ) to completion.
Inserting Verification Points
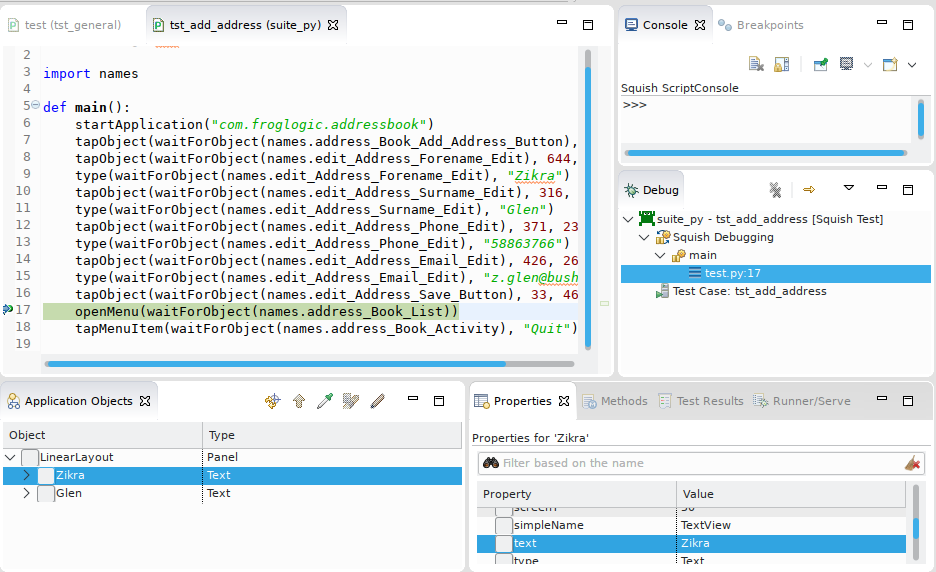
As the screenshot below shows, when Squish stops at a breakpoint the Squish IDE automatically changes to the Test Debugging Perspective. The perspective shows the Variables view, the Editor view, the Debug view, the Application Objects view, and the Properties view, Methods view, and Test Results view.
To insert a property verification point we must first decide (by selecting) which object contains the property of interest, and then we must check the property of interest. We can expand items in the Application Objects view until we find the object we want to verify, or use the Object Picker ( ) to find it visually in the GUI.
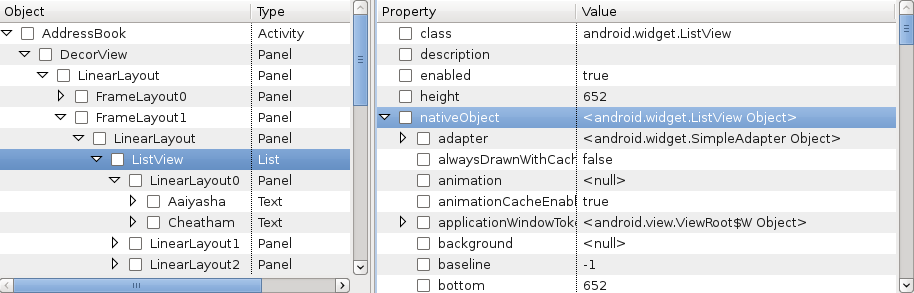
In this example, we want to verify the first row's text, so we expand the AddressBook item, and its child items until we find the ListView, and within that search for the objects we are interested in. Once we click the Zikra object, its properties are shown in the Properties view as the screenshot shows.
The normal Test Management Perspective can be returned to at any time by choosing it from the Window menu (or by clicking its toolbar button), although the Squish IDE will automatically return to it if you stop the script or run it to completion.
Here, we can see that the text property of this TextView item has the value "Zikra". To make sure that this is verified every time the test is run, click this TextView item in the Application Objects view to make its properties appear, and then click the text property to check its check box. After we check it, the Verification Point Creator view appears as shown in the screenshot.
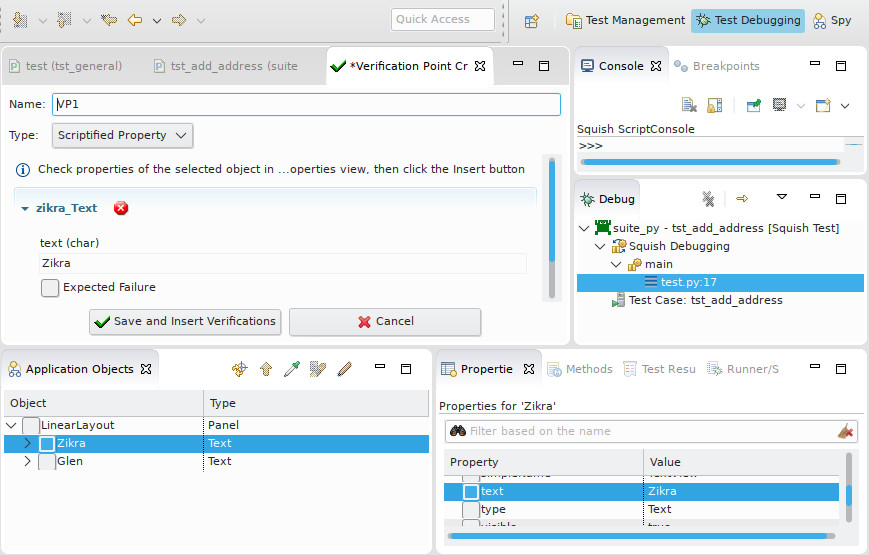
At this point, the verification point has not yet been added to the test script. We could easily add it by clicking the Save and Insert Verifications button. But before doing that we'll add one more thing to be verified.
Scroll down and click the "Glen" TextView item in the Application Objects view; then click its text property. Now both verifications will appear in the Verification Point Creator view as the screenshot shows.
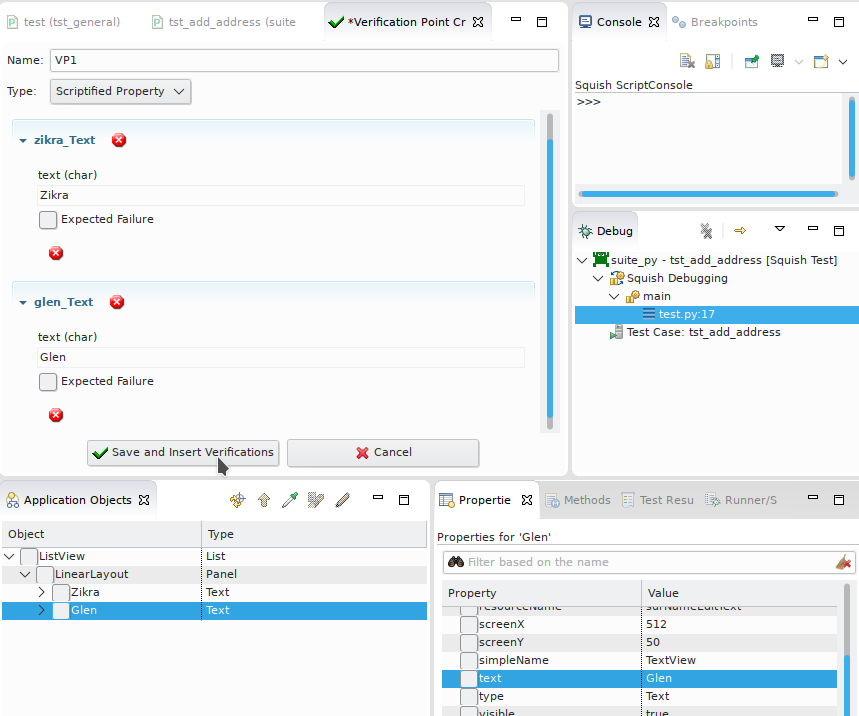
We have now said that we expect these properties to have the values shown, that is, a forename of "Zikra" and surname of "Glen". We must click the Insert button to actually insert the verification point, so do that now.
We don't need to continue running the test now, so we can either stop running the test at this point (by clicking the Stop toolbar button), or we can continue (by clicking the Resume button).
Once we have finished inserting verifications and stopped or finished running the test we should now disable the break point. Just right click the break point and click the Disable Breakpoint menu option in the context menu. We are now ready to run the test without any breakpoints but with the verification points in place. Click the Run Test button. This time we will get some additional test results—as the screenshot shows—one of which we have expanded to show its details. (We have also selected the lines of code that Squish inserted to perform the verifications—notice that the code is structurally identical to the code inserted during recording.)
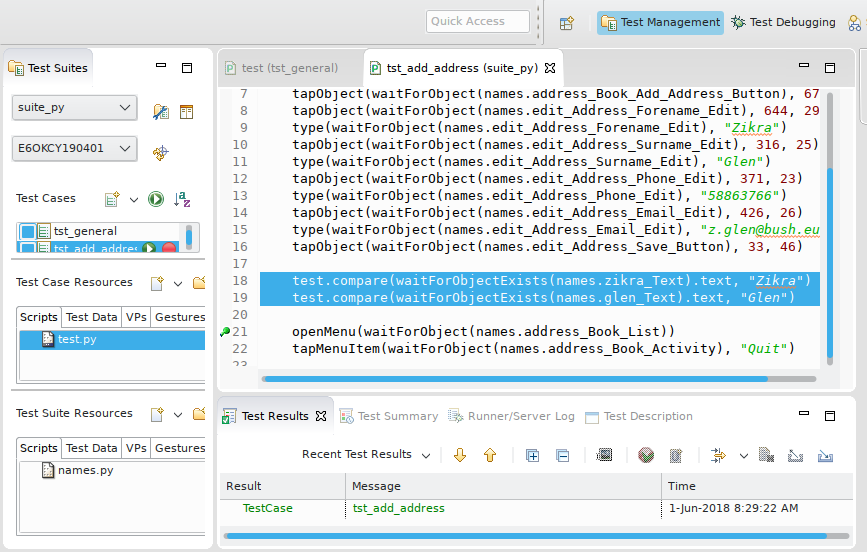
These particular verification points generate two tests comparing the forename and surname of the newly inserted entry.
Another way to insert verification points is to insert them in code form. In theory we can just add our own calls to Squish's test functions such as Boolean test.compare(value1, value2) and Boolean test.verify(condition) anywhere we like in an existing script. In practice it is best to make sure that Squish knows about the objects we want to verify first so that it can find them when the test is run. This involves a very similar procedure to inserting them using the Squish IDE. First we set a breakpoint where we intend adding our verifications. Then we run the test script until it stops. Next, we navigate in the Application Objects view until we find the object we want to verify. At this point it is wise to right-click the object we are interested in and click the Add to Object Map context menu action. This will ensure that Squish can access the object. Then right click again and select the Copy Symbolic Name context menu action—this gives us the name of the object that Squish will use to identify it. Now we can edit the test script to add in our own verification and finish the execution. (Don't forget to disable the break point once it isn't needed any more.)
Although we can write our test script code to be exactly the same style as the automatically generated code, it is usually clearer and easier to do things in a slightly different style, as we will explain in a moment.
For our manual verifications we want to check the number of addresses present in the list after inserting an entry. The screenshot shows two of the lines of code we entered to get the verification, plus the results of running the test script.

When writing scripts by hand, we use Squish's test module's functions to verify conditions at certain points during our test script's execution. As the screenshot shows, we begin by retrieving a reference to the object we are interested in. Using the Object waitForObject(objectOrName) function is standard practice for manually written test scripts. This function waits for the object to be available (i.e., visible and enabled), and then returns a reference to it. (Otherwise it times out and raises a catchable exception.) We then use this reference to access the item's properties—in this case the ListView's rowCount—and test.compare its value to what we expect it to be.
The coding pattern is very simple: we retrieve a reference to the object we are interested in and then verify its properties using one of Squish's verification functions. And we can, of course, call methods on the object to interact with it if we wish.
For more examples of manually written code, see Creating Tests by Hand, How to Create Test Scripts, and How to Test Applications - Specifics.
For complete coverage of verification points, see How to Create and Use Verification Points.
Test Results
After each test run finishes, the test results—including those for the verification points—are shown in the Test Results view at the bottom of the Squish IDE.
This is a detailed report of the test run and would also contain details of any failures or errors, etc. If you click on a Test Results item, the Squish IDE highlights the script line which generated the test result. And if you expand a Test Results item, you can see additional details of the test.
Squish's interface for test results is very flexible. By implementing custom report generators it is possible to process test results in many different ways, for example to store them in a database, or to output them as HTML files. The default report generator simply prints the results to stdout when Squish is run from the command line, or to the Test Results view when Squish IDE is being used. You can save the test results from the Squish IDE as XML by right clicking on the Test Results and choosing the Export Results menu option. For a list of report generators, see squishrunner –reportgen: Generating Reports. It is also possible to log test results directly to a database. See How to Access Databases from Squish Test Scripts.
If you run tests on the command line using squishrunner, you can also export the results in different formats and save them to files. For more information, see Processing Test Results and How to Use Test Statements.
Creating Tests by Hand
Now that we have seen how to record a test and modify it by inserting verification points, we are ready to see how to create tests manually. The easiest way to do this is to modify and refactor recorded tests, although it is also perfectly possible to create manual tests from scratch.
Potentially the most challenging part of writing manual tests is to use the right object names, but in practice, this is rarely a problem. We can either copy the symbolic names that Squish has already added to the Object Map when recording previous tests, or we can copy object names directly from recorded tests. And if we haven't recorded any tests and are starting from scratch we can use the Spy. We do this by clicking the Launch AUT toolbar button. This starts the AUT and switches to the Spy Perspective. We can then interact with the AUT until the object we are interested in is visible. Then, inside the Squish IDE we can navigate to the object in the Application Objects view and use the context menu to both add the object to the Object Map (so that Squish will remember it) and to the clipboard (so that we can paste it into our test script). And at the end we can click the Quit AUT toolbar button to terminate the AUT and return Squish to the Test Management Perspective.
We can open the Object Map editor by clicking the Object Map( ) toolbar button (see also, the Object Map view). Every application object that Squish interacts with is listed here, either as a top-level object, or as a child object (the view is a tree view). We can retrieve the symbolic name used by Squish in recorded scripts by right-clicking the object we are interested in and then clicking the context menu's Copy Symbolic Name action. This is useful for when we want to modify existing test scripts or when we want to create test scripts from scratch, as we will see later on in the tutorial.
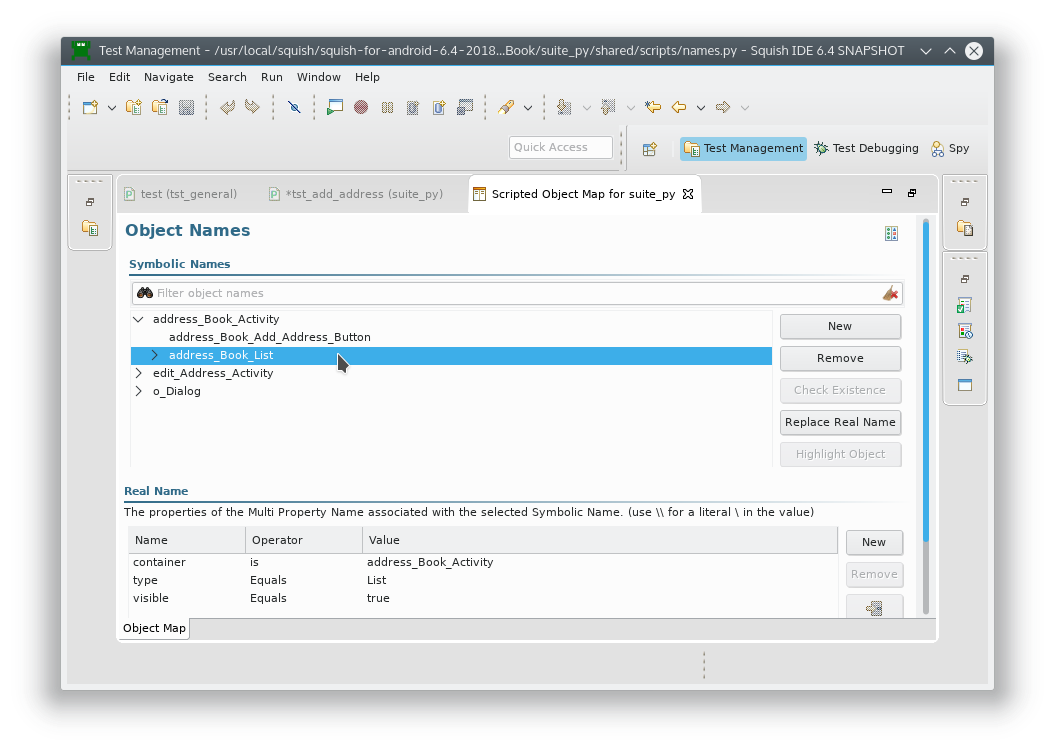
Alternatively, real names can be used, also by right-clicking the object we are interested in and then clicking the context menu's Copy Real Name. For this List object the 'real name' is a mapping of native script-language key-value pairs. Since object references (e.g. for container) can use symbolic or real names for values, the following three waitForObject calls are in the context of this test suite equivalent:
waitForObject(names.address_Book_List)
waitForObject({"container": names.address_Book_Activity, "type": "List", "visible": True})
waitForObject({"container": {"text": "Address Book", "type": "Activity", "visible": True}, "type": "List", "visible": True})
waitForObject(names.addressBookList);
waitForObject({"container": names.addressBookActivity, "type": "List", "visible": true});
waitForObject({"container": {"text": "Address Book", "type": "Activity", "visible": true}, "type": "List", "visible": true});
waitForObject($Names::address_book_list);
waitForObject({"container" => $Names::address_book_activity, "type" => "List", "visible" => "true"});
waitForObject({"container" => {"text" => "Address Book", "type" => "Activity", "visible" => "true"}, "type" => "List", "visible" => "true"});
waitForObject(Names::Address_Book_List))
waitForObject({:container => Names::Address_Book_Activity, :type => "List", :visible => true}))
waitForObject({:container => {:text => "Address Book", :type => "Activity", :visible => true}, :type => "List", :visible => true}))
waitForObject $names::Address_Book_List
waitForObject [::Squish::ObjectName container $names::Address_Book_Activity type List visible true]
waitForObject [::Squish::ObjectName container [::Squish::ObjectName text {Address Book} type Activity visible true] type List visible true]
This can be useful when dynamically creating object names. When using real names directly, no entry from the object map is needed. See How to Access Named Objects for more information.
Modifying and Refactoring Recorded Tests
Suppose we want to test the AUT's Add functionality by adding three new addresses. We could of course record such a test, but it is just as easy to do everything in code. The steps we need the test script to do are:
- tap the "Add Address" button
- fill in the fields
- tap the "Save" button
We also want to verify at the start that there are no rows of data and at the end that there are three rows. We will refactor as we go, to make our code as neat and modular as possible.
Lets start with the "tst_adding" script we created earlier, and turn this into a function that gets field values as arguments.
def addNameAndAddress(fields):
    forename,surname,email,phone = fields
    tapObject(waitForObject(names.address_Book_Add_Address_Button))
    tapObject(waitForObject(names.edit_Address_Forename_Edit))
    type(waitForObject(names.edit_Address_Forename_Edit), forename)
    tapObject(waitForObject(names.edit_Address_Surname_Edit))
    type(waitForObject(names.edit_Address_Surname_Edit), surname)
    tapObject(waitForObject(names.edit_Address_Phone_Edit))
    type(waitForObject(names.edit_Address_Phone_Edit), phone)
    tapObject(waitForObject(names.edit_Address_Email_Edit))
    type(waitForObject(names.edit_Address_Email_Edit), email)
    tapObject(waitForObject(names.edit_Address_Save_Button))
function addNameAndAddress(fields)
{
tapObject(waitForObject(names.addressBookAddAddressButton));
tapObject(waitForObject(names.editAddressForenameEdit));
type(waitForObject(names.editAddressForenameEdit), fields[0]);
tapObject(waitForObject(names.editAddressSurnameEdit));
type(waitForObject(names.editAddressSurnameEdit), fields[1]);
tapObject(waitForObject(names.editAddressPhoneEdit));
type(waitForObject(names.editAddressPhoneEdit), fields[3]);
tapObject(waitForObject(names.editAddressEmailEdit));
type(waitForObject(names.editAddressEmailEdit), fields[2]);
tapObject(waitForObject(names.editAddressSaveButton));
}sub addNameAndAddress {
my ($forename,$surname,$email,$phone) = @_;
tapObject(waitForObject($Names::address_book_add_address_button));
tapObject(waitForObject($Names::edit_address_forename_edit));
type(waitForObject($Names::edit_address_forename_edit), $forename);
tapObject(waitForObject($Names::edit_address_surname_edit));
type(waitForObject($Names::edit_address_surname_edit), $surname);
tapObject(waitForObject($Names::edit_address_phone_edit));
type(waitForObject($Names::edit_address_phone_edit), $phone);
tapObject(waitForObject($Names::edit_address_email_edit));
type(waitForObject($Names::edit_address_email_edit), $email);
tapObject(waitForObject($Names::edit_address_save_button));
}def addNameAndAddress(fields)
tapObject(waitForObject(Names::Address_Book_Add_Address_Button))
tapObject(waitForObject(Names::Edit_Address_Forename_Edit))
type(waitForObject(Names::Edit_Address_Forename_Edit), fields[0])
tapObject(waitForObject(Names::Edit_Address_Surname_Edit))
type(waitForObject(Names::Edit_Address_Surname_Edit), fields[1])
tapObject(waitForObject(Names::Edit_Address_Phone_Edit))
type(waitForObject(Names::Edit_Address_Phone_Edit), fields[3])
tapObject(waitForObject(Names::Edit_Address_Email_Edit))
type(waitForObject(Names::Edit_Address_Email_Edit), fields[2])
tapObject(waitForObject(Names::Edit_Address_Save_Button))
endproc addNameAndAddress {fields} {
invoke tapObject [waitForObject $names::Address_Book_Add_Address_Button]
invoke tapObject [waitForObject $names::Edit_Address_Forename_Edit]
invoke type [waitForObject $names::Edit_Address_Forename_Edit] [lindex $fields 0]
invoke tapObject [waitForObject $names::Edit_Address_Surname_Edit]
invoke type [waitForObject $names::Edit_Address_Surname_Edit] [lindex $fields 1]
invoke tapObject [waitForObject $names::Edit_Address_Phone_Edit]
invoke type [waitForObject $names::Edit_Address_Phone_Edit] [lindex $fields 3]
invoke tapObject [waitForObject $names::Edit_Address_Email_Edit]
invoke type [waitForObject $names::Edit_Address_Email_Edit] [lindex $fields 2]
invoke tapObject [waitForObject $names::Edit_Address_Save_Button]
}Next we call this function with an array of list of fields from the main function.
import names

def main():
    startApplication("com.froglogic.addressbook")
    table = waitForObject(names.address_Book_List)
    test.verify(table.rowCount == 0)
    data = [("Andy", "Beach", "andy.beach@nowhere.com", "555 123 6786"),
            ("Candy", "Deane", "candy.deane@nowhere.com", "555 234 8765"),
            ("Ed", "Fernleaf", "ed.fernleaf@nowhere.com", "555 876 4654")]
    for fields in data:
        addNameAndAddress(fields)
    test.compare(table.rowCount, len(data))
    openMenu(waitForObject(names.address_Book_Activity))
    snooze(0.5)  # recommended to ensure that menu finishes opening before we proceed
    tapMenuItem(waitForObject(names.address_Book_Activity), "Quit")
import * as names from 'names.js';
function main()
{
startApplication("com.froglogic.addressbook");
var table = waitForObject(names.addressBookList);
test.verify(table.rowCount == 0);
var data = [["Andy", "Beach", "andy.beach@nowhere.com", "555 123 6786"],
["Candy", "Deane", "candy.deane@nowhere.com", "555 234 8765"],
["Ed", "Fernleaf", "ed.fernleaf@nowhere.com", "555 876 4654"]];
for (var row = 0; row < data.length; ++row) {
addNameAndAddress(data[row]);
}
test.compare(table.rowCount, data.length);
// depending on the Android API version, either a menu or toolbar is shown
var androidApiVersion = waitForObjectExists(names.addressBookActivity).nativeObject.getClass().forName("android.os.Build$VERSION").newInstance().SDK_INT;
if (androidApiVersion < 21) {
openMenu(waitForObject(names.addressBookActivity));
snooze(0.5); // recommended to ensure that menu finishes opening before we proceed
tapMenuItem(waitForObject(names.addressBookActivity), "Quit");
} else {
tapObject(waitForObject(names.mainToolbarButton));
tapObject(waitForObjectItem(names.mainToolbar, "Quit"));
}
}require 'names.pl';
sub main() {
startApplication("com.froglogic.addressbook");
my $table = waitForObject($Names::address_book_list);
test::verify($table->rowCount == 0);
my @data = (['Andy', 'Beach', 'andy.beach@nowhere.com', '555 123 6786'],
['Candy', 'Deane', 'candy.deane@nowhere.com', '555 234 8765'],
['Ed', 'Fernleaf', 'ed.fernleaf@nowhere.com', '555 876 4654']);
foreach $line (@data) {
addNameAndAddress(@$line);
}
test::compare($table->rowCount, scalar(@data));
openMenu(waitForObject($Names::address_book_activity));
snooze(0.5); # recommended to ensure that menu finishes opening before we proceed
tapMenuItem(waitForObject($Names::address_book_activity), "Quit");
}require 'names';
require 'squish'
include Squish
def main
startApplication("com.froglogic.addressbook")
table = waitForObject(Names::Address_Book_List)
Test.verify(table.rowCount == 0)
data = [["Andy", "Beach", "andy.beach@nowhere.com", "555 123 6786"],
["Candy", "Deane", "candy.deane@nowhere.com", "555 234 8765"],
["Ed", "Fernleaf", "ed.fernleaf@nowhere.com", "555 876 4654"]]
data.each do |address|
addNameAndAddress(address)
end
Test.compare(table.rowCount, data.length)
openMenu(waitForObject(Names::Address_Book_Activity))
snooze(0.5) # recommended to ensure that menu finishes opening before we proceed
tapMenuItem(waitForObject(Names::Address_Book_Activity), "Quit")
endsource [findFile "scripts" "names.tcl"]
proc main {} {
startApplication "com.froglogic.addressbook"
set table [waitForObject $names::Address_Book_List]
test compare [property get $table rowCount] 0
set data [list \
[list "Andy" "Beach" "andy.beach@nowhere.com" "555 123 6786"] \
[list "Candy" "Deane" "candy.deane@nowhere.com" "555 234 8765"] \
[list "Ed" "Fernleaf" "ed.fernleaf@nowhere.com" "555 876 4654"] ]
for {set i 0} {$i < [llength $data]} {incr i} {
addNameAndAddress [lindex $data $i]
}
test compare [property get $table rowCount] [llength $data]
invoke openMenu [waitForObject $names::Address_Book_Activity]
# recommended to ensure that menu finishes opening before we proceed
snooze 0.5
invoke tapMenuItem [waitForObject $names::Address_Book_Activity] "Quit"
}However, one aspect of the test case is not very satisfactory. Although embedding test data as we did here is sensible for small amounts, it is rather limiting, especially when we want to use a lot of test data. In the next section we will create a new version of this test, only this time we will pull in the data from an external data source.
Creating Data Driven Tests
In the previous section we had hard-coded names and addresses in our test. But what if we want to test lots of data? Or what if we want to change the data without having to change our test script's source code. One approach is to import a dataset into Squish and use the dataset as the source of the values we insert into our tests. Squish can import data in .tsv (tab-separated values format), .csv (comma-separated values format), .xls, or .xlsx (Microsoft Excel spreadsheet formats).
Note: Both .csv and .tsv files are assumed to use the Unicode UTF-8 encoding, which is used for all test scripts.
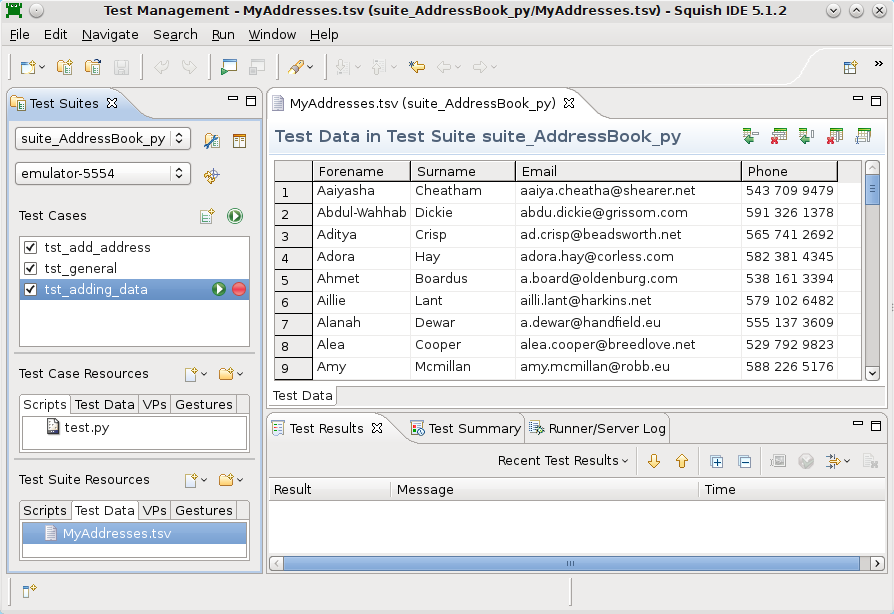
We want to add a test data file to the test suite. We can copy MyAddresses.tsv directly into the suite's shared/testdata directory, or we can import it using the Squish IDE (from shared/testdata of one of the example test suites).
To import, we click File > Import Test Resource to pop-up the Import Squish Resource dialog. Inside the dialog, click the Browse button to choose the file to import (you can find this file already added to our example test suites). Make sure that the Import As combobox is set to "TestData".
By default the Squish IDE will import the test data just for the current test case, but we want the test data to be available to all the test suite's test cases: to do this check the Copy to Test Suite for Sharing radio button. Next, click the Finish button.
You should now see the file listed in the Test Suite Resources view (in the Test Data tab), and if you click the file's name it will be shown in an Editor view. The screenshot shows Squish IDE after some test data has been opened.
Adding a Test Case
Although in real life we would modify our tst_adding test case to use the test data, for the purpose of the tutorial we will make a new test case called tst_adding_data that is a copy of tst_adding and which we will modify to make use of the test data.
The only function we have to change is main, where instead of iterating over hard-coded items of data, we iterate over all the records in the dataset. We also need to update the expected row count at the end since we are adding a lot more records now, and we will also add a function to verify each record that's added.
import names

def main():
    startApplication("com.froglogic.addressbook")
    table = waitForObject(names.address_Book_List)
    test.verify(table.rowCount == 0)
    limit = 10 # To avoid testing 100s of rows since that would be boring
    for row, record in enumerate(testData.dataset("MyAddresses.tsv")):
        fields = testData.field(record, "Forename"), testData.field(record, "Surname"), testData.field(record, "Email"), testData.field(record, "Phone")
        addNameAndAddress(fields)
        if row > limit:
            break
    test.compare(table.rowCount, row+1)
import * as names from 'names.js';
function main()
{
startApplication("com.froglogic.addressbook");
var table = waitForObject(names.addressBookList);
test.verify(table.rowCount == 0);
var limit = 10; // To avoid testing 100s of rows since that would be boring
var records = testData.dataset("MyAddresses.tsv");
var row = 0;
for (; row < records.length; ++row) {
var record = records[row];
var line = [testData.field(record, "Forename")
, testData.field(record, "Surname")
, testData.field(record, "Email")
, testData.field(record, "Phone")];
addNameAndAddress(line);
if (row > limit)
break;
}
test.compare(table.rowCount, row+1);
openMenu(waitForObject(names.addressBookActivity));
snooze(0.5); // recommended to ensure that menu finishes opening before we proceed
tapMenuItem(waitForObject(names.addressBookActivity), "Quit");
}require 'names.pl';
sub main() {
startApplication("com.froglogic.addressbook");
my $table = waitForObject($Names::address_book_list);
test::verify($table->rowCount == 0);
my $limit = 10; # To avoid testing 100s of rows since that would be boring
my @records = testData::dataset("MyAddresses.tsv");
my $row = 0;
for (; $row < scalar(@records); $row++) {
my $record = $records[$row];
my @line = ( testData::field($record, "Forename")
, testData::field($record, "Surname")
, testData::field($record, "Email")
, testData::field($record, "Phone") );
addNameAndAddress(@line);
if ($row > $limit) {
last;
}
}
test::compare($table->rowCount, $row+1);
openMenu(waitForObject($Names::address_book_activity));
snooze(0.5); # recommended to ensure that menu finishes opening before we proceed
tapMenuItem(waitForObject($Names::address_book_activity), "Quit");
}require 'squish'
require 'names';
include Squish
def main
startApplication("com.froglogic.addressbook")
table = waitForObject(Names::Address_Book_List)
Test.verify(table.rowCount == 0)
limit = 10 # To avoid testing 100s of rows since that would be boring
rows = 0
TestData.dataset("MyAddresses.tsv").each_with_index do
|record, row|
line = [TestData.field(record, "Forename"),
TestData.field(record, "Surname"),
TestData.field(record, "Email"),
TestData.field(record, "Phone")]
addNameAndAddress(line)
break if row > limit
rows += 1
end
Test.compare(table.rowCount, rows+1)
openMenu(waitForObject(Names::Address_Book_Activity))
snooze(0.5) # recommended to ensure that menu finishes opening before we proceed
tapMenuItem(waitForObject(Names::Address_Book_Activity), "Quit")
endsource [findFile "scripts" "names.tcl"]
proc main {} {
startApplication "com.froglogic.addressbook"
set table [waitForObject $names::Address_Book_List]
test compare [property get $table rowCount] 0
# To avoid testing 100s of rows since that would be boring
set limit 10
set data [testData dataset "MyAddresses.tsv"]
set columns [llength [testData fieldNames [lindex $data 0]]]
set row 0
for {} {$row < [llength $data]} {incr row} {
set record [lindex $data $row]
set fields [list \
[testData field $record "Forename"] \
[testData field $record "Surname"] \
[testData field $record "Email"] \
[testData field $record "Phone"]]
addNameAndAddress $fields
if {$row > $limit} {
break
}
}
test compare [property get $table rowCount] [expr $row+1]
invoke openMenu [waitForObject $names::Address_Book_Activity]
# recommended to ensure that menu finishes opening before we proceed
snooze 0.5
invoke tapMenuItem [waitForObject $names::Address_Book_Activity] "Quit"
}Using the Android native API
In this section we take a quick look at the nativeObject property and use it to rewrite a recorded script that scrolls through the demo list of addresses. This property allows access to the underlying Java object of a Squish user interface object. The available properties and methods of these native objects are dynamically created on use in the scripts. The online Android developer reference is the place to get documenation about them.
When recording a test on an item in a list that is only visible when scrolling the list, we probably get a script that contains the touchAndDrag(objectOrName, x, y, dx, dy) function. E.g. here a small recording:
function main() {
    startApplication("com.froglogic.addressbook");
    openMenu(waitForObject(names.addressBookActivity));
    tapMenuItem(waitForObject(names.addressBookActivity), "Demo Data");
    touchAndDrag(waitForObject(names.coonsText), 49, 6, 32, -451);
    touchAndDrag(waitForObject(names.mccullaghText), 105, 19, 13, -252);
    touchAndDrag(waitForObject(names.harrietText), 154, 15, -40, 365);
    touchAndDrag(waitForObject(names.dewarText), 149, 28, -51, 266);
    openMenu(waitForObject(names.addressBookList));
    snooze(0.5);  // recommended to ensure that menu finishes opening before we proceed
    tapMenuItem(waitForObject(names.addressBookActivity), "Quit");
}
sub main
{
startApplication("com.froglogic.addressbook");
openMenu(waitForObject($Names::address_book_activity));
tapMenuItem(waitForObject($Names::address_book_activity), "Demo Data");
touchAndDrag(waitForObject($Names::boardus_text), 71, 10, -26, 229);
touchAndDrag(waitForObject($Names::puckett_text), 61, 25, 14, -257);
touchAndDrag(waitForObject($Names::burnand_text), 61, 12, 14, -240);
touchAndDrag(waitForObject($Names::dyson_text), 67, 32, -29, 253);
touchAndDrag(waitForObject($Names::case_text), 71, 5, 3, 196);
openMenu(waitForObject($Names::address_book_list));
snooze(0.5); # recommended to ensure that menu finishes opening before we proceed
tapMenuItem(waitForObject($Names::address_book_activity), "Quit");
}def main():
startApplication("com.froglogic.addressbook")
openMenu(waitForObject(names.address_Book_Activity))
tapMenuItem(waitForObject(names.address_Book_Activity), "Demo Data")
touchAndDrag(waitForObject(names.atkinson_Text), 39, 9, 8, -198)
touchAndDrag(waitForObject(names.harriet_Text), 69, 19, 16, -195)
touchAndDrag(waitForObject(names.address_Book_List), 582, 556, 5, -251)
touchAndDrag(waitForObject(names.burnand_Text), 49, 4, -24, 250)
touchAndDrag(waitForObject(names.address_Book_List), 554, 558, 23, -247)
openMenu(waitForObject(names.address_Book_List))
snooze(0.5) # recommended to ensure that menu finishes opening before we proceed
tapMenuItem(waitForObject(names.address_Book_Activity), "Quit")def main
startApplication("com.froglogic.addressbook")
openMenu(waitForObject(Names::Address_Book_Activity))
tapMenuItem(waitForObject(Names::Address_Book_Activity), "Demo Data")
touchAndDrag(waitForObject(Names::Wasling_Text), 55, 18, 1, -221)
touchAndDrag(waitForObject(Names::Hullson_Text), 53, 28, 3, -144)
touchAndDrag(waitForObject(Names::Munford_Text), 62, 7, -12, 323)
touchAndDrag(waitForObject(Names::Puckett_Text), 55, 6, 2, -170)
openMenu(waitForObject(Names::Address_Book_List))
snooze(0.5) # recommended to ensure that menu finishes opening before we proceed
tapMenuItem(waitForObject(Names::Address_Book_Activity), "Quit")
endproc main {} {
startApplication "com.froglogic.addressbook"
invoke openMenu [waitForObject $names::Address_Book_Activity]
invoke tapMenuItem [waitForObject $names::Address_Book_Activity] "Demo Data"
invoke touchAndDrag [waitForObject $names::Puckett_Text] 68 4 -14 -175
invoke touchAndDrag [waitForObject $names::Selby_Text] 65 10 -11 -196
invoke touchAndDrag [waitForObject $names::Coons_Text] 58 30 8 202
invoke touchAndDrag [waitForObject $names::Grieve_Text] 37 13 -6 182
invoke openMenu [waitForObject $names::Address_Book_List]
# recommended to ensure that menu finishes opening before we proceed
snooze 0.5
invoke tapMenuItem [waitForObject $names::Address_Book_Activity] "Quit"
}While this replays well as long as the demo list is unchanged, it is somewhat slow on replay. Also the starting point objects of the touchAndDrag(objectOrName, x, y, dx, dy) function may not be there when replayed with a device or emulator having a smaller vertical resolution. A more robust approach would be to search through the items of the list, scroll the list to it and then tap on the item.
We can programmatically scroll the list using the ListView method smoothScrollToPosition. For finding the position to scroll to, we show three different approaches.
- Using an adapter
- Changing the object hierarchy during scrolling
- Searching for an object name while scrolling
More examples for using nativeObject can be found in the section How to Use the nativeObject Property.
Using the adapter of the list
We can use the adapter of this list because the adapter is a SimpleAdapter. It holds a List of Map objects.
Here an example of a function that uses this approach, given a list and a text to be found:
def scrollListToText1(list, text):
    adapter = list.nativeObject.adapter
    for i in range(adapter.getCount()):
        row = adapter.getItem(i)
        if (row.containsValue(text)):
            list.nativeObject.smoothScrollToPosition(i)
            break
function scrollListToText1(list, text) {
var adapter = list.nativeObject.adapter;
var total = adapter.getCount();
for (var i = 0; i < total; ++i) {
var row = adapter.getItem(i);
if (row.containsValue(text)) {
list.nativeObject.smoothScrollToPosition(i);
snooze(0.5); // recommended so that scroll stops before we proceed
break;
}
}
}sub scrollListToText1 {
my ($list, $text) = @_;
my $adapter = $list->nativeObject->adapter;
my $total = $adapter->getCount();
for (my $i = 0; $i < $total; ++$i) {
my $row = $adapter->getItem($i);
if ($row->containsValue($text)) {
$list->nativeObject->smoothScrollToPosition($i);
snooze(0.5); # recommended so that scroll stops before we proceed
last;
}
}
}def scrollListToText1(list, text)
adapter = list.nativeObject.adapter
total = adapter.getCount();
i = 0
while i < total
row = adapter.getItem(i)
if (row.containsValue(text))
list.nativeObject.smoothScrollToPosition(i)
snooze(0.5) # recommended so that scroll stops before we proceed
break
end
i += 1
end
endproc scrollListToText1 {lst text} {
set adapter [property get [property get $lst nativeObject] adapter]
set total [invoke $adapter getCount]
for {set i 0} {$i < $total} {incr i} {
set row [invoke $adapter getItem $i]
if {[invoke $row containsValue $text]} {
invoke [property get $lst nativeObject] smoothScrollToPosition $i
# recommended so that scroll stops before we proceed
snooze 0.5
break
}
}
}According to the API documentation, the getItem member returns an java.lang.Object, but the actual value is a java.util.Map, and thus we can just call containsValue on it.
This is the simplest approach but only works when a list has this SimpleAdapter type set as data source. For other types, a variation can be written of course. Here the main function using scrollListToText.
import names
def main():
startApplication("com.froglogic.addressbook")
openMenu(waitForObject(names.address_Book_Activity))
tapMenuItem(waitForObject(names.address_Book_Activity), "Demo Data")
list = waitForObject(names.address_Book_List)
scrollListToText3(list, "Nataniel")
tapObject(waitForObject(names.nataniel_Text))
openMenu(waitForObject(names.edit_Address_Forename_Edit))
tapMenuItem(waitForObject(names.edit_Address_Activity), "Cancel")
openMenu(waitForObject(names.address_Book_List))
snooze(0.5) # recommended to ensure that menu finishes opening before we proceed
tapMenuItem(waitForObject(names.address_Book_Activity), "Quit")import * as names from 'names.js';
function main() {
startApplication("com.froglogic.addressbook");
openMenu(waitForObject(names.addressBookActivity));
tapMenuItem(waitForObject(names.addressBookActivity), "Demo Data");
list = waitForObject(names.addressBookList);
scrollListToText2(list, "Nataniel");
tapObject(waitForObject(names.natanielText));
openMenu(waitForObject(names.editAddressForenameEdit));
tapMenuItem(waitForObject(names.editAddressActivity), "Cancel");
openMenu(waitForObject(names.addressBookList));
snooze(0.5); // recommended to ensure that menu finishes opening before we proceed
tapMenuItem(waitForObject(names.addressBookActivity), "Quit");
}require 'names.pl';
sub scrollListToText1 {
    my ($list, $text) = @_;
    my $adapter = $list->nativeObject->adapter;
    my $total = $adapter->getCount();
    for (my $i = 0; $i < $total; ++$i) {
        my $row = $adapter->getItem($i);
        if ($row->containsValue($text)) {
            $list->nativeObject->smoothScrollToPosition($i);
            snooze(0.5); # recommended so that scroll stops before we proceed
            last;
        }
    }
}require 'squish'
require 'names';
include Squish
def main()
startApplication("com.froglogic.addressbook")
openMenu(waitForObject(Names::Address_Book_Activity))
tapMenuItem(waitForObject(Names::Address_Book_Activity), "Demo Data")
list = waitForObject(Names::Address_Book_List)
scrollListToText2(list, "Nataniel")
tapObject(waitForObject(Names::Nataniel_Text))
openMenu(waitForObject(Names::Edit_Address_Forename_Edit))
tapMenuItem(waitForObject(Names::Edit_Address_Activity), "Cancel")
openMenu(waitForObject(Names::Address_Book_List))
snooze(0.5) # recommended to ensure that menu finishes opening before we proceed
tapMenuItem(waitForObject(Names::Address_Book_Activity), "Quit")
endsource [findFile "scripts" "names.tcl"]
proc main {} {
startApplication "com.froglogic.addressbook"
invoke openMenu [waitForObject $names::Address_Book_Activity]
invoke tapMenuItem [waitForObject $names::Address_Book_Activity] "Demo Data"
set lst [waitForObject $names::Address_Book_List]
scrollListToText3 $lst "Nataniel"
invoke tapObject [waitForObject $names::Nataniel_Text]
invoke openMenu [waitForObject $names::Edit_Address_Forename_Edit]
invoke tapMenuItem [waitForObject $names::Edit_Address_Activity] "Cancel"
invoke openMenu [waitForObject $names::Address_Book_List]
# recommended to ensure that menu finishes opening before we proceed
snooze 0.5
invoke tapMenuItem [waitForObject $names::Address_Book_Activity] "Quit"
}Using the Object Hierarchy Inside the List
Next we try to scroll using the SequenceOfObjects object.children(object) function traversing the Squish object hierarchy. As we can see in the object tree, the list has for each row a Panel object with two Text objects. Only the rows visible are in this hierarchy. So this list changes when scrolling down. With that knowledge we can try to scroll to an item as follows:
def scrollListToText2(list, text):
    total = list.rowCount
    current = 0
    while current < total:
        list.nativeObject.smoothScrollToPosition(current)
        snooze(0.5)  # recommended so that scroll stops before we proceed
        rows = object.children(list)
        for row in rows:
            for textview in object.children(row):
                if textview.text == text:
                    return
        current += len(rows)
function scrollListToText2(list, text) {
var total = list.rowCount;
var current = 0;
while (current < total) {
list.nativeObject.smoothScrollToPosition(current);
snooze(0.5); // recommended so that scroll stops before we proceed
var rows = object.children(list);
for (var r = 0; r < rows.length; ++r) {
var columns = object.children(rows[r]);
for (var c = 0; c < columns.length; ++c) {
if (columns[c].text == text)
return;
}
}
current += rows.length;
}
list.nativeObject.smoothScrollToPosition(total-1);
snooze(0.5); // recommended so that scroll stops before we proceed
}sub scrollListToText2 {
my ($list, $text) = @_;
my $total = $list->rowCount;
my $current = 0;
while ($current < $total) {
$list->nativeObject->smoothScrollToPosition($current);
snooze(0.5); # recommended so that scroll stops before we proceed
my @rows = object::children($list);
for my $row (@rows) {
for my $textview (object::children($row)) {
if ($textview->text eq $text) {
return;
}
}
}
$current += $#rows;
}
$list->nativeObject->smoothScrollToPosition($total-1);
snooze(0.5); # recommended so that scroll stops before we proceed
}def scrollListToText2(list, text)
total = list.rowCount
current = 0
while current < total
list.nativeObject.smoothScrollToPosition(current)
snooze(0.5) # recommended so that scroll stops before we proceed
rows = Squish::Object.children(list)
rows.each do |row|
for textview in Squish::Object.children(row)
if textview.text == text
return
end
end
end
current += rows.length
end
list.nativeObject.smoothScrollToPosition(total-1)
snooze(0.5) # recommended so that scroll stops before we proceed
endproc scrollListToText2 {lst text} {
set total [property get $lst rowCount]
set current 0
while {$current < $total} {
invoke [property get $lst nativeObject] smoothScrollToPosition $current
# recommended so that scroll stops before we proceed
snooze 0.5
set rows [object children $lst]
foreach row $rows {
set columns [object children $row]
foreach textview $columns {
set tmp [property get $textview text]
if {$tmp == $text} {
return
}
}
}
incr current [llength $rows]
}
invoke [property get $lst nativeObject] smoothScrollToPosition [expr $total - 1]
# recommended so that scroll stops before we proceed
snooze 0.5
}Using this method of scrolling to a certain Text object is very dependent on the exact hierarchy layout and will break when a layer is added or removed.
Using object name search
Just like Using the object hierarchy inside the list we let the object hierarchy change with scrolling but this time we just search for an object name using the Boolean object.exists(objectName) function:
def scrollListToText3(list, text):
    objectname = {"container": names.address_Book_List, "text": text, "type": "Text", "visible": True}
    total = list.rowCount
    current = 0
    page = list.nativeObject.getLastVisiblePosition() - list.nativeObject.getFirstVisiblePosition()
    while current < total:
        list.nativeObject.smoothScrollToPosition(current)
        snooze(0.5)  # recommended so that scroll stops before we proceed
        if object.exists(objectname):
            return
        current += page
function scrollListToText3(list, text) {
var objectname = {"container": names.addressBookList, "text": text, "type": "Text", "visible": true}
var total = list.rowCount;
var page = list.nativeObject.getLastVisiblePosition() - list.nativeObject.getFirstVisiblePosition();
for (var current = 0; current < total; current += page) {
list.nativeObject.smoothScrollToPosition(current);
snooze(0.5); // recommended so that scroll stops before we proceed
if (object.exists(objectname))
return;
}
list.nativeObject.smoothScrollToPosition(total-1);
snooze(0.5); // recommended so that scroll stops before we proceed
}sub scrollListToText3 {
my ($list, $text) = @_;
my $objectname = {"container" => $Names::address_book_list, "text" => $text, "type" => "Text", "visible" => "true"};
my $total = $list->rowCount;
my $current = 0;
my $page = $list->nativeObject->getLastVisiblePosition() - $list->nativeObject->getFirstVisiblePosition();
while ($current < $total) {
$list->nativeObject->smoothScrollToPosition($current);
snooze(0.5); # recommended so that scroll stops before we proceed
if (object::exists($objectname)) {
return;
}
$current += $page;
}
$list->nativeObject->smoothScrollToPosition($total-1);
snooze(0.5); # recommended so that scroll stops before we proceed
}def scrollListToText3(list, text)
objectname = {:container => Names::Address_Book_List, :text => text, :type => "Text", :visible => true}
total = list.rowCount
current = 0
page = list.nativeObject.getLastVisiblePosition() - list.nativeObject.getFirstVisiblePosition()
while current < total
list.nativeObject.smoothScrollToPosition(current)
snooze(0.5) # recommended so that scroll stops before we proceed
if Squish::Object.exists(objectname)
return
end
current += page
end
list.nativeObject.smoothScrollToPosition(total-1)
snooze(0.5) # recommended so that scroll stops before we proceed
endproc scrollListToText3 {lst text} {
set objectname [::Squish::ObjectName container $names::Address_Book_List text $text type Text visible true]
set total [property get $lst rowCount]
set current 0
set page [expr [invoke [property get $lst nativeObject] getLastVisiblePosition] - [invoke [property get $lst nativeObject] getFirstVisiblePosition]]
while {$current < $total} {
invoke [property get $lst nativeObject] smoothScrollToPosition $current
# recommended so that scroll stops before we proceed
snooze 0.5
if {[object exists $objectname]} {
return
}
incr current $page
}
invoke [property get $lst nativeObject] smoothScrollToPosition [expr $total - 1]
# recommended so that scroll stops before we proceed
snooze 0.5
}This method of scrolling to a certain Text object is the most robust of the three presented. When the object hierarchy changes in a later version of the app, it likely will still work because the object name only requires a Text object in a List object.
These test scripts could be shorter if we moved our common code into a shared location. Each script language has its own mechanism for creating and importing libraries, but in addition, Squish has Shared Scripts and Global Scripts that you can use to locate and access shared code.
Learning More
We have now completed the tutorial. Squish can do much more than we have shown here, but the aim has been to get you started with basic testing as quickly and easily as possible. The How to Create Test Scripts, and How to Test Applications - Specifics sections provide many more examples, including those that show how tests can interact with particular input elements, such as selects, select-ones, texts, and text-areas.
The API Reference and Tools Reference give full details of Squish's testing API and the numerous functions it offers to make testing as easy and efficient as possible. The time you invested will be repaid because you'll know what functionality Squish provides out of the box and can avoid reinventing things that are already available.
Squish for Android supports recording and replaying of gestures. As well as a powerful API to create or manipulate them in your scripts. See How to Use the GestureBuilder class for further reading.
The key Android examples with links to the places they are used are given below.
- The AddressBook shows how to test some Android widgets such as:
Button,TextEdit,ListView, andMenu - The WebBrowserHost shows how to test with an embedded Android
WebViewwidget.
Testing of Android Automotive applications
Android provides a derivative of its operating system (OS) specifically designed for the automotive environment - Android Automotive. Android Automotive requires the applications to fulfill certain requirements to be eligible as automotive applications. These conditions restrict the control of the applications and allow the OS to control the lifecycle and layout of the application's content based on templates.
These requirements make it necessary to take certain measures for GUI testing.
Instrumentation and control of Android Automotive applications
Squish treats native Android and Automotive applications the same for the IDE and setup of the TestSuite. For detailed information regarding how to instrument your application and how to navigate the IDE please take a look at the Squish for Android tutorial.
Now that you are familiar with the IDE and you instrumented and deployed your AUT to the device or emulator, we can go into the specifics regarding recording.
Confirmed testing setup
Squish for Android was tested and is confirmed to work using the official images. The image can be used in an Android emulator or on actual hardware. Both work fine with Squish. Please keep in mind that the most important feature needed for the image to work with Squish is the ability to connect to it via adb. The connection can be wired or wireless.
{Signing specifics with Android Automotive}
Note: The specifics are only needed on actual devices, not on a emulator.
Android Automotive applications require a special treatment during signing to be able to communicate with the Android Automotive car services. You need to use the same keypass that is delivered with the Android Automotive image for signing the application. To provide it to the instrumentation please follow the instructions regarding the squish-apk-tool.
Recording of Android Automotive tests
Recording of Android Automotive applications comes with a caveat caused by the restrictions of the automotive platform. Android handles the layout of the application internally which causes Squish to use the accessibility layer as a fallback. This impacts the recording feature and limits the interactivity of test script creation. However, the testing capabilities of Squish are not affected by this, only the method with which the test scripts are generated.
Using the possibilities provided by the Remote Control in Squish we enable recording of certain interactions - like touch, drag/swipe interactions and picking - indirectly through the Remote Control window. This recording results in a test script containing interactions with accessibility elements.
The section regarding accessibility in Android explains how to work with and record tests using Squish. An alternate option to accessibility is to use the Squish functions for OCR- or image-features interactions. For more information regarding these topics please refer to How to Do Image-Based Testing.
Recording of verifications will work the same as with native Android. See Inserting Verification Points for more information.
Now that the recording of tests is done, we can continue with test replay.
Restrictions during replay of Android Automotive tests
The replay of tests for Android Automotive applications behaves exactly the same as with regular Android. Due to the limitations of accessibility events it can be necessary to replace the object an interaction was recorded on with a more suitable, unique one. For this please follow the instructions on how to work with accessibility elements.
Running Tests from IDE
To run a test case in the Squish IDE, click the Run Test Case () that appears when the test case is hovered or selected in the Test Suites view.
To run two or more test cases one after another or to run only the selected test cases, click Run Test Suite ().
Running Tests from Command Line
To playback a recorded test from the command line, we execute the squishrunner program. We provide squishrunner the path to a test suite, and optionally also the name of a test case.
A squishserver must be running when running a test, and we can provide squishrunner an IP/Port of an already running one, or use the --local option which creates one for the duration of the process. For more information, see squishserver.
For example, assuming we are in the directory that contains the test suite's directory:
Tutorial: Designing Behavior Driven Development (BDD) Tests
This tutorial will show you how to create, run, and modify Behavior Driven Development (BDD) tests for an example application. You will learn about Squish's most frequently used features. By the end of the tutorial you will be able to write your own tests for your own applications.
For this chapter we will use a simple Address Book application as our Application Under Test (AUT). This is a very basic application that allows users to add, edit, and remove entries. The screenshot shows the application in action with a user adding a new entry.
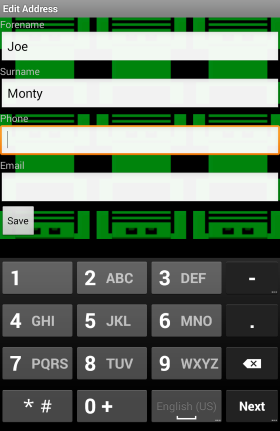
Introduction to Behavior Driven Development
Behavior-Driven Development (BDD) is an extension of the Test-Driven Development approach which puts the definition of acceptance criteria at the beginning of the development process as opposed to writing tests after the software has been developed. With possible cycles of code changes done after testing.
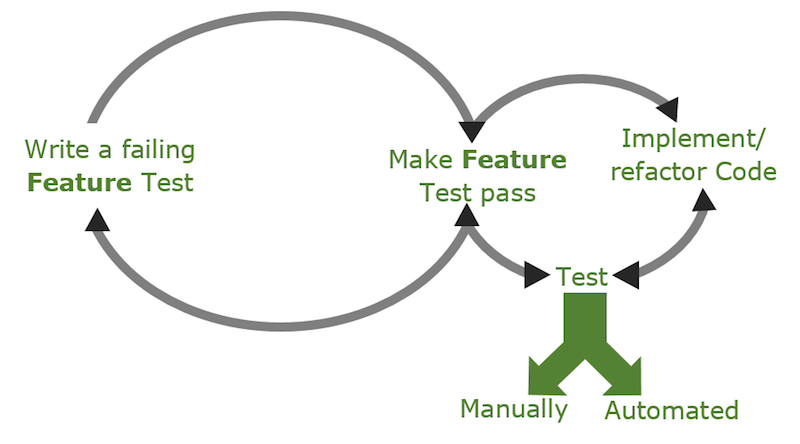
Behavior Driven Tests are built out of a set of Feature files, which describe product features through the expected application behavior in one or many Scenarios. Each Scenario is built out of a sequence of steps which represent actions or verifications that need to be tested for that Scenario.
BDD focuses on expected application behavior, not on implementation details. Therefore BDD tests are described in a human-readable Domain Specific Language (DSL). As this language is not technical, such tests can be created not only by programmers, but also by product owners, testers or business analysts. Additionally, during the product development, such tests serve as living product documentation. For Squish usage, BDD tests shall be created using Gherkin syntax. The previously written product specification (BDD tests) can be turned into executable tests. This step by step tutorial presents automating BDD tests with Squish IDE support.
Gherkin syntax
Gherkin files describe product features through the expected application behavior in one or many Scenarios. An example showing the "Filling of addressbook" feature of the addressbook example application.
Feature: Filling of addressbook
    As a user I want to fill the addressbook with entries

    Scenario: Initial state of created address book
        Given addressbook application is running
        Then addressbook should have zero entries

    Scenario: State after adding one entry
        Given addressbook application is running
        When I add a new person 'John','Doe','john@m.com','500600700' to address book
        Then '1' entries should be present

    Scenario: State after adding two entries
        Given addressbook application is running
        When I add new persons to address book
            | forename  | surname  | email        | phone  |
            | John      | Smith    | john@m.com   | 123123 |
            | Alice     | Thomson  | alice@m.com  | 234234 |
        Then '2' entries should be present

    Scenario: Forename and surname is added to table
        Given addressbook application is running
        When I add a new person 'Bob','Doe','Bob@m.com','123321231' to address book
        Then previously entered forename and surname shall be at the top
Most of the above is free form text (does not have to be English). It's just the Feature/Scenario structure and the leading keywords like "Given", "And", "When" and "Then" that are fixed. Each of those keywords marks a step defining preconditions, user actions and expected results. Above application behavior description can be passed to software developers to implement these features and at the same time the same description can be passed to software testers to implement automated tests.
Test implementation
Creating Test Suite
First, we need to create a Test Suite, which is a container for all Test Cases. Start the squishide and select File > New Test Suite . Please follow the New Test Suite wizard, provide a Test Suite name, choose the Android Toolkit and scripting language of your choice and finally register Address Book application as AUT. Please refer to Creating a Test Suite for more details about creating new Test Suite.
Creating Test Case
Squish offers two types of Test Cases: Script Test Case and BDD Test Case. As "Script Test Case" is the default one, in order to create new "BDD Test Case" we need to use the context menu by clicking on the expander next to New Script Test Case () and choosing New BDD Test Case. The Squish IDE will remember your choice and the BDD Test Case will become the default when clicking on the button in the future.
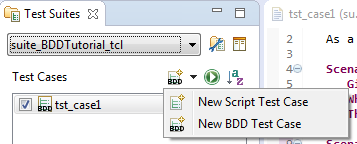
The newly created BDD Test Case consists of a test.feature file (filled with a Gherkin template while creating a new BDD test case), a file named test.(py|js|pl|rb|tcl) which will drive the execution (there is no need to edit this file), and a file in Test Suite Resources named steps/steps.(py|js|pl|rb|tcl) where step implementation code will be placed.
We need to replace the Gherkin template with a Feature for the addressbook example application. To do this, copy the Feature description below and paste it into the Feature file.
Feature: Filling of addressbook
    As a user I want to fill the addressbook with entries

    Scenario: Initial state of created address book
        Given addressbook application is running
        Then addressbook should have zero entries
When editing the test.feature file, a Feature file warning No implementation found is displayed for each undefined step. The implementations are in the steps subdirectory, in Test Case Resources, or in Test Suite Resources. Running our Feature test now will currently fail at the first step with a No Matching Step Definition and the following steps will be skipped.
Recording Step implementation
In order to record the Scenario, press the Record button next to the respective Scenario that is listed in the Scenarios tab in Test Case Resources view.
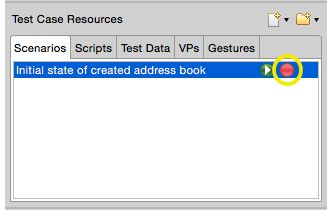
This will cause Squish to run the AUT so that we can interact with it. Additionally, the Control Bar is displayed with a list of all steps that need to be recorded. Now all interaction with the AUT or any verification points added to the script will be recorded under the first step Given addressbook application is running (which is bolded in the Step list on the Control Bar). In order to verify that this precondition is met, we will add a Verification Point. To do this, click on Verify () in the Control Bar and select Properties.
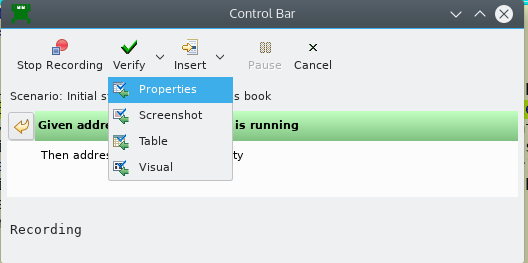
As a result the Squish IDE is put into Spy perspective, which displays views for Application Objects and Properties. In the Application Objects tree, select the AddressBook Activity. Selecting it will update the Properties view on the right side. Next click on the checkbox in front of the enabled in the Properties view. Finally, click on the button Save and Insert Verifications. The Squish IDE disappears and the Control Bar is shown again.
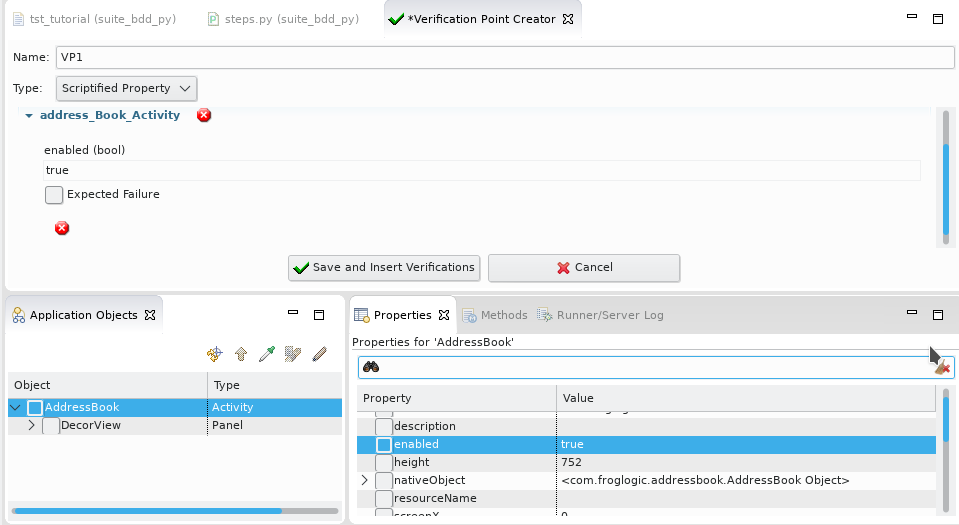
When we are done with each step, we can move to the next undefined step (playing back the ones that were previously defined) by clicking on the Finish Recording Step( ) arrow button in the Control Bar that is located to the left of the current step.
Next, for the step Then addressbook should have zero entries verify that the table containing the address entries is empty. To record this verification, click on Verify () while recording, select Properties. In the Application Objects view, navigate or use the Object Picker () tool to select the Table object containing the address book entries (in our case this table is empty). Check the rowCount property from the Properties view and click Save and Insert Verifications. Finally, click on the last Finish Recording Step() arrow button in the Control Bar.
As a result, Squish will generate the following step definitions in the steps.* file (at Test Suites > Test Suite Resources):
@Given("addressbook application is running")
def step(context):
    startApplication("com.froglogic.addressbook")
    test.compare(waitForObjectExists(names.address_Book_Activity).enabled, True)

@Then("addressbook should have zero entries")
def step(context):
    test.compare(waitForObjectExists(names.address_Book_addressList_List).rowCount, 0)
Given("addressbook application is running", function(context) {
startApplication("com.froglogic.addressbook");
test.compare(waitForObjectExists(names.addressBookActivity).enabled, true);
});
Then("addressbook should have zero entries", function(context) {
test.compare(waitForObjectExists(names.addressBookAddressListList).rowCount, 0);
});Given("addressbook application is running", sub {
my $context = shift;
startApplication("com.froglogic.addressbook");
test::compare(waitForObjectExists($Names::address_book_activity)->enabled, 1);
});
Then("addressbook should have zero entries", sub {
my $context = shift;
test::compare(waitForObjectExists($Names::address_book_addresslist_list)->rowCount, 0);
});Given("addressbook application is running") do |context|
startApplication("com.froglogic.addressbook")
Test.compare(waitForObjectExists(Names::Address_Book_Activity).enabled, true)
end
Then("addressbook should have zero entries") do |context|
Test.compare(waitForObjectExists(Names::Address_Book_addressList_List).rowCount, 0)
endGiven "addressbook application is running" {context} {
startApplication "com.froglogic.addressbook"
test compare [property get [waitForObjectExists $names::Address_Book_Activity] enabled] true
}
Then "addressbook should have zero entries" {context} {
test compare [property get [waitForObjectExists $names::Address_Book_addressList_List] rowCount] 0
}The application is automatically started at the beginning of the first step due to the recorded startApplication() call. At the end of each Scenario, the OnScenarioEnd hook is called, causing detach() to be called on the application context. Because the AUT was started with startApplication(), this causes it to terminate. This hook function is found in the file bdd_hooks.(py|js|pl|rb|tcl), which is located in the Scripts tab of the Test Suite Resources view. You can define additional hook functions here. For a list of all available hooks, please refer to Performing Actions During Test Execution Via Hooks.
@OnScenarioEnd
def OnScenarioEnd():
    for ctx in applicationContextList():
        ctx.detach()
OnScenarioEnd(function(context) {
applicationContextList().forEach(function(ctx) { ctx.detach(); });
});OnScenarioEnd(sub {
foreach (applicationContextList()) {
$_->detach();
}
});OnScenarioEnd do |context| applicationContextList().each { |ctx| ctx.detach() } end
OnScenarioEnd {context} {
    foreach ctx [applicationContextList] {
        applicationContext $ctx detach
    }
}
Step parametrization
So far, our steps did not use any parameters and all values were hardcoded. Squish has different types of parameters like any, integer or word, allowing our step definitions to be more reusable. Let us add a new Scenario to our Feature file which will provide step parameters for both the Test Data and the expected results. Copy the below section into your Feature file.
Scenario: State after adding one entry
    Given addressbook application is running
    When I add a new person 'John','Doe','john@m.com','500600700' to address book
    Then '1' entries should be present
After auto-saving the Feature file, the Squish IDE provides a hint that only 2 steps need to be implemented: When I add a new person 'John', 'Doe','john@m.com','500600700' to address book and Then '1' entries should be present. The remaining steps already have a matching step implementation.
To record the missing steps, hit the record button next to the test case name in the Test Suites view. The script will play until it gets to the missing step and then prompt you to implement it. If you select the Add button, then you can type in the information for a new entry. Click on the Finish Recording Step() button to move to the next step. For the second missing step, we could record an object property verification like we did with the step Then addressbook should have zero entries. Or we could copy that step's implementation in the steps.(py|js|pl|rb|tcl) file and increment the number at the end of the test.compare line. Instead of testing for zero items, we are testing for one item.
Now we parametrize the generated When step implementation by replacing the values with parameter types. Since we want to be able to add different names, replace 'John' with '|word|'. Each parameter will be passed to the step implementation function in the order of appearance in the descriptive name of the step. Finish parametrizing by editing the typed values into keywords, to look like this example step When I add a new person 'John', 'Doe','john@m.com','500600700' to address book:
@When("I add a new person '|word|','|word|','|any|','|integer|' to address book")
def step(context, forename, surname, email, phone):
    tapObject(waitForObject(names.address_Book_Add_Address_Button))
    tapObject(waitForObject(names.edit_Address_Forename_Edit))
    type(waitForObject(names.edit_Address_Forename_Edit), forename)
    tapObject(waitForObject(names.edit_Address_Surname_Edit))
    type(waitForObject(names.edit_Address_Surname_Edit), surname)
    tapObject(waitForObject(names.edit_Address_Phone_Edit))
    type(waitForObject(names.edit_Address_Phone_Edit), phone)
    tapObject(waitForObject(names.edit_Address_Email_Edit))
    type(waitForObject(names.edit_Address_Email_Edit), email)
    tapObject(waitForObject(names.edit_Address_Save_Button))
    context.userData = {}
    context.userData['forename'] = forename
    context.userData['surname'] = surname
When("I add a new person '|word|','|word|','|any|','|integer|' to address book", function(context, forename, surname, email, phone) {
tapObject(waitForObject(names.addressBookAddAddressButton));
tapObject(waitForObject(names.editAddressForenameEdit));
type(waitForObject(names.editAddressForenameEdit), forename);
tapObject(waitForObject(names.editAddressSurnameEdit));
type(waitForObject(names.editAddressSurnameEdit), surname);
tapObject(waitForObject(names.editAddressPhoneEdit));
type(waitForObject(names.editAddressPhoneEdit), phone);
tapObject(waitForObject(names.editAddressEmailEdit));
type(waitForObject(names.editAddressEmailEdit), email);
tapObject(waitForObject(names.editAddressSaveButton));
context.userData = {};
context.userData['forename'] = forename;
context.userData['surname'] = surname;
});When("I add a new person '|word|','|word|','|any|','|integer|' to address book", sub {
my ($context, $forename, $surname, $email, $phone) = @_;
tapObject(waitForObject($Names::address_book_add_address_button));
tapObject(waitForObject($Names::edit_address_forename_edit));
type(waitForObject($Names::edit_address_forename_edit), $forename);
tapObject(waitForObject($Names::edit_address_surname_edit));
type(waitForObject($Names::edit_address_surname_edit), $surname);
tapObject(waitForObject($Names::edit_address_phone_edit));
type(waitForObject($Names::edit_address_phone_edit), $phone);
tapObject(waitForObject($Names::edit_address_email_edit));
type(waitForObject($Names::edit_address_email_edit), $email);
tapObject(waitForObject($Names::edit_address_save_button));
$context->{userData}{'forename'} = $forename;
$context->{userData}{'surname'} = $surname;
});When("I add a new person '|word|','|word|','|any|','|integer|' to address book") do |context, forename, surname, email, phone|
tapObject(waitForObject(Names::Address_Book_Add_Address_Button))
tapObject(waitForObject(Names::Edit_Address_Forename_Edit))
type(waitForObject(Names::Edit_Address_Forename_Edit), forename)
tapObject(waitForObject(Names::Edit_Address_Surname_Edit))
type(waitForObject(Names::Edit_Address_Surname_Edit), surname)
tapObject(waitForObject(Names::Edit_Address_Phone_Edit))
type(waitForObject(Names::Edit_Address_Phone_Edit), phone)
tapObject(waitForObject(Names::Edit_Address_Email_Edit))
type(waitForObject(Names::Edit_Address_Email_Edit), email)
tapObject(waitForObject(Names::Edit_Address_Save_Button))
context.userData = Hash.new
context.userData[:forename] = forename
context.userData[:surname] = surname
endWhen "I add a new person '|word|','|word|','|any|','|integer|' to address book" {context forename surname email phone} {
invoke tapObject [waitForObject $names::Address_Book_Add_Address_Button]
invoke tapObject [waitForObject $names::Edit_Address_Forename_Edit]
invoke type [waitForObject $names::Edit_Address_Forename_Edit] $forename
invoke tapObject [waitForObject $names::Edit_Address_Surname_Edit]
invoke type [waitForObject $names::Edit_Address_Surname_Edit] $surname
invoke tapObject [waitForObject $names::Edit_Address_Phone_Edit]
invoke type [waitForObject $names::Edit_Address_Phone_Edit] $phone
invoke tapObject [waitForObject $names::Edit_Address_Email_Edit]
invoke type [waitForObject $names::Edit_Address_Email_Edit] $email
invoke tapObject [waitForObject $names::Edit_Address_Save_Button]
$context userData [dict create forename $forename surname $surname]
}If we recorded the final Then as a missing step, and verified the rowCount is 1 in the table, we can modify the step so that it takes a parameter, so it can verify other integer values later.
@Then("'|integer|' entries should be present")
def step(context, count):
    test.compare(waitForObjectExists(names.address_Book_addressList_List).rowCount, count)
Then("'|integer|' entries should be present", function(context, count) {
test.compare(waitForObjectExists(names.addressBookAddressListList).rowCount, count);
});Then("'|integer|' entries should be present", sub {
my ($context, $count) = @_;
test::compare(waitForObjectExists($Names::address_book_addresslist_list)->rowCount, $count);
});Then("'|integer|' entries should be present") do |context, count|
Test.compare(waitForObjectExists(Names::Address_Book_addressList_List).rowCount, count)
endThen "'|integer|' entries should be present" {context count} {
test compare [property get [waitForObjectExists $names::Address_Book_addressList_List] rowCount] $count
}Provide parameters for Step in table
The next Scenario will test adding multiple entries to the address book. We could use step When I add a new person John','Doe','john@m.com','500600700' to address book multiple times just with different data. But lets instead define a new step called When I add a new person to address book which will handle data from a table.
When I add new persons to address book
    | forename  | surname  | email        | phone  |
    | John      | Smith    | john@m.com   | 123123 |
    | Alice     | Thomson  | alice@m.com  | 234234 |
The step implementation to handle such tables looks like this:
@When("I add new persons to address book")
def step(context):
    table = context.table
    # Drop initial row with column headers
    table.pop(0)
    for (forename, surname, email, phone) in table:
        tapObject(waitForObject(names.address_Book_Add_Address_Button))
        tapObject(waitForObject(names.edit_Address_Forename_Edit))
        type(waitForObject(names.edit_Address_Forename_Edit), forename)
        tapObject(waitForObject(names.edit_Address_Surname_Edit))
        type(waitForObject(names.edit_Address_Surname_Edit), surname)
        tapObject(waitForObject(names.edit_Address_Phone_Edit))
        type(waitForObject(names.edit_Address_Phone_Edit), phone)
        tapObject(waitForObject(names.edit_Address_Email_Edit))
        type(waitForObject(names.edit_Address_Email_Edit), email)
        tapObject(waitForObject(names.edit_Address_Save_Button))
When("I add new persons to address book", function(context) {
var table = context.table;
// Skip initial row with column headers by starting at index 1
for (var i = 1; i < table.length; ++i) {
var forename = table[i][0];
var surname = table[i][1];
var email = table[i][2];
var phone = table[i][3];
tapObject(waitForObject(names.addressBookAddAddressButton));
tapObject(waitForObject(names.editAddressForenameEdit));
type(waitForObject(names.editAddressForenameEdit), forename);
tapObject(waitForObject(names.editAddressSurnameEdit));
type(waitForObject(names.editAddressSurnameEdit), surname);
tapObject(waitForObject(names.editAddressPhoneEdit));
type(waitForObject(names.editAddressPhoneEdit), phone);
tapObject(waitForObject(names.editAddressEmailEdit));
type(waitForObject(names.editAddressEmailEdit), email);
tapObject(waitForObject(names.editAddressSaveButton));
}
});When("I add new persons to address book", sub {
my $context = shift;
my $table = $context->{'table'};
# Drop initial row with column headers
shift(@{$table});
for my $row (@{$table}) {
my ($forename, $surname, $email, $phone) = @{$row};
tapObject(waitForObject($Names::address_book_add_address_button));
tapObject(waitForObject($Names::edit_address_forename_edit));
type(waitForObject($Names::edit_address_forename_edit), $forename);
tapObject(waitForObject($Names::edit_address_surname_edit));
type(waitForObject($Names::edit_address_surname_edit), $surname);
tapObject(waitForObject($Names::edit_address_phone_edit));
type(waitForObject($Names::edit_address_phone_edit), $phone);
tapObject(waitForObject($Names::edit_address_email_edit));
type(waitForObject($Names::edit_address_email_edit), $email);
tapObject(waitForObject($Names::edit_address_save_button));
}
});When("I add new persons to address book") do |context|
table = context.table
# Drop initial row with column headers
table.shift
for forename, surname, email, phone in table do
tapObject(waitForObject(Names::Address_Book_Add_Address_Button))
tapObject(waitForObject(Names::Edit_Address_Forename_Edit))
type(waitForObject(Names::Edit_Address_Forename_Edit), forename)
tapObject(waitForObject(Names::Edit_Address_Surname_Edit))
type(waitForObject(Names::Edit_Address_Surname_Edit), surname)
tapObject(waitForObject(Names::Edit_Address_Phone_Edit))
type(waitForObject(Names::Edit_Address_Phone_Edit), phone)
tapObject(waitForObject(Names::Edit_Address_Email_Edit))
type(waitForObject(Names::Edit_Address_Email_Edit), email)
tapObject(waitForObject(Names::Edit_Address_Save_Button))
end
endWhen "I add new persons to address book" {context} {
set table [$context table]
# Drop initial row with column headers
foreach row [lreplace $table 0 0] {
foreach {forename surname email phone} $row break
invoke tapObject [waitForObject $names::Address_Book_Add_Address_Button]
invoke tapObject [waitForObject $names::Edit_Address_Forename_Edit]
invoke type [waitForObject $names::Edit_Address_Forename_Edit] $forename
invoke tapObject [waitForObject $names::Edit_Address_Surname_Edit]
invoke type [waitForObject $names::Edit_Address_Surname_Edit] $surname
invoke tapObject [waitForObject $names::Edit_Address_Phone_Edit]
invoke type [waitForObject $names::Edit_Address_Phone_Edit] $phone
invoke tapObject [waitForObject $names::Edit_Address_Email_Edit]
invoke type [waitForObject $names::Edit_Address_Email_Edit] $email
invoke tapObject [waitForObject $names::Edit_Address_Save_Button]
}
}Sharing data between Steps and Scenarios
Lets add a new Scenario to the Feature file. This time we would like to check not the number of entries in address book list, but if this list contains proper data. Because we enter data into the address book in one step and verify them in another, we must share information about entered data among those steps in order to perform a verification.
Scenario: Forename and surname is added to table
    Given addressbook application is running
    When I add a new person 'Bob','Doe','Bob@m.com','123321231' to address book
    Then previously entered forename and surname shall be at the top
To share this data, context.userData can be used.
@When("I add a new person '|word|','|word|','|any|','|integer|' to address book")
def step(context, forename, surname, email, phone):
    tapObject(waitForObject(names.address_Book_Add_Address_Button))
    tapObject(waitForObject(names.edit_Address_Forename_Edit))
    type(waitForObject(names.edit_Address_Forename_Edit), forename)
    tapObject(waitForObject(names.edit_Address_Surname_Edit))
    type(waitForObject(names.edit_Address_Surname_Edit), surname)
    tapObject(waitForObject(names.edit_Address_Phone_Edit))
    type(waitForObject(names.edit_Address_Phone_Edit), phone)
    tapObject(waitForObject(names.edit_Address_Email_Edit))
    type(waitForObject(names.edit_Address_Email_Edit), email)
    tapObject(waitForObject(names.edit_Address_Save_Button))
    context.userData = {}
    context.userData['forename'] = forename
    context.userData['surname'] = surname
When("I add a new person '|word|','|word|','|any|','|integer|' to address book", function(context, forename, surname, email, phone) {
tapObject(waitForObject(names.addressBookAddAddressButton));
tapObject(waitForObject(names.editAddressForenameEdit));
type(waitForObject(names.editAddressForenameEdit), forename);
tapObject(waitForObject(names.editAddressSurnameEdit));
type(waitForObject(names.editAddressSurnameEdit), surname);
tapObject(waitForObject(names.editAddressPhoneEdit));
type(waitForObject(names.editAddressPhoneEdit), phone);
tapObject(waitForObject(names.editAddressEmailEdit));
type(waitForObject(names.editAddressEmailEdit), email);
tapObject(waitForObject(names.editAddressSaveButton));
context.userData = {};
context.userData['forename'] = forename;
context.userData['surname'] = surname;
});When("I add a new person '|word|','|word|','|any|','|integer|' to address book", sub {
my ($context, $forename, $surname, $email, $phone) = @_;
tapObject(waitForObject($Names::address_book_add_address_button));
tapObject(waitForObject($Names::edit_address_forename_edit));
type(waitForObject($Names::edit_address_forename_edit), $forename);
tapObject(waitForObject($Names::edit_address_surname_edit));
type(waitForObject($Names::edit_address_surname_edit), $surname);
tapObject(waitForObject($Names::edit_address_phone_edit));
type(waitForObject($Names::edit_address_phone_edit), $phone);
tapObject(waitForObject($Names::edit_address_email_edit));
type(waitForObject($Names::edit_address_email_edit), $email);
tapObject(waitForObject($Names::edit_address_save_button));
$context->{userData}{'forename'} = $forename;
$context->{userData}{'surname'} = $surname;
});When("I add a new person '|word|','|word|','|any|','|integer|' to address book") do |context, forename, surname, email, phone|
tapObject(waitForObject(Names::Address_Book_Add_Address_Button))
tapObject(waitForObject(Names::Edit_Address_Forename_Edit))
type(waitForObject(Names::Edit_Address_Forename_Edit), forename)
tapObject(waitForObject(Names::Edit_Address_Surname_Edit))
type(waitForObject(Names::Edit_Address_Surname_Edit), surname)
tapObject(waitForObject(Names::Edit_Address_Phone_Edit))
type(waitForObject(Names::Edit_Address_Phone_Edit), phone)
tapObject(waitForObject(Names::Edit_Address_Email_Edit))
type(waitForObject(Names::Edit_Address_Email_Edit), email)
tapObject(waitForObject(Names::Edit_Address_Save_Button))
context.userData = Hash.new
context.userData[:forename] = forename
context.userData[:surname] = surname
endWhen "I add a new person '|word|','|word|','|any|','|integer|' to address book" {context forename surname email phone} {
invoke tapObject [waitForObject $names::Address_Book_Add_Address_Button]
invoke tapObject [waitForObject $names::Edit_Address_Forename_Edit]
invoke type [waitForObject $names::Edit_Address_Forename_Edit] $forename
invoke tapObject [waitForObject $names::Edit_Address_Surname_Edit]
invoke type [waitForObject $names::Edit_Address_Surname_Edit] $surname
invoke tapObject [waitForObject $names::Edit_Address_Phone_Edit]
invoke type [waitForObject $names::Edit_Address_Phone_Edit] $phone
invoke tapObject [waitForObject $names::Edit_Address_Email_Edit]
invoke type [waitForObject $names::Edit_Address_Email_Edit] $email
invoke tapObject [waitForObject $names::Edit_Address_Save_Button]
$context userData [dict create forename $forename surname $surname]
}All data stored in context.userData can be accessed in all steps and Hooks in all Scenarios of the given Feature. Finally, we need to implement the step Then previously entered forename and surname shall be at the top.
@Then("previously entered forename and surname shall be at the top")
def step(context):
    list = waitForObject(names.address_Book_addressList_List)
    rows = object.children(list)
    row_0 = rows[0]
    columns_row_0 = object.children(row_0)
    test.compare(columns_row_0[0].text, context.userData["forename"])
    test.compare(columns_row_0[1].text, context.userData["surname"])
Then("previously entered forename and surname shall be at the top", function(context) {
var list = waitForObject(names.addressBookAddressListList);
var rows = object.children(list);
var row_0 = rows[0];
var columns_row_0 = object.children(row_0);
test.compare(columns_row_0[0].text, context.userData["forename"]);
test.compare(columns_row_0[1].text, context.userData["surname"]);
});Then("previously entered forename and surname shall be at the top", sub {
my $context = shift;
my $list = waitForObject($Names::address_book_addresslist_list);
my @rows = object::children($list);
my $row_0 = $rows[0];
my @columns_row_0 = object::children($row_0);
test::compare($columns_row_0[0]->text, $context->{userData}{'forename'}, "forename?");
test::compare($columns_row_0[1]->text, $context->{userData}{'surname'}, "surname?");
});Then("previously entered forename and surname shall be at the top") do |context|
list = waitForObject(Names::Address_Book_addressList_List)
rows = Squish::Object.children(list)
row_0 = rows[0]
columns_row_0 = Squish::Object.children(row_0)
Test.compare(columns_row_0[0].text, context.userData[:forename])
Test.compare(columns_row_0[1].text, context.userData[:surname])
endThen "previously entered forename and surname shall be at the top" {context} {
set list [waitForObject $names::Address_Book_addressList_List]
set rows [object children $list]
set row_0 [lindex $rows 0]
set columns_row_0 [object children $row_0]
test compare [property get [lindex $columns_row_0 0] text] [dict get [$context userData] "forename"]
test compare [property get [lindex $columns_row_0 1] text] [dict get [$context userData] "surname"]
}Scenario Outline
Assume our Feature contains the following two Scenarios:
Scenario: State after adding one entry
    Given addressbook application is running
    When I add a new person 'John','Doe','john@m.com','500600700' to address book
    Then "1" entries should be present

Scenario: State after adding one entry
    Given addressbook application is running
    When I add a new person 'Bob','Koo','bob@m.com','500600800' to address book
    Then "1" entries should be present
As we can see, those Scenarios perform the same actions using different test data. The same can be achieved by using a Scenario Outline (a Scenario template with placeholders) and Examples (a table with parameters).
Scenario Outline: Adding single entries multiple time
    Given addressbook application is running
    When I add a new person '<forename>','<surname>','<email>','<phone>' to address book
    Then '1' entries should be present
    Examples:
        | forename | surname  | email       | phone     |
        | John     | Doe      | john@m.com  | 500600700 |
        | Bob      | Koo      | bob@m.com   | 500600800 |
The OnScenarioEnd hook will be executed at the end of each loop iteration in a Scenario Outline.
Test execution
In the Squish IDE, users can execute all Scenarios in a Feature, or execute only one selected Scenario. In order to execute all Scenarios, the proper Test Case has to be executed by clicking on the Play button in the Test Suites view.
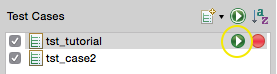
In order to execute only one Scenario, you need to open the Feature file, right-click on the given Scenario and choose Run Scenario. An alternative approach is to click on the Play button next to the respective Scenario in the Scenarios tab in Test Case Resources.
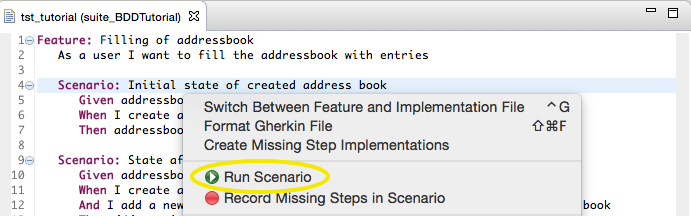
After a Scenario is executed, the Feature file is colored according to the execution results. More detailed information (like logs) can be found in the Test Results View.
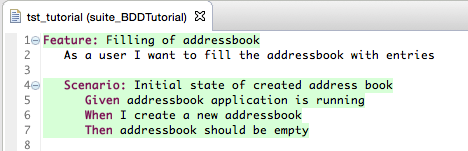
Test debugging
Squish offers the possibility to pause an execution of a Test Case at any point in order to check script variables, spy application objects or run custom code in the Squish Script Console. To do this, a breakpoint has to be placed before starting the execution, either in the Feature file at any line containing a step or at any line of executed code (i.e., in middle of step definition code).

After the breakpoint is reached, you can inspect all application objects and their properties. If a breakpoint is placed at a step definition or a hook is reached, then you can additionally add Verification Points or record code snippets.
Re-using Step definitions
BDD test maintainability can be increased by reusing step definitions in test cases located in another directory. For more information, see collectStepDefinitions().
Tutorial: Migration of existing tests to BDD
This chapter is for users that have existing Squish tests and who would like to introduce Behavior Driven Testing. The first section describes how to keep the existing tests and simply add new tests with the BDD approach. The second section describes how to convert script-based tests to BDD tests.
Extend existing tests to BDD
The first option is to keep existing Squish tests and add new BDD tests. It's possible to have a Test Suite containing script-based and BDD Test Cases. Simply open an existing Test Suite and choose the New BDD Test Case option from the drop down menu to the right of the New Script Test Case () toolbar button.
Assuming your existing Test Cases make use of a library and you are calling shared functions to interact with the AUT, those functions can also be used from BDD Test Cases. In the example below, a function is called from multiple script-based Test Cases:
def deleteFirstEntry():
    #...
    pass
function deleteFirstEntry(){
//...
}sub deleteFirstEntry{
#...
}def deleteFirstEntry
#...
endproc deleteFirstEntry {} {
#...
}New BDD Test Cases can easily use the same function:
@When("I delete the first entry")
def step(context):
deleteFirstEntry()When("I delete the first entry", function(context){ deleteFirstEntry() });
When("I delete the first entry", sub {
    deleteFirstEntry();
});
When("I delete the first entry") do |context|
  deleteFirstEntry
end
When "I delete the first entry" {context} {
    deleteFirstEntry
}
Convert existing tests to BDD
The second option is to convert an existing Test Suite that contains script-based Test Cases into behavior driven tests. Since a Test Suite can contain script-based and BDD Test Cases, migration can be done gradually. A Test Suite containing a mix of both Test Case types can be executed and results analyzed without any extra effort required.
The first step is to review all Test Cases of the existing Test Suite and group them by the Feature they test. Each script-based Test Case will be transformed into a Scenario, which is a part of a Feature. For example, assume we have 5 script-based Test Cases. After analysis, we realize that they examine two Features. Therefore, when migration is completed, our Test Suite will contain two BDD Test Cases, each of them containing one Feature. Each Feature will contain multiple Scenarios. In our example, the first Feature contains three Scenarios and the second Feature contains two Scenarios.
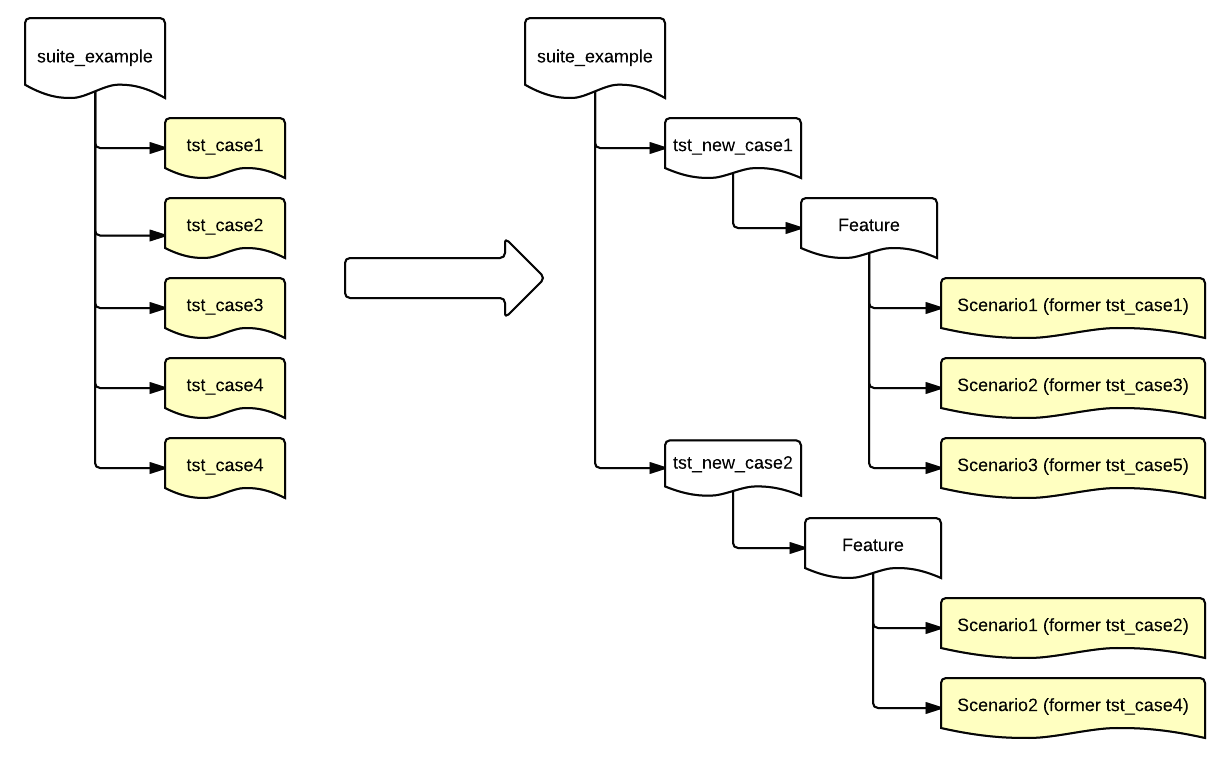
At the beginning, open a Test Suite in the Squish IDE that contains Squish tests that are planned to be migrated to BDD. Next, create a new Test Case by choosing New BDD Test Case option from the context menu. Each BDD Test Case contains a test.feature file that can be filled with maximum one Feature. Next, open the test.feature file to describe the Features using the Gherkin language. Following the syntax from the template, edit the Feature name and optionally provide a short description. Next, analyze which actions and verifications are performed in the script-based Test Case that need to be migrated. This is how an example Test Case for the addressbook application might look:
def main():
    startApplication("com.froglogic.addressbook")
    test.compare(waitForObjectExists(names.address_Book_List).rowCount, 0, "Addressbook is empty?")
function main(){
startApplication("com.froglogic.addressbook");
test.compare(waitForObjectExists(names.addressBookList).rowCount, 0, "Addressbook is empty?");
}sub main {
startApplication("com.froglogic.addressbook");
test::compare(waitForObjectExists($Names::address_book_list)->rowCount,0, "Addressbook is empty?");
}def main startApplication("com.froglogic.addressbook") Test.compare(waitForObjectExists(Names::Address_Book_List).rowCount, 0, "Addressbook is empty?") end
proc main {} {
    startApplication "com.froglogic.addressbook"
    test compare [property get [waitForObjectExists $names::Address_Book_List] rowCount] 0
}
After analyzing the above script-based test, we can create the following Scenario and add it to test.feature file:
Scenario: Initial state of created address book
   Given addressbook application is running
   Then addressbook should have zero entries
Next, right-click on the Scenario and choose the option Create Missing Step Implementations from the context menu. This will create a skeleton of steps definitions:
@Given("addressbook application is running")
def step(context):
    test.warning("TODO implement addressbook application is running")

@Then("addressbook should have zero entries")
def step(context):
    test.warning("TODO implement addressbook should have zero entries")
Given("addressbook application is running", function(context) {
    test.warning("TODO implement addressbook application is running");
});

Then("addressbook should have zero entries", function(context) {
    test.warning("TODO implement addressbook should have zero entries");
});
Given("addressbook application is running", sub {
    my $context = shift;
    test::warning("TODO implement addressbook application is running");
});

Then("addressbook should have zero entries", sub {
    my $context = shift;
    test::warning("TODO implement addressbook should have zero entries");
});
Given("addressbook application is running") do |context|
  Test.warning "TODO implement addressbook application is running"
end

Then("addressbook should have zero entries") do |context|
  Test.warning "TODO implement addressbook should have zero entries"
end
Given "addressbook application is running" {context} {
    test warning "TODO implement addressbook application is running"
}

Then "addressbook should have zero entries" {context} {
    test warning "TODO implement addressbook should have zero entries"
}
Now we put code snippets from the script-based Test into respective step definitions and remove the lines containing test.warning. If your script-based Tests make use of shared scripts, you can call those functions inside of the step definition as well. For example, the final result could look like this:
@Given("addressbook application is running")
def step(context):
    startApplication("com.froglogic.addressbook")

@Then("addressbook should have zero entries")
def step(context):
    test.compare(waitForObjectExists(names.address_Book_List).rowCount, 0,  "Addressbook is empty?")
Given("addressbook application is running", function(context) {
    startApplication("com.froglogic.addressbook");
});

Then("addressbook should have zero entries", function(context) {
        test.compare(waitForObjectExists(names.addressBookList).rowCount, 0);
});
Given("addressbook application is running", sub {
    my $context = shift;
    startApplication("com.froglogic.addressbook");
});

Then("addressbook should have zero entries", sub {
    my $context = shift;
    test::compare(waitForObjectExists($Names::address_book_list)->rowCount,0);
});
Given("addressbook application is running") do |context|
  startApplication("com.froglogic.addressbook")
end

Then("addressbook should have zero entries") do |context|
  Test.compare(waitForObjectExists(Names::Address_Book_List).rowCount, 0, "Addressbook is empty?")
end
Given "addressbook application is running" {context} {
    startApplication "com.froglogic.addressbook"
}

Then "addressbook should have zero entries" {context} {
    test compare [property get [waitForObjectExists $names::Address_Book_List] rowCount] 0
}
After running each Scenario, the AUT is terminated, from the auto-generated OnScenarioEnd hooks file shown below:
@OnScenarioEnd
def hook(context):
    for ctx in applicationContextList():
        ctx.detach()
OnScenarioEnd(function(context) {
applicationContextList().forEach(function(ctx) { ctx.detach(); });
});OnScenarioEnd(sub {
foreach (applicationContextList()) {
$_->detach();
}
});OnScenarioEnd do |context| applicationContextList().each { |ctx| ctx.detach() } end
OnScenarioEnd {context} {
    foreach ctx [applicationContextList] {
        applicationContext $ctx detach
    }
}
The above example was simplified for this tutorial. In order to take full advantage of Behavior Driven Testing in Squish, please familiarize yourself with the section Behavior Driven Testing in API Reference.
© 2025 The Qt Company Ltd.
Documentation contributions included herein are the copyrights of
their respective owners.
The documentation provided herein is licensed under the terms of the GNU Free Documentation License version 1.3 as published by the Free Software Foundation.
Qt and respective logos are trademarks of The Qt Company Ltd. in Finland and/or other countries worldwide. All other trademarks are property
of their respective owners.
