Image Selection Editor
The Image Selection Editor view opens when you insert an image-based-action function into the test script using a new image.
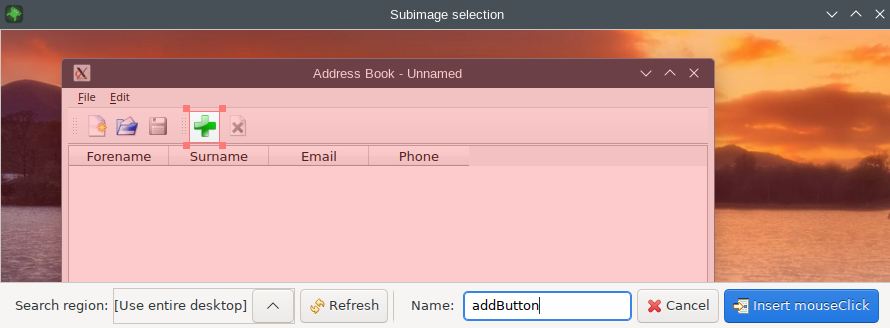
The Image Selection Editor view
In the Image Selection Editor you can view, mark a region of the desktop's screenshot to copy and store the region to disk for subsequent searches. There are scrollbars to pan to different parts of the screen, and a slider or zoom buttons to zoom in and out of the image. Drag the default rectangular selection to the correct position, and resize the edges to make it fit the element to be searched. Keep the amount of background pixels as small as possible for faster and more robust searches.
Clicking on Search Region lets you restrict the image search to specific windows or widgets of the AUT. By default, the entire desktop is searched.
Enter a descriptive file name in the Name field. The image is stored in the test suite's shared visual look-up directory (test_suite/shared/searchImages/) and used as an argument to the ScreenRectangle waitForImage(imageFile, [parameterMap], [searchRegion]) function.
To insert an action, click the Insert mouseClick, Insert doubleClick, or Insert tapObject button. Squish IDE executes the action and inserts the respective script statement into the test script.
If you are not happy with the result, click the Refresh or Refresh in 3 sec button to try again, either immediately or with a delay. The delay gives you time to rearrange the application, for example by opening an application menu before taking the screenshot.
Click the Cancel button to cancel the insertion of a new script statement and return to the main recording mode.
© 2025 The Qt Company Ltd.
Documentation contributions included herein are the copyrights of
their respective owners.
The documentation provided herein is licensed under the terms of the GNU Free Documentation License version 1.3 as published by the Free Software Foundation.
Qt and respective logos are trademarks of The Qt Company Ltd. in Finland and/or other countries worldwide. All other trademarks are property
of their respective owners.
