Qt Quick 3D Physics - 複合形状の例
複雑なコリジョンシェイプの使い方を説明します。

この例では、複数のコリジョンシェイプを使用して、衝突検出用の複雑なオブジェクトを作成する方法を示します。シーンは、緑色の静的な平面と、互いに接続された一連のリンクで構成されています。最初、シミュレーションは無効になっています。しばらくして、あるいはユーザーがスペースキーを押すと、シミュレーションが始まります。左端と右端のリンクが水平に前後に動くアニメーションが始まります。
セットアップ
いつものように、PhysicsWorld :
PhysicsWorld {
    id: physicsWorld
    enableCCD: true
    maximumTimestep: 20
    scene: viewport.scene
}
環境、カメラ、ライトを用意する:
environment: SceneEnvironment {
    antialiasingMode: SceneEnvironment.MSAA
    backgroundMode: SceneEnvironment.Color
    clearColor: "lightblue"
}

focus: true

PerspectiveCamera {
    id: camera
    position: Qt.vector3d(0, 900, 1500)
    eulerRotation: Qt.vector3d(-10, 0, 0)
    clipFar: 15500
    clipNear: 1
}

DirectionalLight {
    eulerRotation.x: -45
    eulerRotation.y: 45
    castsShadow: true
    brightness: 1.5
    shadowMapQuality: Light.ShadowMapQualityHigh
}
物理オブジェクト
通常の静的な平面を用意します:
StaticRigidBody {
    position: Qt.vector3d(0, -100, 0)
    eulerRotation: Qt.vector3d(-90, 0, 0)
    collisionShapes: PlaneShape {}
    Model {
        source: "#Rectangle"
        scale: Qt.vector3d(500, 500, 1)
        materials: PrincipledMaterial {
            baseColor: "green"
        }
        castsShadows: false
        receivesShadows: true
    }
}
次に、リンクのインスタンスを作ります。
MeshLink {
    id: leftLink
    isKinematic: true
    property vector3d startPos: Qt.vector3d(-6 * viewport.ringDistance,
                                            viewport.ringY,
                                            0)
    property vector3d startRot: Qt.vector3d(90, 0, 0)
    kinematicPosition: startPos
    position: startPos
    kinematicEulerRotation: startRot
    eulerRotation: startRot
    color: "red"
}

CapsuleLink {
    position: Qt.vector3d(-5 * viewport.ringDistance, viewport.ringY, 0)
    eulerRotation: Qt.vector3d(90, 0, 0)
}

MeshLink {
    position: Qt.vector3d(-4 * viewport.ringDistance, viewport.ringY, 0)
    eulerRotation: Qt.vector3d(90, 0, 0)
}

MeshLink {
    position: Qt.vector3d(-3 * viewport.ringDistance, viewport.ringY, 0)
    eulerRotation: Qt.vector3d(0, 90, 0)
}

MeshLink {
    position: Qt.vector3d(-2 * viewport.ringDistance, viewport.ringY, 0)
    eulerRotation: Qt.vector3d(90, 0, 0)
}

MeshLink {
    position: Qt.vector3d(-1 * viewport.ringDistance, viewport.ringY, 0)
    eulerRotation: Qt.vector3d(0, 90, 0)
}

CapsuleLink {
    position: Qt.vector3d(0, viewport.ringY, 0)
}

MeshLink {
    position: Qt.vector3d(1 * viewport.ringDistance, viewport.ringY, 0)
    eulerRotation: Qt.vector3d(0, 90, 0)
}

MeshLink {
    position: Qt.vector3d(2 * viewport.ringDistance, viewport.ringY, 0)
    eulerRotation: Qt.vector3d(90, 0, 0)
}

MeshLink {
    position: Qt.vector3d(3 * viewport.ringDistance, viewport.ringY, 0)
    eulerRotation: Qt.vector3d(0, 90, 0)
}

MeshLink {
    position: Qt.vector3d(4 * viewport.ringDistance, viewport.ringY, 0)
    eulerRotation: Qt.vector3d(90, 0, 0)
}

CapsuleLink {
    position: Qt.vector3d(5 * viewport.ringDistance, viewport.ringY, 0)
    eulerRotation: Qt.vector3d(90, 0, 0)
}

MeshLink {
    id: rightLink
    isKinematic: true
    property vector3d startPos: Qt.vector3d(6 * viewport.ringDistance,
                                            viewport.ringY,
                                            0)
    property vector3d startRot: Qt.vector3d(90, 0, 0)
    kinematicPosition: startPos
    position: startPos
    kinematicEulerRotation: startRot
    eulerRotation: startRot
    color: "red"
}
左側の最初のリンクは、アニメーションでコントロールできるように、isKinematic プロパティをtrue に設定します。これはキネマティックオブジェクトなので、kinematicPosition とkinematicRotation プロパティを設定する必要があります。アニメーションは、kinematicPosition プロパティをアニメーションさせることで行います。他のリンクは、いくつかの間隔を空けてインスタンス化されています。
物理的なシミュレーションに正確に追従する滑らかなアニメーションを得るために、AnimationController を使い、PhysicsWorld のonFrameDone 信号に接続します。こうすることで、シミュレーションが遅くなるようなコマ落ちがあっても、アニメーションはそれに応じて遅くなります。左端と右端のリングを前後に動かすために、4つのNumberAnimation を持つSequentialAnimation を使います。これがアニメーションのQMLコードです:
Connections {
    target: physicsWorld
    property real totalAnimationTime: 12000
    function onFrameDone(timeStep) {
        let progressStep = timeStep / totalAnimationTime
        animationController.progress += progressStep
        if (animationController.progress >= 1) {
            animationController.completeToEnd()
            animationController.reload()
            animationController.progress = 0
        }
    }
}

AnimationController {
    id: animationController
    animation: SequentialAnimation {
        NumberAnimation {
            target: leftLink
            property: "kinematicPosition.x"
            to: 3 * viewport.ringDistance
            from: -6 * viewport.ringDistance
            easing.type: Easing.InOutCubic
            duration: 1000
        }
        NumberAnimation {
            target: leftLink
            property: "kinematicPosition.x"
            from: 3 * viewport.ringDistance
            to: -6 * viewport.ringDistance
            easing.type: Easing.InOutCubic
            duration: 1000
        }
        NumberAnimation {
            target: rightLink
            property: "kinematicPosition.x"
            to: -3 * viewport.ringDistance
            from: 6 * viewport.ringDistance
            easing.type: Easing.InOutCubic
            duration: 1000
        }
        NumberAnimation {
            target: rightLink
            property: "kinematicPosition.x"
            from: -3 * viewport.ringDistance
            to: 6 * viewport.ringDistance
            easing.type: Easing.InOutCubic
            duration: 1000
        }
    }
}
興味深いのは、MeshファイルとCapsule Linksファイルの中で起こっていることです。それぞれのファイルを見てみよう。
メッシュリンク
DynamicRigidBody {
    scale: Qt.vector3d(100, 100, 100)
    property color color: "white"
    PrincipledMaterial {
        id: _material
        baseColor: color
        metalness: 1.0
        roughness: 0.5
    }

    Model {
        source: "meshes/ring.mesh"
        materials: [_material]
    }

    collisionShapes: [
        ConvexMeshShape {
            source: "meshes/segmentedRing_001.mesh"
        },
        ConvexMeshShape {
            source: "meshes/segmentedRing_002.mesh"
        },
        ConvexMeshShape {
            source: "meshes/segmentedRing_003.mesh"
        },
        ConvexMeshShape {
            source: "meshes/segmentedRing_004.mesh"
        },
        ConvexMeshShape {
            source: "meshes/segmentedRing_005.mesh"
        },
        ConvexMeshShape {
            source: "meshes/segmentedRing_006.mesh"
        },
        ConvexMeshShape {
            source: "meshes/segmentedRing_007.mesh"
        },
        ConvexMeshShape {
            source: "meshes/segmentedRing_008.mesh"
        },
        ConvexMeshShape {
            source: "meshes/segmentedRing_009.mesh"
        },
        ConvexMeshShape {
            source: "meshes/segmentedRing_010.mesh"
        },
        ConvexMeshShape {
            source: "meshes/segmentedRing_011.mesh"
        },
        ConvexMeshShape {
            source: "meshes/segmentedRing_012.mesh"
        }
    ]
}
メッシュリンクは、モデルとマテリアルを持つダイナミック剛体です。モデルはメッシュファイルからメッシュをロードします。また、コリジョンシェイプのリストがあり、それらを組み合わせてコリジョン検出用の複合シェイプを形成します。各シェイプは、ソースファイルからメッシュをロードするコンベックスメッシュシェイプです。凸シェイプは基本的に、シェイプ内の任意の2点間の線が常にシェイプの内側にあるシェイプです。
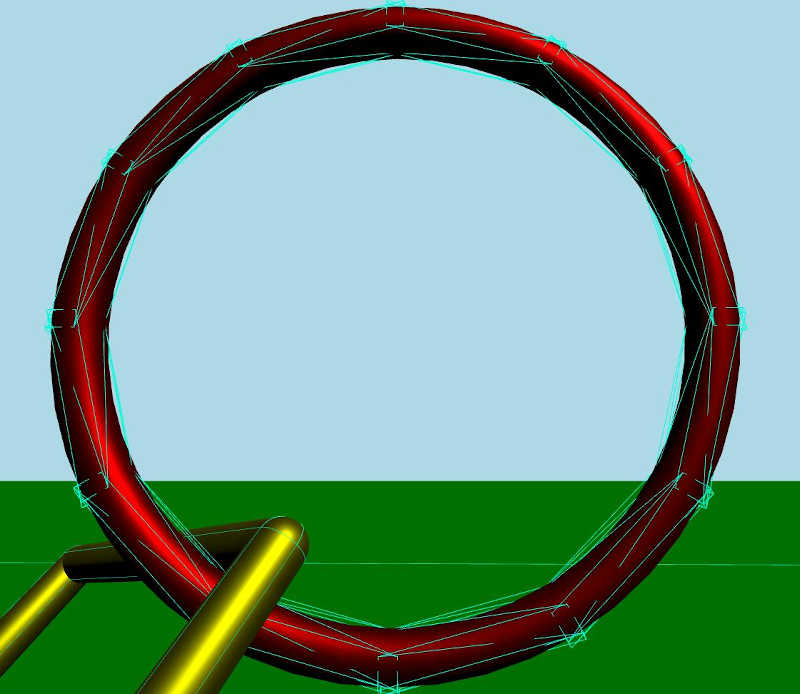
デバッグモードが有効になっているときに詳しく見てみると、このようにコリジョンシェイプが複合コリジョンシェイプを形成している:
カプセルリンク
DynamicRigidBody {
    property real len: 170
    property real w: 17
    PrincipledMaterial {
        id: material3
        baseColor: "yellow"
        metalness: 1.0
        roughness: 0.5
    }
    Node {
        opacity: 1
        Model {
            materials: material3
            source: "#Cylinder"
            scale: Qt.vector3d(w / 100, len / 100, w / 100)
            eulerRotation.z: 90
            y: -len / 2
        }
        Model {
            materials: material3
            source: "#Cylinder"
            scale: Qt.vector3d(w / 100, len / 100, w / 100)
            eulerRotation.z: 90
            y: len / 2
        }
        Model {
            materials: material3
            source: "#Cylinder"
            scale: Qt.vector3d(w / 100, len / 100, w / 100)
            x: len / 2
        }
        Model {
            materials: material3
            source: "#Cylinder"
            scale: Qt.vector3d(w / 100, len / 100, w / 100)
            x: -len / 2
        }
        Model {
            materials: material3
            source: "#Sphere"
            scale: Qt.vector3d(w / 100, w / 100, w / 100)
            x: -len / 2
            y: -len / 2
        }
        Model {
            materials: material3
            source: "#Sphere"
            scale: Qt.vector3d(w / 100, w / 100, w / 100)
            x: -len / 2
            y: len / 2
        }
        Model {
            materials: material3
            source: "#Sphere"
            scale: Qt.vector3d(w / 100, w / 100, w / 100)
            x: len / 2
            y: -len / 2
        }
        Model {
            materials: material3
            source: "#Sphere"
            scale: Qt.vector3d(w / 100, w / 100, w / 100)
            x: len / 2
            y: len / 2
        }
    }
    collisionShapes: [
        CapsuleShape {
            y: -len / 2
            height: len
            diameter: w
        },
        CapsuleShape {
            y: len / 2
            height: len
            diameter: w
        },
        CapsuleShape {
            x: -len / 2
            eulerRotation.z: 90
            height: len
            diameter: w
        },
        CapsuleShape {
            x: len / 2
            eulerRotation.z: 90
            height: len
            diameter: w
        }
    ]
}
カプセルリンクは、同じ素材を共有するいくつかのモデルを持つダイナミック剛体です。このリンクは、いくつかの円柱と球から形成されています。メッシュリンクのように、コリジョンシェイプのリストがあります。今回はそれぞれのシェイプがカプセルシェイプです。
デバッグモードを有効にしてよく見ると、このようにコリジョンシェイプが複合コリジョンシェイプを形成しています。

ファイル
© 2026 The Qt Company Ltd. Documentation contributions included herein are the copyrights of their respective owners. The documentation provided herein is licensed under the terms of the GNU Free Documentation License version 1.3 as published by the Free Software Foundation. Qt and respective logos are trademarks of The Qt Company Ltd. in Finland and/or other countries worldwide. All other trademarks are property of their respective owners.
