How to Create and Access Application Bindings
This section discusses an advanced and very powerful feature offered by Squish — how to create wrappers that provide application bindings.
Automatic Dynamic Bindings
From Squish 4.0, Squish's bindings support has been greatly enhanced. For Java and Qt-based applications, Squish now dynamically creates wrappers that automatically provide bindings for all the standard library objects that the AUT uses, and also for the AUT's own custom classes. And in Java's case, even classes that are not automatically dynamically bound can often be accessed using Java's introspection facilities. This means that in most cases there is no need to create custom bindings.
For Qt AUT's Squish will automatically bind slots and properties (even handlers for selected signals can also be installed). Slots are member functions declared in a class's public slots: section; properties are declared using Qt's Q_PROPERTY macro. If you want to bind ordinary methods it is easiest to simply declare them as slots. However, if you don't want to make your methods slots, or if you want to bind global functions, then you can create your own bindings, as described in this section.
Creating Bindings
Squish already comes with complete script bindings for the GUI toolkits it supports, such as Qt and Java AWT/Swing and Java SWT. This enables test engineers to access all the widgets, functions, and properties that these toolkits provide. Using these script bindings it is then possible to query and set object properties, and to call object methods, for any of the standard objects (such as widgets), used by the AUT. This make it possible to implement sophisticated and robust test scripts that can verify the application's state and behavior using verification points.
In most cases, the script bindings provided with Squish are sufficient. But in some cases it might be necessary to access objects that are defined in the AUT or in a component used by the AUT that isn't one of the GUI toolkit's standard classes. This isn't a problem with Squish 4.0, since from that version bindings for AUT classes are automatically created by Squish. But for earlier versions this must be done manually.
Why would we want to access custom AUT components rather than simply those components in the GUI toolkit that the AUT is built with? Because sometimes we want to access the additional custom properties or to call the custom methods that custom components provide. For example, we might want to test a CAD application for which its custom Canvas widget is a key component. To provide comprehensive tests we would want to be able to query the custom Canvas to verify that objects that the test has drawn (by interacting with the application's user interface), have been drawn correctly.
For this purpose Squish provides a very powerful mechanism which makes it possible to instrument C++ code and create script bindings for it. With the bindings in place it then becomes possible to call functions and access properties which are declared in the application without changing the application itself.
In this section we will present an example that shows how to create bindings to make your AUT's API accessible to your test scripts. We will take you step-by-step through the process, so that you can see exactly how to instrument your application.
For the example, we will use the canvas example that comes with Qt, and which is located in examples/qt3/canvas for Qt 3 and in examples/qt/canvas for Qt 4.
This application is a very simple vector drawing application. By clicking on the canvas view, a new rectangle is inserted. Rectangles can be moved by dragging (clicking, and moving with the left mouse button held down).
To verify that the canvas inserts and moves the rectangles correctly, we need to access its API, so that we can to query their sizes and positions.
Instrumenting and Wrapping
To create the bindings we must instrument the AUT or additional components and produce a bindings library (also called a wrapper library).
First we will instrument the application. To do this we will use the squishidl tool—this parses C++ header files and generates binding code that exposes the application's API to the script languages. The tool provides a number of command line options which are all explained in the squishidl section in the Tools Reference. Instead of running squishidl manually for every file, we will use Squish's build tool (called "build"), which considerably simplifies the task. build uses a JavaScript-like language to describe build rules and targets and is a portable alternative to make.
Note: Even if you don't use build for your applications, we recommend using it for generating bindings libraries.
To use build to create the application bindings, create a file called Buildroot in your application's source directory. This file must have a single line containing the absolute path of the Squish installation directory. For example, if Squish is installed in /usr/local/squish, the Buildroot file would contain this single line:
/usr/local/squish
This will ensure that build can locate all the files necessary to create a bindings library.
Note: Even if you use a binary version of Squish you will need Squish in source form to create bindings—in particular the src subdirectory. This is necessary because the source code contains files and information that are essential for resolving dependencies to internal libraries that are needed during compilation.
When build is run, in addition to looking for the Buildroot file that tells it where Squish is, it also looks for a file called Buildsub. This file is the build tool's equivalent to a Makefile for the make tool—it describes the build targets and should be in the same directory as the AUT's source code along with the Buildroot file.
Instrumenting the Canvas Application
To generate an application bindings library for the canvas example (whether for Qt 3 or Qt 4), we must put the following code in the Buildsub file:
var canvasWrapperHeaders = ["canvas.h"];
var canvasWrapperLib = wrapperLib("canvas",
    canvasWrapperHeaders, stdIncs, ".");
First we define an array which lists all the header files that we want squishidl to create wrappers for. In this case we want to wrap the API defined in the canvas.h file.
To create the wrapper library, the build tool will call the wrapperLib function. The first argument to this function must be the name which we want to use for the wrapper library. Usually this is the application's or component's name without a suffix (i.e., no .exe or .dll on Windows). The second argument is an array that lists the files that we want wrapped: We pass the array that we created in the previous line for this purpose. The third parameter specifies the include paths which should be used, and for this we use the build tool's predefined stdIncs array which contains all the standard include paths. The last parameter specifies the directory where we want the wrapper library to be built. Here we have just said to build it in the current directory.
If the files you want to wrap include files from other directories, you must add the directories where those files can be found to the include paths. For example:
var all_includes = stdIncs.concat(["/my/include/path"]);
And instead of passing the stdIncs array as the third parameter, pass your own array (here, all_includes), as the third argument to the wrapperLib function.
Now that the Buildsub file has all the information it needs, we can run the build tool in the directory that contains the Buildsub file. This will result in the bindings library being generated.
Symbols on Unix
There is one potential problem. At runtime the wrapper library will need to access the application's symbols (classes, functions, etc.), but they will only be accessible if they are exported.
How symbols are exported varies depending on the compiler. For example, on Solaris and IRIX, the symbols are automatically exported by default. But gcc on Linux doesn't do this, and requires the addition of the -rdynamic option to be given to the linker.
How you add the -rdynamic option depends on the build system you use. If you are using Qt's qmake as your application's build tool, you could add the following line to your project file:
linux-g++*:LIBS += -rdynamic
This will add the -rdynamic option to the link line on both 32- and 64-bit Linux when gcc is used. The .pro file can also be safely used on other platforms because on them this line will be ignored.
Symbols on Windows
For Windows, exporting the symbols is a little more involved. Essentially we have to do the same to the application as we would do when we create a DLL. We must mark each class that we want to be exported with the __declspec(dllexport) attribute. This will generate an import library with the application's exported symbols which we must link into the wrapper library (this last part is automatically handled by the build tool).
The first part is to modify the application's build system to export the symbols and to create the import library.
If you are using qmake to build your application, these lines must be added to the application's project (.pro) file:
win32:DEFINES += TEST_EXPORT=__declspec(dllexport)
unix:DEFINES += TEST_EXPORT=
If you don't use qmake, but use nmake directly to compile your application, add the following to the NMakefile file's CXXFLAGS variable:
/DTEST_EXPORT=__declspec(dllexport)
If you also use make on Unix you can add a corresponding line to the Unix Makefile's CXXFLAGS variable:
-DTEST_EXPORT=
Now the export macro is defined correctly. But one more step is required so that the Windows linker will create the desired import library with the exported symbols: You must use the export macro in the code which should be exported.
In our canvas example we have the following class definitions defined in canvas.h which we want to create bindings for:
class CanvasInterface : public Qt
{
    //...
};

class CanvasItem : public CanvasInterface
{
    //...
};

class CanvasRect : public CanvasItem
{
    //...
};

class CanvasModel : public QObject, public CanvasInterface
{
    //...
};

class CanvasView : public QScrollView
{
    //...
};
To let the Windows linker know that we want to export the symbols of these classes, we must mark them with the export macro we have just defined. So we modify the file by adding the TEST_EXPORT to the class definitions as shown below:
class TEST_EXPORT CanvasInterface : public Qt
{
    //...
};

class TEST_EXPORT CanvasItem : public CanvasInterface
{
    //...
};

class TEST_EXPORT CanvasRect : public CanvasItem
{
    //...
};

class TEST_EXPORT CanvasModel : public QObject, public CanvasInterface
{
    //...
};

class TEST_EXPORT CanvasView : public QScrollView
{
    //...
};
Note: If the class is defined in a Qt .ui XML file, open the file in Qt Designer, double click on the name property in the Properties tab of the Object Explorer. Enter the TEST_EXPORT macro into the export macro field that will appear, and save the .ui file. From now on the uic tool will automatically add the macro to the generated C++ classes.
Note: On Windows, the squishidl tool creates introspection and automation code only for classes, global functions, and variables which are exported using the TEST_EXPORT macro. This is to avoid problems with unresolved symbols in the generated libraries.
If you now rebuild your application, an import library with the exported symbols called <appname>.lib will be created.
The next step is to extend the wrapper library's Buildsub file to import the application's exported symbols. To do this we must add the following code to the Buildsub file:
var importMacro;
if (windows)
    importMacro = "TEST_EXPORT=__declspec(dllimport)";
else
    importMacro = "TEST_EXPORT=";
setDefines(canvasWrapperLib, [importMacro]);
This defines a macro called TEST_EXPORT to import exported symbols. Also, it adds it as a define to the canvasWrapper library's complier line.
Now when using build to create the wrapper library, the bindings library will be correctly generated.
Extra Dependencies
Depending on your application's architecture there might be extra libraries involved that the application or that the wrapped library depends on. Such dependencies will be inherited by the wrapper library. Since some platforms require that all undefined symbols are resolved at link time we will sometimes have to explicitly specify the extra libraries when linking the wrapper.
Such dependencies become apparent if you get "unresolved external symbol" (or similar) errors at link time when building the wrapper library.
Here's a build script snippet—i.e., an extract from a Buildsub file—that demonstrates how to use the extras property that is reserved for the purpose of specifying additional link flags. It is based on above example with the additional requirement that the MyUtils Windows DLL defines some symbols required by the wrapped object:
// create an array property if it doesn't exist
if (!canvasWrapperLib.extras)
    canvasWrapperLib.extras = [];
// push a new element onto the end of the array
canvasWrapperLib.extras.push("MyUtils.lib");
On a Unix-like system you would pass a switch like -lMyUtils and possibly -L flags that tell the linker which paths to search when looking for the library.
Simplified API for Testing
Sometimes, it's not desirable (or possible) to expose the internal API 1:1. The reasons can be manifold:
- The original API makes use of C++ features that cannot be handled because squishidl limitations. Like the C++ STL or nested namespaces.
- The API uses C++ templates which cannot be accessed via non-compiled scripting languages.
- The tester would be confronted with hard or impossible to use internals of the application.
- Testers want to have a stable interface that is decoupled from ongoing refactoring done by application developers.
In cases such as these the internal API can be hidden behind an extra layer created for testing purposes only. Either fully or only partially whenever needed.
Here is an example interface that encapsulates usage of a C++ template class behind a function inside of a test-specific class:
#ifndef TESTAPI_H
#define TESTAPI_H

#include "internal.h"

class TEST_EXPORT TestAPI
{
public:
    // simple script access to internal C++ template class
    static void setNetworkEnabled(bool on) { Component<Network>::self()->setEnabled(on); }
};

#endif
Once the application has been started and the extra wrapper got loaded the function will be available via simple script call:
TestAPI.setNetworkEnabled(true);
Final Considerations
We have seen that is it sometimes necessary to change some build settings to make the application's API testable. If you want to test exactly the same build as you will ship, you can leave these settings on all the time since exporting the application's symbols is harmless.
If you want to make the API of a dynamic library testable, the library's symbols will be exported anyway (otherwise it wouldn't be possible to use the library). So for dynamic libraries, no extra work is necessary to export symbols.
Creating a Test Using the Wrapper Library
If the wrapper library containing the application bindings follows the naming convention libAUT_NAMEwrapper.so (Unix), libAUT_NAMEwrapper.dylib (macOS) or AUT_NAMEwrapper.dll (Windows), and it is located in an AUT path or a path listed in the SQUISH_WRAPPER_PATH environment variable, the wrapper library is automatically loaded when starting the AUT. This is convenient when just wrapping the AUT's API. But if we also want to wrap the APIs of additional components, it is usually more convenient to create multiple wrapper libraries (one for each component).
For Squish to load multiple wrapper libraries, they must all be located in an AUT path or a path listed in the SQUISH_WRAPPER_PATH environment variable. To tell Squish to load specific wrapper libraries, simply specify their names in the test suite's suite.conf, as the value of the WRAPPERS key. The name of the wrapper is what you specified as first argument to the wrapperLib function in the wrapper's Buildsub file.
Alternatively, you can specify which wrapper libraries to load in the Squish IDE via the Test Suite's Test Suite Settings view. All the available wrappers are listed in the Wrappers section—simply check the checkboxes of those you want to be loaded.
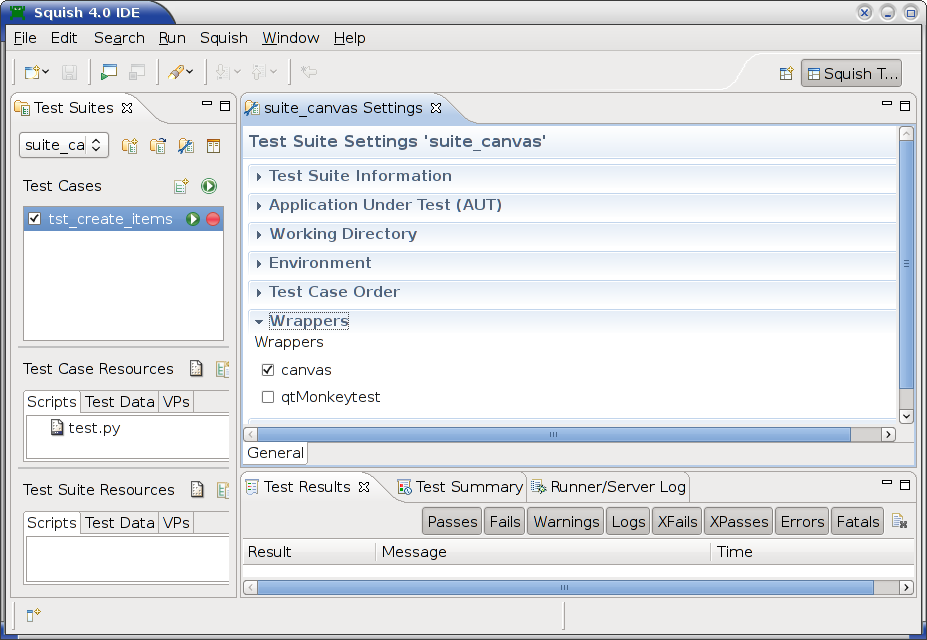
The Squish IDE's Settings View Showing the Wrappers
As the screenshot shows, the default wrappers—i.e., those for the relevant GUI toolkit—are not listed since they are always loaded automatically anyway.
Example Test Case
Here's an example test script which inserts three rectangles into the canvas. To verify that the rectangles were inserted correctly, we use the functions, CanvasView::canvasModel, CanvasModel::numItems, CanvasModel::item (taking an integer index) and CanvasItem::rect. All of these functions are available through the bindings library we created.
Here is the example script's code. The complete example test suite can be found in examples/qt/suite_canvas for Qt 4. (A very similar example for Qt 3, that only has a Python test script, is in examples/qt3/suite_canvas).
import names
import os

def checkRectangle(item, x, y, width, height):
    test.compare(item.rect().x, x)
    test.compare(item.rect().y, y)
    test.compare(item.rect().width, width)
    test.compare(item.rect().height, height)

def main():
    startApplication('"' + os.environ["SQUISH_PREFIX"] + '/examples/qt/canvas/canvas"')

    # insert 3 rectangular items
    mouseClick(names.canvas_CanvasView_CanvasView, 90, 56, 1, Qt.LeftButton)
    mouseClick(names.canvas_CanvasView_CanvasView, 170, 173, 1, Qt.LeftButton)
    mouseClick(names.canvas_CanvasView_CanvasView, 271, 96, 1, Qt.LeftButton)
    snooze(0.5)

# retrieve reference to the canvas model
    canvas = waitForObject(names.canvas_CanvasView_CanvasView)
    model = canvas.canvasModel()

# check that it contains 3 items
    test.compare(model.numItems(), 3)

# for each item, check that it has the correct geometry
    checkRectangle(model.item(0), 90, 56, 50, 70)
    checkRectangle(model.item(1), 170, 173, 50, 70)
    checkRectangle(model.item(2), 271, 96, 50, 70)

    # close and exit
    sendEvent("QCloseEvent", names.canvas_QMainWindow)
import * as names from 'names.js';

function checkRectangle(item, x, y, width, height)
{
    test.compare(item.rect().x, x);
    test.compare(item.rect().y, y);
    test.compare(item.rect().width, width);
    test.compare(item.rect().height, height);
}

function main()
{
    startApplication('"' + OS.getenv("SQUISH_PREFIX") + '/examples/qt/canvas/canvas"');

    // insert 3 rectangular items
    mouseClick(names.canvasCanvasViewCanvasView, 90, 56, 1, Qt.LeftButton);
    mouseClick(names.canvasCanvasViewCanvasView, 170, 173, 1, Qt.LeftButton);
    mouseClick(names.canvasCanvasViewCanvasView, 271, 96, 1, Qt.LeftButton);
    snooze(0.5);

// retrieve reference to the canvas model
    var canvas = waitForObject(names.canvasCanvasViewCanvasView);
    var model = canvas.canvasModel();

// check that it contains 3 items
    test.compare(model.numItems(), 3);

// for each item, check that it has the correct geometry
    checkRectangle(model.item(0), 90, 56, 50, 70);
    checkRectangle(model.item(1), 170, 173, 50, 70);
    checkRectangle(model.item(2), 271, 96, 50, 70);

    // close and exit
    sendEvent("QCloseEvent", names.canvasQMainWindow);
}
require 'names.pl';

sub checkRectangle
{
    my ($item, $x, $y, $width, $height) = @_;
    test::compare($item->rect()->x, $x);
    test::compare($item->rect()->y, $y);
    test::compare($item->rect()->width, $width);
    test::compare($item->rect()->height, $height);
}

sub main
{
    startApplication("\"$ENV{'SQUISH_PREFIX'}/examples/qt/canvas/canvas\"");
    # insert 3 rectangular items
    mouseClick($Names::canvas_canvasview_canvasview, 90, 56, 1, Qt::LeftButton);
    mouseClick($Names::canvas_canvasview_canvasview, 170, 173, 1, Qt::LeftButton);
    mouseClick($Names::canvas_canvasview_canvasview, 271, 96, 1, Qt::LeftButton);
    snooze(0.5);

    # retrieve reference to the canvas model
    my $canvas = waitForObject($Names::canvas_canvasview_canvasview);
    my $model = $canvas->canvasModel();

    # check that it contains 3 items
    test::compare($model->numItems(), 3);

    # for each item, check that it has the correct geometry
    checkRectangle($model->item(0), 90, 56, 50, 70);
    checkRectangle($model->item(1), 170, 173, 50, 70);
    checkRectangle($model->item(2), 271, 96, 50, 70);

    # close and exit
    sendEvent("QCloseEvent", $Names::canvas_qmainwindow);
}
# encoding: UTF-8
require 'names'

require 'squish'

include Squish

def checkRectangle(item, x, y, width, height)
    Test.compare(item.rect().x, x)
    Test.compare(item.rect().y, y)
    Test.compare(item.rect().width, width)
    Test.compare(item.rect().height, height)
end

def main
    startApplication("\"#{ENV['SQUISH_PREFIX']}/examples/qt/canvas/canvas\"")
    # insert 3 rectangular items
    mouseClick(Names::Canvas_CanvasView_CanvasView, 90, 56, 1, Qt::LEFT_BUTTON)
    mouseClick(Names::Canvas_CanvasView_CanvasView, 170, 173, 1, Qt::LEFT_BUTTON)
    mouseClick(Names::Canvas_CanvasView_CanvasView, 271, 96, 1, Qt::LEFT_BUTTON)
    snooze(0.5)

    # retrieve reference to the canvas model
    canvas = waitForObject(Names::Canvas_CanvasView_CanvasView)
    model = canvas.canvasModel

    # check that it contains 3 items
    Test.compare(model.numItems(), 3)

    # for each item, check that it has the correct geometry
    checkRectangle(model.item(0), 90, 56, 50, 70)
    checkRectangle(model.item(1), 170, 173, 50, 70)
    checkRectangle(model.item(2), 271, 96, 50, 70)

    # close and exit
    sendEvent("QCloseEvent", Names::Canvas_QMainWindow)
end
source [findFile "scripts" "names.tcl"]

proc checkRectangle {item x y width height} {
    test compare [property get [invoke $item rect] x] $x
    test compare [property get [invoke $item rect] y] $y
    test compare [property get [invoke $item rect] width] $width
    test compare [property get [invoke $item rect] height] $height
}

proc main {} {
    startApplication "\"$::env(SQUISH_PREFIX)/examples/qt/canvas/canvas\""

# insert 3 rectangular items
    invoke mouseClick $names::Canvas_CanvasView_CanvasView 90 56 1 [enum Qt LeftButton]
    invoke mouseClick $names::Canvas_CanvasView_CanvasView 170 173 1 [enum Qt LeftButton]
    invoke mouseClick $names::Canvas_CanvasView_CanvasView 271 96 1 [enum Qt LeftButton]
    snooze 0.5

# retrieve reference to the canvas model
    set canvas [waitForObject $names::Canvas_CanvasView_CanvasView]
    set model [invoke $canvas canvasModel]

# check that it contains 3 items
    test compare [invoke $model numItems] 3

# for each item, check that it has the correct geometry
    checkRectangle [invoke $model item 0] 90 56 50 70
    checkRectangle [invoke $model item 1] 170 173 50 70
    checkRectangle [invoke $model item 2] 271 96 50 70

    # close and exit
    sendEvent "QCloseEvent" $names::Canvas_QMainWindow
}
This wraps up the coverage of creating application bindings and accessing them from test scripts. Using this functionality, it is possible to implement very powerful, robust, and sophisticated tests.
© 2023 The Qt Company Ltd.
Documentation contributions included herein are the copyrights of
their respective owners.
The documentation provided herein is licensed under the terms of the GNU Free Documentation License version 1.3 as published by the Free Software Foundation.
Qt and respective logos are trademarks of The Qt Company Ltd. in Finland and/or other countries worldwide. All other trademarks are property
of their respective owners.