How to Test Android Applications
To perform testing of Android AUTs, these things are required:
- A running Android system that is visible by adb,
- an application to test—known as the Application Under Test (AUT), and
- a test script that exercises the AUT.
When Squish starts an Android AUT, it uses a program called androidobserver which establishes an attach port into the instrumented and deployed AUT, as it is started.
Note: For Android devices, make sure USB Debugging is enabled after the device is connected to your PC. This usually requires first enabling Developer Options on the device before you can see the option under Settings.
Note: For Qt applications on Android, see Installing Squish/Qt for Android testing.
API Access
Java API access is available for apps that are started by Squish, either using ApplicationContext startApplication(autName) or androidobserver in combination with ApplicationContext attachToApplication(autName). For the Android desktop and for other apps, Squish can invoke touch and keyboard actions on objects available via the Android accessibility framework if the Android OS version is 4.3 or later.
Squish's Android Object API enables you to find and query objects, call methods, and access properties:
- How to Work with Accessibility objects
- How to Use the nativeObject Property
- How to Use the GestureBuilder class
In addition, the Android Convenience API provides functions for executing common user interface actions, such as tapping on a button or typing text into a text widget. Java objects are made available in a wrapper and the underlying objects' properties and methods are accessible through the Squish-added nativeObject property.
How to Work with Accessibility Objects
For certain tests it may be required to change Android wide settings. Other tests may launch a third party app that cannot be instrumented with Squish or use the accessibility framework.
Squish cannot directly record on objects in apps that it did not instrument or start. However, if you use the Remote Control dialog as a display for the Android device during recording, actions are recorded for the provided accessibility user interface nodes. Android OS version must be 4.3 or later.
Like with in-app object names, prefer objects with unique text, resource name, or description. Also refer to UiAutomator support, when replaying touches doesn't have any effect.
The Squish IDE can help getting object names. When the Squish IDE is at a breakpoint or recording is paused, the Application Objects view will show an extra top element, typically of type AccessiblePanel, if the by Squish instrumented app is not visible. So via the context menu, object names can be copied.
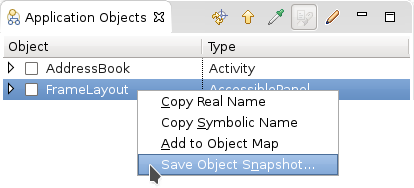
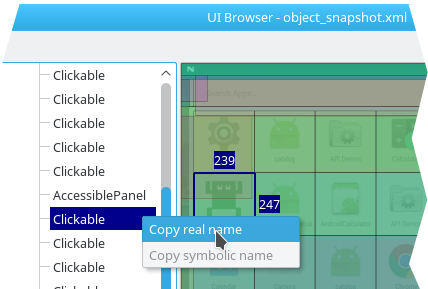
The object snapshot viewer, called UI Browser, may help finding a particular accessibility object. Right-click an accessibility object in the Application Objects view. Choose Save Object Snapshot, include screenshot and object names and select Open Snapshot in Browser After Saving in the dialog that follows. In the graphical representation of the Android UI of the viewer, click the wanted object. Then right-click the selected item in the left hierarchical view and choose Copy real name.
For following object snapshots, just leave Open Snapshot in Browser After Saving unchecked. The viewer will automatically update its content when the object snapshot output file changes on disk.
Note: Make sure to refresh the Application Objects view every time the screen content changes.
The following example script snippet presses the Home button, opens the setting app, and so on. To emphasise the differences in the object names, multi property names are shown but abbreviated.
goHome()
tapObject(waitForObject("{... description='Apps' type='Clickable' ...}"))
tapObject(waitForObject("{... text='Settings' type='Clickable' ...}"))
tapObject(waitForObject("{... text='Accounts' type='AccessibleLabel' ...}"))
tapObject(waitForObject("{... text='Add account' type='AccessibleLabel' ...}"))
tapObject(waitForObject("{... text='Exchange' type='AccessibleLabel' ...}"))
type(waitForObject("{... type='Editable' ...}"), "user@example.com")
Only one Android instrumentation can access the Android UIAutomation framework. If more than one app should be accessed by Squish test scripts, then all but one should be started using the –no-ui-automation launcher option. For example:
startApplication("{no-ui-automation}:com.froglogic.addressbook")How to Use the nativeObject Property
The nativeObject property provides access to the methods and properties of a Java object. For example, to change the text of an Android Button, we would first obtain a reference to the button object, and then call setText:
button = waitForObject(":Okay_Button")
button.nativeObject.setText("Cancel")
var button = waitForObject(":Okay_Button");
button.nativeObject.setText("Cancel");
my $button = waitForObject(":Okay_Button");
button->nativeObject->setText("Cancel");
button = waitForObject(":Okay_Button")
button.nativeObject.setText("Cancel")
set button [waitForObject ":Okay_Button"]
invoke $button setText "Cancel"
The following example writes the method names of a Java object method (in this case a Button widget) to the Squish log:
buttonclass = button.nativeObject.getClass()
methods = buttonclass.getMethods()
for method in methods:
    test.log("Button method: " + method.getName())
var buttonclass = button.nativeObject.getClass();
var methods = buttonclass.getMethods();
for (i = 0; i < methods.length; ++i)
    test.log("Button method: " + methods.at(i).getName());
my $buttonclass = button->nativeObject->getClass();
my @methods = buttonclass->getMethods();
foreach $method (@methods) {
    test.log("Button method: " . $method->getName());
}
buttonclass = button.nativeObject.getClass()
methods = buttonclass.getMethods()
for method in methods:
    test.log("Button method: " + method.getName())
end
set buttonclass [invoke [property get $button nativeObject] getClass]
set methods [invoke $buttonclass getMethods]
foreach method $methods {
    set name [invoke $method getName]
    test.log("ListView method: $name")
}
Finally, an example of accessing a static property:
test.log("Value of View.INVISIBLE is " + Native.android.view.View.INVISIBLE)
test.log("Value of View.INVISIBLE is " + Native.android.view.View.INVISIBLE);
test->log("Value of View.INVISIBLE is " . Native::android::view::View->INVISIBLE);
How to Use the GestureBuilder class
An instance of this class is returned by readGesture(gesture-file). However, when the recorded gesture doesn't fit on the screen of the target device or emulator, a scaling or translation can be done.
It might be useful to get the screen metrics. Here is an example of how to get the screen size, using the Java script bindings. These metrics are in pixels, and therefore include a conversion to millimeters to match the points in the GestureBuilder object.
var activity = findObject(":Your_Activity").nativeObject;
var metrics = activity.getClass().forName("android.util.DisplayMetrics").newInstance();
activity.getWindowManager().getDefaultDisplay().getMetrics(metrics);
w = metrics.widthPixels * 25.4 / metrics.xdpi;
y = metrics.heightPixels * 25.4 / metrics.ydpi;
Suppose the gesture was recorded in portrait mode, and when replaying in landscape mode, the gesture is too large and too much to the bottom-left. Then using Object GestureBuilder.scale(scaleX, scaleY, originX, originY) and Object GestureBuilder.translate(x, y) towards the top-right is a possible solution.
For instance, scale the gesture 3/4 in size and move it 5 cm to the right and 1 cm upwards:
gesture(waitForObject(":some_object"), readGesture("Gesture_1").scale(0.75).translate(50,-10));
When using the Squish IDE, use the Console view when at a breakpoint in your script, to experiment with gesture transformations.
Another approach could be to only scale the gesture with an origin in the top-right corner:
var gst = readGesture("Gesture_1");
gesture(waitForObject(":some_object"), gst.scale(0.75, 0.75, gst.areaWidth, 0));
In some cases dynamic created gestures are required, e.g. for more accurate control or dependency on runtime state information. Then the Gesture creation methods can be used.
Here is an example of a pitch gesture, that is, a two-finger gesture making a curved counter clockwise movement on a 800x1200 pixel screen in one second.
var tb = new GestureBuilder(800, 1280, GestureBuilder.Pixel);
tb.addStroke( 600, 400 );
tb.curveTo(1000, 500, 300, 300, 300, 200, 400 );
tb.addStroke( 200, 800 );
tb.curveTo(1000, 300, 900, 500, 900, 600, 800);
tb.build();
gesture(waitForObject(":some_object"), tb);
And here is an example of a zoom gesture, a two-finger gesture moving away from each other, also in one second. This time written as one statement.
gesture(waitForObject(":some_object"),
        new GestureBuilder(800, 1280, GestureBuilder.Pixel)
           .addStroke( 500, 400 )
           .lineTo(1000, 700, 100 )
           .addStroke( 300, 700 )
           .lineTo(1000, 100, 1000)
           .build());
In the above two examples, the coordinate values are based on the area size of 800x1280. For different screen sizes or different size or position of the widget on which the gesture should replay, some calculation is needed to get these values. The following strategy might help to keep the complexity under control when having to deal with that:
- Create a gesture given the screen dimensions, within the boundary of x-axis [-0.5,0.5] and y-axis [-0.5,0.5] and a duration of 1 s.
- Translate it to the center of the target widget.
- Scale it with a maximum of the widget size, using the center of this widget as origin.
- Adjust the duration.
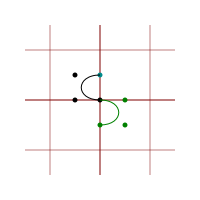
Here is a listing of this, in this case an S shaped figure:
var activity = findObject(":Your_Activity").nativeObject;
var metrics = activity.getClass().forName("android.util.DisplayMetrics").newInstance();
activity.getWindowManager().getDefaultDisplay().getMetrics(metrics);

var tb = new GestureBuilder(metrics.widthPixels, metrics.heightPixels, GestureBuilder.Pixel)
             .addStroke(0, 0.5)
             .curveTo(500, -0.5, 0.5, -0.5, 0, 0, 0)
             .curveTo(500, 0.5, 0, 0.5, -0.5, 0, -0.5)
             .build();

var widget = findObject(":Some widget");
var scale = widget.width > widget.height ? widget.height : widget.width;
var centerX = widget.screenX + widget.width/2;
var centerY = widget.screenY + widget.height/2;
gesture(widget,
        tb.translate(centerX, centerY)
          .scale(scale, -scale, centerX, centerY)
          .accelerate(1/2))
This example defines the figure with the positive y-axis upwards. To ensure that the figure is not up-side-down, a mirror in the x-axis is needed. The trick is to use a negative scale factor in the vertical direction.
Keeping the defined gesture within the -0.5 to 0.5 boundary has the advantage that the total size is 1. Thus it can be scaled with the widget sizes without being scaled outside the screen boundaries. Having (0, 0) in the center, makes the translation simple, just to the center of the widget.
How to test without modifying the AUT on Android
For security or compliance reasons a user can decide or be forced to opt out of the instrumentation and built-in approach we use with Squish in combination with the AUT.
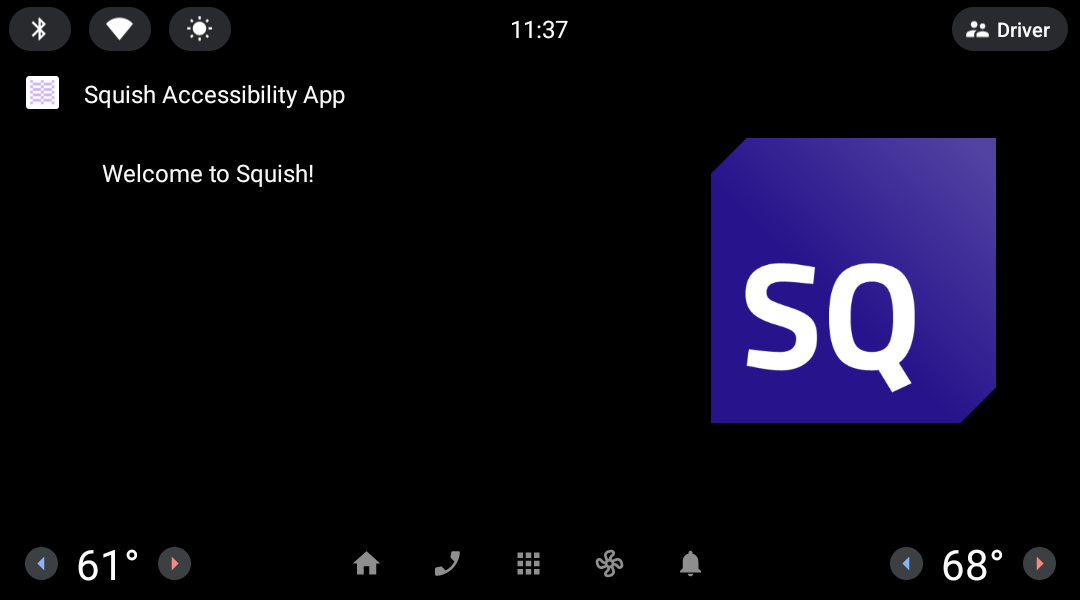
For Squish to get access to the device it still needs to add an entry point. Since the AUT itself must not be touched, a simple helper application can be used in its place. The helper is provided in the Customer Portal and will give Squish access to the Android system.
The application is a simple Android application that has no further functionality. Squish provides you with a version for mobile and for automotive purposes.
After the helper application is instrumented using Squish IDE the test creation can start. The start should be a call to bail out of our helper application:
startApplication("org.qtproject.squishaccessapp")
goHome()startApplication("org.qtproject.squishaccessapp");
goHome();startApplication("org.qtproject.squishaccessapp");
goHome();startApplication("org.qtproject.squishaccessapp");
goHome();startApplication "org.qtproject.squishaccessapp"
goHomeAfterwards a breakpoint should be set and the actual test recording can start. For these cases Squish provides the possibility to interact with and verify object-states based on accessibility, image-based and text-based.
© 2025 The Qt Company Ltd.
Documentation contributions included herein are the copyrights of
their respective owners.
The documentation provided herein is licensed under the terms of the GNU Free Documentation License version 1.3 as published by the Free Software Foundation.
Qt and respective logos are trademarks of The Qt Company Ltd. in Finland and/or other countries worldwide. All other trademarks are property
of their respective owners.
