
Qt Quick 3D物理シミュレーション - 簡単な例
簡単な物理シーンの設定方法を解説します。
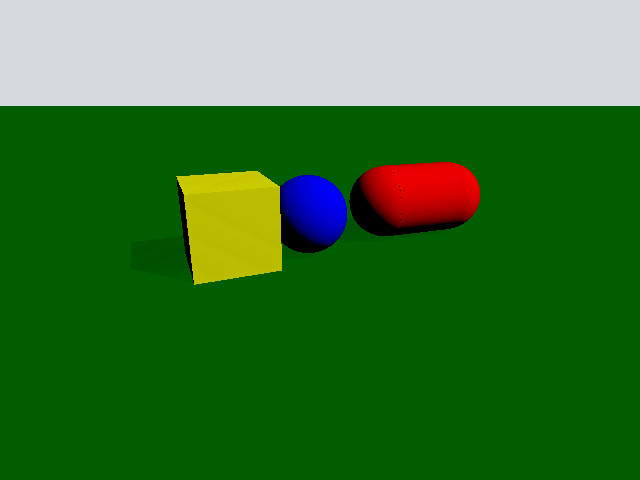
この例では、簡単な例のコードを解説することで、Quick 3D Physicsの基本機能について概説します。なお、この解説では、Qt Quick の3Dモジュールに関する知識があることを前提としています。
セットアップ
この例全体はmain.qmlファイル内に含まれており、そこで設定されています。まず、物理世界を作成するオブジェクトを見てみましょう。このノードはPhysicsWorld と呼ばれます:
PhysicsWorld {
    scene: viewport.scene
}
scene プロパティには、View3D のシーンを設定します。scene プロパティは、シミュレーションが物理ノードを検索する範囲を定義します。シーンノードの外側に配置された物理ノードは、シミュレーションの対象外となります。
シーン
シーンを見てみましょう。
View3D {
    id: viewport
    anchors.fill: parent

    environment: SceneEnvironment {
        clearColor: "#d6dbdf"
        backgroundMode: SceneEnvironment.Color
    }

    PerspectiveCamera {
        position: Qt.vector3d(-200, 100, 500)
        eulerRotation: Qt.vector3d(-20, -20, 0)
        clipFar: 5000
        clipNear: 1
    }

    DirectionalLight {
        eulerRotation.x: -45
        eulerRotation.y: 45
        castsShadow: true
        brightness: 1
        shadowFactor: 50
    }

    StaticRigidBody {
        position: Qt.vector3d(0, -100, 0)
        eulerRotation: Qt.vector3d(-90, 0, 0)
        collisionShapes: PlaneShape {}
        Model {
            source: "#Rectangle"
            scale: Qt.vector3d(10, 10, 1)
            materials: PrincipledMaterial {
                baseColor: "green"
            }
            castsShadows: false
            receivesShadows: true
        }
    }

    DynamicRigidBody {
        position: Qt.vector3d(-100, 100, 0)
        collisionShapes: BoxShape {
            id: boxShape
        }
        Model {
            source: "#Cube"
            materials: PrincipledMaterial {
                baseColor: "yellow"
            }
        }
    }

    DynamicRigidBody {
        position: Qt.vector3d(0, 100, 0)
        collisionShapes: SphereShape {
            id: sphereShape
        }
        Model {
            source: "#Sphere"
            materials: PrincipledMaterial {
                baseColor: "blue"
            }
        }
    }

    DynamicRigidBody {
        position: Qt.vector3d(75, 200, 0)
        collisionShapes: CapsuleShape {
            id: capsuleShape
        }

        Model {
            geometry: CapsuleGeometry {}
            materials: PrincipledMaterial {
                baseColor: "red"
            }
        }
    }
}物理オブジェクトを描画したいので、このシーンは単にView3D で構成されています。レンダリング用のPerspectiveCamera とDirectionalLight が含まれていますが、さらに重要なのは、StaticRigidBody と3つのDynamicRigidBody ノードが含まれていることです。物理学において、剛体とは、変形せず、均一な密度を持つ固体です。 利用可能な剛体は2種類あります。StaticRigidBody とDynamicRigidBody です。StaticRigidBody は、静的(動かない)剛体を含むQMLノードです。技術的には剛体を動かすことは可能ですが、パフォーマンスの低下を招きます。一方、DynamicRigidBody は、移動可能なオブジェクトに使用されます。DynamicRigidBody にはisKinematic プロパティがあり、これをtrueに設定すると、剛体は外部からの力の影響を受けなくなり、スクリプトやアニメーションから制御できるようになります。例えば、サッカーボールはキネマティックではありませんが、エレベーターや移動プラットフォームは通常、キネマティックです。これはまた、サッカーボールのposition プロパティを更新してもその位置へ移動しないのに対し、エレベーターは移動することを意味します。
他の物理オブジェクトと相互作用できるようにするには、collisionShapes プロパティを設定する必要があります。collisionShapes プロパティは、1つ以上のシェイプを含むことができるリストであり、これらは1つの剛体ユニットとして統合されて動作します。これらのシェイプは、互いに関連付けて位置や回転を調整できます。なお、平面、三角メッシュ、およびハイトマップのシェイプは、そのボディがキネマティックである場合にのみ、ダイナミックボディとして機能することに注意してください。
シェイプ
このシーンには、4つの物理オブジェクト(平面、箱、ボール、カプセル)が含まれています。これらを1つずつ見ていきましょう。
平面
StaticRigidBody {
    position: Qt.vector3d(0, -100, 0)
    eulerRotation: Qt.vector3d(-90, 0, 0)
    collisionShapes: PlaneShape {}
    Model {
        source: "#Rectangle"
        scale: Qt.vector3d(10, 10, 1)
        materials: PrincipledMaterial {
            baseColor: "green"
        }
        castsShadows: false
        receivesShadows: true
    }
}平面は、StaticRigidBody ノードを作成することで生成します。このノード内で、collisionShapes プロパティにPlaneShape を指定します。平面は空間を「上」と「下」に分割します。平面の「下」にあるすべてのオブジェクトは平面と衝突し、その上へと押し上げられます。この平面はYZ平面上にあり、「上」は正のX方向を指しています。 平面をレンダリングするために、StaticRigidBody ノード内にモデルを配置します。これは、シーン内で物理オブジェクトが相互作用する際、モデルも同様に移動・回転するようにするための一般的な手法です。平面をXY平面上に配置したいので、eulerRotation プロパティを使用して回転させます。モデルについても同様の方法で回転させます。
ボックス
DynamicRigidBody {
    position: Qt.vector3d(-100, 100, 0)
    collisionShapes: BoxShape {
        id: boxShape
    }
    Model {
        source: "#Cube"
        materials: PrincipledMaterial {
            baseColor: "yellow"
        }
    }
}「DynamicRigidBody 」ノードと、「collisionShapes 」内の単一の「BoxShape 」を作成して、球体を生成します。これはダイナミックノードであるため、この箱は自由物体として衝突や移動を行い、シーンと相互作用します。立方体のモデルは単位立方体の100倍の大きさであるため、それに応じてスケール調整を行う必要があります。これはダイナミックボディであり、物理的な重量を持つため、「density 」プロパティを設定します。
球体
DynamicRigidBody {
    position: Qt.vector3d(0, 100, 0)
    collisionShapes: SphereShape {
        id: sphereShape
    }
    Model {
        source: "#Sphere"
        materials: PrincipledMaterial {
            baseColor: "blue"
        }
    }
}
collisionShapes 内で、DynamicRigidBody ノードとSphereShape を1つ作成し、球体を生成します。
カプセル
DynamicRigidBody {
    position: Qt.vector3d(75, 200, 0)
    collisionShapes: CapsuleShape {
        id: capsuleShape
    }

    Model {
        geometry: CapsuleGeometry {}
        materials: PrincipledMaterial {
            baseColor: "red"
        }
    }
}カプセルを作成するには、collisionShapes でDynamicRigidBody ノードと1つのCapsuleShape を作成します。Qt Quick 3Dが提供する組み込みのCapsuleGeometryを使用して、カプセルモデルを構築します。
ファイル:
© 2026 The Qt Company Ltd. Documentation contributions included herein are the copyrights of their respective owners. The documentation provided herein is licensed under the terms of the GNU Free Documentation License version 1.3 as published by the Free Software Foundation. Qt and respective logos are trademarks of The Qt Company Ltd. in Finland and/or other countries worldwide. All other trademarks are property of their respective owners.
