Qt Quick コントロールのカスタマイズ
Qt Quick コントロールは、項目の階層(ツリー)で構成されています。カスタムのルック&フィールを提供するために、各アイテムのデフォルトの QML 実装をカスタムのものに置き換えることができます。
コントロールのカスタマイズ
時には、UIの特定の部分だけ "その場限り "のルックを作成し、他の部分には完全なスタイルを使用したいと思うかもしれません。今使っているスタイルには満足しているけれども、あるボタンには特別な意味があるとします。
このボタンを作成する最初の方法は、必要な場所にインプレースで定義することです。たとえば、「基本」スタイルの「ボタン」の角が四角いことに不満があるとします。角を丸くするには、background アイテムをオーバーライドして、Rectangle の半径プロパティを設定します:
import QtQuick
import QtQuick.Controls.Basic

ApplicationWindow {
    width: 400
    height: 400
    visible: true

    Button {
        id: button
        text: "A Special Button"
        background: Rectangle {
            implicitWidth: 100
            implicitHeight: 40
            color: button.down ? "#d6d6d6" : "#f6f6f6"
            border.color: "#26282a"
            border.width: 1
            radius: 4
        }
    }
}
注意: どのスタイルでも、コントロールを構成するさまざまなアイテムは一緒に動作するように設計されているため、目的の外観を得るには他のアイテムをオーバーライドする必要がある場合があります。また、すべてのスタイルをカスタマイズできるわけではありません。詳細については、「カスタマイズ・リファレンス」の注記を参照してください。
ボタンを作成する2つ目の方法は、丸みを帯びたボタンを複数の場所で使用する場合に適しています。この方法では、コードをプロジェクト内のQMLファイルに移動させます。
この方法では、BasicスタイルのButton.qml から背景のコードをコピーします。このファイルは、Qtインストール内の以下のパスにあります:
$QTDIR/qml/QtQuick/Controls/Basic/Button.qml
その後、次の行を追加します:
radius: 4モジュール自体のコントロールとの混同を避けるため、このファイルをMyButton.qml と呼ぶことにする。アプリケーションでコントロールを使用するには、ファイル名で参照してください:
import QtQuick.Controls.Basic

ApplicationWindow {
    MyButton {
        text: qsTr("A Special Button")
    }
}
ボタンを作成する3つ目の方法は、ファイルがファイルシステムのどこにあるかという点でも、QMLでどのように使用されるかという点でも、もう少し構造化されています。まず、上と同じように既存のファイルをコピーします。ただし、今回はプロジェクトのサブフォルダに(例えば)controls という名前で入れます。コントロールを使用するには、まずそのフォルダをネームスペースにインポートします:
import QtQuick.Controls.Basic
import "controls" as MyControls

ApplicationWindow {
    MyControls.Button {
        text: qsTr("A Special Button")
    }
}
これでMyControls ネームスペースができたので、Qt Quick Controls モジュールの実際の対応物にちなんでコントロールに名前を付けることができます。追加したいコントロールがあれば、このプロセスを繰り返すことができます。
これら3つの方法の利点は、テンプレートをゼロから実装する必要がないことです。
注意: ToolTip は内部的に作成された共有アイテムなので、ここで紹介した3つの方法は、添付の をカスタマイズする場合には使えません。ToolTip を単発でカスタマイズするには、Custom Tool Tips を参照してください。添付のToolTip をカスタマイズするには、独自のスタイルの一部として提供する必要があります。
カスタム・スタイルの作成
独自のスタイルを作成するには、いくつかの方法があります。以下に、さまざまなアプローチについて説明します。
スタイルの定義
Qt Quick Controlsでは、スタイルは基本的に1つのディレクトリ内にあるQMLファイルの集合です。スタイルが使用可能であるためには、4つの要件があります:
- コントロールと同じ名前のQMLファイル(例えば、
Button.qml)が少なくとも1つ存在すること。 - 各 QML ファイルには、QtQuick.Templatesインポートにある関連する型がルート項目として含まれていなければなりません。例えば、Button.qml は、Button テンプレートをルート項目として含んでいなければなりません。
前のセクションで行ったように、QtQuick.Controlsインポートから対応する型を使用した場合、うまくいきません。
- qmldirファイルは QML ファイルと一緒に存在しなければなりません。以下は、ボタンを提供するスタイルのシンプルな
qmldirファイルの例です:module MyStyle Button 2.15 Button.qml
コンパイル時のスタイル選択を使用している場合、qmldirはフォールバックスタイルもインポートする必要があります:
# ...
import QtQuick.Controls.Basic auto
これは、例えば、QQuickStyle::setFallbackStyle()を使用する代わりに、実行時のスタイル選択のために行うこともできます。
このようなスタイルのディレクトリ構造は次のようになります:
MyStyle
├─── Button.qml
└─── qmldir
- ファイルはQMLインポートパスで検索可能なディレクトリに置く必要があります。
例えば、上記のMyStyleディレクトリへのパスが
/home/user/MyApp/MyStyleであった場合、/home/user/MyAppをQMLインポートパスに追加する必要があります。MyAppで MyStyleを 使用するには、MyStyleを名前で参照します:
./MyApp -style MyStyle
mystyleまたはMYSTYLEを渡すことはサポートされていません。
デフォルトでは、スタイリング・システムは、実装されていないコントロールのフォールバックとしてBasicスタイルを使用します。他の組み込みスタイルをカスタマイズまたは拡張するには、QQuickStyle を使用して別のフォールバック・スタイルを指定することができます。
これが意味するのは、カスタム・スタイルのために好きなだけコントロールを実装し、ほとんどどこにでも配置できるということです。また、ユーザーがアプリケーション用に独自のスタイルを作成することもできます。
Qt Quick Designer でのカスタムスタイルのプレビュー
上記の方法で、Qt Quick Designer でカスタム スタイルをプレビューできます。そのためには、プロジェクトにqtquickcontrols2.confファイルがあり、以下のエントリが存在することを確認してください:
[Controls]
Style=MyStyle
詳細はフラットスタイルの例を参照してください。
スタイル固有のC++拡張
C++を使用してカスタムスタイルを拡張する必要がある場合があります。
- その型を使用するスタイルがアプリケーションで使用される唯一のスタイルである場合、QML_ELEMENT マクロを追加してファイルを QML モジュールの一部とし、QML エンジンにその型を登録してください:
qt_add_qml_module(ACoolItem
    URI MyItems
    VERSION 1.0
    SOURCES
        acoolcppitem.cpp acoolcppitem.h
)
CONFIG += qmltypes QML_IMPORT_NAME = MyItems QML_IMPORT_MAJOR_VERSION = 1
クラスが宣言されているヘッダがプロジェクトのインクルードパスからアクセスできない 場合、生成された登録コードをコンパイルできるようにインクルードパスを修正する必要が あるかもしれません。
INCLUDEPATH += MyItems
詳しくはC++からのQML型の定義と QMLアプリケーションのビルドを参照してください。
- 型を使用するスタイルがアプリケーションで使用される多くのスタイルのうちの1つである場合、各スタイルを別々のモジュールに入れることを検討してください。モジュールは必要に応じてロードされます。
カスタムスタイルの考慮事項
独自のスタイルを実装してコントロールをカスタマイズする場合、アプリケーションのパフォーマンスを可能な限り向上させるために注意すべき点がいくつかあります。
スタイルのアイテム デリゲートの実装に id を割り当てないようにする。
スタイルの定義で説明したように、コントロールに独自のスタイルを実装する場合、そのコントロールに関連するテンプレートから始めます。例えば、スタイルのButton.qml は、このような構造になっています:
T.Button {
    // ...

    background: Rectangle {
        // ...
    }

    contentItem: Text {
        // ...
    }

    // ...
}
アプリケーションで Button を使用する場合、background とcontentItem アイテムが作成され、ルートButton アイテムの親になります:
// Creates the Button root item, the Rectangle background,
// and the Text contentItem.
Button {
    text: qsTr("Confirm")
}
アプリケーションでButtonを使用する場合、、 のアイテムが作成され、ルート アイテムの親となります。(コントロールのカスタマイズで説明したように)Buttonを単発でカスタマイズする必要があるとします:
import QtQuick
import QtQuick.Controls.Basic

ApplicationWindow {
    width: 400
    height: 400
    visible: true

    Button {
        id: button
        text: "A Special Button"
        background: Rectangle {
            implicitWidth: 100
            implicitHeight: 40
            color: button.down ? "#d6d6d6" : "#f6f6f6"
            border.color: "#26282a"
            border.width: 1
            radius: 4
        }
    }
}
QMLでは通常、このような場合、デフォルトのbackground 実装と、その場限りのカスタムbackground アイテムの両方が作成されることになります。 Qt Quick Controlsでは、この両方のアイテムの作成を避け、カスタムbackground のみを作成するテクニックを採用しており、コントロールの作成パフォーマンスを大幅に向上させています。
この技法は、そのアイテムのスタイルの実装にid がないことに依存します。id が割り当てられると、このテクニックは機能せず、両方のアイテムが作成されます。たとえば、ファイル内の他のオブジェクトがこれらのアイテムを参照できるように、background やcontentItem に id を割り当てたくなることがあります:
T.Button {
    // ...

    background: Rectangle {
        id: backgroundRect
        // ...
    }

    contentItem: Text {
        // Use backgroundRect in some way...
    }

    // ...
}
このコードでは、カスタマイズされた背景を持つButtonインスタンスが作成されるたびに、両方の背景が作成されることになり、作成パフォーマンスが最適化されません。
Qt 5.15以前では、古い未使用の背景を削除することで、関連するリソースを解放していました。しかし、コントロールはアイテムを所有していないので、削除すべきではありません。Qt 5.15では、古いアイテムは削除されなくなりました。そのため、backgroundRect のアイテムは必要以上に長く、通常はアプリケーションが終了するまで生き続けることになります。古いアイテムは非表示になり、コントロールから視覚的にアンペアレントされ、アクセシビリティツリーから削除されますが、このコンテキストでidを割り当てるときは、これらの未使用アイテムの作成時間とメモリ使用量を念頭に置くことが重要です。
カスタムアイテムの命令的な割り当ては避ける
上のセクションで述べたテクニックは、アイテムが宣言的に初めて割り当てられる場合にのみ機能します。可能であれば、カスタムアイテムの割り当てには常に宣言的バインディングを使用してください。
QMLの実装でQtQuick.Controlsをインポートしない
スタイルのコントロール実装の QML を書く際には、QtQuick.Controls をインポートしないことが重要です。インポートすると、QMLコンパイラでコンパイルできなくなります。
他の型が使用する型を実装する
アプリケーションでScrollViewを使用していて、そのスクロールバーをカスタマイズしたいと思ったとします。ScrollBar.qmlを実装し、ScrollView がカスタマイズされたScrollBar を自動的にピックアップするようにしたいところです。しかし、これはうまくいきません。ScrollBar.qmlと ScrollView.qml の両方を実装する必要があります。
付属プロパティ
スタイルには、すべてのコントロールに適用される特定のプロパティや属性があるのが普通です。アタッチド・プロパティは、そのアイテムに属する既存のC++を変更することなく、QMLのアイテムを拡張する素晴らしい方法です。例えば、マテリアル・スタイルと ユニバーサル・スタイルには、アイテムやその子アイテムを明るいテーマで表示するか、暗いテーマで表示するかを制御するテーマ・プロパティが付属しています。
例として、高さを制御する付属プロパティを追加してみましょう。このスタイルでは、高度をドロップシャドウで表現します。高度が高いほど、シャドウは大きくなります。
最初のステップは、Qt Creator で新しいQt Quick Controls アプリケーションを作成することです。その後、標高を格納するC++型を追加します。この型は、スタイルでサポートされるすべてのコントロールで使用され、後で他のプロパティを追加する可能性があるため、MyStyleと呼ぶことにします。以下はMyStyle.h です:
#ifndef MYSTYLE_H
#define MYSTYLE_H

#include <QObject>
#include <QtQml>

class MyStyle : public QObject
{
    Q_OBJECT
    Q_PROPERTY(int elevation READ elevation WRITE setElevation NOTIFY elevationChanged)

public:
    explicit MyStyle(QObject *parent = nullptr);

    static MyStyle *qmlAttachedProperties(QObject *object);

    int elevation() const;
    void setElevation(int elevation);

signals:
    void elevationChanged();

private:
    int m_elevation;
};

QML_DECLARE_TYPEINFO(MyStyle, QML_HAS_ATTACHED_PROPERTIES)

#endif // MYSTYLE_H
MyStyle.cpp:
#include "mystyle.h"

MyStyle::MyStyle(QObject *parent) :
    QObject(parent),
    m_elevation(0)
{
}

MyStyle *MyStyle::qmlAttachedProperties(QObject *object)
{
    return new MyStyle(object);
}

int MyStyle::elevation() const
{
    return m_elevation;
}

void MyStyle::setElevation(int elevation)
{
    if (elevation == m_elevation)
        return;

    m_elevation = elevation;
    emit elevationChanged();
}
MyStyle タイプは、インスタンス化されるのではなく、アタッチされたプロパティに使用されるという意味で特別です。そのため、次のようにmain.cpp に登録します:
#include <QGuiApplication>
#include <QQmlApplicationEngine>

#include "mystyle.h"

int main(int argc, char *argv[])
{
    QGuiApplication app(argc, argv);

    qmlRegisterUncreatableType<MyStyle>("MyStyle", 1, 0, "MyStyle", "MyStyle is an attached property");

    QQmlApplicationEngine engine;
    // Make the directory containing our style known to the QML engine.
    engine.addImportPath(":/");
    engine.load(QUrl(QLatin1String("qrc:/main.qml")));

    return app.exec();
}
次に、$QTDIR/qml/QtQuick/Controls/Basic/ のBasicスタイルからButton.qml をプロジェクト・ディレクトリの新しいmyproject フォルダにコピーします。新しくコピーしたButton.qml を、QMLファイルを含むリソースファイルであるqml.qrc に追加します。
次に、Buttonのbackground デリゲートにドロップシャドウを追加します:
// ...
import QtQuick.Effects
import MyStyle
// ...

background: Rectangle {
    // ...

    layer.enabled: control.enabled && control.MyStyle.elevation > 0
    layer.effect: MultiEffect {
        shadowEnabled: true
        shadowHorizontalOffset: 3
        shadowVerticalOffset: 3
        shadowColor: control.visualFocus ? "#330066ff" : "#aaaaaa"
        shadowBlur: control.pressed ? 0.8 : 0.4
    }
}
ここで注意してください:
- 標高が高いときは、わざわざドロップシャドウを使う必要はありません。
0 - ボタンにフォーカスがあるかどうかで、影の色を変える。
- 影の大きさを標高に依存させる。
付属のプロパティを試すために、main.qml に2つのボタンがあるRow を作成します:
import QtQuick
import QtQuick.Controls

import MyStyle 1.0

ApplicationWindow {
    id: window
    width: 400
    height: 400
    visible: true

    Row {
        spacing: 20
        anchors.centerIn: parent

        Button {
            text: "Button 1"
        }
        Button {
            text: "Button 2"
            MyStyle.elevation: 10
        }
    }
}
1つのボタンは標高がなく、もう1つのボタンは標高が10 です。
これでサンプルを実行できます。アプリケーションに新しいスタイルを使用するように指示するために、アプリケーションの引数として-style MyStyle を渡しますが、使用するスタイルを指定する方法はたくさんあります。
最終結果です:
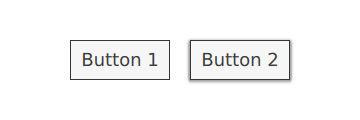
MyStyle に属するアタッチされたプロパティを使用しているため、import MyStyle 1.0 ステートメントが必要なだけであることに注意してください。インポートを削除しても、両方のボタンでカスタム・スタイルが使用されます。
カスタマイズのリファレンス
以下のスニペットは、「コントロールのカスタマイズ」セクションと同じアプローチで基本スタイルのコントロールをカスタマイズした例です。このコードは、カスタムのルック&フィールを実装するための出発点として使用できます。
注意: macOSと Windowsのスタイルはカスタマイズに適していません。基本スタイル、フュージョン・スタイル、イマジン・スタイル、マテリアル・スタイル、ユニバーサル・スタイルなど、すべてのプラットフォームで利用可能な単一のスタイルをベースにカスタマイズすることをお勧めします。そうすることで、アプリケーションがどのスタイルで実行されても、常に同じように見えることが保証されます。別のスタイルを使用する方法については、 Qt Quick コントロールでスタイルを使用するを参照してください。また、独自のスタイルを作成することもできます。
アプリケーションウィンドウのカスタマイズ
ApplicationWindow のカスタマイズには、background というビジュアルアイテムがあります。
import QtQuick
import QtQuick.Controls.Basic

ApplicationWindow {
    visible: true

    background: Rectangle {
        gradient: Gradient {
            GradientStop { position: 0; color: "#ffffff" }
            GradientStop { position: 1; color: "#c1bbf9" }
        }
    }
}
BusyIndicator のカスタマイズ
BusyIndicator は 2 つのビジュアルアイテムbackground とcontentItem で構成されています。

import QtQuick
import QtQuick.Controls.Basic

BusyIndicator {
    id: control

    contentItem: Item {
        implicitWidth: 64
        implicitHeight: 64

        Item {
            id: item
            x: parent.width / 2 - 32
            y: parent.height / 2 - 32
            width: 64
            height: 64
            opacity: control.running ? 1 : 0

            Behavior on opacity {
                OpacityAnimator {
                    duration: 250
                }
            }

            RotationAnimator {
                target: item
                running: control.visible && control.running
                from: 0
                to: 360
                loops: Animation.Infinite
                duration: 1250
            }

            Repeater {
                id: repeater
                model: 6

                Rectangle {
                    id: delegate
                    x: item.width / 2 - width / 2
                    y: item.height / 2 - height / 2
                    implicitWidth: 10
                    implicitHeight: 10
                    radius: 5
                    color: "#21be2b"

                    required property int index

                    transform: [
                        Translate {
                            y: -Math.min(item.width, item.height) * 0.5 + 5
                        },
                        Rotation {
                            angle: delegate.index / repeater.count * 360
                            origin.x: 5
                            origin.y: 5
                        }
                    ]
                }
            }
        }
    }
}
ボタンのカスタマイズ
Button は二つのビジュアルアイテムから構成されています:background とcontentItem 。

import QtQuick
import QtQuick.Controls.Basic

Button {
    id: control
    text: qsTr("Button")

    contentItem: Text {
        text: control.text
        font: control.font
        opacity: enabled ? 1.0 : 0.3
        color: control.down ? "#17a81a" : "#21be2b"
        horizontalAlignment: Text.AlignHCenter
        verticalAlignment: Text.AlignVCenter
        elide: Text.ElideRight
    }

    background: Rectangle {
        implicitWidth: 100
        implicitHeight: 40
        opacity: enabled ? 1 : 0.3
        border.color: control.down ? "#17a81a" : "#21be2b"
        border.width: 1
        radius: 2
    }
}
チェックボックスのカスタマイズ
CheckBox は3つのビジュアル・アイテムで構成されています:background contentItem とindicator 。

import QtQuick
import QtQuick.Controls.Basic

CheckBox {
    id: control
    text: qsTr("CheckBox")
    checked: true

    indicator: Rectangle {
        implicitWidth: 26
        implicitHeight: 26
        x: control.leftPadding
        y: parent.height / 2 - height / 2
        radius: 3
        border.color: control.down ? "#17a81a" : "#21be2b"

        Rectangle {
            width: 14
            height: 14
            x: 6
            y: 6
            radius: 2
            color: control.down ? "#17a81a" : "#21be2b"
            visible: control.checked
        }
    }

    contentItem: Text {
        text: control.text
        font: control.font
        opacity: enabled ? 1.0 : 0.3
        color: control.down ? "#17a81a" : "#21be2b"
        verticalAlignment: Text.AlignVCenter
        leftPadding: control.indicator.width + control.spacing
    }
}
CheckDelegateのカスタマイズ
CheckDelegate は3つのビジュアル・アイテムから構成されている:background contentItem とindicator 。

import QtQuick
import QtQuick.Controls.Basic

CheckDelegate {
    id: control
    text: qsTr("CheckDelegate")
    checked: true

    contentItem: Text {
        rightPadding: control.indicator.width + control.spacing
        text: control.text
        font: control.font
        opacity: enabled ? 1.0 : 0.3
        color: control.down ? "#17a81a" : "#21be2b"
        elide: Text.ElideRight
        verticalAlignment: Text.AlignVCenter
    }

    indicator: Rectangle {
        implicitWidth: 26
        implicitHeight: 26
        x: control.width - width - control.rightPadding
        y: control.topPadding + control.availableHeight / 2 - height / 2
        radius: 3
        color: "transparent"
        border.color: control.down ? "#17a81a" : "#21be2b"

        Rectangle {
            width: 14
            height: 14
            x: 6
            y: 6
            radius: 2
            color: control.down ? "#17a81a" : "#21be2b"
            visible: control.checked
        }
    }

    background: Rectangle {
        implicitWidth: 100
        implicitHeight: 40
        visible: control.down || control.highlighted
        color: control.down ? "#bdbebf" : "#eeeeee"
    }
}
コンボボックスのカスタマイズ
ComboBox は、background 、contentItem 、popup 、indicator 、delegate で構成されています。

pragma ComponentBehavior: Bound

import QtQuick
import QtQuick.Controls.Basic

ComboBox {
    id: control
    model: ["First", "Second", "Third"]

    delegate: ItemDelegate {
        id: delegate

        required property var model
        required property int index

        width: control.width
        contentItem: Text {
            text: delegate.model[control.textRole]
            color: "#21be2b"
            font: control.font
            elide: Text.ElideRight
            verticalAlignment: Text.AlignVCenter
        }
        highlighted: control.highlightedIndex === index
    }

    indicator: Canvas {
        id: canvas
        x: control.width - width - control.rightPadding
        y: control.topPadding + (control.availableHeight - height) / 2
        width: 12
        height: 8
        contextType: "2d"

        Connections {
            target: control
            function onPressedChanged() { canvas.requestPaint(); }
        }

        onPaint: {
            context.reset();
            context.moveTo(0, 0);
            context.lineTo(width, 0);
            context.lineTo(width / 2, height);
            context.closePath();
            context.fillStyle = control.pressed ? "#17a81a" : "#21be2b";
            context.fill();
        }
    }

    contentItem: Text {
        leftPadding: 0
        rightPadding: control.indicator.width + control.spacing

        text: control.displayText
        font: control.font
        color: control.pressed ? "#17a81a" : "#21be2b"
        verticalAlignment: Text.AlignVCenter
        elide: Text.ElideRight
    }

    background: Rectangle {
        implicitWidth: 120
        implicitHeight: 40
        border.color: control.pressed ? "#17a81a" : "#21be2b"
        border.width: control.visualFocus ? 2 : 1
        radius: 2
    }

    popup: Popup {
        y: control.height - 1
        width: control.width
        height: Math.min(contentItem.implicitHeight, control.Window.height - topMargin - bottomMargin)
        padding: 1

        contentItem: ListView {
            clip: true
            implicitHeight: contentHeight
            model: control.popup.visible ? control.delegateModel : null
            currentIndex: control.highlightedIndex

            ScrollIndicator.vertical: ScrollIndicator { }
        }

        background: Rectangle {
            border.color: "#21be2b"
            radius: 2
        }
    }
}
ComboBox Model Roles で説明したように、ComboBox は複数のタイプのモデルをサポートしています。
すべてのモデルが modelData で匿名プロパティを提供するので、以下の式はすべてのケースで正しいテキストを取得します:
text: model[control.textRole]
特定のtextRole 、選択された役割を提供する構造化データを持つモデルを提供する場合、この式は通常のプロパティ検索です。文字列のリストのような特異なデータを持つモデルと空のtextRole を提供する場合、この式はmodelData を取得します。
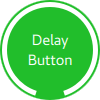
DelayButtonのカスタマイズ
DelayButton は、background とcontentItem の2つのビジュアル・アイテムから構成されます。
import QtQuick
import QtQuick.Controls.Basic

DelayButton {
    id: control
    checked: true
    text: qsTr("Delay\nButton")

    contentItem: Text {
        text: control.text
        font: control.font
        opacity: enabled ? 1.0 : 0.3
        color: "white"
        horizontalAlignment: Text.AlignHCenter
        verticalAlignment: Text.AlignVCenter
        elide: Text.ElideRight
    }

    background: Rectangle {
        implicitWidth: 100
        implicitHeight: 100
        opacity: enabled ? 1 : 0.3
        color: control.down ? "#17a81a" : "#21be2b"
        radius: size / 2

        readonly property real size: Math.min(control.width, control.height)
        width: size
        height: size
        anchors.centerIn: parent

        Canvas {
            id: canvas
            anchors.fill: parent

            Connections {
                target: control
                function onProgressChanged() { canvas.requestPaint(); }
            }

            onPaint: {
                var ctx = getContext("2d")
                ctx.clearRect(0, 0, width, height)
                ctx.strokeStyle = "white"
                ctx.lineWidth = parent.size / 20
                ctx.beginPath()
                var startAngle = Math.PI / 5 * 3
                var endAngle = startAngle + control.progress * Math.PI / 5 * 9
                ctx.arc(width / 2, height / 2, width / 2 - ctx.lineWidth / 2 - 2, startAngle, endAngle)
                ctx.stroke()
            }
        }
    }
}
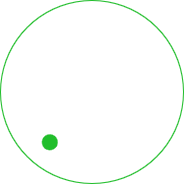
ダイヤルのカスタマイズ
Dial はbackground とhandle の 2 つのビジュアルアイテムで構成されます。
import QtQuick
import QtQuick.Controls.Basic

Dial {
    id: control
    background: Rectangle {
        x: control.width / 2 - width / 2
        y: control.height / 2 - height / 2
        implicitWidth: 140
        implicitHeight: 140
        width: Math.max(64, Math.min(control.width, control.height))
        height: width
        color: "transparent"
        radius: width / 2
        border.color: control.pressed ? "#17a81a" : "#21be2b"
        opacity: control.enabled ? 1 : 0.3
    }

    handle: Rectangle {
        id: handleItem
        x: control.background.x + control.background.width / 2 - width / 2
        y: control.background.y + control.background.height / 2 - height / 2
        width: 16
        height: 16
        color: control.pressed ? "#17a81a" : "#21be2b"
        radius: 8
        antialiasing: true
        opacity: control.enabled ? 1 : 0.3
        transform: [
            Translate {
                y: -Math.min(control.background.width, control.background.height) * 0.4 + handleItem.height / 2
            },
            Rotation {
                angle: control.angle
                origin.x: handleItem.width / 2
                origin.y: handleItem.height / 2
            }
        ]
    }
}
ドロワーのカスタマイズ
ドロワーはbackground のビジュアルアイテムを持つことができます。
background: Rectangle {
    Rectangle {
        x: parent.width - 1
        width: 1
        height: parent.height
        color: "#21be2b"
    }
}
フレームのカスタマイズ
フレームは 1 つのビジュアルアイテムbackground で構成されます。

import QtQuick
import QtQuick.Controls.Basic

Frame {
    background: Rectangle {
        color: "transparent"
        border.color: "#21be2b"
        radius: 2
    }

    Label {
        text: qsTr("Content goes here!")
    }
}
グループボックスのカスタマイズ
GroupBox は 2 つのビジュアルアイテムbackground とlabel で構成されます。

import QtQuick
import QtQuick.Controls.Basic

GroupBox {
    id: control
    title: qsTr("GroupBox")

    background: Rectangle {
        y: control.topPadding - control.bottomPadding
        width: parent.width
        height: parent.height - control.topPadding + control.bottomPadding
        color: "transparent"
        border.color: "#21be2b"
        radius: 2
    }

    label: Label {
        x: control.leftPadding
        width: control.availableWidth
        text: control.title
        color: "#21be2b"
        elide: Text.ElideRight
    }

    Label {
        text: qsTr("Content goes here!")
    }
}
ItemDelegate のカスタマイズ
ItemDelegate は2つのビジュアルアイテムから構成されます:background とcontentItem 。

import QtQuick
import QtQuick.Controls.Basic

ItemDelegate {
    id: control
    text: qsTr("ItemDelegate")

    contentItem: Text {
        rightPadding: control.spacing
        text: control.text
        font: control.font
        color: control.enabled ? (control.down ? "#17a81a" : "#21be2b") : "#bdbebf"
        elide: Text.ElideRight
        verticalAlignment: Text.AlignVCenter
    }

    background: Rectangle {
        implicitWidth: 100
        implicitHeight: 40
        opacity: enabled ? 1 : 0.3
        color: control.down ? "#dddedf" : "#eeeeee"

        Rectangle {
            width: parent.width
            height: 1
            color: control.down ? "#17a81a" : "#21be2b"
            anchors.bottom: parent.bottom
        }
    }
}
ラベルのカスタマイズ
ラベルはbackground のビジュアルアイテムを持つことができます。

import QtQuick
import QtQuick.Controls.Basic

Label {
    text: qsTr("Label")
    color: "#21be2b"
}
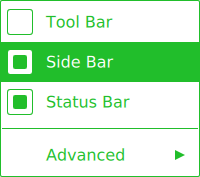
メニューのカスタマイズ
- Menu background 。
- MenuItem は4つのビジュアル・アイテムから構成されています:background contentItem 、indicator 、arrow 。
- MenuSeparator はビジュアルなbackground とcontentItem で構成されます。
import QtQuick
import QtQuick.Controls.Basic

Menu {
    id: menu

    Action { text: qsTr("Tool Bar"); checkable: true }
    Action { text: qsTr("Side Bar"); checkable: true; checked: true }
    Action { text: qsTr("Status Bar"); checkable: true; checked: true }

    MenuSeparator {
        contentItem: Rectangle {
            implicitWidth: 200
            implicitHeight: 1
            color: "#21be2b"
        }
    }

    Menu {
        title: qsTr("Advanced")
        // ...
    }

    topPadding: 2
    bottomPadding: 2

    delegate: MenuItem {
        id: menuItem
        implicitWidth: 200
        implicitHeight: 40

        arrow: Canvas {
            x: parent.width - width
            implicitWidth: 40
            implicitHeight: 40
            visible: menuItem.subMenu
            onPaint: {
                var ctx = getContext("2d")
                ctx.fillStyle = menuItem.highlighted ? "#ffffff" : "#21be2b"
                ctx.moveTo(15, 15)
                ctx.lineTo(width - 15, height / 2)
                ctx.lineTo(15, height - 15)
                ctx.closePath()
                ctx.fill()
            }
        }

        indicator: Item {
            implicitWidth: 40
            implicitHeight: 40
            Rectangle {
                width: 26
                height: 26
                anchors.centerIn: parent
                visible: menuItem.checkable
                border.color: "#21be2b"
                radius: 3
                Rectangle {
                    width: 14
                    height: 14
                    anchors.centerIn: parent
                    visible: menuItem.checked
                    color: "#21be2b"
                    radius: 2
                }
            }
        }

        contentItem: Text {
            leftPadding: menuItem.indicator.width
            rightPadding: menuItem.arrow.width
            text: menuItem.text
            font: menuItem.font
            opacity: enabled ? 1.0 : 0.3
            color: menuItem.highlighted ? "#ffffff" : "#21be2b"
            horizontalAlignment: Text.AlignLeft
            verticalAlignment: Text.AlignVCenter
            elide: Text.ElideRight
        }

        background: Rectangle {
            implicitWidth: 200
            implicitHeight: 40
            opacity: enabled ? 1 : 0.3
            color: menuItem.highlighted ? "#21be2b" : "transparent"
        }
    }

    background: Rectangle {
        implicitWidth: 200
        implicitHeight: 40
        color: "#ffffff"
        border.color: "#21be2b"
        radius: 2
    }
}
メニューバーのカスタマイズ
MenuBar はビジュアルなbackground アイテム、MenuBarItem はビジュアルなbackground とcontentItem の2つのアイテムで構成されます。

import QtQuick
import QtQuick.Controls.Basic

MenuBar {
    id: menuBar

    Menu { title: qsTr("File") }
    Menu { title: qsTr("Edit") }
    Menu { title: qsTr("View") }
    Menu { title: qsTr("Help") }

    delegate: MenuBarItem {
        id: menuBarItem

        contentItem: Text {
            text: menuBarItem.text
            font: menuBarItem.font
            opacity: enabled ? 1.0 : 0.3
            color: menuBarItem.highlighted ? "#ffffff" : "#21be2b"
            horizontalAlignment: Text.AlignLeft
            verticalAlignment: Text.AlignVCenter
            elide: Text.ElideRight
        }

        background: Rectangle {
            implicitWidth: 40
            implicitHeight: 40
            opacity: enabled ? 1 : 0.3
            color: menuBarItem.highlighted ? "#21be2b" : "transparent"
        }
    }

    background: Rectangle {
        implicitWidth: 40
        implicitHeight: 40
        color: "#ffffff"

        Rectangle {
            color: "#21be2b"
            width: parent.width
            height: 1
            anchors.bottom: parent.bottom
        }
    }
}
PageIndicatorのカスタマイズ
PageIndicator は、background 、contentItem 、delegate 。

import QtQuick
import QtQuick.Controls.Basic

PageIndicator {
    id: control
    count: 5
    currentIndex: 2

    delegate: Rectangle {
        implicitWidth: 8
        implicitHeight: 8

        radius: width / 2
        color: "#21be2b"

        opacity: index === control.currentIndex ? 0.95 : pressed ? 0.7 : 0.45

        required property int index

        Behavior on opacity {
            OpacityAnimator {
                duration: 100
            }
        }
    }
}
ペインのカスタマイズ
ペインはbackground で構成されます。

import QtQuick
import QtQuick.Controls.Basic

Pane {
    background: Rectangle {
        color: "#eeeeee"
    }

    Label {
        text: qsTr("Content goes here!")
    }
}
ポップアップのカスタマイズ
Popup はbackground とcontentItem で構成されています。

import QtQuick
import QtQuick.Controls.Basic

Popup {
    id: popup
    background: Rectangle {
        implicitWidth: 200
        implicitHeight: 200
        border.color: "#444"
    }
    contentItem: Column {}
}
プログレスバーのカスタマイズ
ProgressBar はbackground とcontentItem の2つのビジュアルアイテムから構成されます。

import QtQuick
import QtQuick.Controls.Basic

ProgressBar {
    id: control
    value: 0.5
    padding: 2

    background: Rectangle {
        implicitWidth: 200
        implicitHeight: 6
        color: "#e6e6e6"
        radius: 3
    }

    contentItem: Item {
        implicitWidth: 200
        implicitHeight: 4

        // Progress indicator for determinate state.
        Rectangle {
            width: control.visualPosition * parent.width
            height: parent.height
            radius: 2
            color: "#17a81a"
            visible: !control.indeterminate
        }

        // Scrolling animation for indeterminate state.
        Item {
            anchors.fill: parent
            visible: control.indeterminate
            clip: true

            Row {
                spacing: 20

                Repeater {
                    model: control.width / 40 + 1

                    Rectangle {
                        color: "#17a81a"
                        width: 20
                        height: control.height
                    }
                }
                XAnimator on x {
                    from: 0
                    to: -40
                    loops: Animation.Infinite
                    running: control.indeterminate
                }
            }
        }
    }
}
上記では、indeterminate プログレスバーの状態を表現するために contentItem もアニメーションします。
ラジオボタンのカスタマイズ
RadioButton は3つのビジュアル・アイテムで構成されています:background contentItem とindicator 。

import QtQuick
import QtQuick.Controls.Basic

RadioButton {
    id: control
    text: qsTr("RadioButton")
    checked: true

    indicator: Rectangle {
        implicitWidth: 26
        implicitHeight: 26
        x: control.leftPadding
        y: parent.height / 2 - height / 2
        radius: 13
        border.color: control.down ? "#17a81a" : "#21be2b"

        Rectangle {
            width: 14
            height: 14
            x: 6
            y: 6
            radius: 7
            color: control.down ? "#17a81a" : "#21be2b"
            visible: control.checked
        }
    }

    contentItem: Text {
        text: control.text
        font: control.font
        opacity: enabled ? 1.0 : 0.3
        color: control.down ? "#17a81a" : "#21be2b"
        verticalAlignment: Text.AlignVCenter
        leftPadding: control.indicator.width + control.spacing
    }
}
RadioDelegateのカスタマイズ
RadioDelegate は3つのビジュアル・アイテムで構成されています:background contentItem とindicator 。

import QtQuick
import QtQuick.Controls.Basic

RadioDelegate {
    id: control
    text: qsTr("RadioDelegate")
    checked: true

    contentItem: Text {
        rightPadding: control.indicator.width + control.spacing
        text: control.text
        font: control.font
        opacity: enabled ? 1.0 : 0.3
        color: control.down ? "#17a81a" : "#21be2b"
        elide: Text.ElideRight
        verticalAlignment: Text.AlignVCenter
    }

    indicator: Rectangle {
        implicitWidth: 26
        implicitHeight: 26
        x: control.width - width - control.rightPadding
        y: parent.height / 2 - height / 2
        radius: 13
        color: "transparent"
        border.color: control.down ? "#17a81a" : "#21be2b"

        Rectangle {
            width: 14
            height: 14
            x: 6
            y: 6
            radius: 7
            color: control.down ? "#17a81a" : "#21be2b"
            visible: control.checked
        }
    }

    background: Rectangle {
        implicitWidth: 100
        implicitHeight: 40
        visible: control.down || control.highlighted
        color: control.down ? "#bdbebf" : "#eeeeee"
    }
}
RangeSliderのカスタマイズ
RangeSlider は3つのビジュアル・アイテムから構成されています:background first.handle とsecond.handle 。

import QtQuick
import QtQuick.Controls.Basic

RangeSlider {
    id: control
    first.value: 0.25
    second.value: 0.75

    background: Rectangle {
        x: control.leftPadding
        y: control.topPadding + control.availableHeight / 2 - height / 2
        implicitWidth: 200
        implicitHeight: 4
        width: control.availableWidth
        height: implicitHeight
        radius: 2
        color: "#bdbebf"

        Rectangle {
            x: control.first.visualPosition * parent.width
            width: control.second.visualPosition * parent.width - x
            height: parent.height
            color: "#21be2b"
            radius: 2
        }
    }

    first.handle: Rectangle {
        x: control.leftPadding + control.first.visualPosition * (control.availableWidth - width)
        y: control.topPadding + control.availableHeight / 2 - height / 2
        implicitWidth: 26
        implicitHeight: 26
        radius: 13
        color: control.first.pressed ? "#f0f0f0" : "#f6f6f6"
        border.color: "#bdbebf"
    }

    second.handle: Rectangle {
        x: control.leftPadding + control.second.visualPosition * (control.availableWidth - width)
        y: control.topPadding + control.availableHeight / 2 - height / 2
        implicitWidth: 26
        implicitHeight: 26
        radius: 13
        color: control.second.pressed ? "#f0f0f0" : "#f6f6f6"
        border.color: "#bdbebf"
    }
}
ラウンドボタンのカスタマイズ
RoundButton もButton と同じようにカスタマイズできます。
スクロールバーのカスタマイズ
ScrollBar はbackground とcontentItem の2つのビジュアルアイテムから構成されます。

import QtQuick
import QtQuick.Controls.Basic

ScrollBar {
    id: control
    size: 0.3
    position: 0.2
    active: true
    orientation: Qt.Vertical

    contentItem: Rectangle {
        implicitWidth: 6
        implicitHeight: 100
        radius: width / 2
        color: control.pressed ? "#81e889" : "#c2f4c6"
        // Hide the ScrollBar when it's not needed.
        opacity: control.policy === ScrollBar.AlwaysOn || (control.active && control.size < 1.0) ? 0.75 : 0

        // Animate the changes in opacity (default duration is 250 ms).
        Behavior on opacity {
            NumberAnimation {}
        }
    }
}
ScrollIndicator のカスタマイズ
ScrollIndicator はbackground とcontentItem の 2 つのビジュアルアイテムで構成されます。

import QtQuick
import QtQuick.Controls.Basic

ScrollIndicator {
    id: control
    size: 0.3
    position: 0.2
    active: true
    orientation: Qt.Vertical

    contentItem: Rectangle {
        implicitWidth: 2
        implicitHeight: 100
        color: "#c2f4c6"
    }
}
ScrollView のカスタマイズ
ScrollView は、background アイテムと、水平および垂直スクロールバーで構成されます。
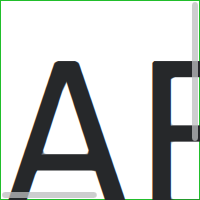
ScrollView {
    id: control

    width: 200
    height: 200
    focus: true

    Label {
        text: "ABC"
        font.pixelSize: 224
    }

    ScrollBar.vertical: ScrollBar {
        parent: control
        x: control.mirrored ? 0 : control.width - width
        y: control.topPadding
        height: control.availableHeight
        active: control.ScrollBar.horizontal.active
    }

    ScrollBar.horizontal: ScrollBar {
        parent: control
        x: control.leftPadding
        y: control.height - height
        width: control.availableWidth
        active: control.ScrollBar.vertical.active
    }

    background: Rectangle {
        border.color: control.activeFocus ? "#21be2b" : "#bdbebf"
    }
}
スライダーのカスタマイズ
スライダーは2つのビジュアルアイテムで構成されます:backgroundとhandle 。

import QtQuick
import QtQuick.Controls.Basic

Slider {
    id: control
    value: 0.5

    background: Rectangle {
        x: control.leftPadding
        y: control.topPadding + control.availableHeight / 2 - height / 2
        implicitWidth: 200
        implicitHeight: 4
        width: control.availableWidth
        height: implicitHeight
        radius: 2
        color: "#bdbebf"

        Rectangle {
            width: control.visualPosition * parent.width
            height: parent.height
            color: "#21be2b"
            radius: 2
        }
    }

    handle: Rectangle {
        x: control.leftPadding + control.visualPosition * (control.availableWidth - width)
        y: control.topPadding + control.availableHeight / 2 - height / 2
        implicitWidth: 26
        implicitHeight: 26
        radius: 13
        color: control.pressed ? "#f0f0f0" : "#f6f6f6"
        border.color: "#bdbebf"
    }
}
スピンボックスのカスタマイズ
SpinBox は4つのビジュアル・アイテムで構成されています:background contentItem 、up indicator 、down indicator 。

import QtQuick
import QtQuick.Controls.Basic

SpinBox {
    id: control
    value: 50
    editable: true

    contentItem: TextInput {
        z: 2
        text: control.textFromValue(control.value, control.locale)

        font: control.font
        color: "#21be2b"
        selectionColor: "#21be2b"
        selectedTextColor: "#ffffff"
        horizontalAlignment: Qt.AlignHCenter
        verticalAlignment: Qt.AlignVCenter

        readOnly: !control.editable
        validator: control.validator
        inputMethodHints: Qt.ImhFormattedNumbersOnly
    }

    up.indicator: Rectangle {
        x: control.mirrored ? 0 : parent.width - width
        height: parent.height
        implicitWidth: 40
        implicitHeight: 40
        color: control.up.pressed ? "#e4e4e4" : "#f6f6f6"
        border.color: enabled ? "#21be2b" : "#bdbebf"

        Text {
            text: "+"
            font.pixelSize: control.font.pixelSize * 2
            color: "#21be2b"
            anchors.fill: parent
            fontSizeMode: Text.Fit
            horizontalAlignment: Text.AlignHCenter
            verticalAlignment: Text.AlignVCenter
        }
    }

    down.indicator: Rectangle {
        x: control.mirrored ? parent.width - width : 0
        height: parent.height
        implicitWidth: 40
        implicitHeight: 40
        color: control.down.pressed ? "#e4e4e4" : "#f6f6f6"
        border.color: enabled ? "#21be2b" : "#bdbebf"

        Text {
            text: "-"
            font.pixelSize: control.font.pixelSize * 2
            color: "#21be2b"
            anchors.fill: parent
            fontSizeMode: Text.Fit
            horizontalAlignment: Text.AlignHCenter
            verticalAlignment: Text.AlignVCenter
        }
    }

    background: Rectangle {
        implicitWidth: 140
        border.color: "#bdbebf"
    }
}
SplitView のカスタマイズ
SplitView は、handle のビジュアルデリゲートから構成されています。
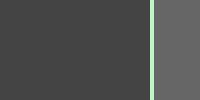
SplitView {
    id: splitView
    anchors.fill: parent

    handle: Rectangle {
        implicitWidth: 4
        implicitHeight: 4
        color: SplitHandle.pressed ? "#81e889"
            : (SplitHandle.hovered ? Qt.lighter("#c2f4c6", 1.1) : "#c2f4c6")
    }

    Rectangle {
        implicitWidth: 150
        color: "#444"
    }
    Rectangle {
        implicitWidth: 50
        color: "#666"
    }
}
スタックビューのカスタマイズ
StackView にはビジュアルなbackground アイテムがあり、push、pop、replace 操作に使用されるトランジションをカスタマイズできます。
import QtQuick
import QtQuick.Controls.Basic

StackView {
    id: control

    popEnter: Transition {
        XAnimator {
            from: (control.mirrored ? -1 : 1) * -control.width
            to: 0
            duration: 400
            easing.type: Easing.OutCubic
        }
    }

    popExit: Transition {
        XAnimator {
            from: 0
            to: (control.mirrored ? -1 : 1) * control.width
            duration: 400
            easing.type: Easing.OutCubic
        }
    }
}
SwipeDelegateのカスタマイズ
SwipeDelegate は6つのビジュアル・アイテムから構成されています:background contentItem,indicator,swipe.left,swipe.right,swipe.behind 。

import QtQuick
import QtQuick.Controls.Basic

SwipeDelegate {
    id: control
    text: qsTr("SwipeDelegate")

    Component {
        id: component

        Rectangle {
            color: SwipeDelegate.pressed ? "#333" : "#444"
            width: parent.width
            height: parent.height
            clip: true

            Label {
                text: qsTr("Press me!")
                color: "#21be2b"
                anchors.centerIn: parent
            }
        }
    }

    swipe.left: component
    swipe.right: component

    contentItem: Text {
        text: control.text
        font: control.font
        color: control.enabled ? (control.down ? "#17a81a" : "#21be2b") : "#bdbebf"
        elide: Text.ElideRight
        verticalAlignment: Text.AlignVCenter

        Behavior on x {
            enabled: !control.down
            NumberAnimation {
                easing.type: Easing.InOutCubic
                duration: 400
            }
        }
    }
}
SwipeViewのカスタマイズ
SwipeView は、background のビジュアル・アイテムを持つことができます。ナビゲーションはcontentItem によって実装されます。
import QtQuick
import QtQuick.Controls.Basic

SwipeView {
    id: control

    background: Rectangle {
        color: "#eeeeee"
    }
}
スイッチのカスタマイズ
Switchは3つのビジュアル・アイテムで構成されています:background contentItem とindicator 。

import QtQuick
import QtQuick.Controls.Basic

Switch {
    id: control
    text: qsTr("Switch")

    indicator: Rectangle {
        implicitWidth: 48
        implicitHeight: 26
        x: control.leftPadding
        y: parent.height / 2 - height / 2
        radius: 13
        color: control.checked ? "#17a81a" : "#ffffff"
        border.color: control.checked ? "#17a81a" : "#cccccc"

        Rectangle {
            x: control.checked ? parent.width - width : 0
            width: 26
            height: 26
            radius: 13
            color: control.down ? "#cccccc" : "#ffffff"
            border.color: control.checked ? (control.down ? "#17a81a" : "#21be2b") : "#999999"
        }
    }

    contentItem: Text {
        text: control.text
        font: control.font
        opacity: enabled ? 1.0 : 0.3
        color: control.down ? "#17a81a" : "#21be2b"
        verticalAlignment: Text.AlignVCenter
        leftPadding: control.indicator.width + control.spacing
    }
}
SwitchDelegateのカスタマイズ
SwitchDelegate は3つのビジュアル・アイテムで構成されている:background contentItem およびindicator 。

import QtQuick
import QtQuick.Controls.Basic

SwitchDelegate {
    id: control
    text: qsTr("SwitchDelegate")
    checked: true

    contentItem: Text {
        rightPadding: control.indicator.width + control.spacing
        text: control.text
        font: control.font
        opacity: enabled ? 1.0 : 0.3
        color: control.down ? "#17a81a" : "#21be2b"
        elide: Text.ElideRight
        verticalAlignment: Text.AlignVCenter
    }

    indicator: Rectangle {
        implicitWidth: 48
        implicitHeight: 26
        x: control.width - width - control.rightPadding
        y: parent.height / 2 - height / 2
        radius: 13
        color: control.checked ? "#17a81a" : "transparent"
        border.color: control.checked ? "#17a81a" : "#cccccc"

        Rectangle {
            x: control.checked ? parent.width - width : 0
            width: 26
            height: 26
            radius: 13
            color: control.down ? "#cccccc" : "#ffffff"
            border.color: control.checked ? (control.down ? "#17a81a" : "#21be2b") : "#999999"
        }
    }

    background: Rectangle {
        implicitWidth: 100
        implicitHeight: 40
        visible: control.down || control.highlighted
        color: control.down ? "#bdbebf" : "#eeeeee"
    }
}
タブバーのカスタマイズ
TabBar は2つの視覚的な項目から構成されています:backgroundとcontentItem 。

import QtQuick
import QtQuick.Controls.Basic

TabBar {
    id: control

    background: Rectangle {
        color: "#eeeeee"
    }

    TabButton {
        text: qsTr("Home")
    }
    TabButton {
        text: qsTr("Discover")
    }
    TabButton {
        text: qsTr("Activity")
    }
}
タブボタンのカスタマイズ
TabButton もButtonと同様にカスタマイズできます。
テキストエリアのカスタマイズ

import QtQuick
import QtQuick.Controls.Basic

TextArea {
    id: control
    placeholderText: qsTr("Enter description")

    background: Rectangle {
        implicitWidth: 200
        implicitHeight: 40
        border.color: control.enabled ? "#21be2b" : "transparent"
    }
}
TextFieldのカスタマイズ

import QtQuick
import QtQuick.Controls.Basic

TextField {
    id: control
    placeholderText: qsTr("Enter description")

    background: Rectangle {
        implicitWidth: 200
        implicitHeight: 40
        color: control.enabled ? "transparent" : "#353637"
        border.color: control.enabled ? "#21be2b" : "transparent"
    }
}
ツールバーのカスタマイズ
ToolBar はひとつの視覚的なアイテムから構成されています:background 。

ToolBar {
    id: control

    background: Rectangle {
        implicitHeight: 40
        color: "#eeeeee"

        Rectangle {
            width: parent.width
            height: 1
            anchors.bottom: parent.bottom
            color: "transparent"
            border.color: "#21be2b"
        }
    }

    RowLayout {
        anchors.fill: parent
        ToolButton {
            text: qsTr("Undo")
        }
        ToolButton {
            text: qsTr("Redo")
        }
    }
}
ツールボタンのカスタマイズ
ToolButton は、background とcontentItem の 2 つのビジュアルアイテムで構成されます。

import QtQuick
import QtQuick.Controls.Basic

ToolButton {
    id: control
    text: qsTr("ToolButton")
    width: 120

    contentItem: Text {
        text: control.text
        font: control.font
        opacity: enabled ? 1.0 : 0.3
        color: control.down ? "#17a81a" : "#21be2b"
        horizontalAlignment: Text.AlignHCenter
        verticalAlignment: Text.AlignVCenter
        elide: Text.ElideRight
    }

    background: Rectangle {
        implicitWidth: 40
        implicitHeight: 40
        color: Qt.darker("#33333333", control.enabled && (control.checked || control.highlighted) ? 1.5 : 1.0)
        opacity: enabled ? 1 : 0.3
        visible: control.down || (control.enabled && (control.checked || control.highlighted))
    }
}
ツールセパレーターのカスタマイズ
ToolSeparator background と の2つのビジュアルアイテムから構成されます。contentItem

ToolBar {
    RowLayout {
        anchors.fill: parent

        ToolButton {
            text: qsTr("Action 1")
        }
        ToolButton {
            text: qsTr("Action 2")
        }

        ToolSeparator {
            padding: vertical ? 10 : 2
            topPadding: vertical ? 2 : 10
            bottomPadding: vertical ? 2 : 10

            contentItem: Rectangle {
                implicitWidth: parent.vertical ? 1 : 24
                implicitHeight: parent.vertical ? 24 : 1
                color: "#c3c3c3"
            }
        }

        ToolButton {
            text: qsTr("Action 3")
        }
        ToolButton {
            text: qsTr("Action 4")
        }

        Item {
            Layout.fillWidth: true
        }
    }
}
ツールチップのカスタマイズ
ToolTip は、background とcontentItem の2つのビジュアル・アイテムで構成されています。
import QtQuick
import QtQuick.Controls.Basic

ToolTip {
    id: control
    text: qsTr("A descriptive tool tip of what the button does")

    contentItem: Text {
        text: control.text
        font: control.font
        color: "#21be2b"
    }

    background: Rectangle {
        border.color: "#21be2b"
    }
}
注: attached ToolTip をカスタマイズするには、独自のスタイルの一部として提供する必要があります。ToolTip を単発的にカスタマイズするには、Custom Tool Tips を参照してください。
タンブラーのカスタマイズ
タンブラーは3つのビジュアル・アイテムから構成されています:background contentItem とdelegate です。

import QtQuick
import QtQuick.Controls.Basic

Tumbler {
    id: control
    model: 15

    background: Item {
        Rectangle {
            opacity: control.enabled ? 0.2 : 0.1
            border.color: "#000000"
            width: parent.width
            height: 1
            anchors.top: parent.top
        }

        Rectangle {
            opacity: control.enabled ? 0.2 : 0.1
            border.color: "#000000"
            width: parent.width
            height: 1
            anchors.bottom: parent.bottom
        }
    }

    delegate: Text {
        text: qsTr("Item %1").arg(modelData + 1)
        font: control.font
        horizontalAlignment: Text.AlignHCenter
        verticalAlignment: Text.AlignVCenter
        opacity: 1.0 - Math.abs(Tumbler.displacement) / (control.visibleItemCount / 2)

        required property var modelData
        required property int index
    }

    Rectangle {
        anchors.horizontalCenter: control.horizontalCenter
        y: control.height * 0.4
        width: 40
        height: 1
        color: "#21be2b"
    }

    Rectangle {
        anchors.horizontalCenter: control.horizontalCenter
        y: control.height * 0.6
        width: 40
        height: 1
        color: "#21be2b"
    }
}
独自のcontentItemを定義したい場合は、ListView またはPathView をルートアイテムとして使用します。ラッピング・タンブラーにはPathView を使います:
Tumbler {
    id: tumbler

    contentItem: PathView {
        id: pathView
        model: tumbler.model
        delegate: tumbler.delegate
        clip: true
        pathItemCount: tumbler.visibleItemCount + 1
        preferredHighlightBegin: 0.5
        preferredHighlightEnd: 0.5
        dragMargin: width / 2

        path: Path {
            startX: pathView.width / 2
            startY: -pathView.delegateHeight / 2
            PathLine {
                x: pathView.width / 2
                y: pathView.pathItemCount * pathView.delegateHeight - pathView.delegateHeight / 2
            }
        }

        property real delegateHeight: tumbler.availableHeight / tumbler.visibleItemCount
    }
}
非ラッピングタンブラーの場合は、ListView を使用します:
Tumbler {
    id: tumbler

    contentItem: ListView {
        model: tumbler.model
        delegate: tumbler.delegate

        snapMode: ListView.SnapToItem
        highlightRangeMode: ListView.StrictlyEnforceRange
        preferredHighlightBegin: height / 2 - (height / tumbler.visibleItemCount / 2)
        preferredHighlightEnd: height / 2 + (height / tumbler.visibleItemCount / 2)
        clip: true
    }
}
TableViewDelegateのカスタマイズ
TableViewDelegate はItemDelegate を継承します。つまり、background とcontentItem の2つのビジュアル・アイテムから構成されます。
デフォルトのeditデリゲートが提供する以外のニーズがある場合、editDelegate に独自のカスタムeditデリゲートを割り当てることができます。
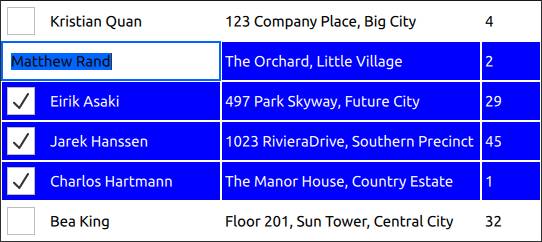
delegate: TableViewDelegate {
    id: tableCell

    checked: column === 0 ? checkBox.checked : tableView.itemAtIndex(tableView.index(row, 0)).checked
    selected: checked

    background: Item {
        Rectangle {
            anchors.fill: parent
            anchors.margins: tableCell.current ? 3 : 1
            color: tableCell.selected ? "blue" : "white"
        }

        Rectangle {
            anchors.fill: parent
            color: "transparent"
            border.color: "darkblue"
            border.width: tableCell.current ? 2 : 0
        }
    }

    contentItem: Item {
        implicitHeight: 40
        visible: !tableCell.editing

        RowLayout {
            anchors.fill: parent

            CheckBox {
                id: checkBox
                implicitWidth: height
                Layout.fillHeight: true
                checked: false
                visible: tableCell.column === 0
            }

            Text {
                Layout.leftMargin: 4
                Layout.fillWidth: true
                Layout.fillHeight: true
                verticalAlignment: Text.AlignVCenter
                color: tableCell.selected ? "white" : "black"
                text: tableCell.model.display
            }
        }
    }

    TableView.editDelegate: FocusScope {
        width: parent.width
        height: parent.height

        TableView.onCommit: {
            let qaim = tableCell.tableView.model
            if (!qaim)
                return
            const index = qaim.index(tableCell.row, tableCell.column)
            // instead of the edit role, any custom role supported by the model can be checked
            // e.g. if (!tableCell.checked || !tableCell.model.customRole)
            if (!tableCell.checked || !tableCell.model.edit)
                return
            // instead of the edit role, any custom role supported by the model can be set
            // e.g. tableCell.model.customRole = textField.text
            tableCell.model.edit = textField.text
            tableCell.model.display = textField.text
        }

        Component.onCompleted: textField.selectAll()

        TextField {
            id: textField
            anchors.fill: parent
            text: tableCell.model.edit ?? tableCell.model.display ?? ""
            focus: true
        }
    }
}
HeaderViewDelegateのカスタマイズ
HeaderViewDelegate はTableViewDelegate を継承しており、background とcontentItem の2つのアイテムで構成されています。
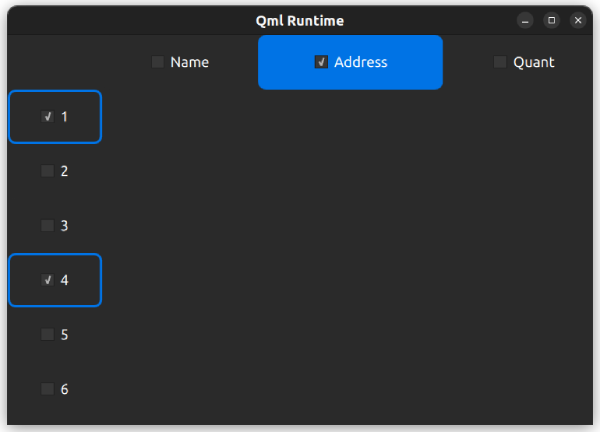
水平ヘッダービューのデリゲートをカスタマイズする例を以下に示す:
delegate: HorizontalHeaderViewDelegate {
    id: horizontalDelegate

    required property int index
    required property string modelData

    background: Rectangle {
        height: horizontalDelegate.height
        color: columnCheckBox.checked ? palette.highlight : palette.base
        radius: 8
    }

    contentItem: Item {
        implicitWidth: columnCheckBox.implicitWidth * 2
        implicitHeight: 40

        CheckBox {
            id: columnCheckBox
            anchors.centerIn: parent
            text: horizontalDelegate.modelData
            Component.onCompleted: checked = horizontalDelegate.index === 1
        }
    }
}
垂直ヘッダービューのデリゲートをカスタマイズする例です:
delegate: VerticalHeaderViewDelegate {
    id: verticalDelegate

    required property int index

    background: Rectangle {
        height: verticalDelegate.height
        color: palette.base
        border.width: rowCheckBox.checked ? 2 : 0
        border.color: palette.highlight
        radius: 8
    }

    contentItem: Item {
        implicitWidth: rowCheckBox.implicitWidth * 2
        implicitHeight: 40

        CheckBox {
            id: rowCheckBox
            anchors.centerIn: parent
            text: verticalDelegate.index + 1
            Component.onCompleted: checked = verticalDelegate.index % 3 === 0
        }
    }
}
© 2025 The Qt Company Ltd. Documentation contributions included herein are the copyrights of their respective owners. The documentation provided herein is licensed under the terms of the GNU Free Documentation License version 1.3 as published by the Free Software Foundation. Qt and respective logos are trademarks of The Qt Company Ltd. in Finland and/or other countries worldwide. All other trademarks are property of their respective owners.

