Using AI-generated shader code in Effect Composer
This tutorial describes how you can use ChatGPT to create a northern lights shader, and then use it in Qt Design Studio.
Creating the shader code
- Go to the ChatGPT web site and enter the following prompt:
Create a northern lights shader that works in Shadertoy
The output from ChatGPT is something like this:
Note: The output can vary but should be similar in most cases.
// Northern Lights Shader
// Shadertoy GLSL Code

void mainImage(out vec4 fragColor, in vec2 fragCoord)
{
    // Normalize coordinates
    vec2 uv = fragCoord / iResolution.xy;
    uv.x *= iResolution.x / iResolution.y; // Aspect ratio correction

    // Time variable for animation
    float t = iTime;

    // Gradient background
    vec3 bgColor = mix(vec3(0.02, 0.02, 0.1), vec3(0.0, 0.1, 0.3), uv.y);

    // Northern lights parameters
    float noiseScale = 10.0;
    float waveSpeed = 0.5;
    float waveAmplitude = 0.2;

    // Perlin-like noise for dynamic patterns
    float noise = sin(uv.y * noiseScale + t * waveSpeed) * waveAmplitude;
    noise += sin(uv.x * noiseScale + t * waveSpeed * 0.5) * waveAmplitude * 0.5;

    // Aurora color
    vec3 auroraColor = vec3(0.3, 0.8, 0.5);

    // Combine noise with aurora color
    auroraColor *= smoothstep(0.2, 0.8, uv.y + noise);

    // Add aurora effect to background
    vec3 finalColor = bgColor + auroraColor * 0.8;

    // Output final color
    fragColor = vec4(finalColor, 1.0);
}
- Copy only the code inside the
mainImagefunction.
Adding the generated shader code to Qt Design Studio
Next, you create a custom effect in Qt Design Studio and copy the generated code there.
- In Qt Design Studio, open the Effect Composer view.
- From the Add Effect dropdown menu (1), select Custom (2). The custom effect node is an empty effect node.
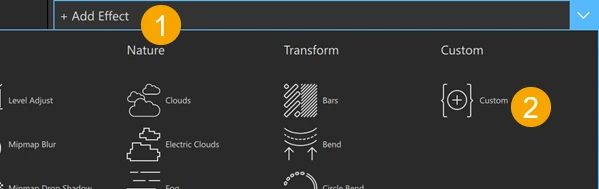
- Select Show Code.
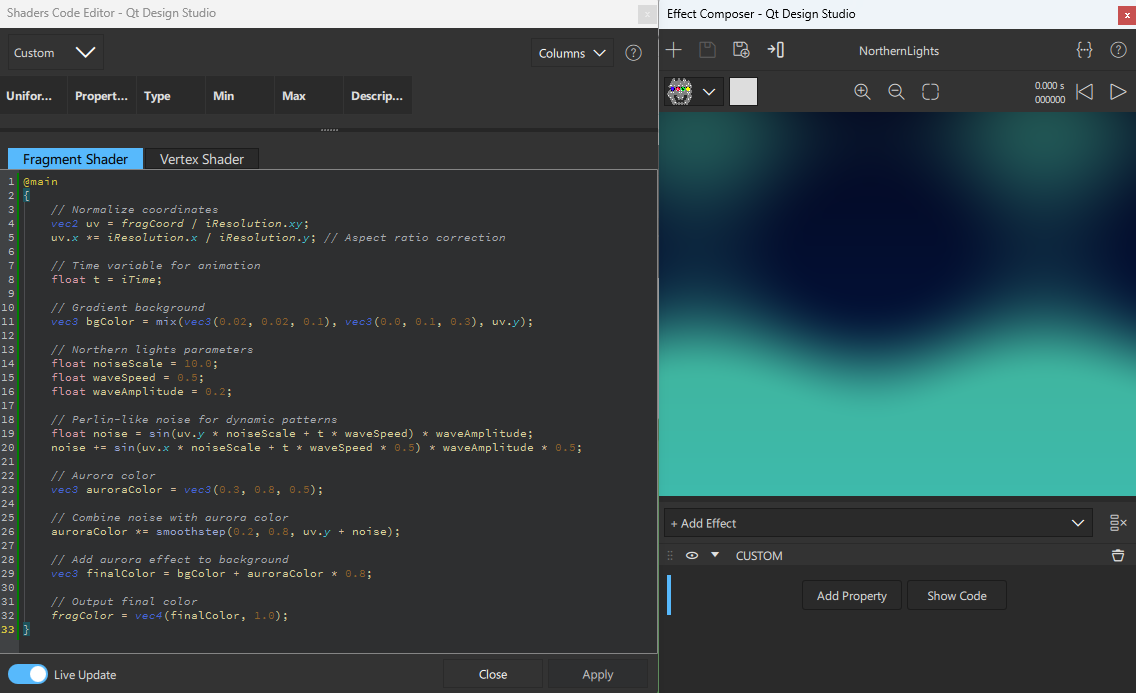
- On the Fragment Shader tab, paste the AI-generated shader code inside the
@mainfunction like this:@main { // Normalize coordinates vec2 uv = fragCoord / iResolution.xy; uv.x *= iResolution.x / iResolution.y; // Aspect ratio correction // Time variable for animation float t = iTime; // Gradient background vec3 bgColor = mix(vec3(0.02, 0.02, 0.1), vec3(0.0, 0.1, 0.3), uv.y); // Northern lights parameters float noiseScale = 10.0; float waveSpeed = 0.5; float waveAmplitude = 0.2; // Perlin-like noise for dynamic patterns float noise = sin(uv.y * noiseScale + t * waveSpeed) * waveAmplitude; noise += sin(uv.x * noiseScale + t * waveSpeed * 0.5) * waveAmplitude * 0.5; // Aurora color vec3 auroraColor = vec3(0.3, 0.8, 0.5); // Combine noise with aurora color auroraColor *= smoothstep(0.2, 0.8, uv.y + noise); // Add aurora effect to background vec3 finalColor = bgColor + auroraColor * 0.8; // Output final color fragColor = vec4(finalColor, 1.0); }
You should now see the effect in the preview window in the Effect Composer view. If you don't see the effect, ensure that Live Update is selected. To update the preview window manually, select Apply.
If the effect is animated, select  to run the animation in the preview window.
Using the effect in your project
To add the effect to a component in your project, see Assigning an effect composition to a component.
See also Effect Composer, Effect Composer example, and Working with shader code in Effect Composer.
Available under certain Qt licenses.
Find out more.
