Adding multi-language support to your project
The Multi-language Support tutorial illustrates how you can add support for multiple languages to your project. In this tutorial you prepare a simple login UI for multi-language support and import translations from a JSON file.
You need to download the starting project for this tutorial from here before you start.
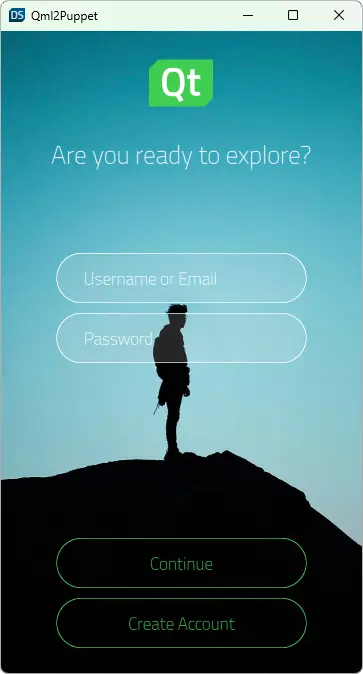
This project consists of a login page with a couple of text elements.
In this tutorial, you also neeed a JSON translation file. Download it from here.
Running the tutorial project
To open the tutorial project in Qt Design Studio, open the .qmlproject file located in the root folder of the downloaded project.
JSON translation file
The JSON translation file you are using in this tutorial has the following structure:
{
    "translatables": [
        {
            "trId": "translation_tagline",
            "translations": [
                {
                    "language": "en",
                    "translation": "Are you ready to explore?"
                },
                {
                    "language": "sv",
                    "translation": "Är du redo att utforska?"
                }
            ]
        },
        {
            "trId": "translation_username",
            "translations": [
                {
                    "language": "en",
                    "translation": "Username or Email"
                },
                {
                    "language": "sv",
                    "translation": "Användarnamn eller E-post"
                }
            ]
        },
        {
            "trId": "translation_password",
            "translations": [
                {
                    "language": "en",
                    "translation": "Password"
                },
                {
                    "language": "sv",
                    "translation": "Lösenord"
                }
            ]
        },
        {
            "trId": "translation_continue",
            "translations": [
                {
                    "language": "en",
                    "translation": "Continue"
                },
                {
                    "language": "sv",
                    "translation": "Fortsätta"
                }
            ]
        },
        {
            "trId": "translation_createaccount",
            "translations": [
                {
                    "language": "en",
                    "translation": "Create Account"
                },
                {
                    "language": "sv",
                    "translation": "Registrera Dig"
                }
            ]
        }
    ]
}
Preparing your project
First, you need to prepare your project for translation:
- In Projects, double-click Screen01.ui.qml to open it.
- All text strings that you want to translate need to be of
qsTrIdtype. In this project the text strings are ofqsTrtype, so you need to change their type. Go to View > Views and select Code to open the Code view. In the Code view, find all five occurrences ofqsTr, and replace them withqsTrId. For example, replace:text: qsTr("Username or Email")with:
text: qsTrId("Username or Email") - Next, you need to replace the text value with the text string variable from the translation file for the five text strings you want to translate. For example, replace:
text: qsTrId("Username or Email")with:
text: qsTrId("translation_username")
Importing translations
Next, you need to import your JSON translation file:
- Go to View > Views and select Translations to open the Translations view. You can drag it to a workspace to dock it.
- In Translations, select
 .
. - Select the languages that you want to support in your project. For this tutorial, select English - American English and Swedish - Svenska.
- Set English - American English as Primary language and select Ok.
- Select
 and open the ml_translations.json file. Now you can see all your imported translations in the Translations view.
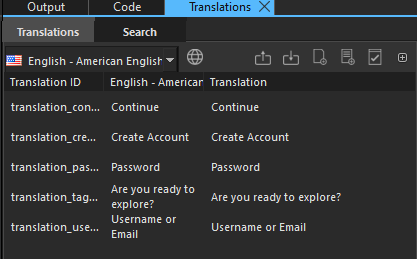
You can select language from the dropdown list on the left side of the Translations view. Qt Design Studio shows translations for the selected languages in the Translations view as well as in the 2D view.
You can run translation tests, import, and export translations as described in Translations.
Finally, before you can see your translations in the application or in Live Preview, you must generate the Qt translation source files. To do this, select  in the Translations view.
Available under certain Qt licenses.
Find out more.
