Using the Figma Desktop MCP Server with Qt Design Studio
This tutorial shows how to connect Qt Design Studio to the Figma Desktop MCP server and use the AI assistant to generate a UI from a Figma design.
The Model Context Protocol (MCP) is an open standard that lets AI assistants call tools provided by external services. When you connect the Figma MCP server to Qt Design Studio, the AI assistant can read your selected Figma nodes and translate them into QML.
Note: This is not a direct import. The AI assistant reads the design data from Figma and interprets it to produce QML; it does not copy the design pixel by pixel. The result is the AI's best attempt at recreating the design in QML, and it will not always match the original exactly. Spacing, fonts, colors, and layout may differ, and results vary between runs and AI models. If your Figma design contains images, the AI assistant cannot recreate them, those elements need to be replaced manually in the generated QML. Treat the output as a starting point that you refine, not a finished UI.
What the tutorial achieves
By the end of this tutorial you will have:
- Enabled the MCP server in the Figma desktop app.
- Added the Figma MCP server to the Qt Design Studio AI assistant.
- Used the AI assistant to generate a QML UI from nodes selected in Figma.
Prerequisites
Before you start, make sure you have the following:
- Qt Design Studio installed and the AI assistant configured with a valid API key. If you have not done this yet, see Setting up the AI assistant.
- The Figma desktop app installed on your computer.
- A Figma Dev or Full seat. For rate limits, see Who can access the Figma MCP server?.
- A Figma design file you want to use as the basis for your UI.
- A Qt Design Studio project open and ready to receive the generated QML.
Setting up the Figma MCP server
The Figma MCP server runs locally on your computer as part of the Figma desktop app. You start it from within Figma's Dev mode and then copy the URL it provides into Qt Design Studio.
Enabling Dev mode
Dev mode gives you access to developer tools in Figma, including the MCP server.
To enable Dev mode:
- Open your design file in the Figma desktop app.
- In the bottom toolbar, toggle the Dev mode switch to on (or press }key Shift + D).

The canvas and the right panel update to show developer-focused information.
Enabling the MCP server and copying the URL
With Dev mode active, you can start the MCP server from the right panel.
To enable the MCP server:
- In the right panel, locate the MCP server setting.
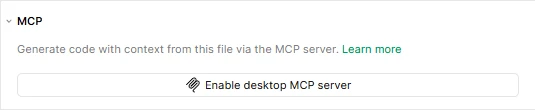
- Enable the MCP server toggle.
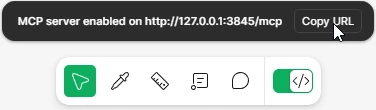
- Copy the server URL that appears below the toggle. You need this URL in the next section.
Connecting to the Figma MCP server in Qt Design Studio
With the Figma MCP server running, add it to the Qt Design Studio AI assistant using the URL you copied.
To add the Figma MCP server:
- In the AI Assistant view, select
 to open the AI assistant settings.
 - On the MCP Server tab select Add MCP server.
- In Server name, enter a name, for example,
MyFigmaMCP. - In Transport, select HTTP.
- In URL, paste the server URL you copied from Figma.
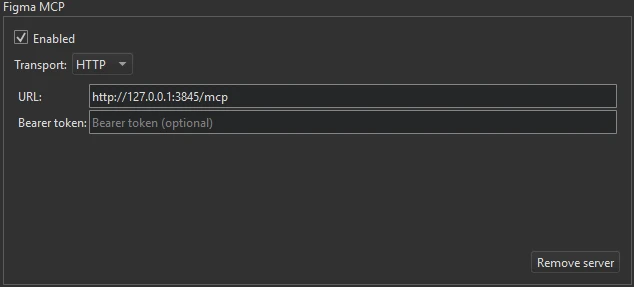
- Select OK.
The Figma server now appears in the MCP server list. Make sure the checkbox next to its name is selected to enable it.
Note: If Qt Design Studio cannot reach the Figma MCP server, an error message appears in the AI assistant chat window.
Importing a Figma design
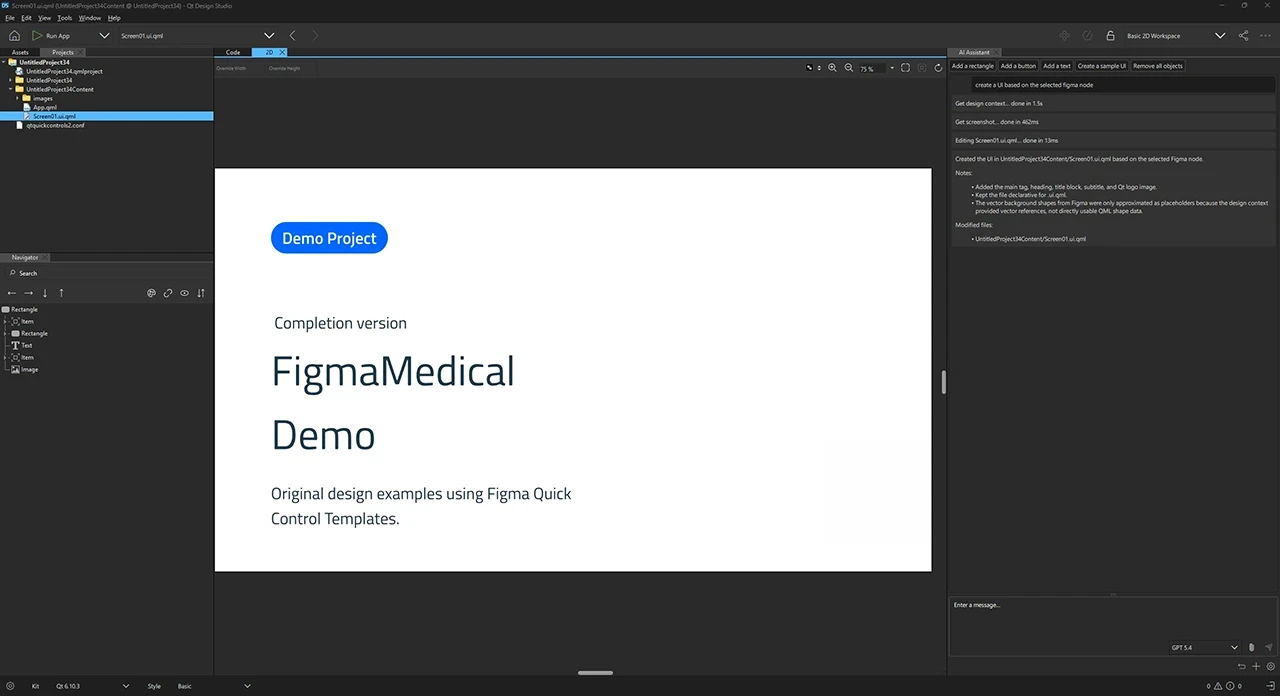
With the server connected, select the nodes you want to import in Figma and then prompt the AI assistant in Qt Design Studio.
Selecting nodes in Figma
The AI assistant reads whichever nodes you have selected in Figma at the time you send your prompt. Select only the frames or layers you want to include in the generated UI.
To select the nodes:
- In the Figma desktop app, navigate to the frame or component you want to import.
- Select the nodes you want the AI assistant to use. You can select a single top-level frame or multiple layers.
Keep Figma open with the nodes selected while you work in Qt Design Studio.
Prompting the AI assistant to generate the UI
With the nodes selected in Figma, switch to Qt Design Studio and send a prompt that refers to the selection.
To generate the UI:
- In the AI Assistant view, select a model that supports tool calls. For guidance on choosing a model, see AI models.
- Enter a prompt that refers to your Figma selection. For example:
Create a UI based on the selected nodes in Figma. - Select
 to run the prompt.
The AI assistant calls the Figma MCP server to read the selected nodes, then uses the tools in the built-in QML MCP server to edit the open file. The generated UI appears immediately in the 2D view.
Note: The AI assistant produces different results for the same prompt because large language models are non-deterministic. If the result does not match your design closely enough, refine your prompt with more specific instructions or ask the assistant to adjust particular elements in a follow-up message.
See also AI assistant, MCP servers, Setting up the AI assistant, and Using the AI assistant.
Available under certain Qt licenses.
Find out more.
