Qt Quick 3D - クイックボールの例
Quick3Dを使用して簡単なゲームを作成する方法を説明します。

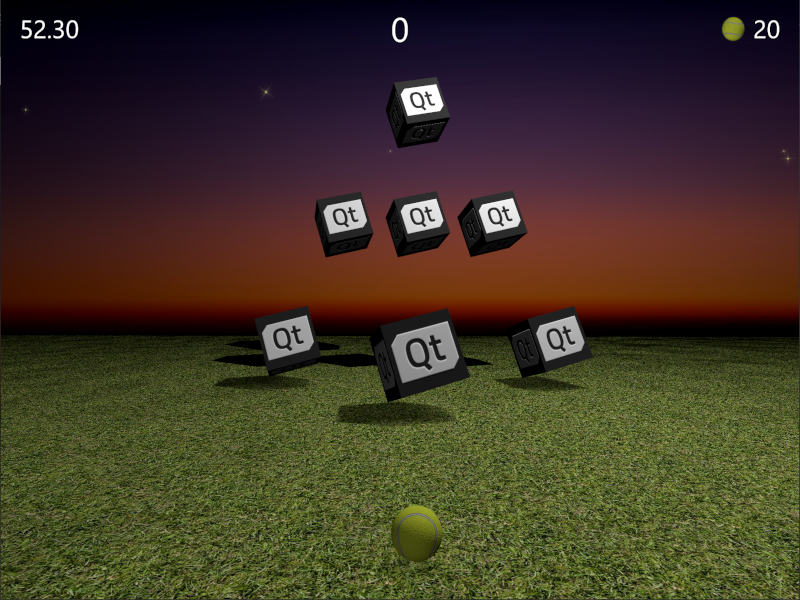
この例では、Qt Quick とQt Quick 3D を組み合わせて簡単な 3D ゲームを作成する方法を示します。ゲームの目的は、ボールを投げてターゲットボックスに当てることです。どれだけ速く、どれだけ少ないボールで、すべてのターゲットを倒したかによってポイントが与えられます。よく狙いを定めて、素早く!
ソースコードは1つのQMLファイルになっており、このサンプルがいかにコンパクトであるかを強調しています。主なプロパティから見ていきましょう。これらは非常に自明で、ゲームにどのような影響を与えるか簡単に調整できます。
// Scaling helpper
readonly property real px: 0.2 + Math.min(width, height) / 800
// This is false until the first game has started
property bool playingStarted: false
// This is true whenever game is on
property bool gameOn: false
// Sizes of our 3D models
readonly property real ballSize: 40
readonly property real targetSize: 120
// Playing time in seconds
readonly property real gameTime: 60
property real currentTime: 0
// Amount of balls per game
readonly property int gameBalls: 20
property int currentBalls: 0
// Scores
property int score: 0
property int timeBonus: 0
property int ballsBonus: 0
ゲームロジックはJavaScriptで実装されている。View3D 、ゲームを開始する関数があり、必要な変数を(再)初期化し、レベルターゲットを作成する。また、ゲーム終了時に最終得点を計算する関数も含まれています。
function createLevel1() {
    // Simple level of target items
    var level1 = [{ "x": 0, "y": 100, "z": -100, "points": 10 },
                  { "x": -300, "y": 100, "z": -400, "points": 10 },
                  { "x": 300, "y": 100, "z": -400, "points": 10 },
                  { "x": -200, "y": 400, "z": -600, "points": 20 },
                  { "x": 0, "y": 400, "z": -600, "points": 20 },
                  { "x": 200, "y": 400, "z": -600, "points": 20 },
                  { "x": 0, "y": 700, "z": -600, "points": 30 }];
    targetsNode.addTargets(level1);
}

function startGame() {
    ballModel.resetBall();
    targetsNode.resetTargets();
    createLevel1();
    score = timeBonus = ballsBonus = 0;
    currentBalls = gameBalls;
    gameOn = true;
    playingStarted = true;
}

function endGame() {
    if (targetsNode.currentTargets == 0) {
        // If we managed to get all targets down -> bonus points!
        timeBonus = mainWindow.currentTime;
        ballsBonus = currentBalls * 10;
    }
    gameOn = false;
    ballModel.resetBall();
}
ビューには、シーンをライトアップするためのPointLight ノードも含まれています。これはオブジェクトの上に配置され、影を落とすように設定されます。ゲームが終了したときに、プレーエリアを暗くするために明るさがどのように使用されているかに注意してください。ambientColor プロパティは、光のコントラストを和らげるために使用されます。このプロパティがないと、オブジェクトの下部が非常に暗くなるからです。
PointLight {
    x: 400
    y: 1200
    castsShadow: true
    shadowMapQuality: Light.ShadowMapQualityHigh
    shadowFactor: 50
    quadraticFade: 2
    ambientColor: "#202020"
    brightness: mainWindow.gameOn ? 200 : 40
    Behavior on brightness {
        NumberAnimation {
            duration: 1000
            easing.type: Easing.InOutQuad
        }
    }
}
ボールを投げるには、Qt Quick MouseArea 。これは、ゲームがオンで、ボールがまだ動いていないときだけ有効になります。
MouseArea {
    anchors.fill: parent
    enabled: mainWindow.gameOn && !ballModel.ballMoving
    onPressed: {
        ballModel.moveBall(mouseX, mouseY);
    }
    onPositionChanged: {
        ballModel.moveBall(mouseX, mouseY);
    }
    onReleased: {
        ballModel.throwBall();
    }
}
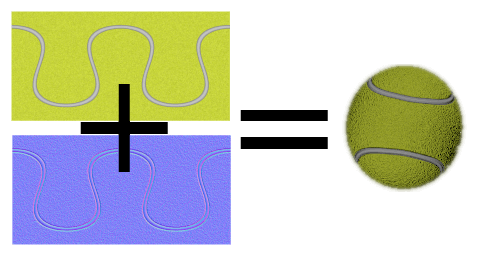
次に、実際の3Dモデルに入ります。ボールの挙動やアニメーション、当たり判定などのロジックが含まれています。まずはボールのプロパティを調べてみよう。ボールは組み込みの球体モデルを使用し、ballSize に基づいてスケーリングされます。テニスボールの外観を作成するために、baseColorMap とnormalMap 、PrincipledMaterial を使用しています。

Model {
    id: ballModel
    property real directionX: 0
    property real directionY: 0
    // How many ms the ball flies
    readonly property real speed: 2000
    readonly property real ballScale: mainWindow.ballSize / 100
    property var moves: []
    readonly property int maxMoves: 5
    readonly property bool ballMoving: ballAnimation.running

    source: "#Sphere"
    scale: Qt.vector3d(ballScale, ballScale, ballScale)

    materials: PrincipledMaterial {
        baseColorMap: Texture {
            source: "images/ball.jpg"
        }
        normalMap: Texture {
            source: "images/ball_n.jpg"
        }
        normalStrength: 1.0
    }
マウスを動かすかタッチスクリーンをスワイプすると、ボールを離す前の最後のmaxMoves の位置がmoves 配列に格納されます。ユーザーがボールを離すと、throwBall() が呼び出され、これらの最新の位置からボールの方向を計算し、アニメーションを開始します。
function resetBall() {
    moves = [];
    x = 0;
    y = mainWindow.ballSize/2;
    z = 400;
}

function moveBall(posX, posY) {
    if (!mainWindow.gameOn) return;
    var pos = view3D.mapTo3DScene(Qt.vector3d(posX, posY, ballModel.z + mainWindow.ballSize));
    pos.y = Math.max(mainWindow.ballSize / 2, pos.y);
    var point = {"x": pos.x, "y": pos.y };
    moves.push(point);
    if (moves.length > maxMoves) moves.shift();
    // Apply position into ball model
    ballModel.x = pos.x;
    ballModel.y = pos.y;
}

function throwBall() {
    if (!mainWindow.gameOn) return;
    mainWindow.currentBalls--;
    var moveX = 0;
    var moveY = 0;
    if (moves.length >= 2) {
        var first = moves.shift();
        var last = moves.pop();
        moveX = last.x - first.x;
        moveY = last.y - first.y;
        if (moveY < 0) moveY = 0;
    }
    directionX = moveX * 20;
    directionY = moveY * 4;
    ballAnimation.start();
}
ボールの位置は、異なる軸の間で別々にアニメーション化されます。これらのアニメーションでは、ボールがどこに移動するかを定義するために、以前に割り当てられたdirectionX とdirectionY を使用します。また、ボールの飛行時間にはspeed を使用します。縦位置には2つの連続したアニメーションがあるので、ボールのバウンスにイージングを使うことができます。位置のアニメーションが終了したら、ボールがまだ残っているか、ゲームを終了すべきかをチェックします。最後に、ユーザーがカーブボールを投げられるように、ボールの回転もアニメーションさせます。
ParallelAnimation {
    id: ballAnimation
    running: false
    // Move forward
    NumberAnimation {
        target: ballModel
        property: "z"
        duration: ballModel.speed
        to: -ballModel.directionY * 5
        easing.type: Easing.OutQuad
    }
    // Move up & down with a bounce
    SequentialAnimation {
        NumberAnimation {
            target: ballModel
            property: "y"
            duration: ballModel.speed * (1 / 3)
            to: ballModel.y + ballModel.directionY
            easing.type: Easing.OutQuad
        }
        NumberAnimation {
            target: ballModel
            property: "y"
            duration: ballModel.speed * (2 / 3)
            to: mainWindow.ballSize / 4
            easing.type: Easing.OutBounce
        }
    }
    // Move sideways
    NumberAnimation {
        target: ballModel
        property: "x"
        duration: ballModel.speed
        to: ballModel.x + ballModel.directionX
    }

    onFinished: {
        if (mainWindow.currentBalls <= 0)
            view3D.endGame();
        ballModel.resetBall();
    }
}

NumberAnimation on eulerRotation.z {
    running: ballModel.ballMoving
    loops: Animation.Infinite
    from: ballModel.directionX < 0 ? 0 : 720
    to: 360
    duration: 10000 / (2 + Math.abs(ballModel.directionX * 0.05))
}
ゲームプレイで重要なのは、ボールがターゲットに当たったことを検出することです。ボールのzの位置が変わるたびに、targets の配列をループして、ボールがどれかに触れているかどうかをfuzzyEquals() を使って検出します。ヒットを検出するたびに、ターゲットhit() 関数を呼び出し、すべてのターゲットがダウンしているかどうかをチェックします。
onZChanged: {
    // Loop through target items and detect collisions
    var hitMargin = mainWindow.ballSize / 2 + mainWindow.targetSize / 2;
    for (var i = 0; i < targetsNode.targets.length; ++i) {
        var target = targetsNode.targets[i];
        var targetPos = target.scenePosition;
        var hit = ballModel.scenePosition.fuzzyEquals(targetPos, hitMargin);
        if (hit) {
            target.hit();
            if (targetsNode.currentTargets <= 0)
                view3D.endGame();
        }
    }
}
それからターゲットを切り替える。これらのターゲットは、ヘルパー関数を含むグループ化ノードに動的に生成され、たとえば、すべてのターゲットをグループとしてアニメーションさせることができます。currentTargets プロパティが必要なのは、QML の配列の変更ではバインディングがトリガーされないためです。
Node {
    id: targetsNode

    property var targets: []
    property int currentTargets: 0

    function addTargets(items) {
        items.forEach(function (item) {
            let instance = targetComponent.createObject(
                    targetsNode, { "x": item.x, "startPosY": item.y, "z": item.z, "points": item.points});
            targets.push(instance);
        });
        currentTargets = targets.length;
    }

    function removeTarget(item) {
        var index = targets.indexOf(item);
        targets.splice(index, 1);
        currentTargets = targets.length;
    }

    function resetTargets() {
        while (targets.length > 0)
            targets.pop().destroy();
        currentTargets = targets.length;
    }
}
ターゲットは、立方体モデルと、点を示すためのテキスト要素を持つノードです。ボールモデルと同様に、baseColorMap とnormalMap テクスチャを使用して、Qt ロゴのあるキューブを作成します。ヒットが検出されると、立方体を順次アニメーションさせ、このターゲットから得たポイントを表示します。アニメーションが終了したら、ターゲットノードを動的に削除します。
Component {
    id: targetComponent
    Node {
        id: targetNode

        property int points: 0
        property real hide: 0
        property real startPosY: 0
        property real posY: 0
        property real pointsOpacity: 0

        function hit() {
            targetsNode.removeTarget(this);
            mainWindow.score += points;
            hitAnimation.start();
            var burstPos = targetNode.mapPositionToScene(Qt.vector3d(0, 0, 0));
            hitParticleEmitter.burst(100, 200, burstPos);
        }

        y: startPosY + posY
        SequentialAnimation {
            running: mainWindow.gameOn && !hitAnimation.running
            loops: Animation.Infinite
            NumberAnimation {
                target: targetNode
                property: "posY"
                from: 0
                to: 150
                duration: 3000
                easing.type: Easing.InOutQuad
            }
            NumberAnimation {
                target: targetNode
                property: "posY"
                to: 0
                duration: 1500
                easing.type: Easing.InOutQuad
            }
        }

        SequentialAnimation {
            id: hitAnimation
            NumberAnimation {
                target: targetNode
                property: "hide"
                to: 1
                duration: 800
                easing.type: Easing.InOutQuad
            }
            NumberAnimation {
                target: targetNode
                property: "pointsOpacity"
                to: 1
                duration: 1000
                easing.type: Easing.InOutQuad
            }
            NumberAnimation {
                target: targetNode
                property: "pointsOpacity"
                to: 0
                duration: 200
                easing.type: Easing.InOutQuad
            }
            ScriptAction {
                script: targetNode.destroy();
            }
        }

        Model {
            id: targetModel

            readonly property real targetScale: (1 + targetNode.hide) * (mainWindow.targetSize / 100)

            source: "#Cube"
            scale: Qt.vector3d(targetScale, targetScale, targetScale)
            opacity: 0.99 - targetNode.hide * 2
            materials: PrincipledMaterial {
                baseColorMap: Texture {
                    source: "images/qt_logo.jpg"
                }
                normalMap: Texture {
                    source: "images/qt_logo_n.jpg"
                }
                normalStrength: 1.0
            }
            Vector3dAnimation on eulerRotation {
                loops: Animation.Infinite
                duration: 5000
                from: Qt.vector3d(0, 0, 0)
                to: Qt.vector3d(360, 360, 360)
            }
        }
        Text {
            anchors.centerIn: parent
            scale: 1 + targetNode.pointsOpacity
            opacity: targetNode.pointsOpacity
            text: targetNode.points
            font.pixelSize: 60 * mainWindow.px
            color: "#808000"
            style: Text.Outline
            styleColor: "#f0f000"
        }
    }
}
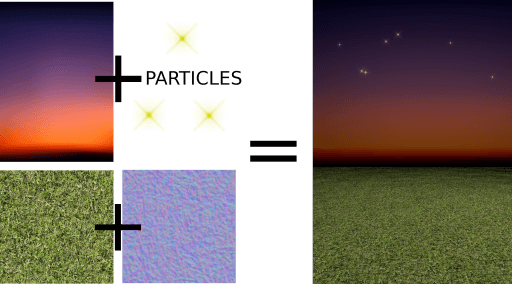
競技エリアのモデルもいくつか必要です。グラウンド・モデルは、草のテクスチャを拡大縮小した矩形で、より大きな面積を埋めます。
Model {
    source: "#Rectangle"
    scale: Qt.vector3d(50, 50, 1)
    eulerRotation.x: -90
    materials: PrincipledMaterial {
        baseColorMap: Texture {
            source: "images/grass.jpg"
            tilingModeHorizontal: Texture.Repeat
            tilingModeVertical: Texture.Repeat
            scaleU: 25.0
            scaleV: 25.0
        }
        normalMap: Texture {
            source: "images/grass_n.jpg"
        }
        normalStrength: 0.6
    }
}
空のモデルはさらに奥にあり、空に影が落ちるのは避けたいので、receivesShadows を false に設定します。空には Qt Quick Particlesモジュールを使って星も追加します。他の2DQt Quick 要素と同様に、パーティクルも3Dノード内に直接追加できます。
Model {
    id: sky
    property real scaleX: 100
    property real scaleY: 20
    source: "#Rectangle"
    scale: Qt.vector3d(sky.scaleX, sky.scaleY, 1)
    position: Qt.vector3d(0, 960, -2000)
    // We don't want shadows casted into sky
    receivesShadows: false
    materials: PrincipledMaterial {
        baseColorMap: Texture {
            source: "images/sky.jpg"
        }
    }
    // Star particles
    Node {
        z: 500
        y: 30
        // Stars are far away, scale up to half the resolution
        scale: Qt.vector3d(2 / sky.scaleX, 2 / sky.scaleY, 1)
        ParticleSystem {
            anchors.horizontalCenter: parent.horizontalCenter
            anchors.top: parent.top
            width: 3000
            height: 400
            ImageParticle {
                source: "qrc:///particleresources/star.png"
                rotationVariation: 360
                color: "#ffffa0"
                colorVariation: 0.1
            }
            Emitter {
                anchors.fill: parent
                emitRate: 4
                lifeSpan: 6000
                lifeSpanVariation: 4000
                size: 30
                sizeVariation: 20
            }
        }
    }
}
地上と空のモデルを組み合わせると、このような3Dワールドになります:

最後に、QtQuick3D.Particles3D モジュールを使って、ターゲットにキラキラを追加します。ParticleSystem3D にはSpriteParticle3D が含まれており、200 と100 のパーティクル・バーストを同時に2つ使用するのに十分な数を割り当てます。ParticleEmitter3D では、パーティクルのスケール、回転、速度、ライフスパンなどの放出プロパティを定義します。また、パーティクルを適切な大きさで下にドラッグするためのGravity3D アフェクタも追加します。
ParticleSystem3D {
    id: psystem
    SpriteParticle3D {
        id: sprite
        sprite: Texture {
            source: "images/particle.png"
        }
        color: Qt.rgba(1.0, 1.0, 0.0, 1.0)
        colorVariation: Qt.vector4d(0.4, 0.6, 0.0, 0.0)
        unifiedColorVariation: true
        maxAmount: 200
    }
    ParticleEmitter3D {
        id: hitParticleEmitter
        particle: sprite
        particleScale: 4.0
        particleScaleVariation: 2.0
        particleRotationVariation: Qt.vector3d(0, 0, 180)
        particleRotationVelocityVariation: Qt.vector3d(0, 0, 250)
        velocity: VectorDirection3D {
            direction: Qt.vector3d(0, 300, 0)
            directionVariation: Qt.vector3d(200, 150, 100)
        }
        lifeSpan: 800
        lifeSpanVariation: 200
        depthBias: 100
    }
    Gravity3D {
        magnitude: 600
    }
}
これでゲームの3D部分は終わりです。まだ、時間、スコア、スタートボタンなどを表示するための2DQt Quick 要素が残っています。これは、ゲームにとっては重要ですが、このQuick 3D ドキュメントには関係ありません。
さて、ボールはあなたの側にあります(ダジャレです)。自由にゲームを拡張し、新しい奇抜なレベルを生成してください!
© 2025 The Qt Company Ltd. Documentation contributions included herein are the copyrights of their respective owners. The documentation provided herein is licensed under the terms of the GNU Free Documentation License version 1.3 as published by the Free Software Foundation. Qt and respective logos are trademarks of The Qt Company Ltd. in Finland and/or other countries worldwide. All other trademarks are property of their respective owners.

